Exercises (1874)
Prone position (push-up) and upright position alternating ► db burpee deadlift
Power
Individual work
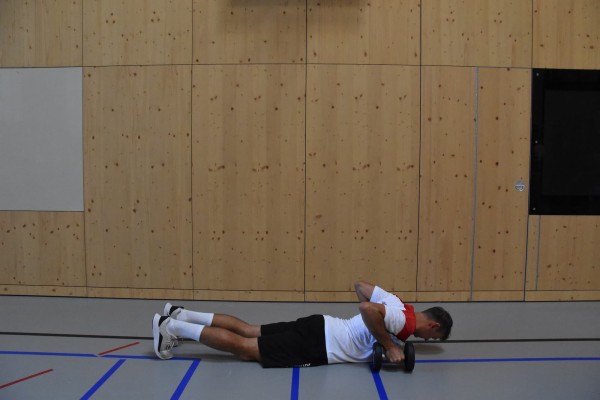
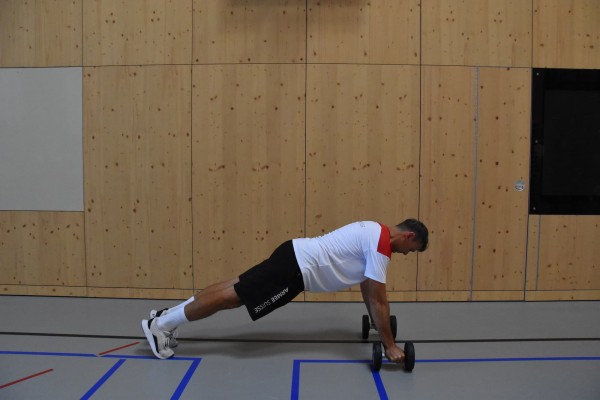

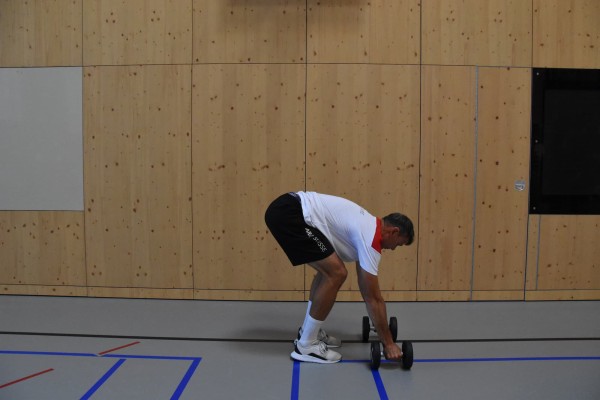
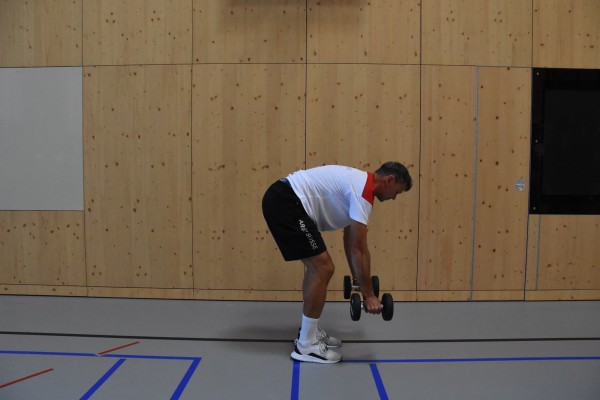
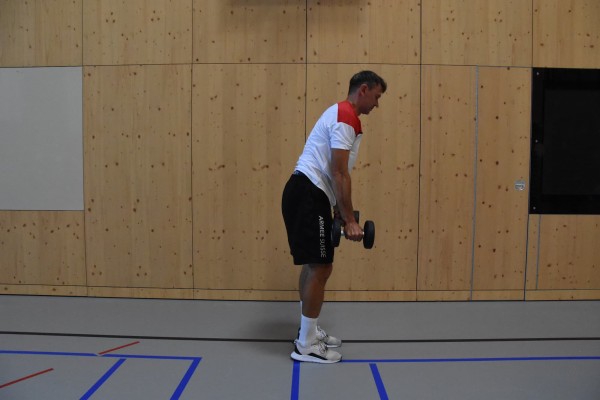
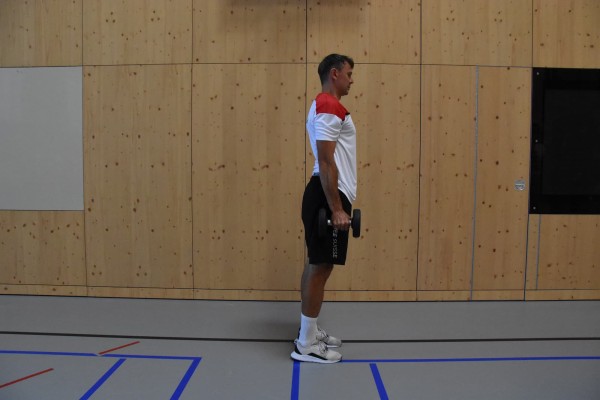
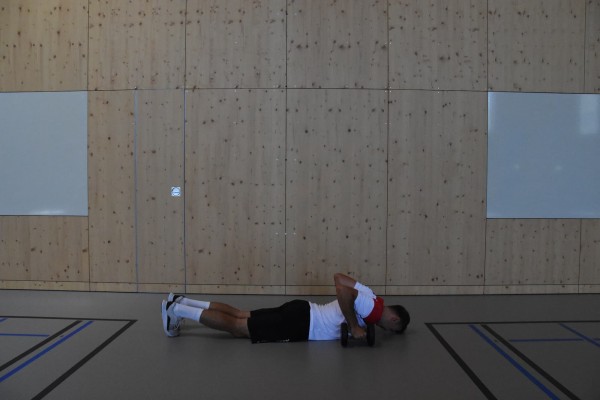
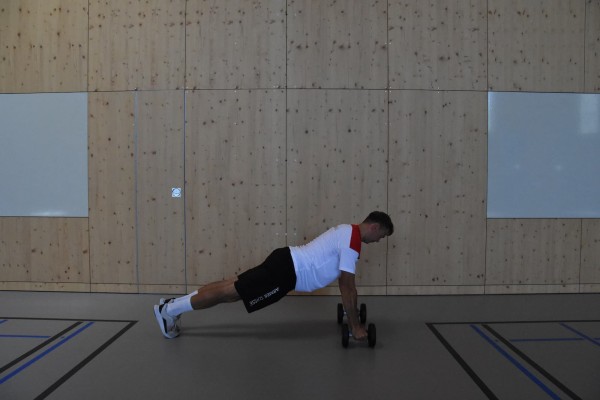
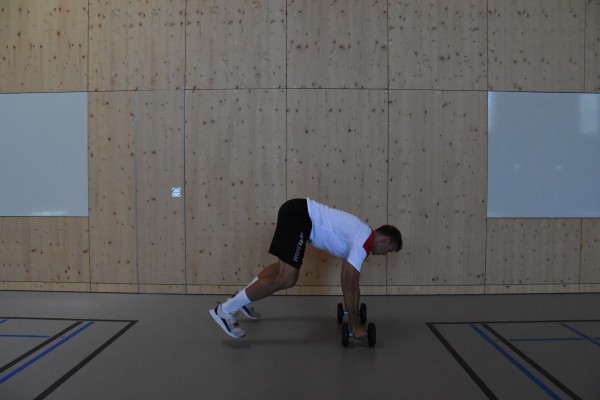
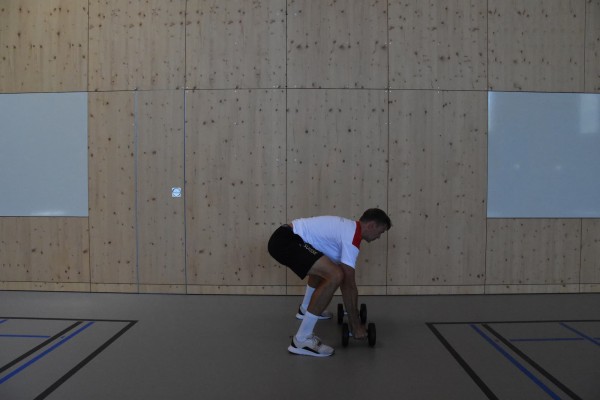
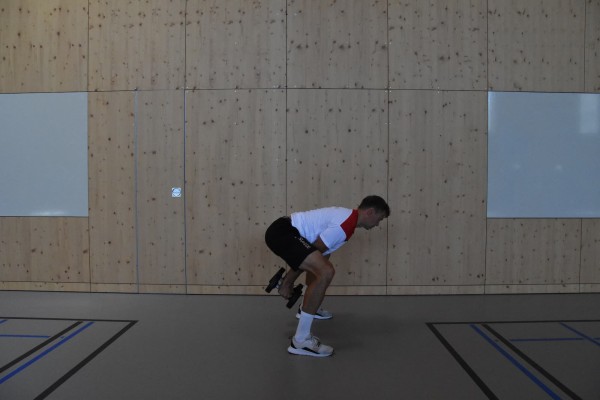
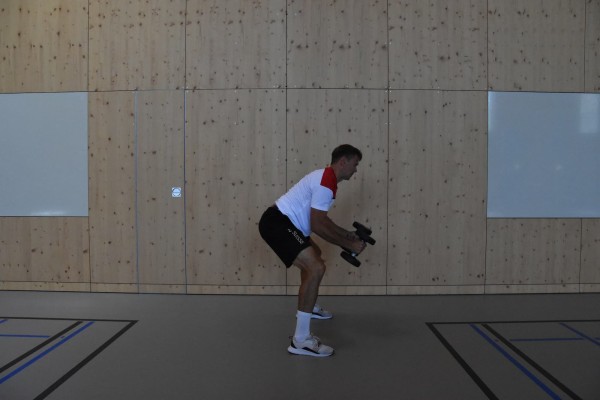
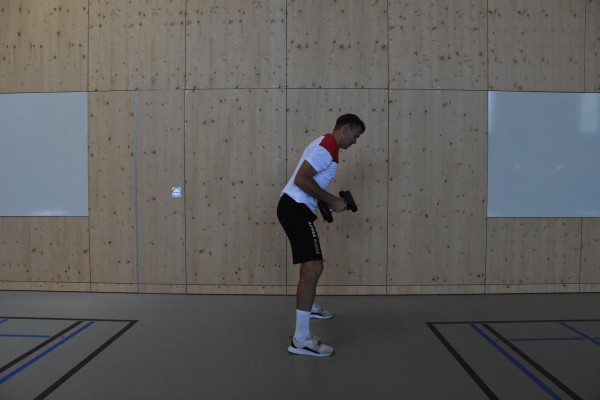
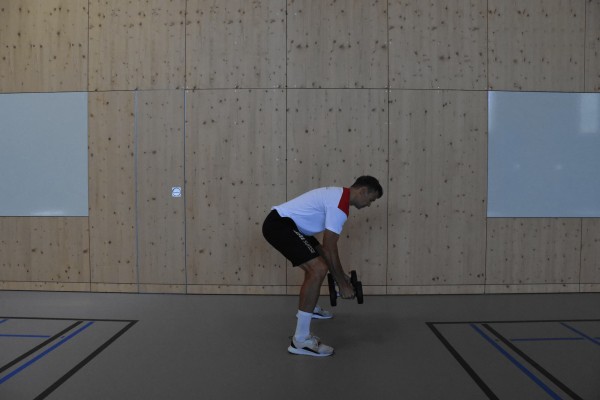
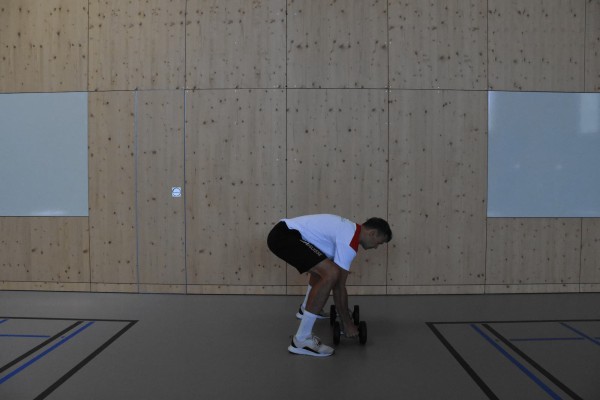
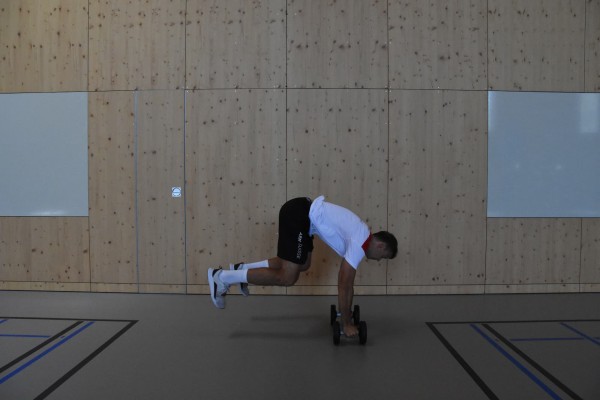
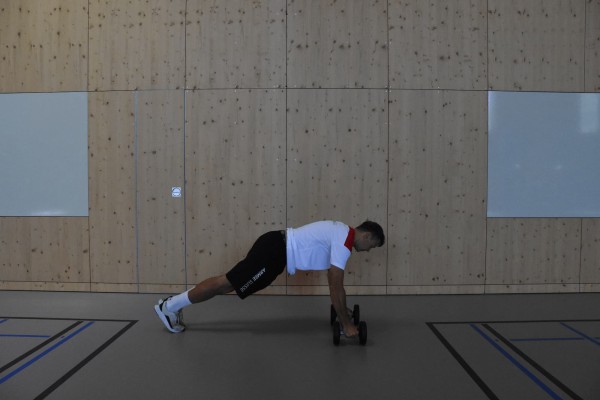
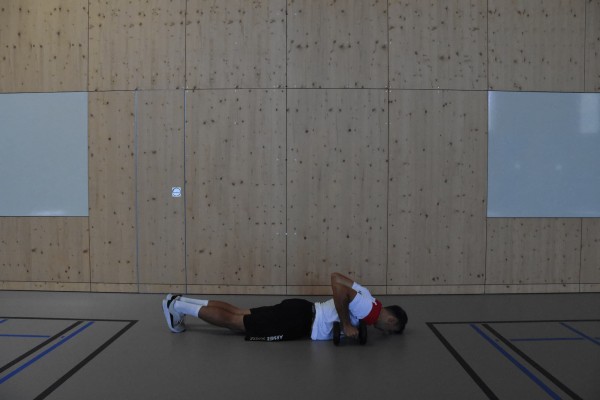
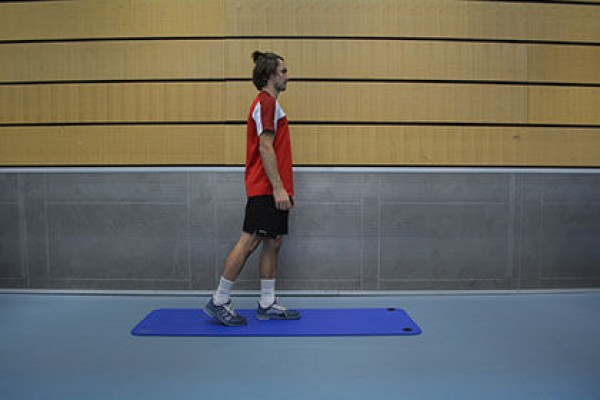
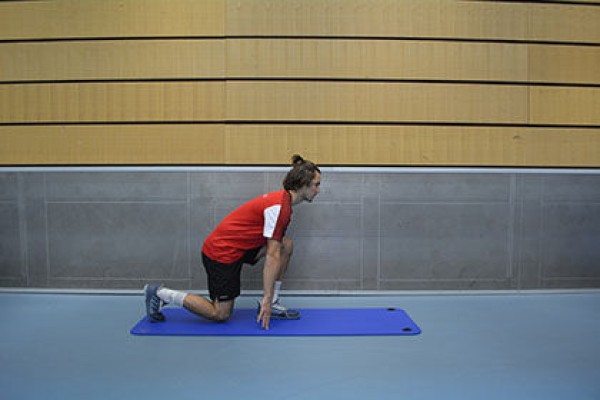
Stomach position, grasp a dumbbell with both hands (back of each hand pointing to the respective side), these are placed on the floor at chest height, the arms are bent accordingly. From this position, stretch your arms to push your upper body away from the floor, your knees are also no longer in contact with the floor and your slightly bent legs are only supported on the tips of your feet. With a small jump forwards, bring your legs approximately shoulder-width apart towards the dumbbells (place your feet slightly inwards behind the dumbbells on each side). The upper body is tilted forwards as the outstretched arms are still holding the weights on the floor (back as straight as possible). Now straighten your legs, push your hips forwards and raise your upper body to a standing position. The arms remain stretched and point sideways along the body towards the floor in the end position so that the weights are approximately at hip height. Then lower your upper body back down to place the weights on the floor again with your arms straight (with the tips of your feet slightly offset outwards). Support your upper body with your arms (hands gripping the dumbbells) to perform a two-legged jump backwards so that you reach the push-up position. Lower your upper body back to the starting position in the prone position (bend your arms, hold the weights next to your chest, knees on the floor, straight legs resting on the tips of your feet).
Lighten:
Less/no weight.
Harden:
Execute a push-up instead of lowering your body to the prone position; more weight.
2 dumbbells
Prone position (push-up) and upright standing alternating with extension and flexion of the arms ► burpee & snatch / devil press
Power
Individual work
Stomach position, grasp a dumbbell with both hands (back of each hand pointing to the respective side), these are placed on the floor at chest height, the arms are bent accordingly. From this position, stretch your arms to push your upper body away from the floor, your knees are also no longer in contact with the floor and your slightly bent legs are only supported on the tips of your feet (push-up position). With a small jump forwards, bring your legs more than shoulder-width apart towards the dumbbells (place your feet slightly outwards behind the dumbbells on each side). The upper body is tilted forwards as the outstretched arms are still holding the weights on the floor (back as straight as possible). Now lift the weights off the floor and move them backwards between your legs to the height of your buttocks with your arms stretched out. Now swing the weights overhead by first holding the dumbbells in front of your chest with your arms bent, and from there push your arms out vertically upwards. The upright stance with arms stretched upwards and legs slightly bent corresponds to the end position. Then bend your arms while standing upright to bring the weights to your shoulders. Tilt your upper body forwards, stretch your arms and place the dumbbells on the floor between your legs (slightly in front of your feet) (legs slightly bent). Support your upper body with your arms (hands gripping the dumbbells), jump backwards with both legs so that you can assume the starting position in the prone position in one smooth movement (bend your arms, lower your upper body, hold the weights next to your chest, knees on the floor, straight legs resting on the tips of your feet).
Lighten:
Less/no weight.
Harden:
Execute a push-up instead of lowering the body to the prone position; more weight.
2 dumbbells
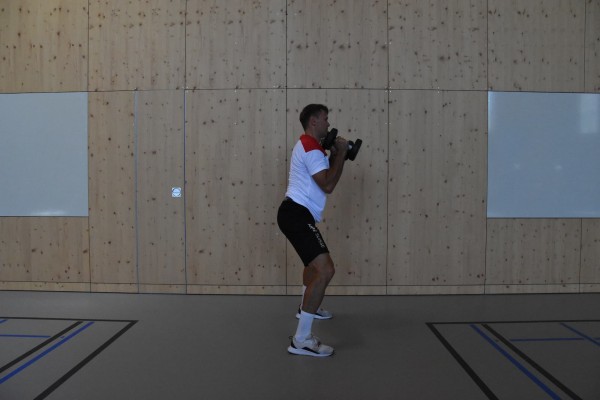
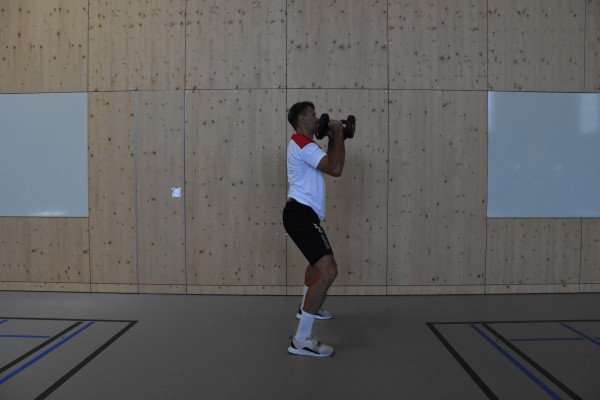
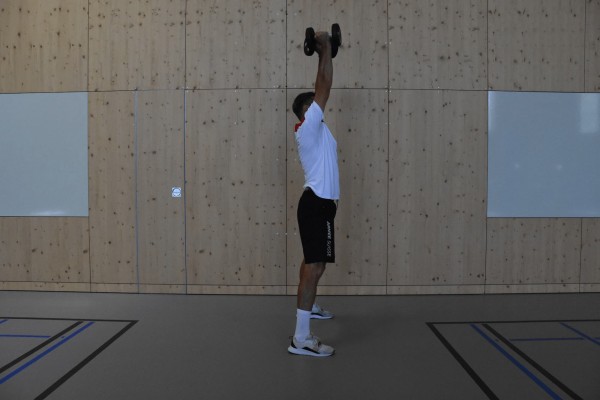
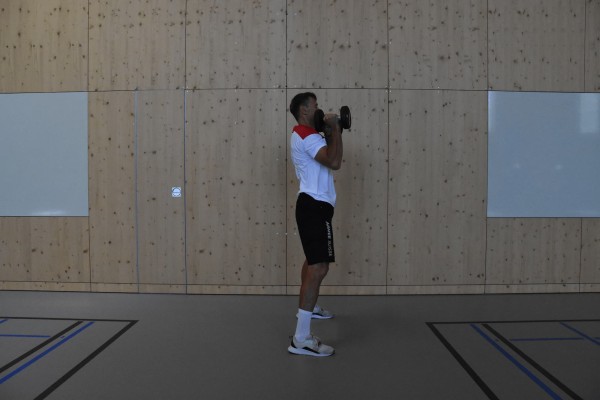
Prone position (push-up) and upright standing alternating with extension and flexion of one arm ► single dumbbell devil press
Power
Individual work
This exercise combines a one-armed burpee with a dumbbell and an overhead press. To do this, place a dumbbell between your feet, squat down and grasp the dumbbell with one hand. Jump or step backwards into a push-up position (optional: your chest briefly touches the floor). Bring your feet back to the front, explosively drive the dumbbell upwards from the hips, fully extend your arm overhead (snatch/press movement), and lower the weight in a controlled manner. Either switch sides after the desired number of repetitions or transfer the weight to the other hand as you lower it.
Attention:
Keep your back neutral during the lift; maintain core tension; generate power from your hips and legs (do not just push with your arms); keep the barbell close to your body; stabilise the overhead position (arm extended, shoulder engaged, do not push your ribs forward); lower the barbell calmly and in a controlled manner.
Common mistakes: Hunching the back when lifting the barbell; pulling with the arms too early instead of extending the hips; unstable shoulders overhead; landing with feet too close together or asymmetrically; loss of core tension during the burpee; weight too heavy (technique breaks down); rotation in the upper body due to uneven load.
Lighten:
Do the exercise without the push-up; step your feet back into the push-up position instead of jumping; use a lighter dumbbell; split the movement (do the burpee first, then the dumbbell snatch separately); instead of lifting the weight overhead, lift it only to shoulder height.
Harden:
Heavier dumbbell; incorporate push-ups; switch hands with every repetition; double devil press with two dumbbells, deficit version (dumbbell on a raised platform); combine with an additional squat or thruster.
1 dumbbell
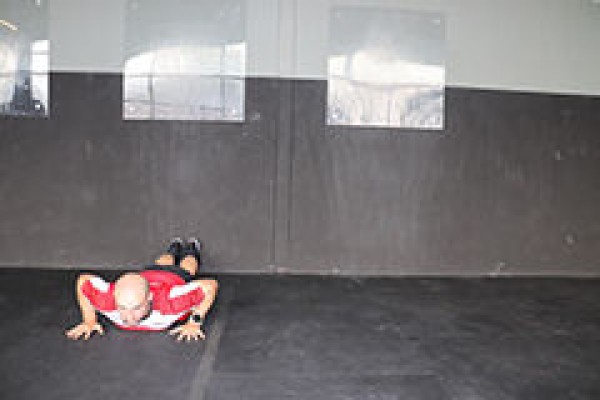
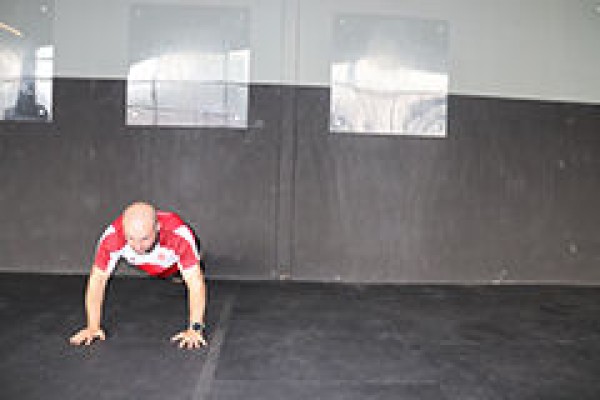
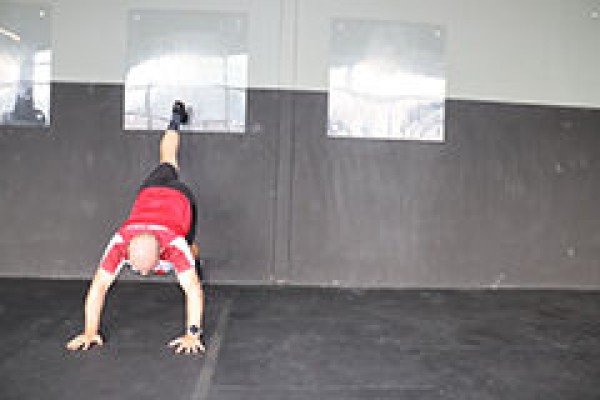
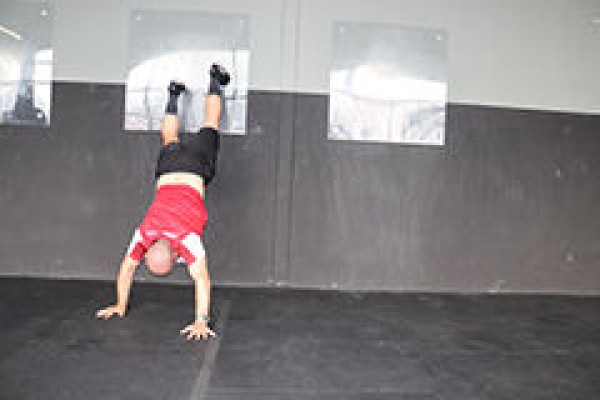
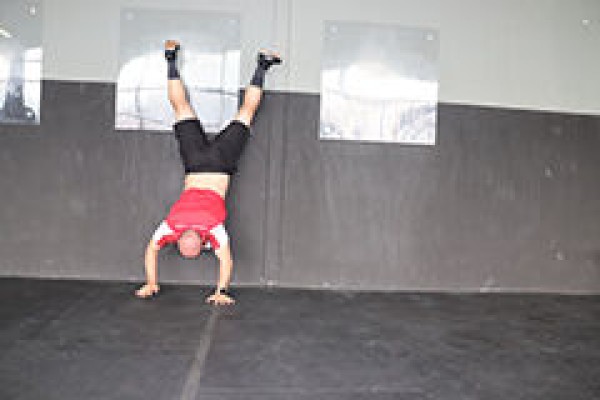
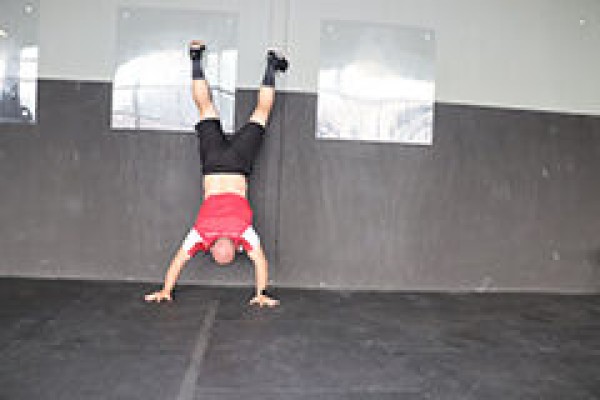
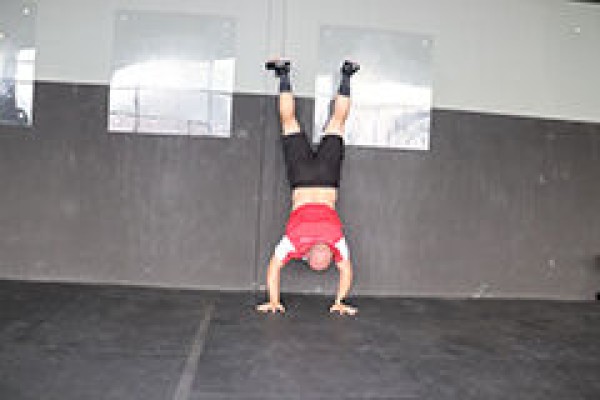
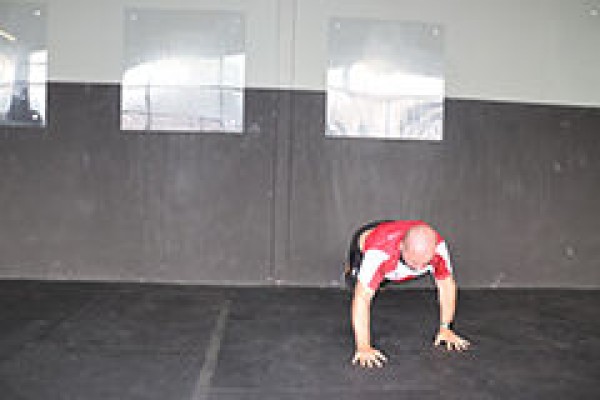
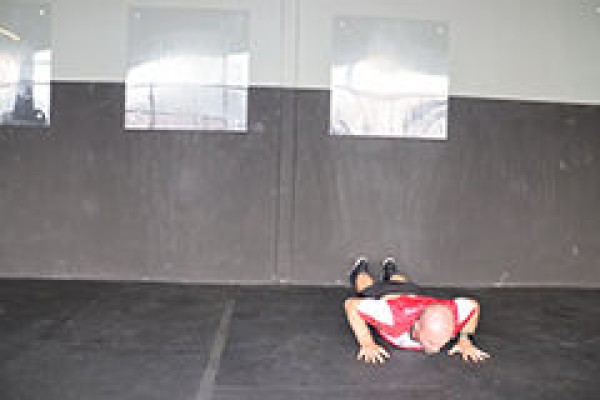
Prone position and alternating handstand ► wall walk
Power
Individual work
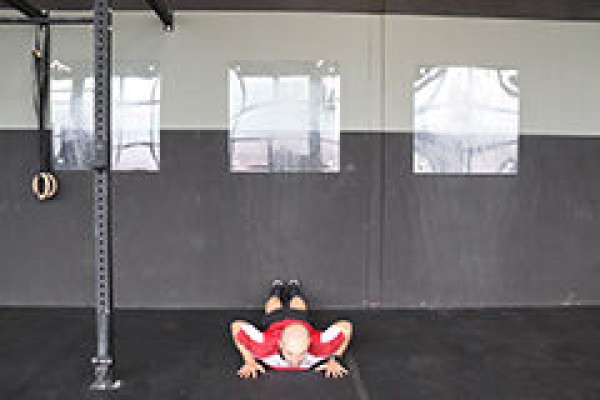

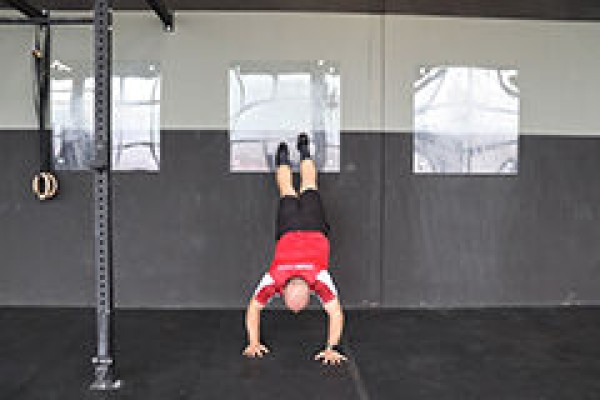
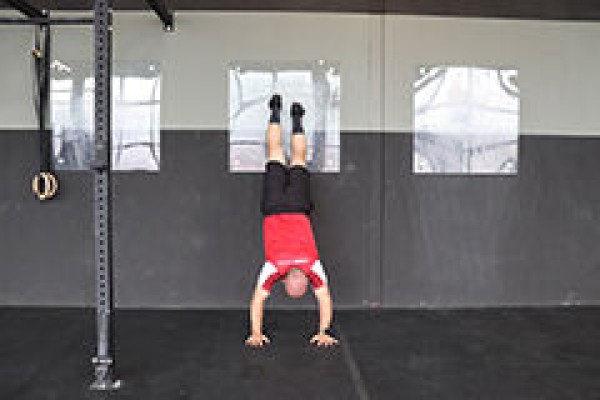


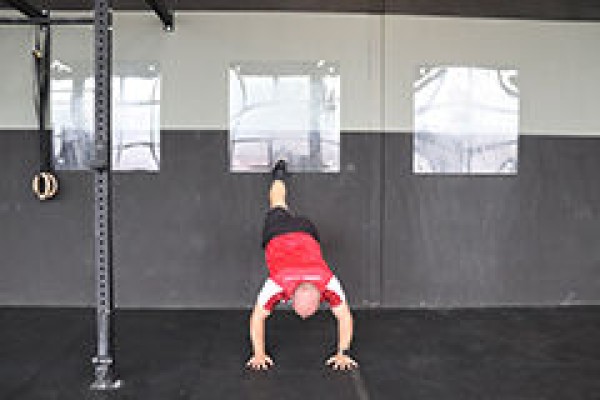


Lie on your stomach in front of a wall with the tips of your feet exactly in the corner between the floor and the wall and your arms bent next to your shoulders (palms on the floor, elbows pointing towards the wall). Extend your arms to push your upper body away from the floor, then walk your feet upwards along the wall (alternately moving one leg upwards), at the same time as moving your legs upwards, alternately move your arms towards the wall (walking with your arms). The legs and arms are moved until the handstand position can be assumed (full body stretch, arms stretched out in a high position). Then perform the movement sequence in reverse order to return from the handstand to the prone position.
Attention:
Move your legs and arms in a controlled manner.
Lighten:
Break off the exercise before the handstand position and return to the prone position (move your legs less far upwards).
Harden:
Additional weight (on your feet).
1 wall
2 weight cuffs/1 weight waistcoat ► make the exercise more difficult (additional weight)
Prone position and handstand with sideways shift alternating ► lateral wall walk
Power
Individual work


Lie on your stomach in front of a wall with the tips of your feet exactly in the corner between the floor and the wall and your arms bent next to your shoulders (palms on the floor, elbows pointing towards the wall). Stretch your arms to push your upper body away from the floor, then walk your feet upwards along the wall (alternately moving one leg upwards), at the same time as lifting your legs, alternately move your arms towards the wall (walking with your arms). The legs and arms are moved until the handstand position can be assumed (full body stretch, arms stretched in a high position). Once in the handstand position, the hands are moved to the side a few times (running sideways with the hands) before the sequence of movements is repeated in reverse order to return from the handstand to the prone position. For the next repetition, move your arms to the other side to return to the starting point of the exercise.
Attention:
Move your legs and arms in a controlled manner.
Lighten:
Stop the exercise before the handstand position and return to the prone position (move your legs less far upwards); perform the exercise without moving your arms.
Harden:
Additional weight (on your feet).
1 wall
2 weight cuffs/1 weight waistcoat ► make the exercise more difficult (additional weight)
Prone position and wall passes with ball ► superman
Power
Individual work


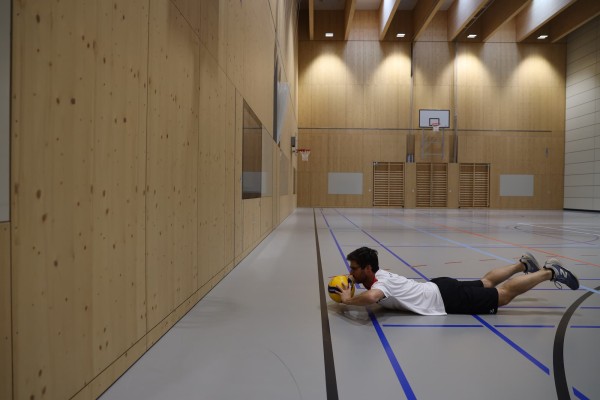
In a prone position approx. 1 metre in front of a wall, hold a ball in front of your head with your arms bent. Raise your upper body slightly and throw the ball against the wall with both arms (movement from the elbows, stretching the arms) and catch it again. The ball never touches the floor.
Attention:
Keep your upper body (incl. arms/elbows) raised at all times.
Lighten:
Choose a lighter ball; just hold the position with your upper body slightly raised (without throwing the ball); hold your arms without the ball in front of you and bring them back sideways next to your body and back to the starting position.
Harden:
Choose a heavier ball.
Variant:
Hold a gymnastic stick in your hands with your upper body slightly raised (arms stretched), bring it to your chest (arms bent) and return to the starting position.
1 wall
1 soft mat (small)
1 ball (e.g. football, volleyball, basketball)
1 medicine ball ► Make the exercise more difficult (additional weight)
1 gymnastics stick/wooden stick ► Variation of the exercise
Encounter run
Basic training
Partner work
Groups of 2 (integrate new group formations)
Two participants run on a circuit (e.g. athletics track) starting from the same point in the opposite direction. As soon as they meet, they run the same route back again. The aim is for both to arrive back at the starting point at the same time. The exercise form is continued until it is cancelled by the training leader.
Track: circuit
Intensity level: 3 (medium)
Max HR: 80-90%
Rule of speech: speak in complete sentences
Variant:
The participants run at different speeds (e.g. participant A: intensity 3; participant B: intensity 2).
Participant:
1 heart rate monitor
Move leg backwards and back in standing position (left) ► kick-back
Power
Individual work
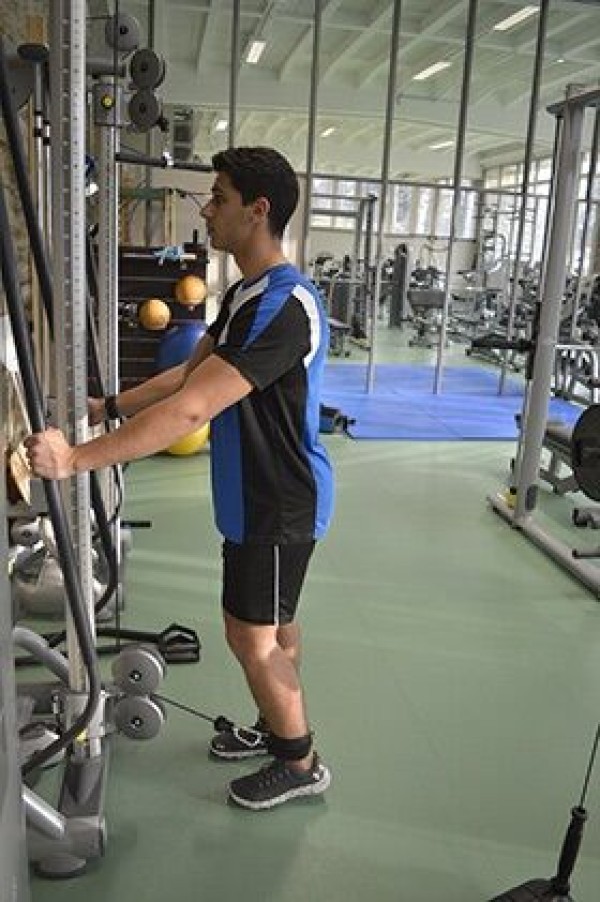
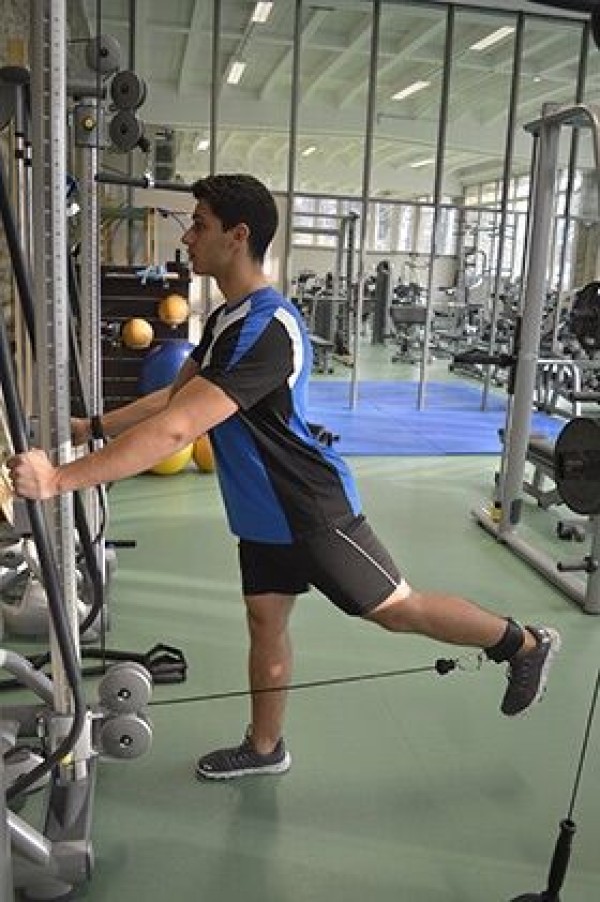
The foot loop of the cable pulley is placed around the training leg (left). In a standing position, facing the cable pulley, the leg is slowly pulled backwards against the weight and returned to the starting position in a controlled manner.
Starting position:
- Stand upright in front of the machine
- Hands on the machine to maintain balance
- Foot loop fixed to the ankle
Finishing position:
- Leg pushed backwards
- Movement from the hip, angle in the knee remains the same
Attention:
Training leg not fully extended.
1 weight tower/machine ► cable pulley (deep)
Move leg backwards and back while standing (right) ► kick-back
Power
Individual work


The foot loop of the cable pulley is placed around the training leg (right). In a standing position, facing the cable pulley, the leg is slowly pulled backwards against the weight and returned to the starting position in a controlled manner.
Starting position:
- Stand upright in front of the machine
- Hands on the machine to maintain balance
- Foot loop fixed to the ankle
Finishing position:
- Leg pushed backwards
- Movement from the hips, angle in the knee remains the same
Attention:
Training leg not fully extended.
1 weight tower/machine ► cable pulley (deep)
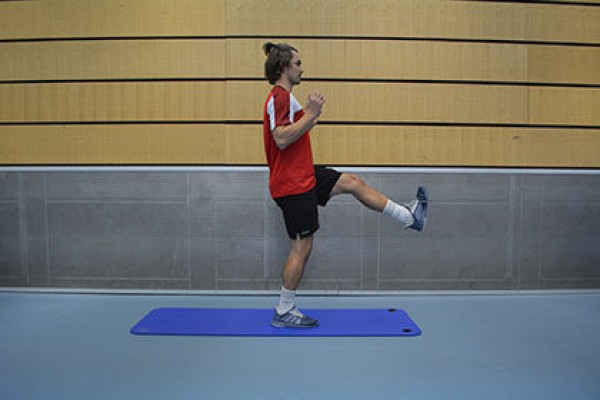
Push your leg out forwards while standing ► front kick
Power
Individual work


Stand shoulder-width apart, one leg slightly backwards (weaker hand/weaker leg in front), gaze/face forward, upper body slightly rotated (to the side of the stronger leg), arms bent in front of the body, lift one leg alternately or in free rhythm and push off in the direction of gaze (push off/kick movement forwards).
Attention:
Do not fall backwards with your upper body when kicking your leg out.
Lighten:
Kick your leg out less high.
Harden:
Push your leg out higher; add weight to your leg.
Variant:
Load one leg for longer by not putting it down completely (or only supporting it slightly on your toes).
2 weight cuffs ► make the exercise more difficult (additional weight)
Push your leg out forwards in a standing position and lunge backwards alternately (left) ► front kick & reverse lunge
Power
Individual work


Stand shoulder-width apart, one leg (left) slightly backwards, gaze/face and upper body facing forwards, arms hanging beside the body. Raise one leg (left) and kick it out in the direction of your gaze (kick movement forwards), bend your arms at the same time and move your hands to head height. Lower your upper body as you bring your free leg back, bend your supporting leg and bring your free leg backwards, both hands touching the floor (lunge position - similar to starting a sprint). Alternate between the two positions (kick forwards and lunge backwards) with a high cadence.
Attention:
Do not fall backwards with your upper body when kicking your leg away. Keep your posture upright when lunging.
Lighten:
Push your leg out less high or far back.
Harden:
Push your leg out higher; add weight to your leg.
1 weight cuff ► make the exercise more difficult (additional weight)
Push your leg out forwards in a standing position and lunge backwards alternately (right) ► front kick & reverse lunge
Power
Individual work

Stand shoulder-width apart, one leg (right) slightly backwards, gaze/face and upper body facing forwards, arms hanging beside the body. Raise one leg (right) and kick it out in the direction of your gaze (kick movement forwards), bend your arms at the same time and move your hands to head height. Lower your upper body as you bring your free leg back, bend your supporting leg and bring your free leg backwards, both hands touching the floor (lunge position - similar to starting a sprint). Alternate between the two positions (kick forwards and lunge backwards) with a high cadence.
Attention:
Do not fall backwards with your upper body when kicking your leg away. Keep your posture upright when lunging.
Lighten:
Push your leg out less high or far back.
Harden:
Push your leg out higher; add weight to your leg.
1 weight cuff ► make the exercise more difficult (additional weight)
Move leg forwards and backwards in shoulder position (left)
Power
Individual work

Shoulder position, one leg (left) bent, the other stretched out or also bent but held high, arms flat on the floor at the side of the body, pelvis raised, bounce forwards and back to the starting position with the supporting leg (left) (touch down with the heel).
Attention:
Pelvis always remains raised, upper body only rests on the shoulders.
Lighten:
Just hold the position with your pelvis raised; move your standing leg less.
Harden:
Additional weight (on the hips).
Variation:
Remnant carpet/felt slipper/glider under the standing leg to glide forwards and backwards.
1 weight vest/weight disc/dumbbell/sandbag ► make the exercise more difficult (additional weight)
1 carpet remnant/felt slipper/glider ► variation of the exercise
Move leg forwards and back in shoulder position (right)
Power
Individual work

Shoulder position, one leg (right) bent, the other stretched out or also bent but held high, arms flat on the floor at the side of the body, pelvis raised, bounce forwards and back to the starting position with the supporting leg (right) (touch down with the heel).
Attention:
Pelvis always remains raised, upper body only rests on the shoulders.
Lighten:
Just hold the position with your pelvis raised; move your standing leg less.
Harden:
Additional weight (on the hips).
Variation:
Remnant carpet/felt slipper/glider under the standing leg to glide forwards and backwards.
Footwork (locomotion)
Light-Contact
Individual work
The participants practise with commands and corrections from the instructor.

The movement is practised as follows:
The foot at the back in the direction of movement pushes off the floor and the foot at the front is placed 10-15cm in front. The rear foot is then pulled back so that the original starting position is restored. The movement is dynamic, gliding light-footedly over the floor. The movement can also be performed with small flat jumps. It is important to ensure that the movement is always practised in combination with the boxing position.
No material required
Footwork (sideways)
Light-Contact
Partner work


One participant circles the tyre with small readjusting steps, while the second participant tries to stay opposite. The participants take small flat (sideways) steps on the balls of their feet. The distance between the feet is not less than shoulder width. The foot closer to the direction of movement goes first, the second foot is only pulled up to shoulder width. Change roles after a while.
Per group:
1 tyre
Footwork (sideways)
Light-Contact
Partner work
The participants glide sideways from tyre to tyre in a boxing position. One participant leads and the other reacts accordingly and follows their partner.
8-12 tyres
Footwork and tackling
Light-Contact
Partner work
Moving from marker to marker (6 cones) in double cover, taking care not to cross your feet and keeping your legs shoulder-width apart. At the end of the course there is a short fight with the partner (first hit wins). The loser performs two quick squats. Both participants then start the movement exercise from the front (the two lanes are next to each other or opposite each other).
12 marking hats (6 per participant)
Participant:
1 pair of boxing gloves
Footwork: slalom
Light-Contact
Individual work
A slalom is run between stakes in double coverage (do not cross your feet but keep them shoulder-width apart).
Variant:
Competition form against another participant (optioanl: the slower one does 5 push-ups/torso bends/extension jumps).
7/14 stakes
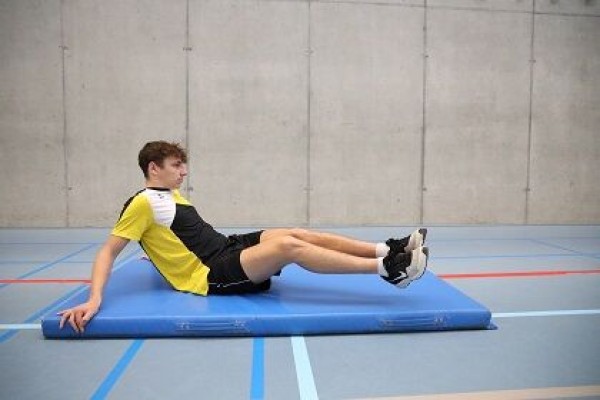
Move your legs to the side while sitting alternately
Power
Individual work

Sit on the floor, upper body slightly tilted backwards and supported by the hands, legs slightly raised from the floor in front of you and almost stretched out, alternately move the legs sideways over an object placed at foot level (e.g. helmet or rucksack), briefly tapping the floor with the heels on each side. Alternate legs sideways over an object (e.g. helmet or rucksack) placed at foot level, briefly touch the ground with your heels on each side.
Attention:
Do not put your feet down.
Lighten:
Legs bent more strongly.
Harden:
Legs extended; additional weight on/between the legs.
1 helmet/fighting rucksack
2 weight cuffs/1 PET bottle (1.5 litres)/ball/(additional) helmet/fighting rucksack ► make the exercise more difficult (additional weight)
Move your legs to the side while sitting alternately
Power
Individual work

Sit on the floor, upper body tilted slightly backwards and supported by the hands, legs slightly raised from the floor in front of you and almost stretched out, alternate legs from one side to the other (optionally tap the floor briefly with your heels on each side).
Caution:
Do not put your feet down.
Lighten:
Bend your legs more.
Harden:
Legs stretched out; additional weight on/between the legs.
2 weight cuffs/1 (medicine) ball/weight disc/dumbbell ► make the exercise more difficult (additional weight)
Blocking
Light-Contact
Partner work
Presentation by leader.
The groups of 2 then practise the movements (including role reversal); the leader corrects them.
One way of blocking from the basic position is simply to turn out the respective hand and bring it forwards (crosswise) in order to ward off/block the attacker's punch with the palm of the hand (fist against palm).
Participant:
1 pair of boxing gloves
Block / evasive manoeuvre with counterattack
Light-Contact
Partner work
Presentation by leader.
The groups of two then practise the movements (including role reversal); the leader corrects. If necessary, an exercise sequence is also performed in the group.
This sequence of movements combines blocking and dodging with a counter (lead hand and punching hand). One participant slowly strikes 4x in the direction of their partner's forehead (2x left/right). The defender blocks the punches twice (left/right) and then dodges twice and simultaneously performs a counter-punch (left/right).
Blocking:
When blocking, the respective hand is turned out from the basic position and brought forward (crosswise) to ward off/block the attacker's punch with the palm of the hand (fist against palm).
Leading hand:
When countering with the leading hand (example left side), the front foot remains stable in place, the weight is shifted to the rear (right) foot (tilt the upper body backwards slightly). To avoid the opponent's punch, the body weight is not only shifted backwards, but the upper body is also tilted to the side (outwards - to the right). Finally, you follow up with your own punch (jab) with the (left) lead hand (on the "inside" side).
Punching hand:
When countering with the punching hand (example right side), you take a step to the (left) side (sidestep), shifting your weight to the front (left) foot. Finally, the own punch (straight) follows with the stronger hand (on the "inner" side).
Exercise:
In groups of 2, the blocking and dodging including the counter punch is practised. This involves blocking and dodging twice on one side and then on the other (lead hand and punching hand). The sequence of movements is practised very slowly at first; the speed can only be increased once the sequence of movements has been completely mastered. The roll can be changed after each pass or after several passes. In order to gain more confidence in the sequence of movements, it is advisable to do several passes in succession. It also makes sense to change partners from time to time (variety and different levels of participants). The instructor can make the exercise more difficult by no longer clearly defining the attacking side (e.g. 2 attacks each to block and evade - side arbitrarily determined by the attacker - change roles - change partners).
Participant A: 2x punch left + right (jab + straight) / Participant B: Block left + right plus dodge with counter (lead hand and punching hand)
Variant:
All participants perform the sequence of movements (= participant B; see above) together (same front - rotate the alignment by 90 degrees after each pass). The instructor counts slowly from 1-4 for the individual steps (block left - block right - dodge incl. counter with the lead hand - dodge incl. counter with the punching hand). The instructor takes the opportunity to make corrections.
Participant:
1 pair of boxing gloves
Blocking with punching hand
Light-Contact
Partner work
Constant role and partner changes
.Position:
Elbows close to the upper body, arms remain where they are in the boxing position, slight shoulder rotation against the punch (3cm).
- Participant A: punch with lead hand
- Participant B: block with punching hand
- Participant A: punch with lead hand, block with punching hand
- Participant B: Block with punching hand, counter with jabbing hand
Variation:
Apply what you have learnt in a short 1:1 match (slowly + carefully; don't hit too hard at the beginning).
Participant:
1 pair of boxing gloves
Floor press
Fighting and roughhousing games
Partner work
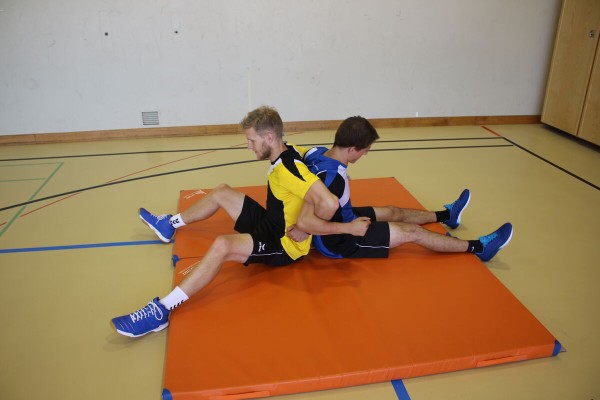
The participants sit back to back with their legs slightly bent in the centre of a mat/lawn area. The participants' arms are interlocked. The aim is to press the opponent's right or left shoulder to the ground. The side is changed with each pass.
2 soft mats (small) ►indoor version
2 tent groundsheets ►outdoor version
Indoor post assembly:
Connect the soft mats to each other on the wide side using Velcro.