Exercises (1549)
Standing and supine position alternating (left) ► turkish get up
Power
Individual work


From the lying position (supine position), you move through various intermediate positions to the upright position, whereby the main focus is on holding the weight (dumbbell or kettlebell) in one hand overhead in a stable position and always working with a stretched back.
As a starting position, the weight is held in a supine position with one arm (left) almost outstretched at chest height (arm pointing upwards), the leg (left) on the same side where the weight is held is bent (foot placed on the floor). Firstly, the shoulders are lifted using the forearm of the arm resting on the floor (right). Then rest the free arm on the hand to lift the whole upper body away from the floor. The hips are then pushed upwards and the outstretched leg (right) is pulled under the body and brought backwards into a kneeling position (half kneeling position with one hand resting on the floor). The arm that is currently still supporting you (right) is then finally lifted off the floor to a half-kneeling position with the upper body upright. A lunge is used to assume the final standing position. Reverse the sequence of movements to return to the starting position lying on the floor.
Starting position:
- Supine position
- Leg bent and positioned on the side of the weight
- Weight held in front of you with one arm almost straight (arm pointing firmly upwards)
- Abdominal and gluteal muscles are tensed
- Gaze is directed towards the weight
Final position:
- Stand upright with a straight back
- Stabilise the weight overhead with an almost outstretched arm
Attention:
This exercise places extremely high demands on mobility and stability, which is why it is only suitable for advanced exercisers. Distribute the weight over the entire foot during the movement sequence
1 dumbbell/kettlebell
Standing and supine position alternating (left) ► turkish get up
Power
Individual work
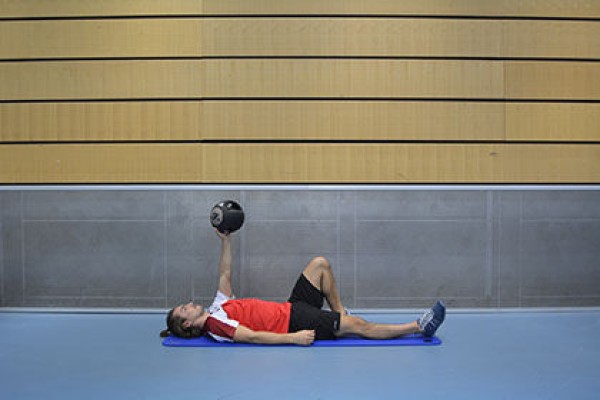


From the lying position (supine position), you move through various intermediate positions to the upright position, whereby the main focus is on holding the weight (dumbbell or kettlebell) in one hand overhead in a stable position and always working with a stretched back.
As a starting position, the weight is held in a supine position with one arm (right) almost outstretched at chest height (arm facing upwards), the leg (right) on the same side where the weight is held is bent (foot on the floor). Firstly, the shoulders are lifted using the forearm of the arm resting on the floor (left). Then rest the free arm on the hand to lift the whole upper body away from the floor. The hips are then pushed upwards and the outstretched leg (left) is pulled under the body and brought backwards into a kneeling position (half kneeling position with one hand resting on the floor). The arm that is currently still supporting you (left) is then finally lifted off the floor to a half-kneeling position with the upper body upright. A lunge is used to assume the final standing position. Reverse the sequence of movements to return to the starting position lying on the floor.
Starting position:
- Supine position
- Leg bent and positioned on the side of the weight
- Weight held in front of you with one arm almost straight (arm pointing firmly upwards)
- Abdominal and gluteal muscles are tensed
- Gaze is directed towards the weight
Final position:
- Stand upright with a straight back
- Stabilise the weight overhead with an almost outstretched arm
Attention:
This exercise places extremely high demands on mobility and stability, which is why it is only suitable for advanced exercisers. Distribute the weight over the entire foot during the movement sequence
1 dumbbell/kettlebell
Standing and supine position alternating (right) ► turkish get up
Power
Individual work
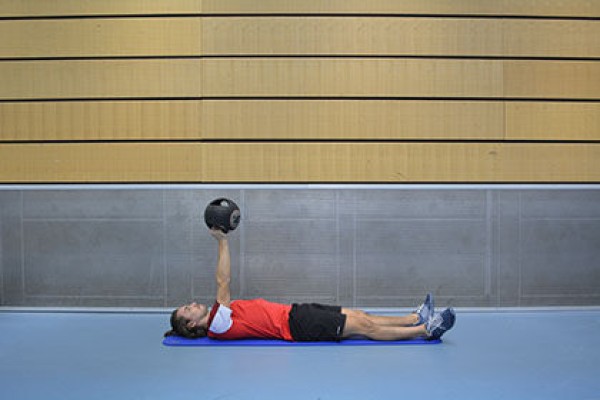


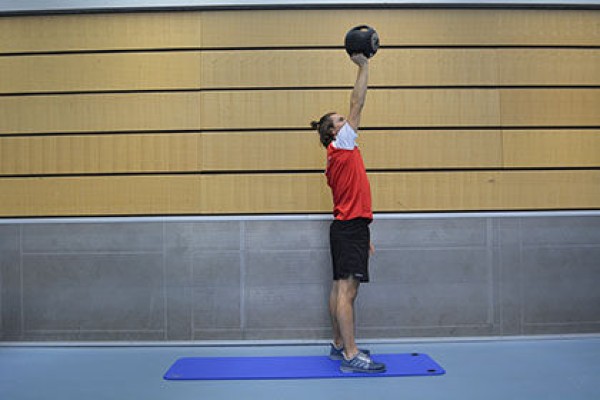
From the lying position (supine position), you move through various intermediate positions to the upright position, whereby the main focus is on holding the weight (dumbbell or kettlebell) in one hand overhead in a stable position and always working with a stretched back.
As a starting position, the weight is held in a supine position with one arm (right) almost outstretched at chest height (arm facing upwards), the leg (right) on the same side where the weight is held is bent (foot on the floor). Firstly, the shoulders are lifted using the forearm of the arm resting on the floor (left). Then rest the free arm on the hand to lift the whole upper body away from the floor. The hips are then pushed upwards and the outstretched leg (left) is pulled under the body and brought backwards into a kneeling position (half kneeling position with one hand resting on the floor). The arm that is currently still supporting you (left) is then finally lifted off the floor to a half-kneeling position with the upper body upright. A lunge is used to assume the final standing position. Reverse the sequence of movements to return to the starting position lying on the floor.
Starting position:
- Supine position
- Leg bent and positioned on the side of the weight
- Weight held in front of you with one arm almost straight (arm pointing firmly upwards)
- Abdominal and gluteal muscles are tensed
- Gaze is directed towards the weight
Final position:
- Stand upright with a straight back
- Stabilise the weight overhead with an almost outstretched arm
Attention:
This exercise places extremely high demands on mobility and stability, which is why it is only suitable for advanced exercisers. Distribute the weight over the entire foot during the movement sequence
1 dumbbell/kettlebell
Standwaage
Power
Individual work


Stand upright, facing the chair. At the same time, tilt your upper body forwards (keep your upper body horizontal to the floor) and raise your practically stretched free leg up to the height of your buttocks. To keep your balance better, support your upper body with your arms on the seat of the chair. In the end position, the leg and upper body are roughly in line. The position in the shape of the letter "T" is also known as the standing balance. Then raise the upper body and lower the leg back to the starting position. Switch sides after each execution (change the supporting leg/playing leg).
Attention:
Keep your back straight at all times (tense your torso), distribute your weight over the entire foot (supporting leg).
1 (office) chair
Standing scale (left)
Power
Individual work
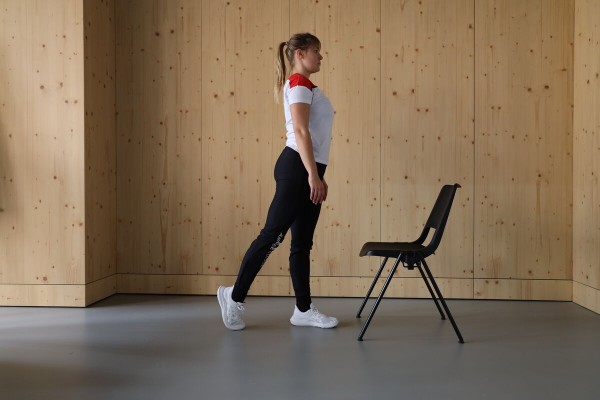
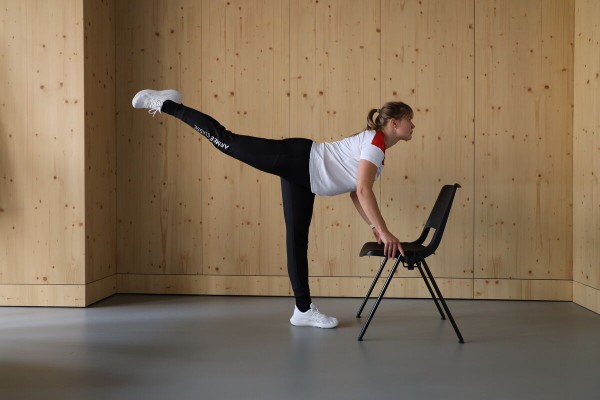
Stand upright, slightly offset, with the free leg (right) slightly further back than the supporting leg (left) and facing the chair. At the same time, tilt the upper body forwards (keep the upper body horizontal to the floor) and raise the practically stretched free leg to the height of the buttocks. To keep your balance better, support your upper body with your arms on the seat of the chair. In the end position, the leg and upper body are roughly in line. The position in the shape of the letter "T" is also known as the standing balance. Then raise your upper body and lower your leg back to the starting position.
Attention:
Keep your back straight at all times (tense your core) and distribute your weight over your entire foot (standing leg).
1 (office) chair
Standwaage (right)
Power
Individual work


Stand upright, slightly offset, with the free leg (left) slightly further back than the supporting leg (right) and facing the chair. At the same time, tilt the upper body forwards (keep the upper body horizontal to the floor) and lift the practically stretched free leg up to the height of the buttocks. To keep your balance better, support your upper body with your arms on the seat of the chair. In the end position, the leg and upper body are roughly in line. The position in the shape of the letter "T" is also known as the standing balance. Then raise your upper body and lower your leg back to the starting position.
Attention:
Keep your back straight at all times (tense your core) and distribute your weight over your entire foot (standing leg).
1 (office) chair
Pushing an object while stationary
Power
Individual work

Push an object lying on the ground (e.g. a tyre) over a certain distance (back and forth). Choose a short distance for multiple pushes (5-10m),
Attention:
Keep your back straight.
Lighten:
Less resistance.
Harden:
More resistance.
1 tyre (DURO)
1 tyre (PUCH) ► Make the exercise easier
1 tyre (10DM) ► Make the exercise more difficult
Pushing an object while stationary
Power
Individual work


Push an inverted vaulting box top including a centre section (possibly filled with medicine balls) over a certain distance (back and forth) (push the bob). Choose a short distance for multiple pushes (5-10m).
Attention:
Keep your back straight.
Lighten:
Less (no) additional weight (medicine balls).
Harden:
Additional weight (medicine balls).
2 vaulting box elements (incl. upper part)
x medicine balls
Stretch jump with momentum from supine position ► reverse burpee
Power
Individual work

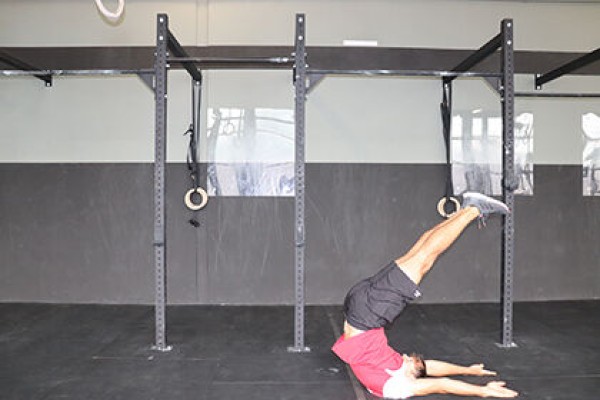


From a shoulder-width stance, move into a squat position (arms pointing diagonally downwards in front) and then drop into a supine position. The outstretched arms are extended overhead (along the floor) and the bent legs are stretched out so that they are pointing towards the sky (upwards). The arms are then brought back in front of the body in a flowing movement so that the momentum can be utilised to return to the standing position. Once in the standing position, immediately perform a stretch jump into the air, landing in the starting position to begin the exercise again.
Attention:
Knee of the training leg should remain as centred as possible over the foot.
Lighten:
Arms support the movement more clearly (more momentum); lower height during the stretch jump (or just straighten the upper body).
Harden:
Additional weight.
2-4 weight cuffs ► Make the exercise more difficult (additional weight)
Support backwards
Power
Individual work

Inverted support (inverted push-up position, the outstretched legs and upper body practically form a line, the legs are supported on the heels and the upper body on the outstretched arms, with the face/gaze pointing upwards). Hold the position.
Attention:
Head, torso, hips and knees form a line (do not let your buttocks sag, tense your stomach), place your hands under your shoulders.
Lighten:
Bend your legs slightly.
Harden:
Additional weight (on the hips); unstable support for the legs (arms probably too difficult).
1 weight vest/weight disc/sandbag ► to make the exercise more difficult (additional weight)
1 ball/balance cushion/balance board ► to make the exercise more difficult (unstable surface)
Support backwards
Power
Individual work

Inverted support (inverted push-up position, the outstretched legs and upper body practically form a line, support the upper body on the outstretched arms) with the feet (calves) placed on the exercise ball and the buttocks pressed upwards (full body stretch). Hold the position you have assumed.
Attention:
Head, torso, hips and knees practically form a line (do not let your buttocks sag, tense your stomach), place your hands under your shoulders.
Lighten:
Exercise ball closer to your buttocks.
Harden:
Additional weight (on the hips).
1 exercise ball
1 weight vest/weight disc/sandbag ► Make the exercise more difficult (additional weight)
Support backwards
Power
Individual work

Inverted support (inverted push-up position, the outstretched legs and upper body practically form a line, the legs are supported by the heels on the balance board and the upper body on the outstretched arms, so the face/gaze is pointing upwards). Hold the position.
Attention:
Head, torso, hips and knees form a line (don't let your buttocks sag, tighten your stomach), place your hands under your shoulders.
Lighten:
Without the balance board; bend your legs slightly.
Harden:
Additional weight (on the hips).
1 balance board
1 weight vest/weight disc/sandbag ► Make the exercise more difficult (additional weight)
Supination of the forearm in the sitting position (left)
Power
Individual work


While seated, place an elasticated band around the (left) thigh and grasp the band with the (left) hand, with the back of the hand pointing upwards. The arm holding the band is bent so that the upper arm is against the body and the lower arm is pointing forwards (90 degree angle at the elbow joint). The other (right) arm fixes the training arm by holding the forearm at the elbow. From this position, perform an outward rotation (supination) with the arm so that the back of the hand points downwards in the end position.
Attention:
The movement only takes place in the forearm, the upper arm remains stable.
Lighten:
Choose an elastic band with less resistance.
Harden:
Choose an elastic band with greater resistance.
1 mini-band
1 seating option (e.g. chair, plyo box or vaulting box)
Supination of the forearm in the sitting position (right)
Power
Individual work
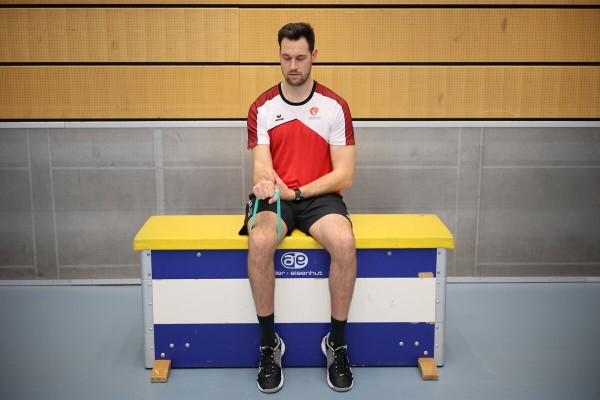

While seated, place an elasticated band around the (right) thigh and grasp the band with the (right) hand, with the back of the hand pointing upwards. The arm holding the band is bent so that the upper arm is against the body and the lower arm is pointing forwards (90 degree angle at the elbow joint). The other (left) arm secures the training arm by holding the forearm at the elbow. From this position, perform an outward rotation (supination) with the arm so that the back of the hand points downwards in the end position.
Attention:
The movement only takes place in the forearm, the upper arm remains stable.
Lighten:
Select an elastic band with less resistance.
Harden:
Select an elastic band with greater resistance.
1 mini-band
1 seating option (e.g. chair, plyo box or vaulting box)
Skip
Power
Individual work

Round race with (3) obstacles (e.g. hurdles or a rope stretched between two stakes). The aim is to jump over the obstacles.
Attention:
Suspend the landing with your legs (lower your buttocks).
Lighten:
Lower obstacles.
Harden:
Higher obstacles.
Variant:
Jump up again immediately after landing (explosive power) or take a roughly right angle with your knees when landing and hold this position briefly before jumping off again.
2 stakes/1 rope or 1 hurdle = 1 obstacle
Alternating skipping and crawling under
Power
Individual work


Round course with (2) obstacles (e.g. hurdles or a rope stretched between two stakes). The aim is to alternately jump over and crawl under the obstacle once.
Attention:
Suspend the landing.
Lighten:
Lower speed; lower obstacle for jumping over; higher obstacle for crawling under.
Harden:
Higher speed; higher obstacle for jumping over; lower obstacle for crawling under.
2 stakes/1 rope or 1 hurdle = 1 obstacle
2 marking cones/caps
Alternating skipping and crawling under
Power
Individual work


Round course with various obstacles: The horse/swinging box is jumped over, at the single swinging box element you crawl/crawl through the opening.
Lighten:
Lower speed; lower elements to jump over/higher elements to crawl under.
Harden:
Higher speed; higher elements to jump over/lower elements to crawl under.
1-2 pommel horses
1-2 vaulting boxes
or instead of pommel horses and vaulting boxes, skipping ropes can be stretched between two painting sticks at different heights for jumping over/crawling under
4-8 painting sticks
2-4 ropes
3-6 soft mats (small)
2 painting sticks (optionally as a reversible pole)
Overcoming an obstacle
Power
Individual work
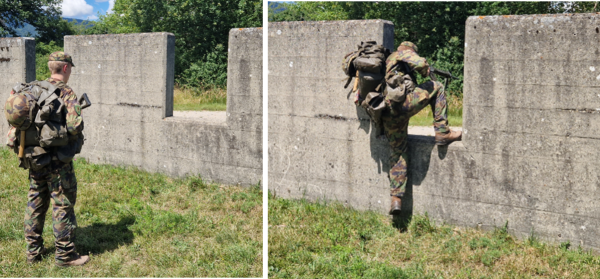
Overcoming a wall or opening using house and location fighting techniques (regulation 53.008.01 - chapter 6.3).
Lighten:
Without equipment;
Less high wall;
Without opening.
Harden:
With a protective waistcoat;
Higher wall.
Material per participant: Tenue CNK 420
Additional material: small wall/ruins, 1 protective vest
Bring your forearm in front of your body while standing (left)
Power
Individual work


Stand upright, shoulder-width apart, sideways (90 degrees) to the wall bars (or e.g. to a tree). Fix the elastic band at elbow height on the wall bars (on the tree), with the upper arm (left, far side of the fixation) resting against the body and the forearm stretched forwards at a right angle. Move the forearm outwards/away from the body and back to the starting position, whereby the movement takes place exclusively in the forearm (the other arm can fix the training arm).
Attention:
Always keep the arm bent at a right angle and the upper arm fixed to the body (rotation in the forearm).
Lighten:
Choose a rubber band with less resistance.
Harden:
Choose a rubber band with greater resistance.
1 elasticated rubber band
1 wall bar/tree
Bring your forearm in front of your body while standing (right)
Power
Individual work


Stand upright, shoulder-width apart, sideways (90 degrees) to the wall bars (or e.g. to a tree). Fix the elastic band at elbow height on the wall bars (on the tree), with the upper arm (right, far side of the fixation) resting against the body and the forearm stretched forwards at a right angle. Move the forearm outwards/away from the body and back to the starting position, whereby the movement takes place exclusively in the forearm (the other arm can fix the training arm).
Attention:
Always keep the arm bent at a right angle and the upper arm fixed to the body (rotation in the forearm).
Lighten:
Choose a rubber band with less resistance.
Harden:
Choose a rubber band with greater resistance.
1 elasticated rubber band
1 wall bar/tree
Bring forearm towards body in standing position (left)
Power
Individual work


Stand upright, shoulder-width apart, sideways (90 degrees) to the wall bars (or e.g. to a tree). Fix the elastic band at elbow height on the wall bars (on the tree), with the upper arm (left, side of the fixation) resting against the body and the forearm stretched forwards at a right angle. Grasp the elastic band with your hand, move the forearm inwards/to the body and back to the starting position, whereby the movement takes place exclusively in the forearm (the other arm can fix the training arm).
Attention:
Always keep the arm bent at right angles and the upper arm fixed to the body (rotation in the forearm).
Lighten:
Choose an elastic band with less resistance.
Harden:
Choose an elastic band with greater resistance.
1 elasticated rubber band
1 wall bar/tree
Bring forearm towards body while standing (right)
Power
Individual work


Stand upright, shoulder-width apart, sideways (90 degrees) to the wall bars (or e.g. to a tree). Hold the elastic band at elbow height on the wall bars (on the tree), with the upper arm (right, side of the fixation) resting against the body and the forearm stretched forwards at a right angle. Grasp the elastic band with your hand, move the forearm inwards/to the body and back to the starting position, whereby the movement takes place exclusively in the forearm (the other arm can fix the training arm).
Attention:
Always keep the arm bent at right angles and the upper arm fixed to the body (rotation in the forearm).
Lighten:
Choose an elastic band with less resistance.
Harden:
Choose an elastic band with greater resistance.
1 elasticated rubber band
1 wall bar/tree
Forearm support
Power
Individual work


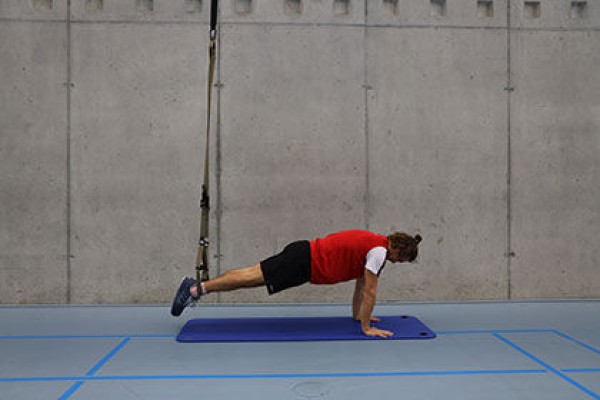
Progression I:
Adjust the sling trainer to mid-lower leg length (when standing), support your forearms with your feet vertically under the attachment point in the slings and hold the position.
Progression II:
Analogue to progression I, but supported on your hands.
Attention:
Keep body tension, do not let hips sag, back straight, hands under shoulders (for both progressions).
Harden:
The further the head is from the attachment point, the more challenging the exercise becomes.
1 sling trainer
Forearm support
Power
Individual work
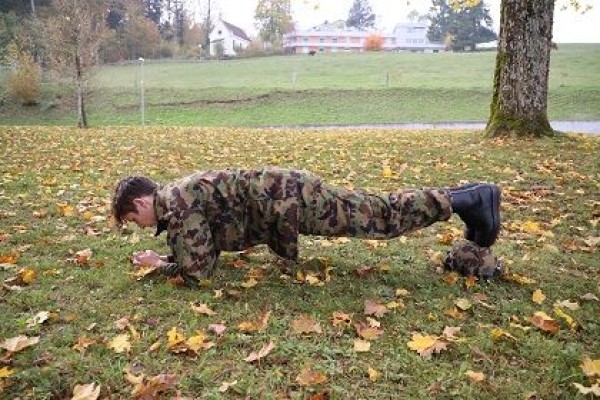

In the forearm support, the outstretched legs and upper body practically form a line. The legs are placed on the tips of the toes on the helmet and the upper body is supported on the forearms. The forearms lie flat on the floor parallel to each other and the upper arms are vertical (90 degree angle at the elbow joint).
Attention:
Head, torso, hips and knees form a line (do not stretch your buttocks upwards or let them sag, tense your stomach), the hands should not touch each other/be closed.
Lighten:
Knees on the floor (feet held up instead of placed on the object).
Harden:
Additional weight (on the back); unstable support (for the arms).
Variant:
Alternate by raising one leg slightly (foot at heel height).
1 helmet
1 weight vest/weight disc/sandbag/fighting rucksack ► to make the exercise more difficult (additional weight)
1 balance board ► to make the exercise more difficult (unstable base)
Unterarmstütz ► elbow plank / front plank
Power
Individual work

In the forearm support, the outstretched legs and upper body practically form a line. The legs are supported on the tips of the toes and the upper body on the forearms, the forearms lie flat on the floor parallel to each other (90 degree angle at the elbow joint).
Attention:
Head, torso, hips and knees form a line (do not stretch your buttocks upwards or let them sag, tense your stomach), the hands should not touch/close.
Lighten:
Knees on the floor (feet held high).
Harden:
Additional weight (on the back); unstable support (possible for both arms and legs).
1 weight vest/weight disc/sandbag ► to make the exercise more difficult (additional weight)
1 ball/balance cushion/balance board ► to make the exercise more difficult (unstable surface)