Cartography and reading technique
Land map
The map is a reliable and miniaturised representation of a part of the globe supplemented with signatures.


The signatures on the map are arranged according to different colour categories.

The larger the map scale, the less space is available for the representation of reality. The map scale specifies the linear reduction ratio in which reality is displayed on the map.

The Swiss coordinate grid has its origins in the old Bern Observatory (old 600 000 / 200 000). With this system, every point in Switzerland can be indicated to the nearest metre. Values between 500 and 800 indicate the west-east direction, 100-300 the south-north direction. Since the end of 2016, a 1 has been added to the six-digit coordinate in the north/south direction and a 2 in the west/east direction. The Swiss coordinate network is now integrated into all modern GPS receivers.

The height curves are lines that connect points at the same height. The equidistance provides information about the difference in altitude between the individual contour lines. A large distance between the curves means flat terrain, a small distance means steep terrain. Typical terrain forms are hills, depressions, ditches, ridges and hollows.


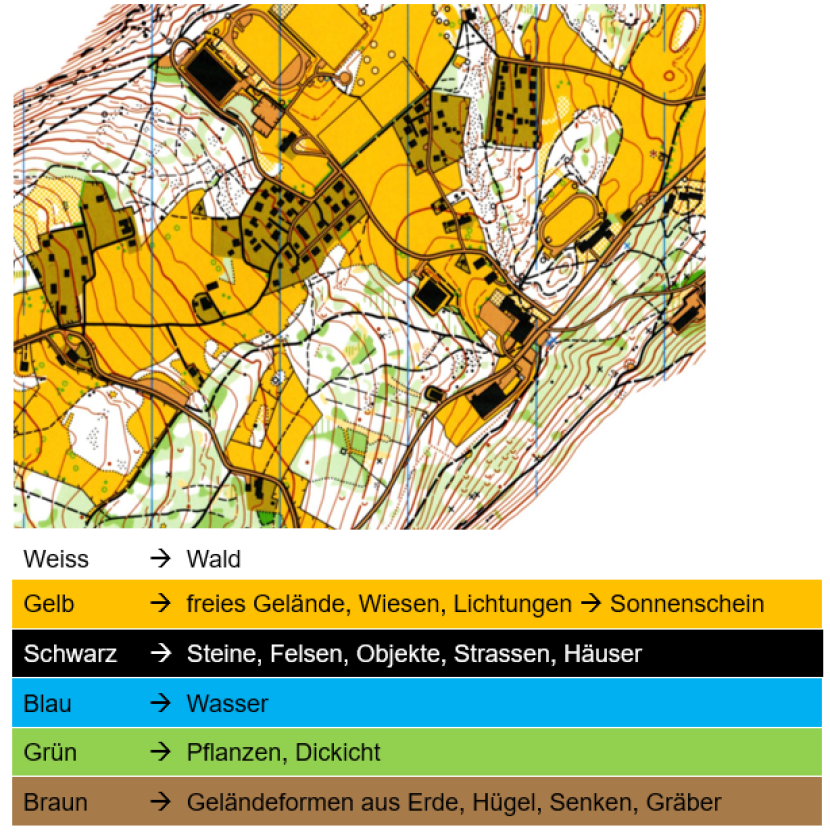
Orienteering map
A map with a scale of 1:10,000 is normally used for orienteering. The equidistance on these maps is 5 metres. The colours differ slightly from the normal national maps.
Reading technique

Orientate map
The map is orientated when what is in front of the runner in the terrain is also in front of the runner on the map in the same direction. When changing direction, the map grip is changed so that you are always behind the map. Key questions: what is in front of me, what is behind me, what is to the left/right of me? The map can be orientated according to the terrain or with a compass.

Use compass
Hold the map with the compass on it so that the point where you are currently standing is near you (at your navel) and the connection to the place where you want to go (post) is pointing straight away from you (towards the tip of your nose).
Turn with the map until the north arrow on the map and the red part of the compass needle are pointing in the same direction. Caution: don't just turn the map, but also your feet!
Now the map is correct, it is orientated. You are already looking in the direction of travel and are standing behind the map. If you look up, you should see the post or object, provided the distance is not too great.

Set compass as an alternative orientation option
Place the long edge of the compass plate in the direction of travel on the connecting route from A (location) to B (destination)
Turn the can until its N-S lines and the N-S lines of the map are parallel. The north marker of the can must face north on the map.
Determine the direction of travel in the terrain: turn with the compass until the north part of the needle is aligned with the north marker of the can. Sight along the long axis of the compass or the arrow on the base plate to determine the direction of travel. Head up, look into the terrain.
The following points are important during orienteering, always remembering that the compass is an aid and the map must not be forgotten:
Check the direction of travel regularly and correct if necessary
Guideline: Clearly visible terrain feature that you can follow without difficulty (e.g. path, stream, edge of forest, edge of terrain).
Catch line: Terrain feature that lies at right angles to the direction of travel and indicates how far you have travelled on the planned route (e.g. as with a guideline) to catch yourself, prevent you from travelling too far and reorient yourself (don't overshoot the target without constantly looking at the map).
Aim for "railway stations" on long compass routes
Correct small deviations by feel.
Check the distance.
For shorter distances, the steps can be counted. A runner needs about 25-30 double steps for 100 metres on good, flat paths; 30-35 double steps cross-country and in the forest, flat terrain; approx. 40 double steps cross-country and in the forest, on slightly uphill terrain.
Compare distances: Use known distances (100m running track, 300m shooting range, football pitch) in the field as a comparison route, estimate the distances from one marker point to the next and add them up as you go.
Distance awareness: With increasing experience, runners detach themselves from auxiliary techniques and trust their sense of distance (e.g. time required for a route).
Bypass obstacles: Locate auxiliary points behind them and continue the compass run from there
Look far ahead in the terrain, aim for prominent objects
Route selection
With increasing experience, more and more criteria are included in the decision-making process:
Length (route / diversions)
Incline / gradient
Accessibility
Physical condition
Personal strength
Tactical considerations
Route decisions should be made in a systematic process and not "off the cuff". The individual steps are as follows:
Search and describe: what sensible and possible routes do I see on this section?
Compare and evaluate: what are their advantages and disadvantages if I take into account the criteria listed above?
Decide and implement: which route do I choose? Then implement the chosen route consistently in the terrain; hesitating or changing routes costs time and safety!