Exercises (1633)
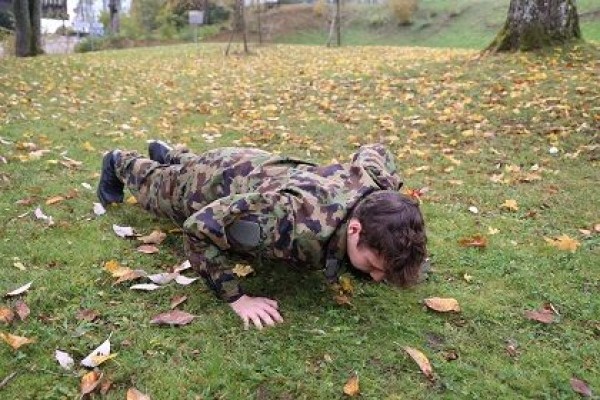
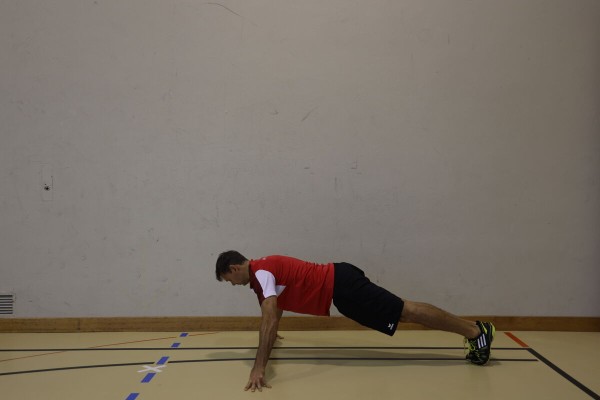
Push-up ► push up
Power
Individual work
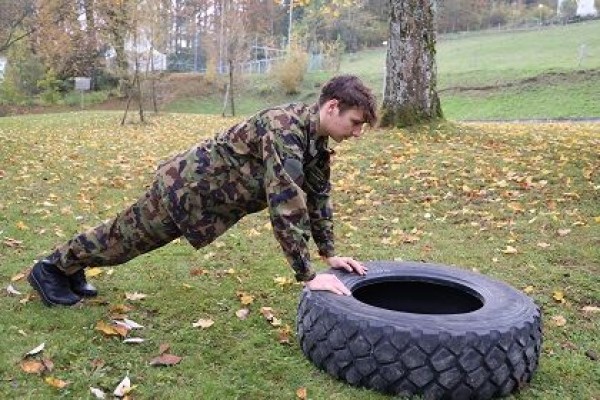
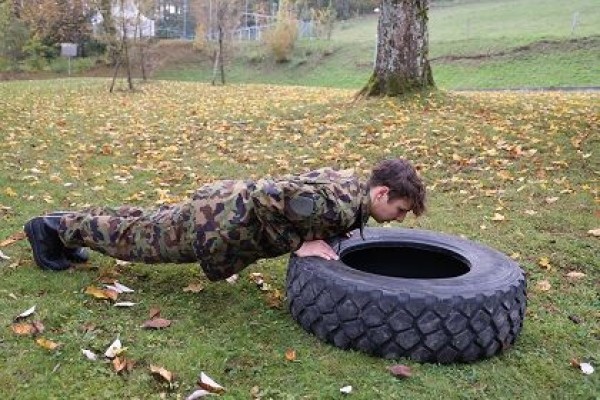
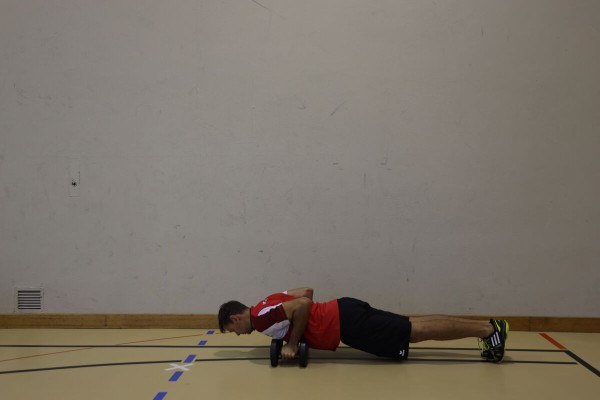
Push-up position with your arms supported on the tyre, bend and stretch your arms (lower and raise your upper body).
Attention:
Do not let your hips sag, actively tense your torso (no hollow back), elbows bent at an angle of approx. 45° from your upper body ("A" shape with your arms), keep your shoulders fixed and press down towards your hips.
Lighten:
Place your knees on the floor (feet held high); lower your upper body less (arms barely bent).
Harder:
Place your feet on a tyre or helmet; arms supported on a helmet (tight push-ups); additional weight (on your back); unstable support for your arms and/or legs.
Variation:
Vary the position of your hands (e.g.: wide, narrow, together).
1 tyre (DURO) ► make the exercise easier or more difficult (leg position)
1 helmet ► make the exercise more difficult (arm/leg position)
1 weight vest/weight disc/sandbag/fighting rucksack ► make the exercise more difficult (additional weight)
1 ball/1-2 balance cushions/balance board ► make the exercise more difficult (unstable surface)
Push-up ► push up
Power
Individual work

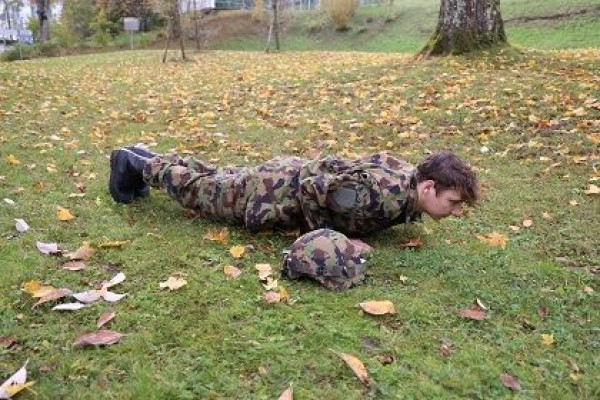
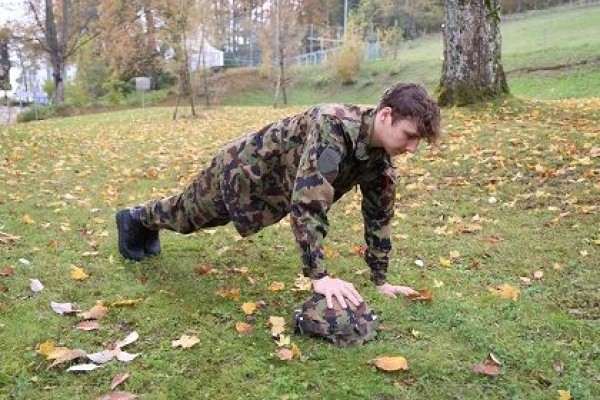
Place an object (e.g. helmet) on the floor. helmet) on the floor to perform the exercise in the following order:
Push-up position with your hands next to the object, perform push-ups,
support the hand facing the object on the object, the other hand remains on the floor, perform push-ups,
support both hands on the object, perform push-ups,
support one hand on the other side of the object on the floor, perform push-ups,
support both hands on the floor (opposite side of the starting position), perform push-ups,
continue the exercise in the opposite direction.
Attention:
Head, torso, hips and knees practically form a line (do not stretch your buttocks upwards or let them sag, tense your stomach). Elbows bent at an angle of approx. 45 degrees from the upper body ("A" shape with the arms). Shoulders are fixed and pressed down towards the hips.
Lighten:
Knees on the floor.
Heavy:
Additional weight (on the back); unstable base for the legs.
1 helmet/(medicine) ball
1 weight vest/weight disc/fighting backpack/sandbag/pneu (PUCH) ► Make the exercise more difficult (additional weight)
1 ball/1-2 balance cushions/1 balance board ► Make the exercise more difficult (unstable base)
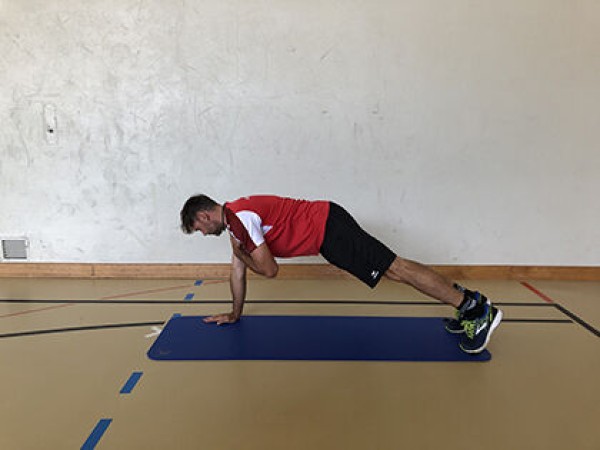
Push-up ► push up
Power
Individual work


Push-up position on the balance board, one leg stretched out (in extension of the body) and one leg bent (kneeling) on the floor, arms bent and stretched (upper body lowered and raised).
Attention:
No hollow back, actively tense the torso. Elbows bent approx. 45 degrees from the upper body ("A" shape with the arms), shoulders are fixed and pressed down towards the hips.
Lighten:
Both legs bent on the floor (kneeling).
Harder:
Both legs stretched out in extension of the body (standing on the tips of the feet); additional weight on the back; unstable base for the legs too.
Variant:
Vary the position of the hands/arms (e.g. wide, narrow, together).
1 balance board incl. roller
1 weight vest/weight disc/sandbag ► to make the exercise more difficult (additional weight)
1 ball/balance cushion/(additional) balance board ► to make the exercise more difficult (unstable base)
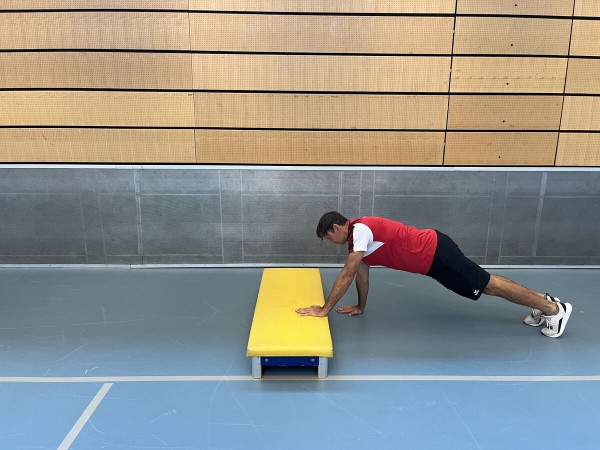
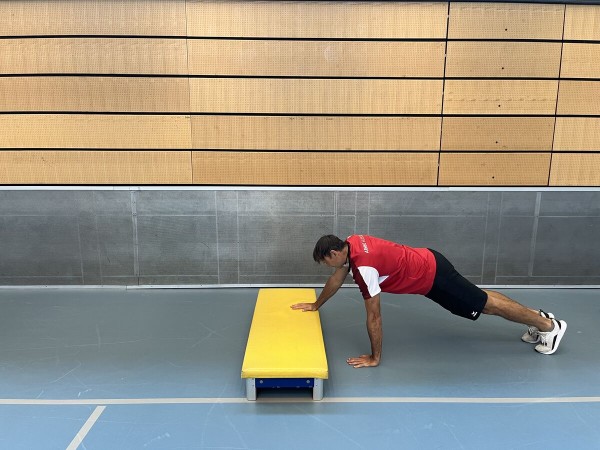
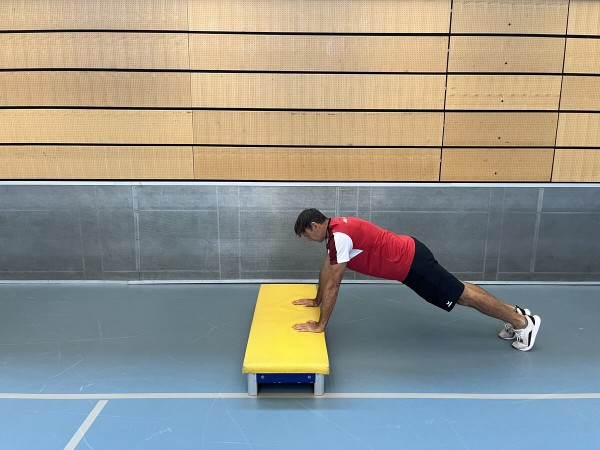
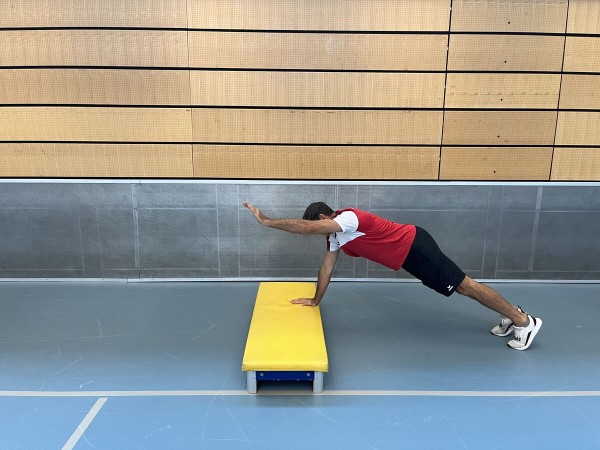
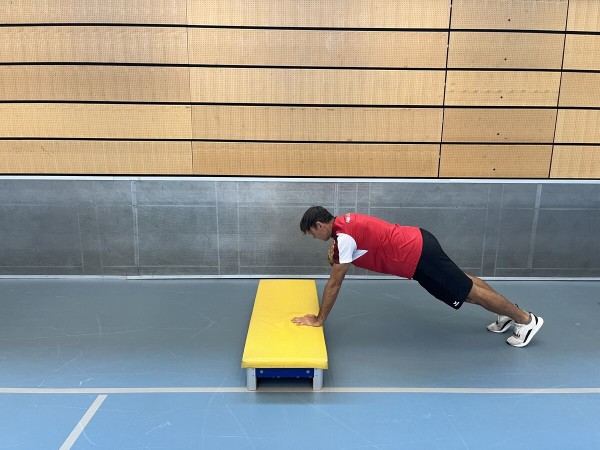
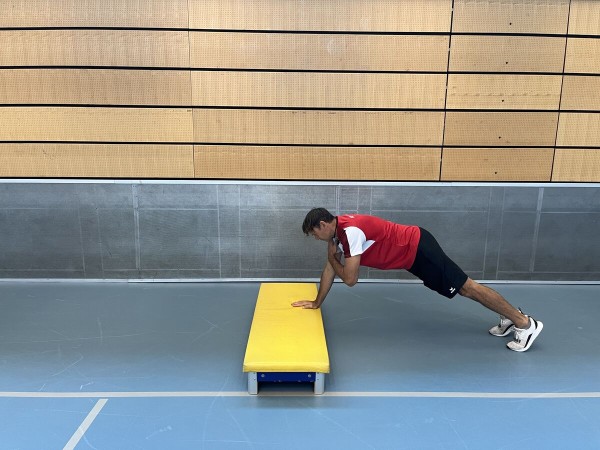
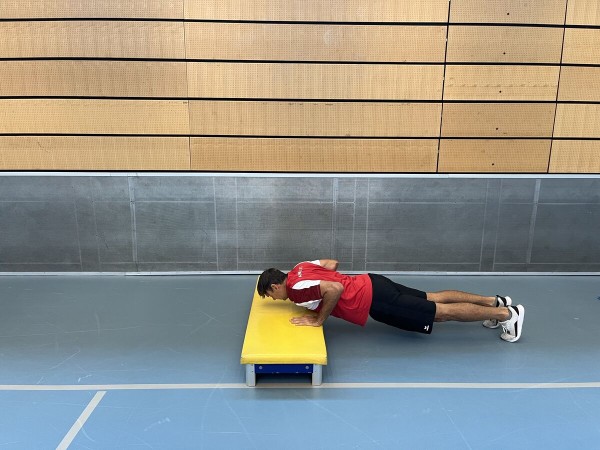
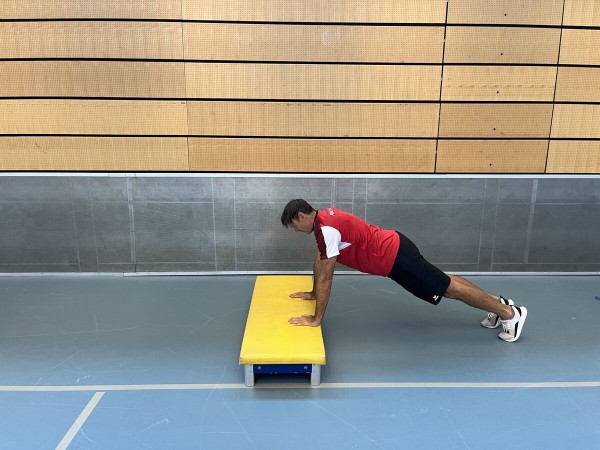
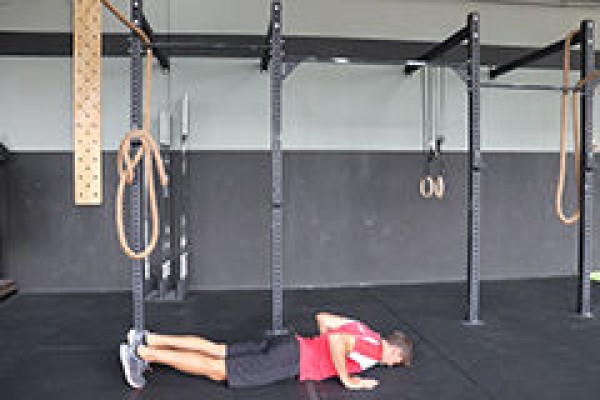
Push-up ► push up
Power

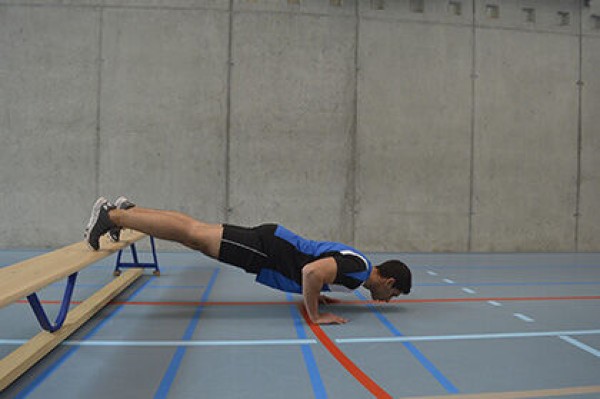
Push-up position, legs placed on the long bench; bend and stretch arms (lower and raise upper body).
Attention:
No hollow back, tense torso, elbows bent approx. 45° from upper body ("A" shape with arms), shoulders fixed and pulled down towards hips.
Lighten:
Support your arms on the long bench instead of your legs; lower your upper body less (hardly bend your arms); normal push-ups (arms and legs on the floor).
Harder:
Additional weight (on the back); unstable support for the arms.
Variant:
Vary the position of the hands/arms (e.g.: wide, narrow, together).
1 long bench
1 weight vest/weight disc/sandbag ► to make the exercise more difficult (additional weight)
1 ball/balance cushion/balance board ► to make the exercise more difficult (unstable surface)
Push-up ► push up
Power
Individual work
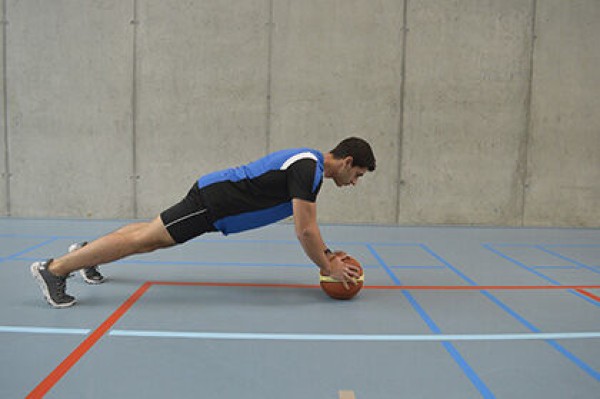

Push-up position, support your upper body with your hands on a ball/helmet (or place your hands on the ball), bend and stretch your arms (lower and raise your upper body).
Attention:
Do not arch your back, tense your torso, bend your elbows approx. 45° from the upper body ("A" shape with the arms), shoulders are fixed and pressed down towards the hips.
Lighten:
Just hold the starting position; lower the upper body less (barely bend the arms).
Harden:
Additional weight (on the shoulders); legs on an unstable surface.
1 ball (e.g. medicine or basketball)/helmet
1 weight vest/weight disc/sandbag ► to make the exercise more difficult (additional weight)
1 additional ball/balance cushion/balance board ► to make the exercise more difficult (unstable base)
Push-up ► push up
Power
Individual work


Push-up position on the balance board, both legs stretched out in extension of the body (standing on the toes), arms bent and stretched (upper body lowered and raised).
Attention:
No hollow back, actively tense the torso. Elbows bent approx. 45 degrees from the upper body ("A" shape with the arms), shoulders are fixed and pressed down towards the hips.
Lighten:
Both legs bent on the floor (kneeling); one leg bent (kneeling) on the floor.
Harder:
Additional weight on the back; unstable base for the legs too.
Variant:
Vary the position of the hands/arms (e.g. wide, narrow, together).
1 balance board incl. roller
1 weight vest/weight disc/sandbag ► to make the exercise more difficult (additional weight)
1 ball/balance cushion/(additional) balance board ► to make the exercise more difficult (unstable base)
Push-up ► push up
Power
Individual work


Push-up position, support your upper body with your hands on a balance cushion, bend and stretch your arms (lower and raise your upper body).
Attention:
Do not hollow back, tense your torso, bend your elbows at an angle of approx. 45° from your upper body ("A" shape with your arms), fix your shoulders and press them down towards your hips.
Lighten:
Just hold the starting position; lower your upper body less (barely bend your arms).
Harden:
Additional weight (on the shoulders); legs on an unstable surface.
Variation:
Replace the balance cushion with a balance hemisphere.
2 balance cushions
1 weight vest/weight disc/sandbag ► Make the exercise more difficult (additional weight)
1 ball/additional balance cushion/balance hemisphere/balance board ► Make the exercise more difficult (unstable surface)
1 balance hemisphere ► Variation of the exercise
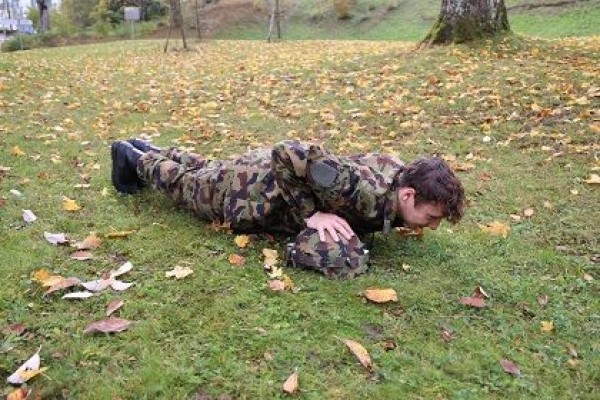
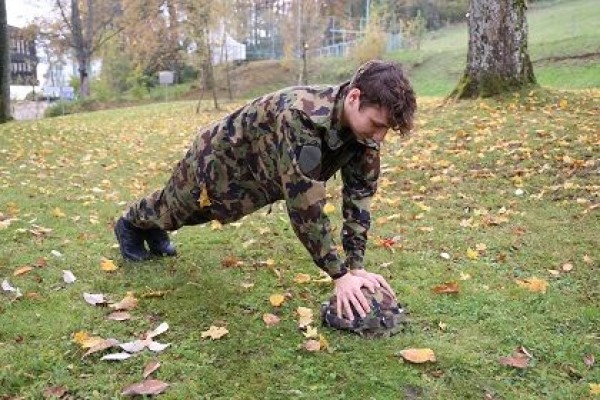
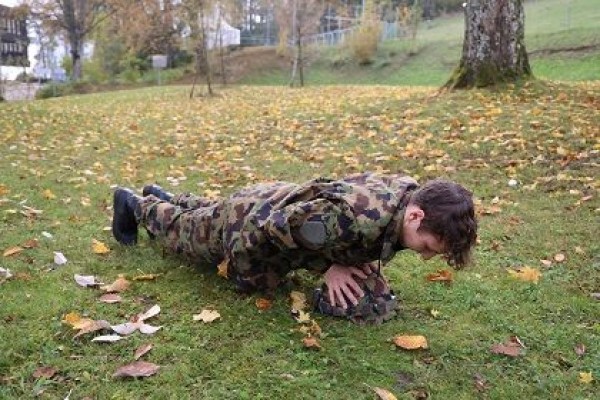
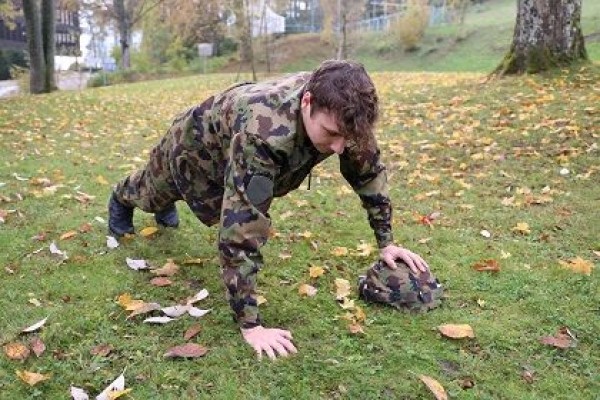
Push-up ► push up
Power
Individual work


Push-up position, one hand on the floor and the other hand supported on a medicine ball/helmet, both hands positioned at about shoulder height, the body practically forming a straight line (the head is held in extension of the spine), bend the arms at the elbow joint, lower the upper body to the ball (lower and raise the upper body) and return to the starting position by stretching the arms. After a few repetitions (or after each exercise), switch sides.
Attention:
Do not arch your back, tense your core.
Lighten:
Just hold the starting position; lower your upper body less (barely bend your arms).
Harder:
Additional weight (on the shoulders); legs on an unstable surface.
Variation:
Push-ups with hand change: roll the ball from one side to the other after each push-up.
1 ball (e.g. medicine or basketball)/helmet
1 weight vest/weight disc/sandbag ► to make the exercise more difficult (additional weight)
1 additional ball/balance cushion/balance board ► to make the exercise more difficult (unstable base)
Push-up ► push up
Power
Individual work


Push-up position with your feet on the balance board (board pointing to the side, T-position), bend and stretch your arms (lower and raise your upper body).
Attention:
Do not arch your back and bend your elbows at an angle of approx. 45° from your upper body ("A" shape with your arms). Keep your shoulders fixed and pull them down towards your hips.
Lighten:
Just hold the push-up position; lower your upper body less (barely bend your arms).
Harder:
Additional weight (on the back); also unstable support for the arms.
Variant:
Vary the position of the hands/arms (e.g.: wide, narrow, together).
1 balance board
1 weight vest/weight disc/sandbag ► to make the exercise more difficult (additional weight)
1 ball/balance cushion/balance board ► to make the exercise more difficult (unstable base)
Push-up ► push up
Power
Individual work
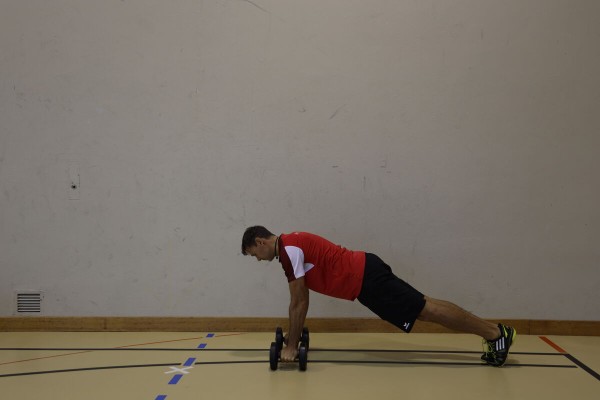
Both hands are supported in a push-up position on a dumbbell each (kettlebell also possible) (backs of hands pointing to the respective side), bend and stretch the arms (lower and raise the upper body).
Attention:
Keep the torso stable and don't let it sag (actively tense the torso muscles).
Lighten:
Place your hands on the floor.
Harden:
More weight; additional weight (on the back).
Variation:
Vary the position of the hands/arms (e.g.: wide, narrow, together).
2 dumbbells/kettlebells
1 weight vest/weight disc/sandbag/fighting backpack ► Make the exercise more difficult (additional weight)
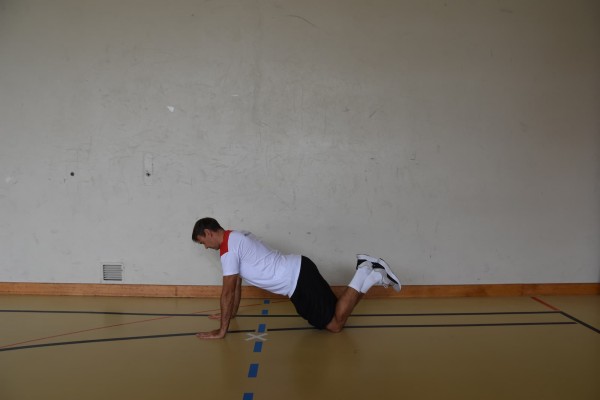
Push-up on knee ► knee push up / kneeling push up (close grip)
Power
Individual work
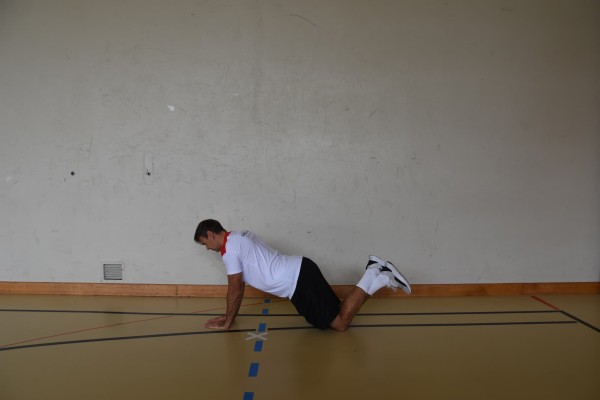
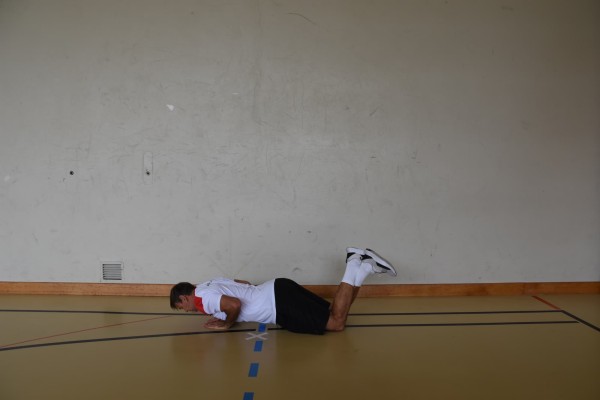
In the knee push-up position (knees on the floor, feet held high with toes raised, body forming a straight line from head to knees, hands together under the chest), bend and stretch the arms (lower and raise the upper body).
Attention:
No hollow back and elbows bent at an angle of approx. 45° from the upper body ("A" shape with the arms). Keep your shoulders fixed and pull them down towards your hips.
Lighten:
Lower your upper body less (hardly bend your arms); support your arms on a raised surface.
Harden:
Additional weight (on the back); unstable support for the arms and/or legs; perform normal push-ups without knee support.
Variant:
Vary the position of the hands/arms (e.g. wide, narrow, together).
1 weight vest/weight disc/sandbag/fighting backpack ► Make the exercise more difficult (additional weight)
1 ball/1-2 balance cushion/balance board ► Make the exercise more difficult (unstable base)
1 raised base ► Make the exercise easier or more difficult (position)
Push-up on knee ► knee push up / kneeling push up (normal grip)
Power
Individual work
In the knee push-up position (knees on the floor, feet held high with toes raised, body forming a straight line from head to knees, hands slightly more than shoulder-width apart under the shoulders), bend and stretch the arms (lower and raise the upper body). In the deep push-up position, the elbows are at the sides of the body (no outward movement of the elbows).
Attention:
No hollow back and elbows bent at an angle of approx. 45° from the upper body ("A" shape with the arms). Keep your shoulders fixed and pull them down towards your hips.
Lighten:
Lower your upper body less (hardly bend your arms); support your arms on a raised surface.
Harden:
Additional weight (on the back); unstable support for the arms and/or legs; perform normal push-ups without knee support.
Variant:
Vary the position of the hands/arms (e.g. wide, narrow, together).
1 weight vest/weight disc/sandbag/fighting backpack ► Make the exercise more difficult (additional weight)
1 ball/1-2 balance cushion/balance board ► Make the exercise more difficult (unstable base)
1 raised base ► Make the exercise easier or more difficult (position)
Push-up on knee ► knee push up / kneeling push up (wide grip)
Power
Individual work
In the knee push-up position (knees on the floor, feet held high with toes raised, body forming a straight line from head to knees, hands placed significantly wider than shoulder width apart), bend and stretch the arms (lower and raise the upper body).
Attention:
No hollow back.
Lighten:
Lower your upper body less (hardly bend your arms); support your arms on a raised surface.
Harden:
Additional weight (on the back); unstable support for the arms and/or legs; perform normal push-ups without knee support.
Variant:
Vary the position of the hands/arms (e.g. wide, narrow, together).
1 weight vest/weight disc/sandbag/fighting backpack ► Make the exercise more difficult (additional weight)
1 ball/1-2 balance cushion/balance board ► Make the exercise more difficult (unstable base)
1 raised base ► Make the exercise easier or more difficult (position)
Push-up with raised buttocks ► pike push up
Power
Individual work


From the push-up position, bring your feet closer to your hands to lift your buttocks, feet on tiptoes, bend and stretch your arms (forehead to the floor and back to the starting position).
Lighten:
Place your knees on the floor; lower your upper body less (barely bend your arms). Place arms on a raised surface.
Make it harder:
Additional weight; unstable surface for the arms/legs; place legs on a raised surface.
Variant:
Vary the position of the hands/arms (e.g.: wide, narrow, together).
1 weight waistcoat ► making the exercise more difficult (additional weight)
1 raised base ► making the exercise easier or more difficult (position)
Push-up with raised buttocks and elevated leg position ► box pike push up
Power
Individual work


The legs are approximately horizontal to the floor, shoulder-width apart on a raised surface (e.g. plyo box, flat bench or vaulting box element incl. top), feet on the toes, outstretched arms are placed on the floor (slightly more than shoulder-width apart) and support the upper body (head between the arms). The buttocks are practically held above the head (straight back almost horizontal to the floor). The hip joint is at a 90 degree angle, so to speak, so that the position of the upper body and legs corresponds to the letter "L". From this position, bend your arms (forehead to the floor) and stretch back to the starting position.
Lighten:
Place your legs on the floor; lower your upper body less (barely bend your arms).
Harden:
Raise your legs additionally.
1 plyo box, flat bench, vaulting box element incl. top
1 additional elements (plyo box, vaulting box) for the raised base ► making the exercise more difficult (position)
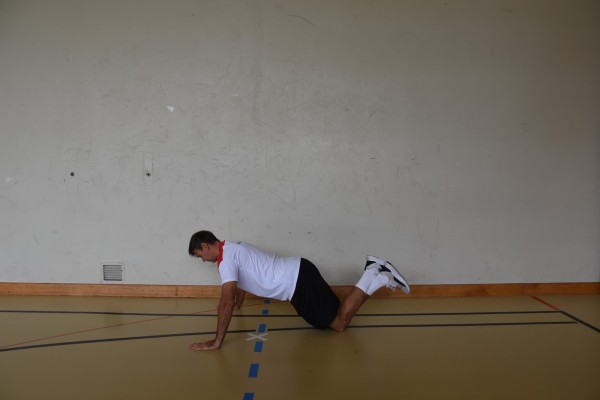
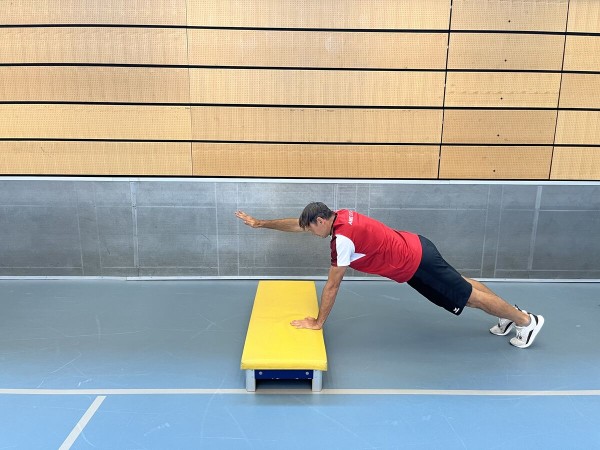
Push-up with lifting one leg ► one leg push up
Power
Individual work
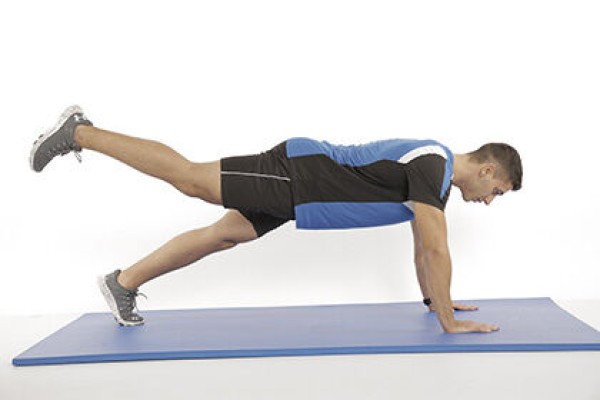

Push-up position (high support, face/look down), alternately raise one leg, lower the upper body at the same time as raising the leg and raise the upper body again when lowering the leg by bending/stretching the arms (push-up). Switch sides (legs) after each exercise.
Attention:
Stay stable (tighten your stomach), elbows bent at an angle of approx. 45° from your upper body ("A" shape with your arms), shoulders fixed and pulled down towards your hips.
Lighten:
Just hold the basic position (push-up position); bend/stretch your arms less.
Harden:
Additional weight (on your back); unstable surface (for your arms).
1 weight vest/weight disc/sandbag ► making the exercise more difficult (additional weight)
1-2 balance cushions/1 balance board ► making the exercise more difficult (unstable surface)
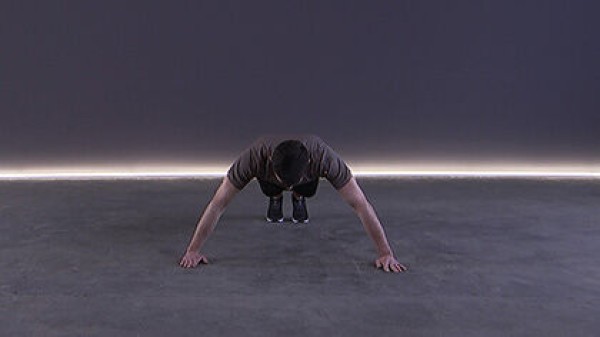
Push-up with wide arm position ► wide push up
Power
Individual work

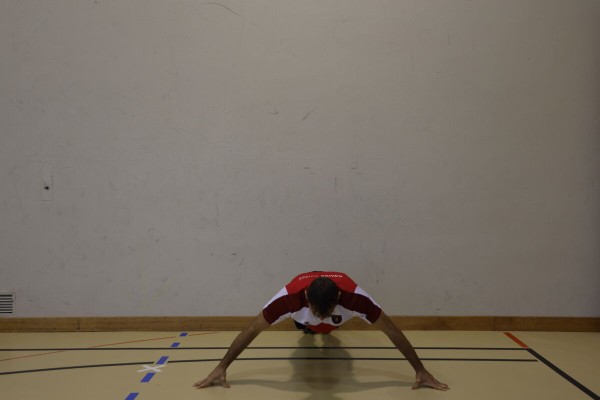
Push-up position with (very) wide arms, arms supported only on the fingers (palms not on the floor), arms bent and stretched (upper body lowered and raised).
Attention:
No hollow back, elbows bent at an angle of approx. 45° from the upper body ("A" shape with the arms). Shoulders are fixed and pressed down towards the hips.
Lighten:
Put your knees on the floor (feet held high); lower your upper body less (arms barely bent).
Harden:
Additional weight (on the back); place the legs on a raised surface; unstable surface for arms and/or legs.
1 weight vest/weight disc/sandbag ► Make the exercise more difficult (additional weight)
1 ball/1-2 balance cushion/balance board ► Make the exercise more difficult (unstable base)
1 raised base ► Make the exercise easier or more difficult (position)
Push-up with wide arm position ► wide push up / wide grip
Power
Individual work

Push-up position with (very) wide arm position, bend and stretch arms (lower and raise upper body).
Attention:
No hollow back, elbows bent at an angle of approx. 45° from the upper body ("A" shape with the arms). Shoulders are fixed and pressed down towards the hips.
Lighten:
Place your knees on the floor (feet held high); lower your upper body less (arms barely bent); support your arms on a raised surface.
Harden:
Additional weight (on the back); place the legs on a raised surface; unstable surface for arms and/or legs.
1 weight vest/weight disc/sandbag ► Make the exercise more difficult (additional weight)
1 ball/1-2 balance cushion/balance board ► Make the exercise more difficult (unstable base)
1 raised base ► Make the exercise easier or more difficult (position)
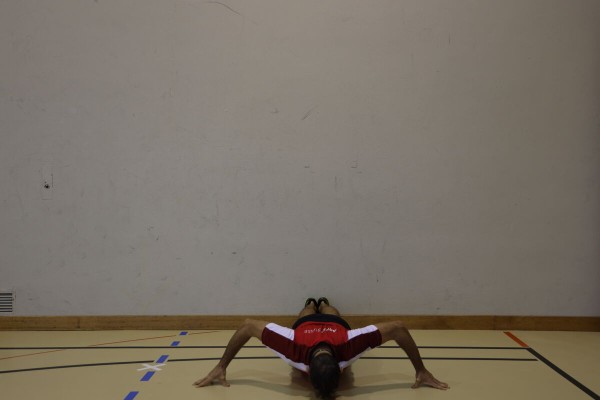
Push-up with close arm position ► diamond push up / close grip
Power
Individual work


Push-up position with narrow arms (the hands can even touch under the body - form hands into a heart-shaped diamond), bend and stretch arms (lower and raise upper body).
Caution:
No hollow back, elbows bent approx. 45° from the upper body ("A" shape with the arms). Shoulders are fixed and pressed down towards the hips.
Lighten:
Place your knees on the floor (feet held high); lower your upper body less (arms barely bent); support your arms on a raised surface.
Lighten:
Additional weight (on your back); place your legs on a raised surface; unstable surface for your arms and/or legs.
1 weight vest/weight disc/sandbag ► Make the exercise more difficult (additional weight)
1 ball/1-2 balance cushion/balance board ► Make the exercise more difficult (unstable base)
1 raised base ► Make the exercise easier or more difficult (position)
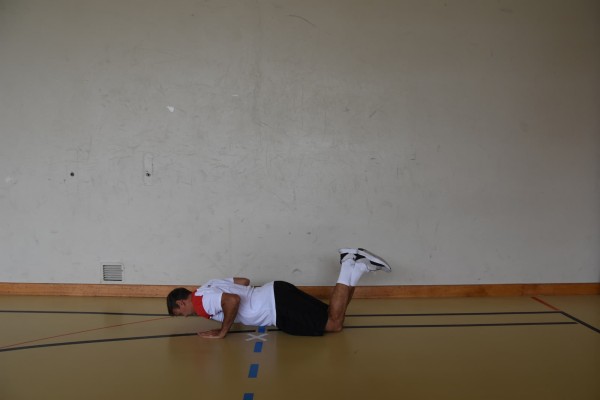
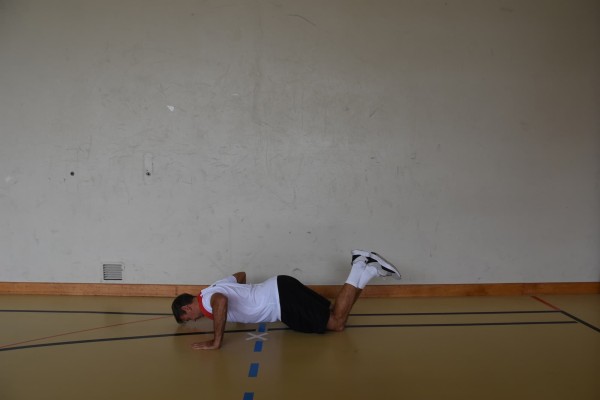
Push-up with one leg bent to the side (salamander) ► lizard push up
Power
Individual work


Push-up position (high support, face/look down), bend one leg as you lower your upper body and bring it to the side of your body (knee to elbow). Switch sides after each exercise.
Caution:
Stay stable (tense your stomach).
Lighten:
Just hold the basic position (push-up position); move your leg less far forwards or barely lower your upper body (bend your arms less).
Lighten:
Additional weight (on your back or legs); unstable surface.
2 weight cuffs/1 weight vest/weight disc/sandbag ► Make the exercise more difficult (additional weight)
1-2 balance cushions/1 balance board ► Make the exercise more difficult (unstable surface)
Push up and step onto an object in push up position ► push up & stair walking push up position
Power
Individual work


Bend and stretch your arms in the push-up position (lower and raise your upper body). In the deep push-up position, place your elbows at the side of your body (do not move your elbows outwards). Back in the push-up position, move your hands onto the top of the vaulting box one after the other and then step down to place your hands on the floor again. Start the exercise combination again, changing the starting position for each movement of the arms.
Attention:
No hollow back, tense torso, elbows bent approx. 45 degrees from the body ("A" shape with the arms), shoulders are fixed and pressed down towards the hips.
Lighten:
Supports in place (possibly raise arms slightly alternately). Alternate raising your arms slightly); replace moving your arms to the top of the box with another exercise, e.g. touching your shoulders crosswise alternately with your hand in a push-up position or stretching your arm forwards.
Harden:
Higher object (e.g. additional swing box element or long bench); additional weight (on the back); unstable surface for the legs.
Variant:
In push-up position on the swing box element or after each push-up, alternately bring the hand crosswise to the shoulder (shoulder tap) or stretch out forwards.
1 vaulting box top
1 additional vaulting box element or 1 long bench ► Make the exercise more difficult (position)
1 weight vest/weight disc/sandbag ► Make the exercise more difficult (additional weight)
1 ball/balance cushion/balance board ► Make the exercise more difficult (unstable base)
Push-up and step onto an object and cross your hand over your shoulder in push-up position ► push up & stair walking and shoulder tap push up position
Power
Individual work


Bend and stretch your arms in the push-up position (lower and raise your upper body). In the deep push-up position, place your elbows at the side of your body (do not move your elbows outwards). Back in the push-up position, move your hands one after the other to the top of the swinging box, alternate between bringing your hand crosswise to your shoulder (shoulder tap) and/or stretching it forwards in the push-up position on the swinging box element. Then step down to place your hands on the floor again. Start the exercise combination again, changing the starting position each time you move your arms.
Attention:
No hollow back, tense torso, elbows bent approx. 45 degrees from the body ("A" shape with the arms), shoulders are fixed and pressed down towards the hips.
Lighten:
Supports in place (possibly raise arms slightly alternately). Alternate raising your arms slightly); replace moving your arms to the top of the box with another exercise, e.g. touching your shoulders alternately with your hand crosswise in a push-up position or stretching your arm forwards.
Harden:
Higher object (e.g. additional swing box element or long bench); additional weight (on the back); unstable surface for the legs.
Variant:
Also perform a push-up on the top of the swing box before or after moving the hand crosswise to the shoulder and/or extending the arms.
1 vaulting box top
1 additional vaulting box element or 1 long bench ► Make the exercise more difficult (position)
1 weight vest/weight disc/sandbag ► Make the exercise more difficult (additional weight)
1 ball/balance cushion/balance board ► Make the exercise more difficult (unstable base)
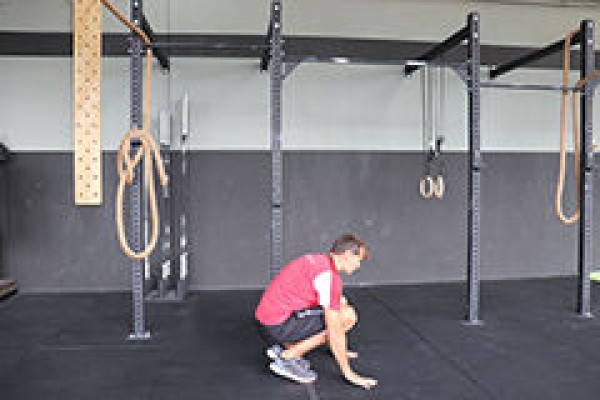
Alternating push-ups and upright stance ► no jump burpee
Power
Individual work

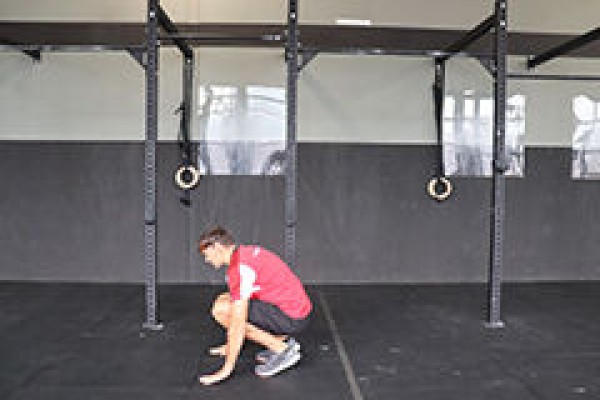


From a standing position, bend your legs and place your hands next to (in front of) your feet to get into a squat position. Support yourself with your hands, jump backwards with both legs to get into the push-up position. Bend your arms to fully lower your upper body (prone position). From the prone position, use both arms to push yourself back into the push-up position and jump back into a squat. From this squatting position, straighten up completely back to standing (push your pelvis forwards, push your chest forwards, push your arms back slightly/press your shoulders back).
Lighten:
Lower intensity between the individual exercises.
Harden:
Additional weight.
2-4 weight cuffs/1 weight waistcoat ► Make the exercise more difficult (additional weight)
Push up and cross hand to shoulder in push up position alternating ► push up & shoulder tap push up positon
Power
Individual work


Push-up position (high support, face/look down), bring one hand crosswise to the shoulder, then perform the same movement with the other hand. Then bend and stretch your arms in the push-up position (lower and raise your upper body) before touching both shoulders alternately again.
Attention:
In the push-up position, your head, torso, hips and knees practically form a line (do not stretch your buttocks upwards or let them sag, tense your stomach). During the push-up, do not arch your back and bend your elbows at an angle of approx. 45° from your upper body ("A" shape with your arms). The shoulders are fixed and pulled down towards the hips.
Lighten:
Just hold the basic position (push-up position); during the push-up, place your knees on the floor or lower your upper body less (barely bend your arms).
Harden:
Additional weight (on your back or arms); unstable surface.
2 weight cuffs/1 weight vest/weight disc/sandbag ► Make the exercise more difficult (additional weight)
1-2 balance cushions/1 balance board ► Make the exercise more difficult (unstable surface)
Push-up and jump up (squat jump) alternating ► burpee tuck jump
Power
Individual work


From a standing position, bend your legs and place your hands next to your feet to get into a squat position. Support yourself with your hands, jump backwards with both legs to get into the push-up position. Bend your arms to fully lower your upper body (prone position). From the prone position, push back into the push-up position with both arms and jump back into a squat position. From this position, push your legs off the floor to jump up (raise your arms horizontally as a swing). During the jump, pull your knees up towards your chest as far as possible (squat jump - bend your arms in front of your body, forearms parallel to the floor, elbows close to your body, palms facing downwards at approximately the level of your navel). Then land in a controlled manner (cushion the jump) to initiate the next repetition (prone position/lying down) by bending the legs.
Attention:
Keep your back straight when jumping up, cushion the landing, keep your whole foot firmly on the ground without bending your knees while your legs are in contact with the floor and keep your knees behind your toes. The palms of the hands touch the knees with every jump. No hollow back in the push-up position (body tension).
Lighten:
Lower intensity between the individual exercises; smaller/less intense jumps, knees pulled up less far; in the squat position, only jump backwards and back again with the legs (without prone position/push-up).
Harden:
Additional weight; soft surface.
2-4 weight cuffs/1 weight waistcoat ► making the exercise more difficult (additional weight)
1 soft mat small/large ► making the exercise more difficult (base)