Exercises (1633)
Lateral lowering and raising of the legs in supine position alternating ► twisting windmill / wipers / windshield wipers
Power
Individual work


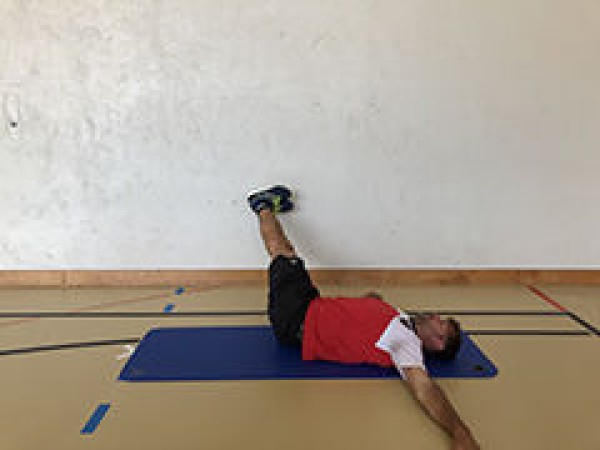
Lie on your back with your arms stretched out on the floor at shoulder height. Keep your legs together and stretched out in an upright position (pointing forwards diagonally upwards), tilt your legs alternately to the left and right side (keep your legs stretched out).
Attention:
Do not put your legs down completely, keep your back in constant contact with the floor (consciously tense your abdomen, possibly place your hands under your back to control the position).
Lighten:
Bend your legs (the closer your knees are to your body, the easier it is); lower your legs less.
Harden:
Additional weight on, between or on top of your legs.
2 weight cuffs/1 weight disc/(medicine) ball/sandbag ► Make the exercise more difficult (additional weight)
Jumping over an object from the side
Power
Individual work


Bipedal sideways jumps from one side of the long bench to the other.
Attention:
Keep your upper body upright.
Lighten:
Jump over a line (lower jump height); lower cadence.
Harden:
Jump over a wider element (upper part of the vault box); jump over a higher element (turn vault box element on its side); jump over a wider and higher element (2 vault box elements including upper part); higher cadence; additional weight (on the feet).
Variant:
Land and jump off with the outer leg only.
1 long bench
1-2 vaulting box elements (possibly incl. top section) ► Make the exercise more difficult
2 weight cuffs/1 weight waistcoat ► Make the exercise more difficult (additional weight)
Jumping over an object from the side with the upper body supported
Power
Individual work


Support your upper body with your arms on the long bench/swinging box top. Jump from one side of the long bench/swinging box top to the other with both legs.
Lighten:
Deeper cadence (pauses between jumps).
Harden:
Higher cadence; additional weight (on the legs); jump over a higher element (additional vaulting box element).
Variant:
Land and jump off with the outer leg only.
1 long bench or vaulting box top
1 vaulting box element ► Make the exercise more difficult (position)
2 weight cuffs/1 weight waistcoat ► Make the exercise more difficult (additional weight)
Raising and lowering the arms sideways and frontally while standing ► lateral raise / front raise
Power
Individual work
Stand upright with both feet on the resistance band. Hold the ends of the band with your hands. First, lift your arms sideways with slightly bent elbows up to shoulder height, then lower them slowly and with control. Next, lift your arms forward to shoulder height and lower them again in a controlled manner. Perform the movements alternately.
Attention:
Have a straight back (possibly back against a wall), actively tense your torso. Back against a wall), actively tense your torso, do not let your arms sag completely (maintain tension).
Lighten:
Use a lighter band; reduce the range of motion.
Harden:
Use a stronger band; perform the movement more slowly or hold briefly at the top.
2 elastic band
Side support (left)
Power
Individual work


Side support on the (left) outstretched arm with the legs in the foot supports (crossed, upper leg in front). Support your upper (right) arm on your hip or extend it vertically upwards, lift your pelvis off the floor and hold the position.
Attention:
Keep your body tensed, don't let your hips sag, keep your back straight and your arm under your shoulder.
Harden:
The further away your head is from the attachment point, the more challenging the exercise becomes.
Variant I:
Lift and lower your pelvis.
Variant II:
Alternately bring your upper arm under your body and stretch it upwards, accompanying the movement with your head.
1 sling trainer
Side support (left) ► high side plank
Power
Individual work

Side plank on your outstretched (left) arm (high side plank), with your hand positioned directly beneath your shoulder; keep your wrist, elbow and shoulder in a straight line, with your legs either crossed or slightly offset. Lift your body until your head, torso and legs also form a straight line. Extend your free arm upwards or rest it on your hip. Maintain the tension and continue to breathe calmly.
Attention:
Hand positioned under the shoulder (otherwise excessive strain on the shoulder joint), elbow not bent (instability in the arm), pelvis does not sag or tilt backwards, shoulder ‘sags’ (lack of active stabilisation), too much pressure on the wrist (incorrect weight distribution), head not in a neutral position.
Lighten:
Lower knee on the floor (shorter lever); feet staggered rather than one on top of the other; hand on a slightly raised surface (e.g. step).
Harden:
Lift your top leg; shift your weight onto your hip; one-legged variation; unstable surface (e.g. balance pad).
1 weight vest/weight disc/sandbag ► make the exercise more difficult (additional weight)
1 ball/1-2 balance cushions/1 balance board ► make the exercise more difficult (unstable surface)
Lateral support (right)
Power
Individual work


Side support on the (right) outstretched arm with the legs in the foot supports (crossed over, upper leg in front). Rest your upper (left) arm on your hip or extend it vertically upwards, lift your pelvis off the floor and hold the position.
Attention:
Keep your body tensed, do not let your hips sag, keep your back straight and your arm under your shoulder.
Harden:
The further away your head is from the attachment point, the more challenging the exercise becomes.
Variant I:
Lift and lower your pelvis.
Variant II:
Alternately bring your upper arm under your body and stretch it upwards, accompanying the movement with your head.
1 sling trainer
Lateral support (right) ► high side plank
Power
Individual work

Side plank on your outstretched (right) arm (high side plank), with your hand positioned directly beneath your shoulder; keep your wrist, elbow and shoulder in a straight line, with your legs either crossed or slightly offset. Lift your body until your head, torso and legs also form a straight line. Extend your free arm upwards or rest it on your hip. Maintain the tension and continue to breathe calmly.
Attention:
Hand positioned under the shoulder (otherwise excessive strain on the shoulder joint), elbow not bent (instability in the arm), pelvis does not sag or tilt backwards, shoulder ‘sags’ (lack of active stabilisation), too much pressure on the wrist (incorrect weight distribution), head not in a neutral position.
Lighten:
Lower knee on the floor (shorter lever); feet staggered rather than one on top of the other; hand on a slightly raised surface (e.g. step).
1 weight vest/weight disc/sandbag ► make the exercise more difficult (additional weight)
1 ball/1-2 balance cushions/1 balance board ► make the exercise more difficult (unstable surface)
Lowering the shoulders on a slope (active slope) ► active hang
Power
Individual work

Hold on to the horizontal bar in a hanging position (full body extension, arms stretched out overhead in a high position - passive hang) (the position can be assumed with the help of a bench or a chair), the hands grasp the bar with an overhand grip (palms facing backwards), the arms are positioned shoulder-width apart. Switch from the passive to the active hang by pulling the shoulders downwards while the elbows remain stable. Hold the position for as long as possible. After the exercise, slowly place your feet back on the chair or bench before releasing your hands from the bar or dropping to the floor to stand.
Attention:
Let your upper body hang still (no swinging; tense your core muscles); arms are fully extended (no bending of the elbows); do not deliberately point your chest upwards, but try to work only in the vertical plane by pulling your shoulders downwards.
Lighten:
Do the exercise for a shorter period of time; use the elastic band as support (place one or both feet on the band).
Harden:
Additional weight.
Variant I:
Knee bent.
Variant II:
Grab the bar with a neutral grip or underhand grip (palm facing your face).
1 horizontal bar
1 elasticated rubber band ► Make the exercise easier (support)
2 weight cuffs/1 weight waistcoat ► Make the exercise more difficult (additional weight)
Lowering the upper body in the seat
Power
Individual work


Sit upright on the Swedish box (or a long bench) with your arms folded across your chest. Lean your upper body backwards and hold the position.
Attention:
Straight back.
Lighten:
Lean your upper body less far backwards; keep your arms in front of you.
Harden:
Place your arms at an angle next to your head or even hold them up; keep additional weight on your chest.
Variant:
Change the distance between your feet and your buttocks.
2-3 vaulting box elements (incl. top section) or 1 long bench
1 weight vest/weight disc/dumbbell/sandbag ► Make the exercise more difficult (additional weight)
Lowering and raising the arms while standing
Power
Individual work


When standing, hold the bar with your hands shoulder-width apart. Keeping your arms almost outstretched, bring them down towards your thighs and back to the starting position.
Starting position:
- Stand shoulder-width apart, knees (slightly) bent
- Leg and gluteal muscles tensed
- Arms held almost straight up, hands grasping the bar with an overhand grip
Finishing position:
- Bar (almost) touching your thighs
- Arms still almost straight
Attention:
Keep your back straight throughout the exercise. The movement only comes from the shoulders, not the upper body
1 weight tower/machine ► Cable pulley (high)
Lowering and raising the arms in supine position
Power
Individual work
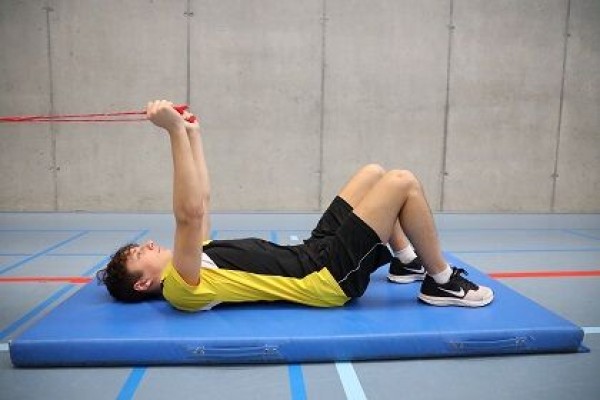
Lie on your back (head on the wall bars/tree) with your legs up and arms stretched vertically upwards. Attach the elastic band to the wall bars/tree at hand height and grasp the elastic band with your hands. Stretch your arms towards your knees and back to the starting position, with the movement only taking place in the shoulder joint.
Attention:
The upper body always remains flat on the floor.
Lighten:
Select a rubber band with less resistance.
Harden:
Select a rubber band with greater resistance.
Variation:
Pass both arms alternately left and right past the knees.
1 elasticated rubber band
1 wall bar/tree
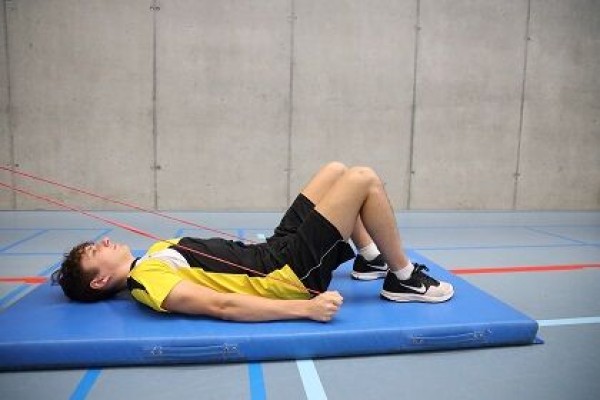
Lowering and raising the arms in supine position
Power
Individual work


While lying on your back on the flat bench, hold the dumbbells in a neutral grip with your arms almost straight above your collarbone. With your elbows slightly bent, move the weights evenly outwards and downwards in an arc. When the dumbbells are at head height, pause briefly before pushing the weights up again.
Starting position:
- Lie on your back on the flat bench
- Arms (almost) stretched out in a high position, grasp dumbbells in a neutral grip
- Avoid a hollow back position (tense your torso)
- Legs are either bent in a high position or placed on the floor or flat bench
- The dumbbells are held in a neutral position.
Final position:
- Dumbbells are lowered in a parallel arc to head height (arms practically form a line)
Variant:
The exercise can also be performed on an incline bench. The bench should be set at an angle of around 45 degrees. The movement idea remains the same.
1 flat bench
2 dumbbells
Lowering and raising the legs in supine position ► leg raise
Power
Partner work
1 trainee & 1 helper ► Note change of position
(= double the time required; for lesson planner see Organisation Kraft: Info button Execution)

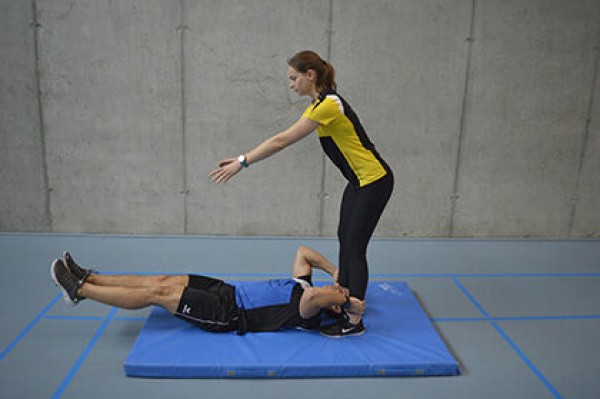
Trainee: Hold the legs of the standing partner in a supine position. Extend the legs vertically upwards and when the partner wants to push the legs towards the floor, hold against them/brake the downward movement so that the legs never touch the floor.
Partner: Hold the trainee's legs in a high position and push them towards the floor.
Attention:
Always listen to/respond to your partner (adjust pressure/intensity). Keep your back in constant contact with the floor (no hollow back, consciously tense your stomach), do not put your legs down, keep your legs as straight as possible.
Lighten:
Just hold the position (legs stretched out in extension of the upper body), raise and lower your legs without additional impulse from your partner.
Harden:
Increased impulse from the partner; additional weight for the legs.
Variant:
The partner pushes the legs not only straight towards the floor but also to the side (direction known to the exerciser or arbitrarily defined by the partner).
2 weight cuffs/ 1 (weighted) ball ► Make the exercise more difficult
Lowering and raising the upper body while kneeling
Power
Individual work


Kneeling (buttocks not resting on your heels, right angle at the knees), support your upper body with your hands on the exercise ball. Roll the exercise ball forwards and back to the starting position and move your upper body with it.
Attention:
Do not fall into a hollow back (actively tense your torso).
Lighten:
Roll the ball less forwards.
Harden:
Lift your knees.
1 exercise ball
Lowering and raising the upper body while kneeling
Power
Partner work
1 trainee & 1 helper ► Note change of position
(= double the time required; for lesson planner see Organisation Kraft: Info button Execution)

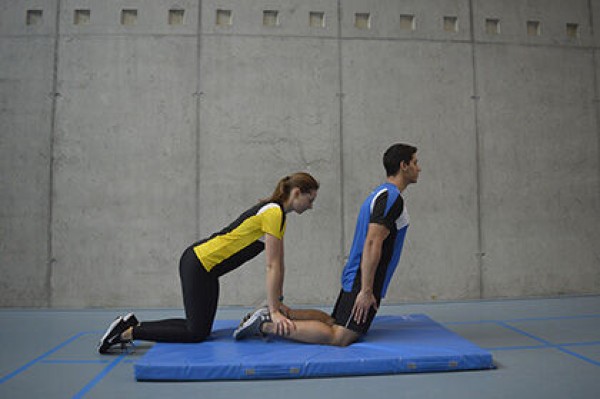
Exerciser: Kneeling with the upper body upright (approx. 90 degrees at the knee joint, no sitting on the heels) and arms folded across the chest. Tilt your upper body forwards as far as possible and straighten up again (movement in the knee joint).
Partner: Hold the legs of the active participant.
Attention:
Straight back.
Lighten:
Just hold the position (the more upright the position, the easier); arms point backwards to the side of the body.
Harden:
Place your arms at an angle next to your head or hold them up; hold additional weight (on your chest).
Variant:
Slowly tilt your upper body forwards as far as possible until you support any fall with your hands.
1 weight disc ► Make the exercise more difficult (additional weight)
Lowering and raising the upper body while kneeling ► Abdominal crunch
Power
Individual work


Stand on your knees with your upper body slightly bent forward in front of the high cable pulley (both positions are possible: facing towards or away from the cable pulley). Build up strength in your core and curl your upper body in a controlled manner. When raising the upper body, work slowly and in a controlled manner until the back is stretched out again.
Starting position:
- Kneel, upper body slightly bent forward
- Hold the cable pulley at head height with both hands and bent arms
Finishing position:
- Pull your elbows and head towards your knees
- Roll up your upper body
Attention:
Do not work with momentum. Only work with as much weight as you can control. It is best to train the technique without weight first. Keep your core tensed the whole time and don't fall into a hollow back.
1 weight tower/machine ► Cable pulley (high)
Lowering and raising the upper body while kneeling ► ghd glute ham raise
Power
Individual work


In a kneeling position on the back of the padding with the upper body upright, fix the feet in the holder (feet pointing downwards), hold the arms on the chest or cross them, tense the abdominal muscles, do not overstretch the spine (straight back). Lower your upper body until it is parallel to the floor (horizontal). To lower, push your knees behind the pad. Depending on the training level, the upper body can also be lowered less far or even lower. Once you have reached the end position (with legs straight), bend your legs and tense your gluteal muscles to return to the starting position on your knees.
Attention:
Keep your back straight (tense your core).
Lighten:
Lower your upper body less (not all the way to horizontal); training partner for support.
Harden:
Lower your upper body beyond horizontal; additional weight (on your chest).
1 glute-ham developer (GHD)
1 weight disc ► to make the exercise more difficult (additional weight)
Lowering and raising the upper body in the seat
Power
Individual work


Sit upright on the Swedish box (or a long bench) with your arms folded across your chest. Lower your upper body backwards and straighten up (do not fully return to the starting position).
Attention:
Straight back, constant tension in the abdominal muscles, head in a neutral position (no double chin).
Lighten:
Lean your upper body less far back; keep your arms forward.
Harden:
Place your arms at an angle next to your head or even hold them up; keep additional weight on your chest.
Variant:
Change the distance between your feet and buttocks.
2-3 vaulting box elements (incl. top section) or 1 long bench
1 weight vest/weight disc/dumbbell/sandbag ► Make the exercise more difficult (additional weight)
Lowering and raising the upper body in the seat
Power
Individual work


Sit on the Swedish box (or a long bench) with your arms folded across your chest. Bend your upper body forwards and return to the starting position.
Attention:
Start stretching consciously in the lower back and try to stretch vertebra by vertebra, rolling back in from the head.
Lighten:
Support your arms on the top of the swinging box.
Harden:
Bend your arms next to your head (hands on your neck) or hold them up; keep additional weight on your chest.
2-3 vaulting box elements (incl. top section) or 1 long bench
1 weight disc/dumbbell/sandbag ► Make the exercise more difficult (additional weight)
Lowering and raising the upper body while seated ► Abdominal crunch
Power
Individual work
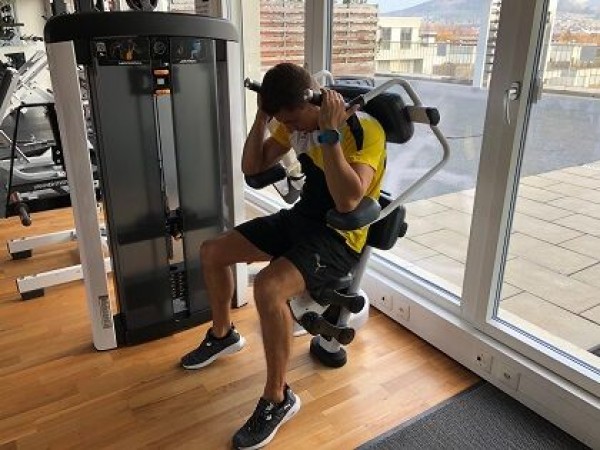

Grab the handles behind your head and position your elbows on the cushions, tense your core muscles and pull your upper body down towards your legs, then raise your upper body back up to the starting position.
Starting position:
- Sitting with the upper body slightly overstretched
- Grasp the handles with your hands behind your head
- Rest your elbows on the cushion
Finishing position:
- Grip unchanged
- Bring your upper body closer to your legs
Attention:
Work from the core muscles, which means that you should not pull with your hands or push with your elbows.
Lowering and raising the upper body in the seat ► back extension / lower back
Power
Individual work


Place the shoulder blades on the cushion, push the upper body backwards from the forward-leaning position against the resistance while sitting, using the thigh and buttock muscles to support the lower back.
Starting position:
- Sitting with the upper body leaning forwards
- Straight back stretched out
Finishing position:
- Upright posture or upper body leaning backwards
- Position of the back unchanged
Lowering and raising the upper body while standing
Power
Individual work


Stand upright, shoulder-width apart with your feet in the loops. Hold the gymnastics pole with outstretched arms in an overhand grip slightly wider than hip-width in front of your body (back of hands pointing forwards), tilt your upper body forwards with a straight back and bend your knees slightly. Stretch your legs and straighten your upper body again to return to the starting position.
Attention:
The movement takes place in the hip joint, move the gymnastics bar close to your body, keep your back straight.
Lighten:
Choose less strong elastic bands; roll up the elastic bands less.
Harden:
Choose stronger elastic bands; roll up the elastic bands more.
Variation:
Hold the gymnastics bar on your shoulders behind your head (longer lever).
1 gymnastic bar with elasticated straps
Lowering and raising the upper body while standing
Power
Individual work


Stand with your feet shoulder-width apart and hold the gymnastics pole on your shoulders behind your head. Your feet are in the loops, your knees are slightly bent and your upper body is leaning forwards with a straight back. Bend your upper body and roll back up to the starting position.
Attention:
The pelvis remains stable and should not move, so try to straighten your upper body vertebra by vertebra.
Lighten:
Choose less strong elastic bands; roll up the elastic bands less.
Harden:
Choose stronger elastic bands; roll up the elastic bands more.
Variation:
Hold the gymnastics bar at knee height with outstretched arms instead of on your shoulders.
1 gymnastic bar with elasticated straps
Lowering and raising the upper body while standing
Power
Individual work


Stand upright, shoulder-width apart, hold a dumbbell/kettlebell in each hand in front of your body at hip height (backs of hands pointing forwards), tilt your upper body forwards with a straight back and move the weight towards your shins. Lower the weight as far as you can keep your back straight before raising your upper body back to the starting position.
Attention:
The movement takes place in the hip joint, move the weight close to the body, keep your back straight.
Lighten:
Less weight or no weight at all.
Harden:
More weight.
2 dumbbells/kettlebells