Exercises (2330)
Single-leg squat (right) ► pistol squat
Power
Individual work

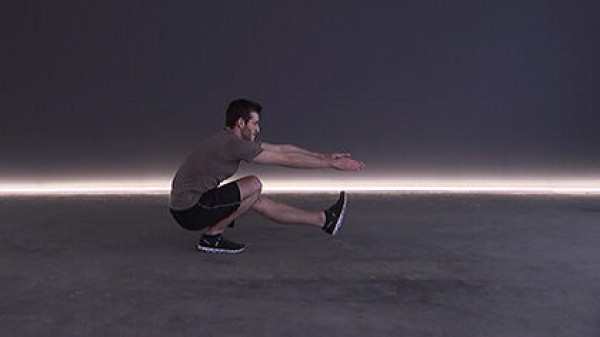
Stand on one leg, arms hanging, supported on the hips, folded across the chest or in front, bend the supporting leg (right) to approximately a right angle at the knee joint (buttocks at knee height), at the same time lift the free leg off the floor and move it forwards as straight as possible (horizontal to the floor). Then stretch the training leg (right) and return the free leg (left) to the starting position in the one-legged stance. When bending the leg, the arms can be brought forwards so that they can support the movement when standing up by bringing them back to the body (work with momentum if necessary).
Attention:
Lower the upper body as upright as possible (no tilting forwards or backwards), keep the knee of the supporting leg behind the tip of the foot for as long as possible.
Lighten:
Bend the supporting leg less (greater angle in the knee); bend the free leg; arms support the movement (momentum).
Harden:
Bend the supporting leg more (smaller angle in the knee), additional weight (on the shoulders, in front of the chest, with hanging arms or in front).
1 weight vest/weight disc/(medicine) ball/sandbag/fighting backpack/2 dumbbells ► Make the exercise more difficult (additional weight)
Single-leg squat (right) ► pistol to low box
Power
Individual work

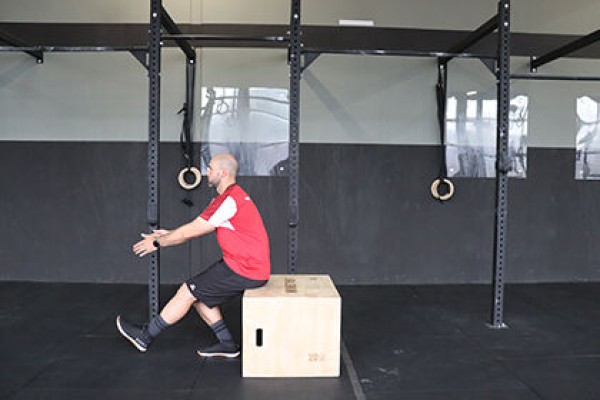
Stand shoulder-width apart in front of a raised surface (e.g. plyo box, flat bench or vaulting box element incl. top), heels/calves practically resting on the raised surface, arms hanging, supported on the hips, crossed on the chest or in front, bend the supporting leg (right) towards the seat on the raised surface, the free leg (left) pointing downwards as straight as possible (lifted off the floor). Then straighten the supporting leg to return to the starting position in the standing position (at the same time bring the free leg back next to the supporting leg). When bending the leg, the arms can be brought forwards so that they can support the movement when standing up by bringing them back to the body (work with momentum if necessary).
Attention:
Lower the upper body as upright as possible (no tilting forwards or backwards); keep the knee of the training leg as centred as possible over the foot.
Lighten:
Higher base to reduce the need to bend the supporting leg (greater angle in the knee); bend the free leg; arms support the movement (momentum).
Harden:
Lower base to bend the supporting leg more (smaller angle in the knee), additional weight (on the shoulders, in front of the chest, with hanging arms or in front); perform the exercise without a base to sit on.
1 plyo box, flat bench, vaulting box element incl. top
1 additional vaulting box element ► Make the exercise easier
1 weight vest/weight disc/(medicine) ball/sandbag/fighting backpack/2 dumbbells ► Make the exercise more difficult (additional weight)
Single-leg squat (right) ► rear foot elevated split squat / rear foot elevated split lunge
Power
Individual work


Stand upright on one leg (right) facing away from the exercise ball, the other (left) leg is bent with the foot resting on the exercise ball, bend the standing leg to approximately a right angle in the knee joint and stretch back to the starting position.
Attention:
Keep the weight centred over the foot, upper body remains upright.
Lighten:
Lower the upper body less (greater angle in the knee joint).
Harden:
Additional weight (on the shoulders, in front or with arms hanging in the hands); unstable support for the supporting leg.
1 exercise ball
1 weight ball/weight vest/weight disc/sandbag/medicine ball/2 dumbbells ► make the exercise more difficult (additional weight)
1 ball/balance cushion/balance board ► make the exercise more difficult (unstable surface)
Single-leg squat (right) ► rear foot elevated split squat / rear foot elevated split lunge
Power
Individual work


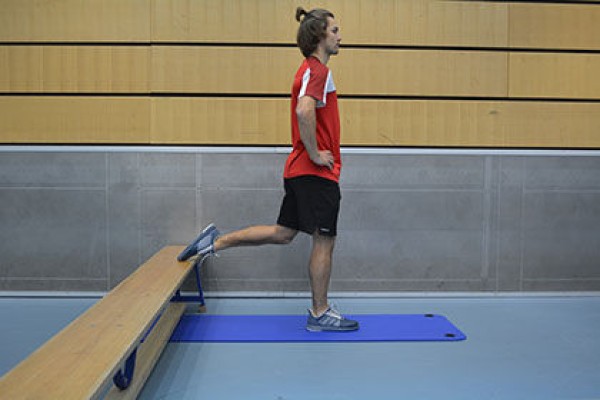
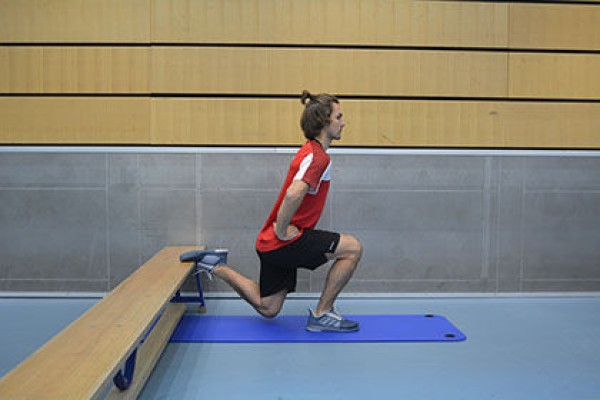
Single-leg stand on the right (back facing the wall bars/long bench or swinging box), arms supported on the hips, free leg (left) hooked onto the wall bars/swinging box at hip height or supported on the long bench, bend the front leg (right) approximately to a right angle at the knee joint (buttocks approximately at knee height) and stretch back to the starting position.
Attention:
Keep the weight centred over the foot. Lower your body in the centre (like a plumb line towards the back knee, keep your upper body upright, tense your abdomen).
Lighten:
Reduce the distance between your standing leg and the support; lower your upper body less (greater angle in the front knee).
Harden:
Increase the distance between the standing leg and the support; additional weight (on the shoulders, with hanging arms or in a forward or upright position); unstable support for the standing leg.
1 vaulting box/long bench or wall bars
1 weight vest/weight disc/(medicine) ball/barbell/sandbag/2 dumbbells ► Make the exercise more difficult (additional weight)
1 softball/balance cushion ► Make the exercise more difficult (unstable surface)
Single-leg squat (right) ► rear foot elevated split squat / rear foot elevated split lunge
Power
Individual work


Progression I:
Adjust the sling trainer to the length of the centre of the lower leg (when standing), stand on one leg approx. 1m in front of the attachment point, bend the lower leg of the free (left) leg and fix the foot in the foot loop, bend the knee with the (right) standing leg (approximately right angle in the knee), simultaneously move the other (left) leg back, move the opposite arm of the standing leg forwards when lowering the upper body, stretch the (right) standing leg back to the starting position.
Progression II:
Analogue to progression I, but with a vertical jump upwards at the end of the straightening phase.
Attention:
Do not allow the knee to move sideways (keep it in line).
Harden:
The further the supporting leg is moved forwards from the attachment point, the more challenging the exercise becomes.
1 sling trainer
Single-leg squat (right) ► rear foot elevated split squat / rear foot elevated split lunge
Power
Individual work
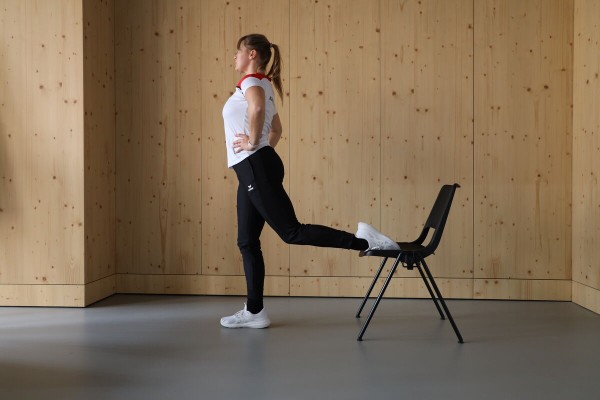
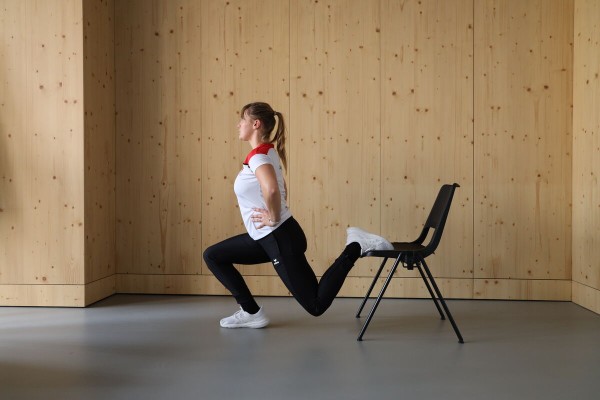
Stand on one leg on the right (back facing the chair), arms supported on the hips, free leg (left) placed on the seat, bend the front leg (right) approximately to a right angle at the knee joint (buttocks at about knee height) and stretch back to the starting position.
Attention:
Keep the weight centred over the foot. Lower your body in the centre (like a plumb line towards the back knee, keep your upper body upright and tense your abdomen)
1 (office) chair
Single-leg squat (right) ► rear foot elevated split squat / rear foot elevated split lunge
Power
Individual work


In a one-legged stance, place your free foot on the (flat) bench at an angle and hold the weights in your hands with your arms hanging down. Bend the front leg (right - standing leg) to approximately a right angle in the knee joint (buttocks at about knee height) and push up strongly from the buttock and thigh muscles back to the starting position in the one-legged stance.
Starting position:
- Stand on one leg, free (back) leg bent and supported on the bench
- Torso under tension
- Hold weights in your hands with arms hanging down
Finishing position:
- Standing leg bent (approximately right angle in the knee joint)
- Upper body upright, back straight
- Knee of the supported leg close to the floor (smaller angle in the knee joint)
2 dumbbells/kettlebells
Single-leg squat (right) ► rear foot elevated split squat / rear foot elevated split lunge
Power
Individual work
Stand on one leg on the right (back facing the wall bars/long bench/plyo box or swing box), arms supported on the hips, free leg (left) hooked onto the wall bars/swing box at knee height or supported on the long bench/plyo box, bend the front leg (right) approximately to a right angle at the knee joint (buttocks approximately at knee height) and stretch back to the starting position. When stretching the supporting leg, a small jump upwards is integrated into the exercise.
Attention:
Keep the weight in the centre of the foot. Lower the body in the centre (like a plumb line towards the back knee, upper body remains upright, tense abdomen).
Lighten:
Lower the upper body less (greater angle in the front knee); no jumps with the supporting leg.
Harden:
Additional weight (on the shoulders, with hanging arms or in a forward or upward position).
1 vaulting box/bar wall or long bench/plyo box
1 weight vest/weight disc/(medicine) ball/barbell/sandbag/2 dumbbells ► Make the exercise more difficult (additional weight)
Single-leg squat (right) ► rear foot elevated split squat / rear foot elevated split lunge
Power
Individual work
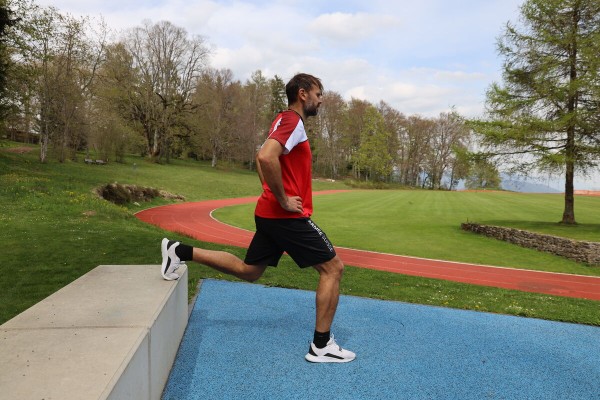
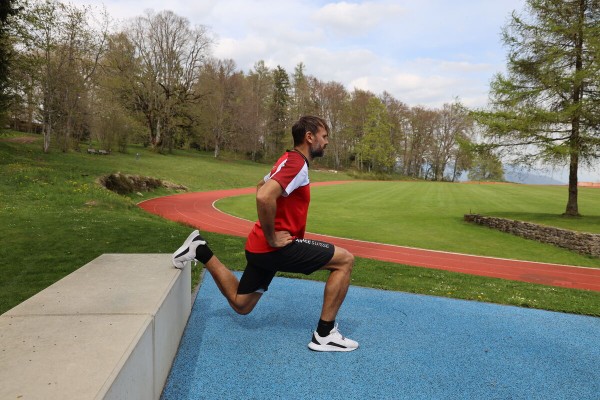
Stand on one leg on the right (back facing the elevation in the form of a plyo box, bench, stairs or similar), arms supported on the hips, free leg (left) supported on the elevation at knee height, bend the front leg (right) approximately to a right angle at the knee joint (buttocks approximately at knee height) and stretch back to the starting position.
Attention:
Keep the weight centred over the foot. Lower your body in the centre (like a plumb line towards the back knee, upper body remains upright, tense your stomach).
Lighten:
Lower your upper body less (greater angle in the front knee).
Harden:
Additional weight (on the shoulders, with hanging arms or in a forward or upright position). When stretching the supporting leg, a small jump into the air is integrated into the exercise
1 vaulting box/bar wall or long bench/plyo box
1 weight vest/weight disc/(medicine) ball/barbell/sandbag/2 dumbbells ► Make the exercise more difficult (additional weight)
One-legged squat (right) ► rig supported pistol squat
Power
Individual work


Stand upright in front of a horizontal bar, with your hands clasping the post at about chest height. Lift one foot off the floor to stand on one leg (right). Bend the standing leg (right) to approximately a right angle at the knee joint (buttocks at knee height) and at the same time extend the free leg forwards as far as possible (horizontally to the floor). Then straighten the training leg (right) again and return the free leg (left) to the starting position in an upright position. The position of the hands remains unchanged throughout the exercise, allowing you to support the one-legged squat with your arms.
Attention:
Lower your upper body as upright as possible (no tilting forwards or backwards), buttocks backwards, not knees forwards. Keep your back straight at all times (keep your torso tensed), distribute your weight over your entire foot.
Lighten:
Bend your supporting leg less (greater knee angle); bend your free leg.
Harden:
Less (or no) arm support.
1 horizontal bar
Single-leg squat (right) ► split squat / split lunge
Power
Individual work


Lunge (right leg in front, upper body upright), arms supported on the hips, crossed on the chest or in front, bend the front (and back) leg to a right angle and stretch back to the starting position (lower and raise the upper body).
Attention:
Keep the weight centred over the foot. Lower your body in the centre (follow the back knee like a plumb line, keep your upper body upright, tense your stomach).
Lighten:
Lower your upper body less (greater angle in the knees).
Harden:
Additional weight (on the shoulders, with hanging arms or in a forward or upright position); unstable base to support the front leg.
1 weight vest/weight disc/(medicine) ball/barbell/sandbag/fighting backpack/2 dumbbells ► Make the exercise more difficult (additional weight)
1 ball/balance cushion/balance board ► Make the exercise more difficult (unstable surface)
Single-leg squat (right) ► split squat / split lunge
Power
Individual work


In a lunge with your legs almost straight (right side in front), rest the barbell on your upper back. Bend the front (right) leg, lowering the hips so low that the back knee almost touches the floor (both legs at right angles, so to speak). Then push the front (right) leg backwards to return to the standing position.
Starting position:
- Lunge with legs almost straight
- Feet pointing forwards
- Barbell placed on upper back, grasp barbell wide in overhand grip
- Look straight ahead (always) in neutral position
Finishing position:
- The front knee is bent at a right angle directly over the heel
- Rear knee almost touches the floor
- Upper body remains upright
Attention:
Keep the weight centred over the foot.
Variant:
Replace the barbell with dumbbells/kettlebells, which are held next to the body with arms outstretched.
1 barbell
2 dumbbells/kettlebells ► Variation of the exercise
Single-leg squat (right) ► split squat / split lunge
Power
Individual work

Hold the long bench suspended from the wall bars/swinging box with your arms bent in front of your chest, lunge (right), keep your upper body upright, bend your front (right) leg to approximately a right angle and stretch it back to the starting position. Lower the body in the centre like a plumb line, following the back knee.
Attention:
Keep the weight in the centre above the foot. Lower your body in the centre (like a plumb line towards the back knee, keep your upper body upright, tighten your stomach).
Lighten:
Lower your upper body less (greater angle in the knees).
Harden:
Additional weight (e.g. place a weight plate on the bench; or a partner sits at the other end of the long bench); unstable support for the front leg.
1 wall bars/swinging box
1 long bench
1 weight disc/sandbag ► to make the exercise more difficult (additional weight on the long bench)
1 balance board/balance cushion ► to make the exercise more difficult (unstable base)
Single-leg squat (right) ► split squat / split lunge
Power
Individual work


In a lunge with your legs almost straight (right side in front), hold the weight (dumbbell or kettlebell) with your arm hanging in your hand on the opposite side of your standing leg (left). Bend the front (right) leg, lowering the hips so low that the back knee almost touches the floor (both legs at right angles, so to speak). Then push the front (right) leg backwards to return to the standing position.
Starting position:
- Lunge with legs almost straight
- Feet pointing forwards
- Grasp weight with hanging arm (opposite side of front leg)
- Look (always) straight ahead in a neutral position
Finishing position:
- The front knee is bent at a right angle directly over the heel
- The back knee almost touches the floor
- The upper body remains upright
Variant:
Hold an additional weight in both hands.
1-2 dumbbell(s)/kettlebell(s)
Single-leg squat (right) ► wall assisted pistol squat
Power
Individual work


Press the exercise ball with your back against a wall, stand upright on one leg (right) with your foot in front of your centre of gravity, raise your other leg (left) slightly at an angle, bend your standing leg to approximately a right angle in the knee joints and stretch it back to the starting position.
Attention:
Always keep the knee of the training leg behind the tip of the foot and centrally above the foot.
Lighten:
Lower the buttocks less (greater angle in the knee joint).
Harden:
Additional weight (on the shoulders, in front or with hanging arms in the hands); unstable base for the supporting leg.
Variant:
The heel of the supporting leg remains slightly raised during the exercise (toe-up position) for additional strain on the calf muscles.
1 exercise ball
1 weight ball/weight vest/weight disc/sandbag/medicine ball/2 dumbbells ► make the exercise more difficult (additional weight)
1 ball/balance cushion/balance board ► make the exercise more difficult (unstable surface)
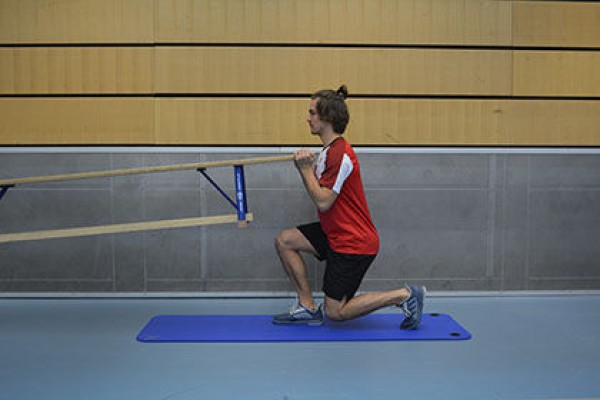
Squat one-legged alternating ► band assisted pistol squat
Power
Individual work


An elasticated rubber band is stretched between two posts just below buttock height. Stand with your feet shoulder-width apart in front of the band so that your thighs (just below your buttocks) touch the band (looking away from the band), with your arms hanging down towards the floor. Bend one leg to approximately a right angle at the knee joint (buttocks at knee height), at the same time release the other leg from the floor and bring it forwards as straight as possible (held horizontally to the floor in the final position). The arms are also moved forwards while bending the supporting leg. Then straighten the training leg again and return the free leg and arms to the starting position in an upright standing position. Change the standing or free leg after each repetition. During the movement sequence (one-legged squat), sit with your buttocks on the elasticated rubber band to provide support during the exercise.
Attention:
Lower your upper body as upright as possible (no tilting forwards or backwards), move your buttocks backwards, not your knees forwards. Keep your back straight at all times (keep your torso tensed), distribute your weight over your entire foot.
Lighten:
Bend your supporting leg less (greater knee angle); bend your free leg; choose an elastic band with greater resistance.
Harden:
Choose an elastic band with less resistance.
2 high bar posts
1 elasticated rubber band
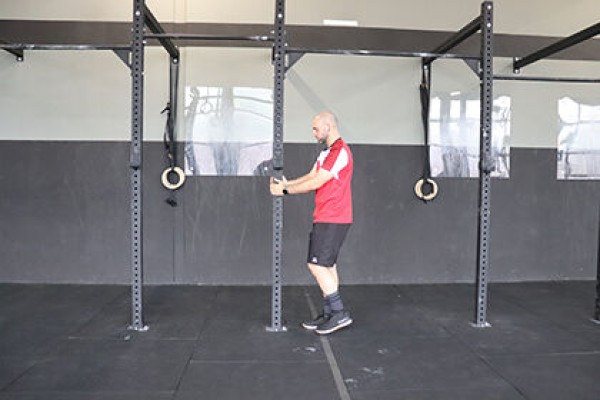
Squat one-legged alternating ► parallel assisted pistol squat
Power
Individual work


Stand shoulder-width apart between the bars of the (handstand) exercise bar (or between two parallettes/ low dip bars) with your arms hanging down towards the floor. Bend one leg to approximately a right angle at the knee joint (buttocks at knee height), at the same time release the other leg from the floor and bring it forwards as straight as possible (held horizontally to the floor in the final position). As you bend your standing leg, move your arms towards the bars to hold on to them (support for performing the one-legged squat exercise). Then straighten the training leg again and return the free leg and arms to the starting position in an upright position (push off from the bars with your arms). After each repetition, change the standing or free leg.
Attention:
Lower your upper body as upright as possible (no tilting forwards or backwards), buttocks backwards, not knees forwards. Keep your back straight at all times (keep your torso tensed), distribute your weight over the entire foot.
Lighten:
Higher bars so that the supporting leg has to be bent less (greater angle in the knee); bend the free leg.
Harden:
Use the bars as little (or not at all) as possible for support.
2 parallettes, dip bars (low), 1 (handstand) exercise bar
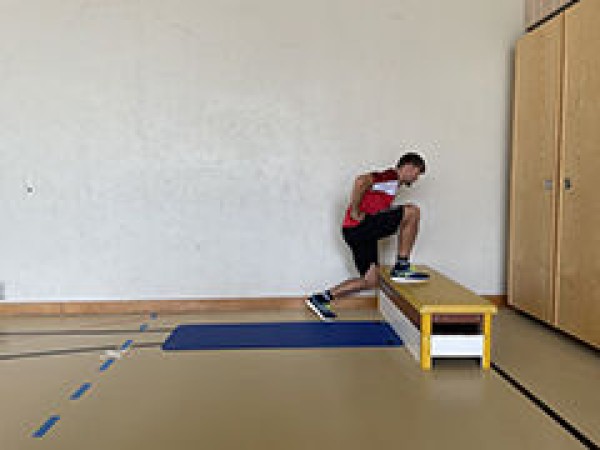
Squat one-legged alternating ► pistol to low box
Power
Individual work


Stand shoulder-width apart in front of a raised surface (e.g. plyo box, flat bench or vaulting box element incl. top), heels/calves practically resting on the raised surface, arms hanging, supported on the hips, crossed on the chest or in front, standing leg bent to sit on the raised surface, the free leg pointing diagonally forwards and downwards (lifted off the floor). Then straighten the supporting leg to return to the starting position in the standing position (at the same time bring the free leg back next to the supporting leg). After each exercise, the standing or free leg is changed. When bending the leg, the arms can be brought forward so that they can support the movement when standing up by bringing them back to the body (work with momentum if necessary).
Attention:
Lower the upper body as upright as possible (no tilting forwards or backwards); keep the knee of the training leg as centred as possible over the foot.
Lighten:
Higher base to reduce the need to bend the supporting leg (greater angle in the knee); bend the free leg; arms support the movement (momentum).
Harden:
Lower base to bend the supporting leg more (smaller angle in the knee), additional weight (on the shoulders, in front of the chest, with hanging arms or in front); perform the exercise without a base to sit on.
1 plyo box, flat bench, vaulting box element incl. top
1 additional vaulting box element ► Make the exercise easier
1 weight vest/weight disc/(medicine) ball/sandbag/fighting backpack/2 dumbbells ► Make the exercise more difficult (additional weight)
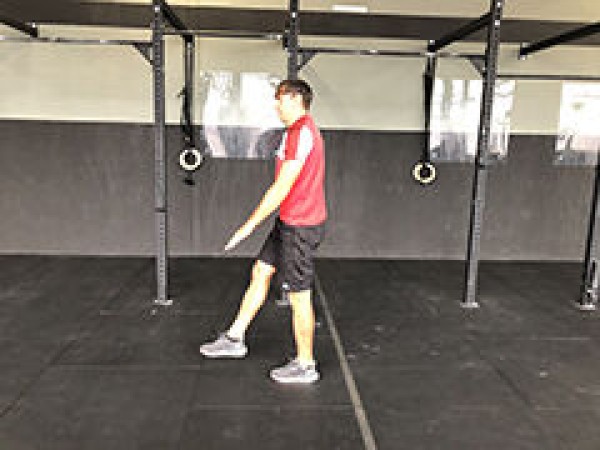
Squat one-legged alternating ► rig supported pistol squat
Power
Individual work


Stand upright in front of a horizontal bar, with your hands holding the post at about chest height. Lift one foot off the floor to stand on one leg. Bend the standing leg to approximately a right angle at the knee joint (buttocks at knee height) and at the same time extend the free leg forwards as far as possible (horizontally to the floor). Then straighten the training leg again and return the free leg to the starting position in an upright position. Change the training or free leg after each repetition. The position of the hands remains unchanged throughout the exercise, allowing you to support the one-legged squat with your arms.
Attention:
Lower your upper body as upright as possible (no tilting forwards or backwards), buttocks backwards, not knees forwards. Keep your back straight at all times (keep your torso tensed), distribute your weight over your entire foot.
Lighten:
Bend your supporting leg less (greater knee angle); bend your free leg.
Harden:
Less (or no) arm support.
1 horizontal bar
Single-leg squat in raised single-leg stance (left)
Power
Individual work


Stand on one leg (left) on an elevated surface (e.g. flat bench, vaulting box element incl. top, long bench), with the supporting leg on the elevation strongly bent (one-legged knee bend with less than 90 degrees in the knee joint) and the other leg also bent with the front foot slightly offset to the side on the floor, resting the arms on the hips. From this position, push the (lower) foot off the floor and stretch it, while at the same time stretching the raised foot so that the body is stretched in a one-legged stance (left). In a fluid movement, bend the raised leg (left) back to the starting position and move the free leg to the other side of the body (stand on the front foot again with the leg bent). In a continuous alternation, the free leg is spread slightly to the side and then crossed over/backwards behind the supporting leg to the other side.
Attention:
Always keep the front knee behind the tip of the foot and centred over the foot. Lower your body in the centre (follow the back knee like a plumb line, keep your upper body upright, tense your stomach).
Lighten:
Lower your upper body less (greater angle in the knees); no or less high support.
Harden:
Additional weight (on the shoulders).
Variation:
Lift the hands from the hips while stretching the body and extend them backwards along the body; when bending the supporting leg again, bring the hands back to the hips.
1 raised base ► flat bench, vaulting box element incl. upper section, long bench
1 weight vest/sandbag/fighting backpack/2 dumbbells ► to make the exercise more difficult (additional weight)
Single-leg squat in raised single-leg stance (right)
Power
Individual work


Stand on one leg (right) on an elevated surface (e.g. flat bench, vaulting box element incl. top, long bench), with the supporting leg on the elevation strongly bent (one-legged knee bend with less than 90 degrees in the knee joint) and the other leg also bent with the front foot slightly offset to the side on the floor, resting the arms on the hips. From this position, push the (lower) foot off the floor and stretch it, while at the same time stretching the raised foot so that the body is stretched in a one-legged stance (right). In a fluid movement, the raised leg (right) is bent back to the starting position and the free leg is moved to the other side of the body (again standing on the front foot with the leg bent). In a continuous alternation, the free leg is spread slightly to the side and then crossed over/backwards behind the supporting leg to the other side.
Attention:
Always keep the front knee behind the tip of the foot and centred over the foot. Lower your body in the centre (follow the back knee like a plumb line, keep your upper body upright, tense your stomach).
Lighten:
Lower your upper body less (greater angle in the knees); no or less high support.
Harden:
Additional weight (on the shoulders).
Variation:
Lift the hands from the hips while stretching the body and extend them backwards along the body; when bending the supporting leg again, bring the hands back to the hips.
1 raised base ► flat bench, vaulting box element incl. upper section, long bench
1 weight vest/sandbag/fighting backpack/2 dumbbells ► to make the exercise more difficult (additional weight)
Single-leg squat with swing from supine position (left) ► candlestick roll to pistol
Power
Individual work


From the shoulder-width stance, move into a squat position (arms pointing diagonally downwards in front) and then drop into a supine position. The outstretched arms are extended overhead (along the floor) and the bent legs are stretched out so that they are pointing towards the sky (upwards). The arms are then brought in front of the body again in a flowing movement so that the momentum can be utilised to return to the standing position. When standing up, however, only one leg (left) is bent and placed on the floor, the other leg (right) remains practically straight and lifted off the floor. Finally, the standing leg (left) is also extended from the deep one-legged high position to reach the standing position. During the low squat position, the leg lifted off the floor (right) points horizontally forwards (low one-legged squat position) and in the subsequent upright stance points diagonally downwards forwards before the leg is brought back to the training leg (left) in the starting position in the shoulder-width stance on both legs.
Attention:
Knee of the training leg remains as centred as possible over the foot.
Lighten:
Arms support the movement more clearly (more momentum); the extended free leg is brought to the floor with the heel to support the standing up movement.
Harden:
Use less momentum (hardly any support from the arms).
No material required
Single-leg squat with swing from supine position (right) ► candlestick roll to pistol
Power
Individual work


From the shoulder-width stance, move into a squat position (arms pointing diagonally downwards in front) and then drop into a supine position. The outstretched arms are extended overhead (along the floor) and the bent legs are stretched out so that they are pointing towards the sky (upwards). The arms are then brought in front of the body again in a flowing movement so that the momentum can be utilised to return to the standing position. When standing up, however, only one leg (right) is bent and placed on the floor, the other leg (left) remains practically straight and lifted off the floor. Finally, the standing leg (right) is also extended from the deep one-legged high position to reach the standing position. During the low squat position, the leg lifted off the floor (left) points horizontally forwards (low one-legged squat position) and in the subsequent upright stance points diagonally downwards forwards before the leg is brought back to the training leg (right) in the starting position in the shoulder-width stance on both legs.
Attention:
Knee of the training leg remains as centred as possible over the foot.
Lighten:
Arms support the movement more clearly (more momentum); the extended free leg is brought to the floor with the heel to support the standing up movement.
Harden:
Use less momentum (hardly any support from the arms).
No material required
Squat one-legged with swing from supine position alternating ► candlestick roll to pistol
Power
Individual work


From the shoulder-width stance, move into a squat position (arms pointing diagonally downwards in front) and then drop into a supine position. The outstretched arms are extended overhead (along the floor) and the bent legs are stretched out so that they are pointing towards the sky (upwards). The arms are then brought in front of the body again in a flowing movement so that the momentum can be utilised to return to the standing position. When standing up, however, only one leg is bent and placed on the floor; the other leg remains practically straight and lifted off the floor. Finally, the standing leg is also extended from the deep one-legged high position to reach the standing position. During the low squat position, the leg lifted off the floor points horizontally forwards (low one-legged squat position) and in the subsequent upright stance points diagonally downwards forwards before the leg is brought back to the training leg in the starting position in the shoulder-width stance on both legs. For the next exercise, change the standing or free leg.
Attetion:
Knee of the training leg should remain as centred as possible over the foot.
Lighten:
Arms support the movement more clearly (more momentum); the extended free leg is brought to the ground with the heel to support the standing up movement.
Harden:
Use less momentum (hardly any support from the arms).
No material required
Squat in contact position ► squat
Power
Individual work


Starting position, bend your knees to approximately a right angle in the knee joints (buttocks at about knee height) and at the same time bring the pistol into the contact position (including scanning), straighten your legs to return to the starting position.
Attention:
Bring your buttocks backwards, not your knees forwards. Keep your back straight at all times (keep your torso tensed), distribute your weight over your entire foot, push your knees outwards (do not tilt them inwards). A support for the heels makes the exercise easier.
The weapon remains parallel to the floor at all times.
Lighten:
Do not lower your buttocks too low (greater angle in the knees).
Harden:
Stable support.
1 pistol (neutralised)
1 soft mat (small)/raised base ► make the exercise easier (position)
1 balance cushion/balance board ► make the exercise more difficult (unstable base)