Exercises (2330)
Powerrolle II
Parkour
Individual work
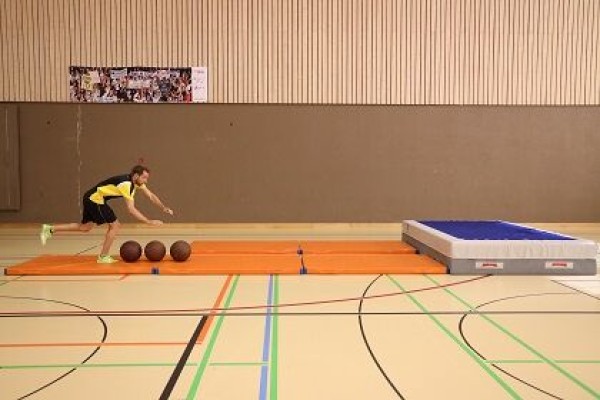
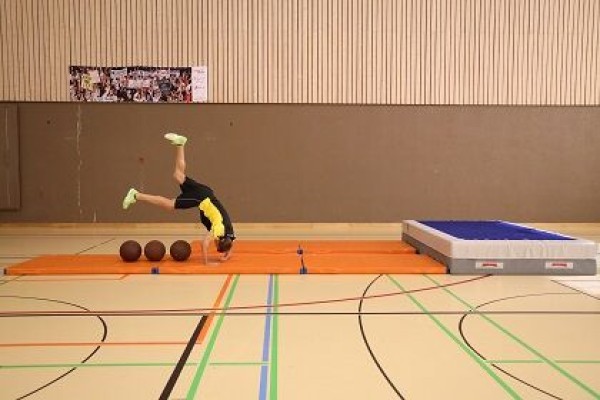
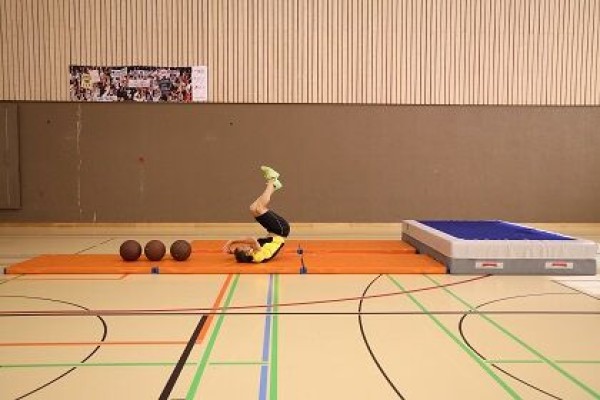
Jump roll over medicine balls, bringing the arms forwards in the air after the horizontal jump to cushion the impact and initiate the roll, place the roll arm on the back of the forearm, look under the outstretched arm, roll forwards over the shoulder of the bent arm directly to the standing position.
3 soft mats (small)
3 medicine balls
Post set-up:
Lay out the soft mats in a row and place the medicine balls on top (spacing depending on the desired jumping distance)
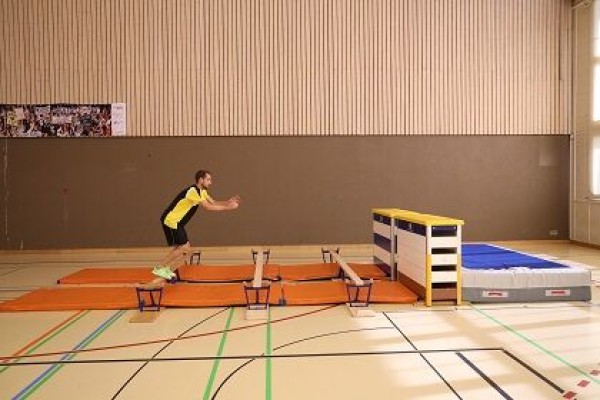
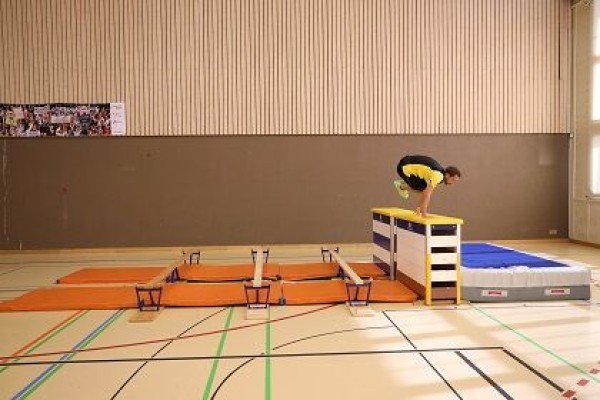
Powerrolle III
Parkour
Individual work
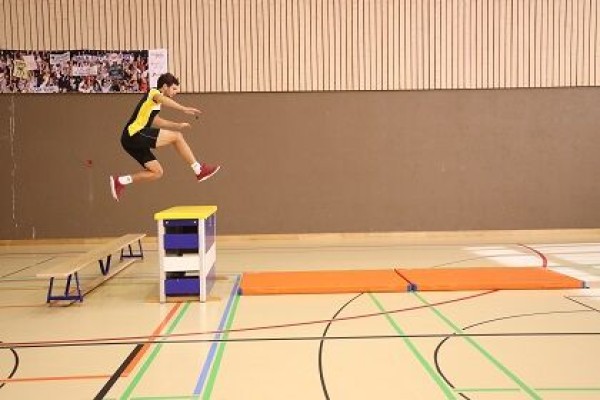
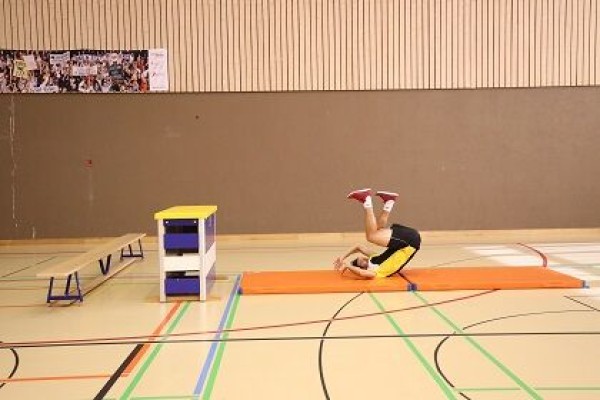
Short run-up, one-legged jump (on the long bench/swinging box top ► indoor version) over an obstacle (high jump facility/swinging box/horse ► indoor version), landing on the feet with an immediate roll (place the rolling arm on the back of the forearm, look under the outstretched arm, roll forwards over the shoulder of the bent arm directly to the standing position).
1 high jump facility (2 uprights with crossbar) or vaulting box/pommel horse ► indoor version
1 long bench ► indoor version
2 soft mats (small) ► indoor version
Post set-up indoor:
Place long bench approx. 1m in front of the high jump facility (parallel). 1m in front of the high jump area (parallel), lay out soft mats behind it.
outdoor:
grass area with obstacle (elevation or participant as obstacle replacement).
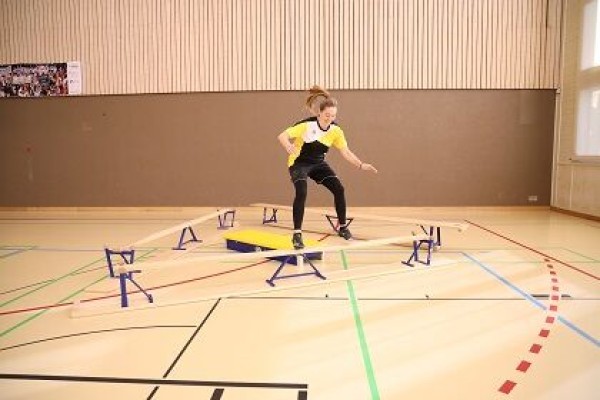
Precision jump I
Parkour
Individual work
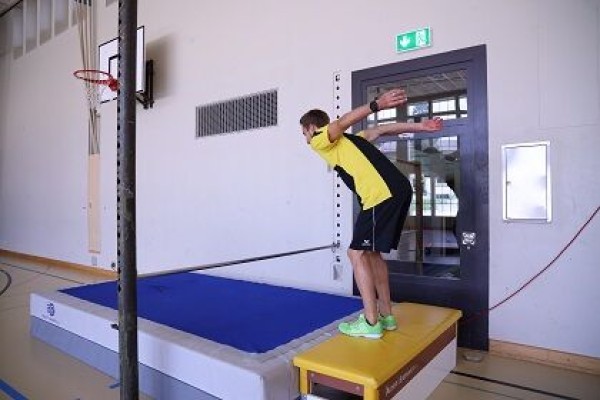

Jump from the top of the vaulting box onto the horizontal bar and then maintain your balance on it for as long as possible.
Variations:
Change the distance between the vaulting box and the horizontal bar;
Change the height of the horizontal bar and/or vaulting box;
Jump off after a running start;
Jump with a 180 or 360 degree turn.
outdoor:
Jump from one elevation to the other. Catch the jump in a controlled manner and keep your balance.
1 horizontal bar (pole) ►indoor version
1 soft mat (large) ►indoor version
1 vaulting box ►indoor version
Indoor post setup:
Fix the horizontal bar at a height of approx. 50 cm, set up a vaulting box (2 elements incl. top section) in front of it, place a soft mat underneath.
outdoor:
Two elevations (e.g. walls, steps, projections on houses, etc.) within jumping distance.
Precision jump II
Parkour
Individual work
Perform various jumps from the long benches to the top section of the vaulting box and vice versa.
Variant:
- Change the distances between the long benches and the top section of the vaulting box
- Additional vaulting box elements to change the height
- Jumps with 180 or 360 degree rotation
3 long benches
1 vaulting box (top section)
Post set-up:
Place the long benches in a triangle with the narrow side facing upwards, place a vaulting box top section in the centre.
Precision jump III
Parkour
Individual work
Jump from bench to bench, at the end hop onto or over the vaulting box onto the soft mat - the legs can be closed or open.
Variant:
- Change the distance between the benches
- Skip over the first bench and jump directly onto the second bench
- Integrate 180 or 360 degree turns when jumping from bench to bench
3 long benches
1 vaulting box
1 soft mat (large)
6 soft mats (small)
Post setup:
Place three upturned long benches and a vaulting box parallel to each other at a distance of approx. 50-150cm each, with small soft mats in between. There is a large soft mat behind the vaulting box.
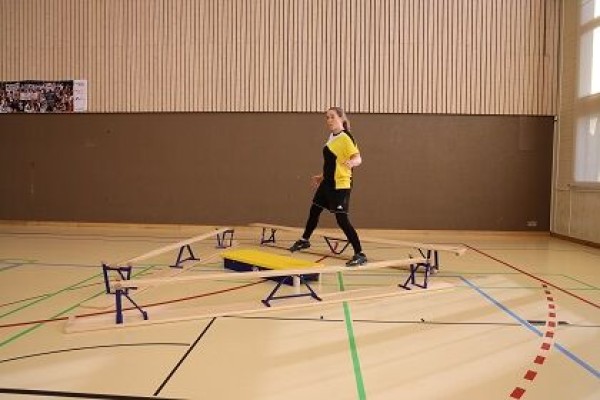
Precision jump IV
Parkour
Individual work
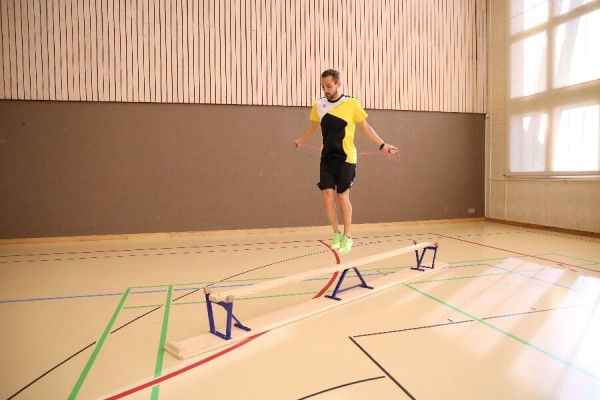
Balance on the narrow side of a long bench (on a narrow edge/elevation ► outdoor version) while jumping rope.
Variations:
Both legs;
One leg;
Forwards;
Backwards.
1 long bench ►indoor version
1 skipping rope ►indoor version
Indoor set-up:
Position the long bench with the narrow side facing upwards and prepare a skipping rope.
outdoor:
Narrow elevation/edge (e.g. wall)
Progressive muscle relaxation: relaxation for the whole body
Regeneration
Individual work
Progressive muscle relaxation: Reducing muscle tension by systematically tensing and relaxing different muscle groups.
How to do it: Lie on your back and just pay attention to your breathing for a few minutes (breathe in and out calmly 20 times). Then tense the whole body as tightly as possible (5 to 7 seconds). Feel the relaxation and muscle sensation for the next 20 seconds or so.
Per day:
1 soft mat (small)
Progressive muscle relaxation: relaxation of extremities and centre
Regeneration
Individual work
Progressive muscle relaxation: Reducing muscle tension by systematically tensing and relaxing different muscle groups.
How to do it: Lie on your back and just pay attention to your breathing for a few minutes (breathe in and out calmly 20 times). Then tense individual body parts as tightly as possible (5 to 7 seconds). For the next 20 seconds or so, feel the relaxation and muscle sensation.
- Dominant hand and arm ("clench fist and press arm against support");
- Non-dominant hand and arm ("clench fist and press arm against support");
- Head and face ("grimace, squint eyes, wrinkle nose, press head against support");
- Upper body, stomach and buttocks ("consciously tense, clench buttocks tightly");
- Dominant foot and dominant leg ("clench feet slightly, lift whole leg off the floor at the same time");
- Non-dominant foot and leg ("clench feet slightly, lift whole leg off the floor at the same time").
Variant:
Power of imagination. The sequence is the same as the exercise above. However, you only imagine the tension (without performing it).
Per day:
1 soft mat (small)
Progressive Muskelrelaxation: Video
Regeneration
Individual work
You can find various videos on progressive muscle relaxation at www.youtube.com that you can integrate 1:1 into your lessons.
Per day:
1 soft mat
Pronation of the forearm in the sitting position (left)
Power
Individual work
While seated, place an elasticated band around the (left) thigh and grasp the band with the (left) hand, with the back of the hand pointing downwards. The arm holding the band is bent so that the upper arm is against the body and the lower arm is pointing forwards (90 degree angle at the elbow joint). The other (right) arm fixes the training arm by holding the forearm at the elbow. From this position, rotate the arm inwards (pronation) so that the back of the hand is pointing upwards in the end position.
Attention:
The movement only takes place in the forearm, the upper arm remains stable.
Lighten:
Select a rubber band with less resistance.
Harden:
Select a rubber band with greater resistance.
1 mini-band
1 seating option (e.g. chair, plyo box or vaulting box)
Pronation of the forearm in the sitting position (right)
Power
Individual work

While seated, place an elasticated band around the (right) thigh and grasp the band with the (right) hand, with the back of the hand pointing downwards. The arm holding the band is bent so that the upper arm is against the body and the lower arm is pointing forwards (90 degree angle at the elbow joint). The other (left) arm secures the training arm by holding the forearm at the elbow. From this position, rotate the arm inwards (pronation) so that the back of the hand is pointing upwards in the end position.
Attention:
The movement only takes place in the forearm, the upper arm remains stable.
Lighten:
Select an elastic band with less resistance.
Harden:
Select an elastic band with greater resistance.
1 mini-band
1 seating option (e.g. chair, plyo box or vaulting box)
Pyramid training (short-long): 100-300-500-800-500-300-100
Pyramid training
Single run or in strength groups, with the pacemaker controlling the time
Pyramid training is a special type of interval training that can be run extensively (longer sections at a brisk pace) or intensively (shorter sections at a very fast pace). As the name suggests, the effort initially increases continuously (in the form of a staircase) and is then reduced again to the same extent. There is always a trotting break between the efforts, which is measured by the intensity of the effort. The units should be run so fast that an interval can just be added at the end (extensive) or another interval would no longer feel possible (intensive). It is important to concentrate on an optimal running technique, because as soon as you are no longer running "cleanly", you are travelling too fast. The individual intervals are run very quickly, but as evenly as possible (the shorter the effort, the higher the intensity and vice versa). For shorter workouts, you cannot rely completely on the heart rate for intensity levels, as the heart rate only adapts to the exertion with a slight delay at the start of the workout.
Running training with alternating exertion and recovery:
- 100m exertion (intensity level: 4-5)
- 300m exertion (intensity level: 4)
- 500m exertion (intensity level: 3-4)
- 800m effort (intensity level: 3-4)
- 500m effort (intensity level: 3-4)
- 300m effort (intensity level: 4)
- 100m effort (intensity level: 4-5)
Break: 200-400m each
Intensity level 3:
HFmax: 80-90%
Rule of speech: speak in complete sentences
Intensity level 4:
HFmax: 90-95%
Rule of speech: concise exchange of words
Intensity level 5:
Hmax: 95-100%
Speech rule: no more word exchanges possible
Pyramid training can be completed both on a track and off-road. Running on the track has the advantage that the runner always has control over the distance and the current running pace, which can promote the development of a sense of speed. Whether on the track or off-road, the distances to be covered must be clearly defined for the participants (distance markings). It may also be the case that a turning point is defined if the total distance is not long enough (determine running directions to avoid collisions). After the exertion phase, the participants continue to trot at a relaxed pace until they reach the marker for the next exertion phase (variation: march). To ensure that the participants have enough space for the run, it makes sense to stagger them (spread them out on the track or send them out on the track in a staggered manner). Pyramid training can be carried out as follows:
- Round course: To ensure that the participants have enough space available for the run, they can be spread out on the round course at the start. The participants/groups start the intervals independently, complete the prescribed distances and, if desired, measure the times (note the times so that the same distances are completed in approximately the same time - note-taking is almost impossible to implement in practice). The participants themselves decide how they spend the breaks (e.g. marching or relaxed trotting - however, the same form of recovery should always be maintained in a training session). During the recovery phase, care is taken to ensure that no participants who are in a stress phase are disturbed.
- Distance of at least 900 metres: Distances are marked with signs (every 25-50 metres). Each participant/group completes the specified distances independently according to the instructions of the sports director (observe running directions so that the total length of the course is sufficient). The times for the respective sections of the course can be recorded independently by the participants if desired (comparison of identical sections). The participants/groups cover the distances to the start of the next interval by marching or at a relaxed trot (keep the same form for training). There is the option of staggering the start of the participants, whereby the running routes must be clearly defined in order to avoid collisions.
- Long-distance circuit: The distances are marked with signs (every 25-50 metres). In the recovery phases, the participants/groups march or trot until the next interval start is marked (always choose the same type of break in a training session). The participants can time the different sections of the course so that the same distances can be compared with each other. After the last interval unit, all runners return to the starting point, which takes additional time. Ideally, the running distance corresponds approximately to the distance that can be covered in the time available in order to generate as little additional displacement time as possible (e.g. 4.2km with 3x200m, 2x300m and 1x400m break sections).
Distance markers (signs with metres)
Evaluation FTA (group formation)
Participant:
1 heart rate monitor
Participant/group:
1 stopwatch
Pyramid training (short-medium): 100-200-300-400-500-400-300-200-100
Pyramid training
Single run or in strength groups, with the pacemaker controlling the time
Pyramid training is a special type of interval training that can be run extensively (longer sections at a brisk pace) or intensively (shorter sections at a very fast pace). As the name suggests, the effort initially increases continuously (in the form of a staircase) and is then reduced again to the same extent. There is always a trotting break between the efforts, which is measured by the intensity of the effort. The units should be run so fast that an interval can just be added at the end (extensive) or another interval would no longer feel possible (intensive). It is important to concentrate on an optimal running technique, because as soon as you are no longer running "cleanly", you are travelling too fast. The individual intervals are run very quickly, but as evenly as possible (the shorter the effort, the higher the intensity and vice versa). For shorter workouts, you cannot rely completely on the heart rate for intensity levels, as the heart rate only adapts to the exertion with a slight delay at the start of the workout.
Running training with alternating exertion and recovery:
- 100m exertion (intensity level: 4-5)
- 200m exertion (intensity level: 4-5)
- 300m exertion (intensity level: 4)
- 400m effort (intensity level: 3-4)
- 500m effort (intensity level: 3-4)
- 400m effort (intensity level: 3-4)
- 300m effort (intensity level: 4)
- 200m effort (intensity level: 4-5)
- 100m effort (intensity level: 4-5)
Pause: 200-400m each
Intensity level 3:
max HR: 80-90%
speaking rule: speak in complete sentences
Intensity level 4:
max HR: 90-95%
Speech rule: short exchanges
Intensity level 5:
HFmax: 95-100%
Speech rule: no more exchanges possible
Pyramid training can be completed both on a track and off-road. Running on the track has the advantage that the runner always has control over the distance and the current running pace, which can promote the development of a sense of speed. Whether on the track or off-road, the distances to be covered must be clearly defined for the participants (distance markings). It may also be the case that a turning point is defined if the total distance is not long enough (determine running directions to avoid collisions). After the exertion phase, the participants continue to trot at a relaxed pace until they reach the marker for the next exertion phase (variation: march). To ensure that the participants have enough space for the run, it makes sense to stagger them (spread them out on the track or send them out on the track in a staggered manner). Pyramid training can be carried out as follows:
- Round course: To ensure that the participants have enough space available for the run, they can be spread out on the round course at the start. The participants/groups start the intervals independently, complete the prescribed distances and, if desired, measure the times (note the times so that the same distances are completed in approximately the same time - note-taking is almost impossible to implement in practice). The participants themselves decide how they spend the breaks (e.g. marching or relaxed trotting - however, the same form of recovery should always be maintained in a training session). During the recovery phase, care is taken to ensure that no participants who are in a stress phase are disturbed.
- Distance of at least 1000 metres: Distances are marked with signs (every 25-50 metres). Each participant/group completes the specified distances independently according to the instructions of the sports director (observe running directions so that the total length of the course is sufficient). The times for the respective sections of the course can be recorded independently by the participants if desired (comparison of identical sections). The participants/groups cover the distances to the start of the next interval by marching or at a relaxed trot (keep the same form for training). There is the option of staggering the start of the participants, whereby the running routes must be clearly defined in order to avoid collisions.
- Long-distance circuit: The distances are marked with signs (every 25-50 metres). In the recovery phases, the participants/groups march or trot until the next interval start is marked (always choose the same type of break in a training session). The participants can time the different sections of the course so that the same distances can be compared with each other. After the last interval unit, all runners return to the starting point, which takes additional time. Ideally, the running distance corresponds approximately to the distance that can be covered in the time available in order to generate as little additional displacement time as possible (e.g. 4.2km with 7x200m and 1x300m break sections).
Distance markers (signs with metres)
Evaluation FTA (group formation)
Participant:
1 heart rate monitor
Participant/group:
1 stopwatch
Pyramid training (short-medium): 15-20-25-30-25-20-15
Pyramid training
Single run or in strength groups, with the pacemaker controlling the time
Pyramid training is a special type of interval training that can be run extensively (longer sections at a brisk pace) or intensively (shorter sections at a very fast pace). As the name suggests, the effort initially increases continuously (in the form of a staircase) and is then reduced again to the same extent. There is always a trotting break between the efforts, which is measured by the intensity of the effort. The units should be run so fast that an interval can just be added at the end (extensive) or another interval would no longer feel possible (intensive). It is important to concentrate on an optimal running technique, because as soon as you are no longer running "cleanly", you are travelling too fast. The individual intervals are run very quickly, but as evenly as possible (the shorter the effort, the higher the intensity and vice versa). For shorter workouts, you cannot rely completely on the heart rate for intensity levels, as the heart rate only adapts to the exertion with a slight delay at the start of the workout.
Running training with alternating exertion and recovery:
- 15 seconds exertion (intensity level: 5) - 15 seconds rest
- 20 seconds exertion (intensity level: 5) - 20 seconds rest
- 25 seconds exertion (intensity level: 4-5) - 25 seconds rest
- 30 seconds load (intensity level: 4-5) - 25 seconds rest
- 25 seconds load (intensity level: 4-5) - 20 seconds rest
- 20 seconds load (intensity level: 5) - 15 seconds break
- 15 seconds of exertion (intensity level: 5)
Intensity level 4:
HFmax: 90-95%
Speech rule: brief exchange of words
Intensity level 5:
HFmax: 95-100%
Speech rule: No more exchange of words possible
The pyramid training can be carried out as follows:
- Round track: To ensure that the participants have enough space available for the run, they can be spread out on the round track for the start. The sports director has all participants in view and can therefore start or stop the intervals by signalling. The participants decide for themselves how to spend the breaks (e.g. on the spot, marching or at a relaxed trot).
- Distance of at least 500 metres: Distances are marked with signs (every 25-50 metres). Each participant receives a stop/pulse watch, runs along the specified route for the duration of the respective exercise (observe the running directions as specified by the sports director so that the total length of the route is sufficient) and calculates the distance covered. It is possible for participants to start in stages, whereby the running routes must be determined in order to avoid collisions. If the course allows it, the sports director can give the start/stop signal for all participants (no staggering possible).
- Longer distance race: The distances are marked with signs (every 25-50m). Each participant receives a stop/pulse watch, runs the course independently and calculates the distance travelled (no staggered start of the participants necessary). During the breaks, participants wait in place or continue running at a relaxed trot until the break time has elapsed. After the last run, all runners return to the starting point, which takes additional time. Ideally, the running distance corresponds approximately to the distance that can be covered in the time available in order to generate as little additional displacement time as possible.
With the same duration of exertion, an attempt is made to ensure that the participants/groups also reach the same distance. However, there is very little time to calculate and record the distances, which makes it difficult to compare runs of the same duration in practice.
Distance markers (signs with metres)
1 signalling instrument (e.g. whistle)
FTA evaluation (group formation)
Per participant:
1 heart rate monitor
For sports leader or per participant/group:
1 stopwatch
Pyramid training (short-medium): 15-30-45-60-45-30-15
Pyramid training
Single run or in strength groups, with the pacemaker controlling the time
Pyramid training is a special type of interval training that can be run extensively (longer sections at a brisk pace) or intensively (shorter sections at a very fast pace). As the name suggests, the effort initially increases continuously (in the form of a staircase) and is then reduced again to the same extent. There is always a trotting break between the efforts, which is measured by the intensity of the effort. The units should be run so fast that an interval can just be added at the end (extensive) or another interval would no longer feel possible (intensive). It is important to concentrate on an optimal running technique, because as soon as you are no longer running "cleanly", you are travelling too fast. The individual intervals are run very quickly, but as evenly as possible (the shorter the effort, the higher the intensity and vice versa). For shorter workouts, you cannot rely completely on the heart rate for intensity levels, as the heart rate only adapts to the exertion with a slight delay at the start of the workout.
Running training with alternating effort and recovery:
- 15 seconds effort (intensity level: 5) - 15 seconds rest
- 30 seconds effort (intensity level: 4-5) - 30 seconds rest
- 45 seconds effort (intensity level: 4-5) - 45 seconds rest
- 60 seconds load (intensity level: 4-5) - 45 seconds rest
- 45 seconds load (intensity level: 4-5) - 30 seconds rest
- 30 seconds load (intensity level: 4-5) - 15 seconds break
- 15 seconds of exertion (intensity level: 5)
Intensity level 4:
HFmax: 90-95%
Rule of speech: brief exchange of words
Intensity level 5:
HFmax: 95-100%
Rule of speech: No more exchange of words possible
The pyramid training can be carried out as follows:
- Round track: To ensure that the participants have enough space available for the run, they can be spread out on the round track for the start. The sports director has all participants in view and can therefore start or stop the intervals by signalling. The participants decide for themselves how to spend the breaks (e.g. on the spot, marching or at a relaxed trot).
- Distance of at least 500 metres: Distances are marked with signs (every 25-50 metres). Each participant receives a stop/pulse watch, runs along the specified route for the duration of the respective exercise (observe the running directions as specified by the sports director so that the total length of the route is sufficient) and calculates the distance covered. It is possible for participants to start in stages, whereby the running routes must be determined in order to avoid collisions. If the course allows it, the sports director can give the start/stop signal for all participants (no staggering possible).
- Longer distance race: The distances are marked with signs (every 25-50m). Each participant receives a stop/pulse watch, runs the course independently and calculates the distance travelled (no staggered start of the participants necessary). During the breaks, participants wait in place or continue running at a relaxed trot until the break time has elapsed. After the last run, all runners return to the starting point, which takes additional time. Ideally, the running distance corresponds approximately to the distance that can be covered in the time available in order to generate as little additional displacement time as possible.
With the same duration of exertion, an attempt is made to ensure that the participants/groups also reach the same distance. However, there is very little time to calculate and record the distances, which makes it difficult to compare runs of the same duration in practice.
Distance markers (signs with metres)
1 signalling instrument (e.g. whistle)
FTA evaluation (group formation)
Per participant:
1 heart rate monitor
For sports leader or per participant/group:
1 stopwatch
Pyramid training (short-medium): 30-45-60-90-60-45-30
Pyramid training
Single run or in strength groups, with the pacemaker controlling the time
Pyramid training is a special type of interval training that can be run extensively (longer sections at a brisk pace) or intensively (shorter sections at a very fast pace). As the name suggests, the effort initially increases continuously (in the form of a staircase) and is then reduced again to the same extent. There is always a trotting break between the efforts, which is measured by the intensity of the effort. The units should be run so fast that an interval can just be added at the end (extensive) or another interval would no longer feel possible (intensive). It is important to concentrate on an optimal running technique, because as soon as you are no longer running "cleanly", you are travelling too fast. The individual intervals are run very quickly, but as evenly as possible (the shorter the effort, the higher the intensity and vice versa). For shorter workouts, you cannot rely completely on the heart rate for intensity levels, as the heart rate only adapts to the exertion with a slight delay at the start of the workout.
Running training with alternating exertion and recovery:
- 30 seconds exertion (intensity level: 5) - 30 seconds rest
- 45 seconds exertion (intensity level: 4-5) - 45 seconds rest
- 60 seconds exertion (intensity level: 4-5) - 60 seconds rest
- 90 seconds load (intensity level: 4) - 60 seconds rest
- 60 seconds load (intensity level: 4-5) - 45 seconds rest
- 45 seconds load (intensity level: 4-5) - 30 seconds break
- 30 seconds of exertion (intensity level: 5)
Intensity level 4:
HFmax: 90-95%
Speech rule: brief exchange of words
Intensity level 5:
HFmax: 95-100%
Speech rule: No more exchange of words possible
The pyramid training can be carried out as follows:
- Round track: To ensure that the participants have enough space available for the run, they can be spread out on the round track for the start. The sports director has all participants in view and can therefore start or stop the intervals by signalling. The participants decide for themselves how to spend the breaks (e.g. on the spot, marching or at a relaxed trot).
- Distance of at least 700 metres: Distances are marked with signs (every 25-50 metres). Each participant receives a stop/pulse watch, runs along the specified route for the duration of the respective exercise (observe the running directions as specified by the sports director so that the total length of the route is sufficient) and calculates the distance covered. It is possible for participants to start in stages, whereby the running routes must be determined in order to avoid collisions. If the course allows it, the sports director can give the start/stop signal for all participants (no staggering possible).
- Longer distance race: The distances are marked with signs (every 25-50m). Each participant receives a stop/pulse watch, runs the course independently and calculates the distance travelled (no staggered start of the participants necessary). During the breaks, participants wait in place or continue running at a relaxed trot until the break time has elapsed. After the last run, all runners return to the starting point, which takes additional time. Ideally, the running distance corresponds approximately to the distance that can be covered in the time available in order to generate as little additional displacement time as possible.
With the same duration of exertion, an attempt is made to ensure that the participants/groups also reach the same distance. However, there is very little time to calculate and record the distances, which makes it difficult to compare runs of the same duration in practice.
Distance markers (signs with metres)
1 signalling instrument (e.g. whistle)
FTA evaluation (group formation)
Per participant:
1 heart rate monitor
For sports leader or per participant/group:
1 stopwatch
Pyramid training (short-medium): 30-60-90-60-30
Pyramid training
Single run or in strength groups, with the pacemaker controlling the time
Pyramid training is a special type of interval training that can be run extensively (longer sections at a brisk pace) or intensively (shorter sections at a very fast pace). As the name suggests, the effort initially increases continuously (in the form of a staircase) and is then reduced again to the same extent. There is always a trotting break between the efforts, which is measured by the intensity of the effort. The units should be run so fast that an interval can just be added at the end (extensive) or another interval would no longer feel possible (intensive). It is important to concentrate on an optimal running technique, because as soon as you are no longer running "cleanly", you are travelling too fast. The individual intervals are run very quickly, but as evenly as possible (the shorter the effort, the higher the intensity and vice versa). For shorter workouts, you cannot rely completely on the heart rate for intensity levels, as the heart rate only adapts to the exertion with a slight delay at the start of the workout.
Running training with alternating exertion and recovery:
- 30 seconds exertion (intensity level: 5) - 30 seconds rest
- 60 seconds exertion (intensity level: 4-5) - 60 seconds rest
- 90 seconds exertion (intensity level: 4) - 60 seconds rest
- 60 seconds exertion (intensity level: 4-5) - 30 seconds rest
- 30 seconds exertion (intensity level: 5)
Intensity level 4:
HFmax: 90-95%
Rule of speech: brief exchange of words
Intensity level 5:
HFmax: 95-100%
Rule of speech: No more exchange of words possible
The pyramid training can be carried out as follows:
- Round track: To ensure that the participants have enough space for the run, they can be spread out on the round track for the start. The sports director has all participants in view and can therefore start or stop the intervals by signalling. The participants decide for themselves how to spend the breaks (e.g. on the spot, marching or at a relaxed trot).
- Distance of at least 700 metres: Distances are marked with signs (every 25-50 metres). Each participant receives a stop/pulse watch, runs along the specified route for the duration of the respective exercise (observe the running directions as specified by the sports director so that the total length of the route is sufficient) and calculates the distance covered. It is possible for participants to start in stages, whereby the running routes must be determined in order to avoid collisions. If the course allows it, the sports director can give the start/stop signal for all participants (no staggering possible).
- Longer distance race: The distances are marked with signs (every 25-50m). Each participant receives a stop/pulse watch, runs the course independently and calculates the distance travelled (no staggered start of the participants necessary). During the breaks, participants wait in place or continue running at a relaxed trot until the break time has elapsed. After the last run, all runners return to the starting point, which takes additional time. Ideally, the running distance corresponds approximately to the distance that can be covered in the time available in order to generate as little additional displacement time as possible.
With the same duration of exertion, an attempt is made to ensure that the participants/groups also reach the same distance. However, there is very little time to calculate and record the distances, which makes it difficult to compare runs of the same duration in practice.
Distance markers (signs with metres)
1 signalling instrument (e.g. whistle)
FTA evaluation (group formation)
Per participant:
1 heart rate monitor
For sports leader or per participant/group:
1 stopwatch
Pyramidentraining (course): 10-15-20-25-30-25-20-15-10
Pyramid training
Single run or in strength groups, with the pacemaker controlling the time
Pyramid training is a special type of interval training that can be run extensively (longer sections at a brisk pace) or intensively (shorter sections at a very fast pace). As the name suggests, the effort initially increases continuously (in the form of a staircase) and is then reduced again to the same extent. There is always a trotting break between the efforts, which is measured by the intensity of the effort. The units should be run so fast that an interval can just be added at the end (extensive) or another interval would no longer feel possible (intensive). It is important to concentrate on an optimal running technique, because as soon as you are no longer running "cleanly", you are travelling too fast. The individual intervals are run very quickly, but as evenly as possible (the shorter the effort, the higher the intensity and vice versa). For shorter workouts, you cannot rely completely on the heart rate for intensity levels, as the heart rate only adapts to the exertion with a slight delay at the start of the workout.
Running training with alternating exertion and recovery:
- 10 seconds exertion (intensity level: 5) - 10 seconds rest
- 15 seconds exertion (intensity level: 5) - 15 seconds rest
- 20 seconds exertion (intensity level: 5) - 20 seconds rest
- 25 seconds load (intensity level: 4-5) - 25 seconds rest
- 30 seconds load (intensity level: 4-5) - 25 seconds rest
- 25 seconds load (intensity level: 4-5) - 20 seconds rest
- 20 seconds load (intensity level: 5) - 15 seconds break
- 15 seconds of exertion (intensity level: 5) - 10 seconds break
- 10 seconds of exertion (intensity level: 5)
Intensity level 4:
Max HR: 90-95%
Rule of speech: brief exchange of words
Intensity level 5:
Max HR: 95-100%
Rule of speech: no more exchange of words possible
The pyramid training can be carried out as follows:
- Round track: To ensure that the participants have enough space available for the run, they can be spread out on the round track for the start. The sports director has all participants in view and can therefore start or stop the intervals by signalling. The participants decide for themselves how to spend the breaks (e.g. on the spot, marching or at a relaxed trot).
- Distance of at least 300 metres: Distances are marked with signs (every 25-50 metres). Each participant receives a stop/pulse watch, runs along the specified route for the duration of the respective exercise (observe the running directions as specified by the sports director so that the total length of the route is sufficient) and calculates the distance covered. It is possible for participants to start in stages, whereby the running routes must be determined in order to avoid collisions. If the course allows it, the sports director can give the start/stop signal for all participants (no staggering possible).
- Longer distance race: The distances are marked with signs (every 25-50m). Each participant receives a stop/pulse watch, runs the course independently and calculates the distance travelled (no staggered start of the participants necessary). During the breaks, participants wait in place or continue running at a relaxed trot until the break time has elapsed. After the last run, all runners return to the starting point, which takes additional time. Ideally, the running distance corresponds approximately to the distance that can be covered in the time available in order to generate as little additional displacement time as possible.
With the same duration of exertion, an attempt is made to ensure that the participants/groups also reach the same distance. However, there is very little time to calculate and record the distances, which makes it difficult to compare runs of the same duration in practice.
Distance markers (signs with metres)
1 signalling instrument (e.g. whistle)
FTA evaluation (group formation)
Per participant:
1 heart rate monitor
For sports leader or per participant/group:
1 stopwatch
Pyramidentraining (course): 15-30-45-30-15
Pyramid training
Single run or in strength groups, with the pacemaker controlling the time
Pyramid training is a special type of interval training that can be run extensively (longer sections at a brisk pace) or intensively (shorter sections at a very fast pace). As the name suggests, the effort initially increases continuously (in the form of a staircase) and is then reduced again to the same extent. There is always a trotting break between the efforts, which is measured by the intensity of the effort. The units should be run so fast that an interval can just be added at the end (extensive) or another interval would no longer feel possible (intensive). It is important to concentrate on an optimal running technique, because as soon as you are no longer running "cleanly", you are travelling too fast. The individual intervals are run very quickly, but as evenly as possible (the shorter the effort, the higher the intensity and vice versa). For shorter workouts, you cannot rely completely on the heart rate for intensity levels, as the heart rate only adapts to the exertion with a slight delay at the start of the workout.
Running training with alternating exertion and recovery:
- 15 seconds exertion (intensity level: 5) - 15 seconds rest
- 30 seconds exertion (intensity level: 4-5) - 30 seconds rest
- 45 seconds exertion (intensity level: 4-5) - 30 seconds rest
- 30 seconds exertion (intensity level: 4-5) - 15 seconds rest
- 15 seconds exertion (intensity level: 5)
Intensity level 4:
HFmax: 90-95%
Rule of speech: brief exchange of words
Intensity level 5:
HFmax: 95-100%
Rule of speech: No more exchange of words possible
The pyramid training can be carried out as follows:
- Round track: To ensure that the participants have enough space for the run, they can be spread out on the round track for the start. The sports director has all participants in view and can therefore start or stop the intervals by signalling. The participants decide for themselves how to spend the breaks (e.g. on the spot, marching or at a relaxed trot).
- Distance of at least 400 metres: Distances are marked with signs (every 25-50 metres). Each participant receives a stop/pulse watch, runs along the specified route for the duration of the respective exercise (observe the running directions as specified by the sports director so that the total length of the route is sufficient) and calculates the distance covered. It is possible for participants to start in stages, whereby the running routes must be determined in order to avoid collisions. If the course allows it, the sports director can give the start/stop signal for all participants (no staggering possible).
- Longer distance race: The distances are marked with signs (every 25-50m). Each participant receives a stop/pulse watch, runs the course independently and calculates the distance travelled (no staggered start of the participants necessary). During the breaks, participants wait in place or continue running at a relaxed trot until the break time has elapsed. After the last run, all runners return to the starting point, which takes additional time. Ideally, the running distance corresponds approximately to the distance that can be covered in the time available in order to generate as little additional displacement time as possible.
With the same duration of exertion, an attempt is made to ensure that the participants/groups also reach the same distance. However, there is very little time to calculate and record the distances, which makes it difficult to compare runs of the same duration in practice.
Distance markers (signs with metres)
1 signalling instrument (e.g. whistle)
FTA evaluation (group formation)
Per participant:
1 heart rate monitor
For sports leader or per participant/group:
1 stopwatch
Pyramidentraining (course): 20-30-40-30-20
Pyramid training
Single run or in strength groups, with the pacemaker controlling the time
Pyramid training is a special type of interval training that can be run extensively (longer sections at a brisk pace) or intensively (shorter sections at a very fast pace). As the name suggests, the effort initially increases continuously (in the form of a staircase) and is then reduced again to the same extent. There is always a trotting break between the efforts, which is measured by the intensity of the effort. The units should be run so fast that an interval can just be added at the end (extensive) or another interval would no longer feel possible (intensive). It is important to concentrate on an optimal running technique, because as soon as you are no longer running "cleanly", you are travelling too fast. The individual intervals are run very quickly, but as evenly as possible (the shorter the effort, the higher the intensity and vice versa). For shorter workouts, you cannot rely completely on the heart rate for intensity levels, as the heart rate only adapts to the exertion with a slight delay at the start of the workout.
Running training with alternating effort and recovery:
- 20 seconds of effort (intensity level: 5) - 20 seconds of rest
- 30 seconds of effort (intensity level: 4-5) - 30 seconds of rest
- 40 seconds of effort (intensity level: 4-5) - 30 seconds of rest
- 30 seconds of effort (intensity level: 4-5) - 20 seconds of rest
- 20 seconds of effort (intensity level: 5)
Intensity level 4:
HFmax: 90-95%
Rule of speech: brief exchange of words
Intensity level 5:
HFmax: 95-100%
Rule of speech: No more exchange of words possible
The pyramid training can be carried out as follows:
- Round track: To ensure that the participants have enough space for the run, they can be spread out on the round track for the start. The sports director has all participants in view and can therefore start or stop the intervals by signalling. The participants decide for themselves how to spend the breaks (e.g. on the spot, marching or at a relaxed trot).
- Distance of at least 400 metres: Distances are marked with signs (every 25-50 metres). Each participant receives a stop/pulse watch, runs along the specified route for the duration of the respective exercise (observe the running directions as specified by the sports director so that the total length of the route is sufficient) and calculates the distance covered. It is possible for participants to start in stages, whereby the running routes must be determined in order to avoid collisions. If the course allows it, the sports director can give the start/stop signal for all participants (no staggering possible).
- Longer distance race: The distances are marked with signs (every 25-50m). Each participant receives a stop/pulse watch, runs the course independently and calculates the distance travelled (no staggered start of the participants necessary). During the breaks, participants wait in place or continue running at a relaxed trot until the break time has elapsed. After the last run, all runners return to the starting point, which takes additional time. Ideally, the running distance corresponds approximately to the distance that can be covered in the time available in order to generate as little additional displacement time as possible.
With the same duration of exertion, an attempt is made to ensure that the participants/groups also reach the same distance. However, there is very little time to calculate and record the distances, which makes it difficult to compare runs of the same duration in practice.
Distance markers (signs with metres)
1 signalling instrument (e.g. whistle)
FTA evaluation (group formation)
Per participant:
1 heart rate monitor
For sports leader or per participant/group:
1 stopwatch
Pyramid training (long-medium): 1000-600-600-300-300-800-300
Pyramid training
Single run or in strength groups, with the pacemaker controlling the time
Pyramid training is a special type of interval training that can be run extensively (longer sections at a brisk pace) or intensively (shorter sections at a very fast pace). As the name suggests, the effort initially increases continuously (in the form of a staircase) and is then reduced again to the same extent. There is always a trotting break between the efforts, which is measured by the intensity of the effort. The units should be run so fast that an interval can just be added at the end (extensive) or another interval would no longer feel possible (intensive). It is important to concentrate on an optimal running technique, because as soon as you are no longer running "cleanly", you are travelling too fast. The individual intervals are run very quickly, but as evenly as possible (the shorter the effort, the higher the intensity and vice versa). For shorter workouts, you cannot rely completely on the heart rate for intensity levels, as the heart rate only adapts to the exertion with a slight delay at the start of the workout.
Running training with alternating exertion and recovery:
- 1000m exertion (intensity level: 3-4)
- 600m exertion (intensity level: 4)
- 600m exertion (intensity level: 4)
- 300m exertion (intensity level: 4-5)
- 300m exertion (intensity level: 4-5)
- 800m exertion (intensity level: 3-4)
- 300m exertion (intensity level: 4-5)
Pause: 200-400m each
Intensity level 3:
HFmax: 80-90%
Rule of speech: speak in complete sentences
Intensity level 4:
HFmax: 90-95%
Rule of speech: brief exchange of words
Intensity level 5:
HFmax: 95-100%
Speech rule: no more exchange of words possible
Pyramid training can be completed both on a track and off-road. Running on the track has the advantage that the runner always has control over the distance and the current running pace, which can promote the development of a sense of speed. Whether on the track or off-road, the distances to be covered must be clearly defined for the participants (distance markings). It may also be the case that a turning point is defined if the total distance is not long enough (determine running directions to avoid collisions). After the exertion phase, the participants continue to trot at a relaxed pace until they reach the marker for the next exertion phase (variation: march). To ensure that the participants have enough space for the run, it makes sense to stagger them (spread them out on the track or send them out on the track in a staggered manner). Pyramid training can be carried out as follows:
- Round course: To ensure that the participants have enough space available for the run, they can be spread out on the round course at the start. The participants/groups start the intervals independently, complete the prescribed distances and, if desired, measure the times (note the times so that the same distances are completed in approximately the same time - note-taking is almost impossible to implement in practice). The participants themselves decide how they spend the breaks (e.g. marching or relaxed trotting - however, the same form of recovery should always be maintained in a training session). During the recovery phase, care is taken to ensure that no participants who are in a stress phase are disturbed.
- Distance of at least 1000 metres: Distances are marked with signs (every 25-50 metres). Each participant/group completes the specified distances independently according to the instructions of the sports director (observe running directions so that the total length of the course is sufficient). The times for the respective sections of the course can be recorded independently by the participants if desired (comparison of identical sections). The participants/groups cover the distances to the start of the next interval by marching or at a relaxed trot (keep the same form for training). There is the option of staggering the start of the participants, whereby the running routes must be clearly defined in order to avoid collisions.
- Long-distance circuit: The distances are marked with signs (every 25-50 metres). In the recovery phases, the participants/groups march or trot until the next interval start is marked (always choose the same type of break in a training session). The participants can time the different sections of the course so that the same distances can be compared with each other. After the last interval unit, all runners return to the starting point, which takes additional time. Ideally, the running distance corresponds approximately to the distance that can be covered in the time available in order to generate as little additional displacement time as possible (e.g. 5.4km with 4x200m, 1x300m and 1x400m break sections).
Distance markers (signs with metres)
Evaluation FTA (group formation)
Participant:
1 heart rate monitor
Participant/group:
1 stopwatch
Pyramid training (long-medium): 1000-800-600-400-600-800-1000
Pyramid training
Single run or in strength groups, with the pacemaker controlling the time
Pyramid training is a special type of interval training that can be run extensively (longer sections at a brisk pace) or intensively (shorter sections at a very fast pace). As the name suggests, the effort initially increases continuously (in the form of a staircase) and is then reduced again to the same extent. There is always a trotting break between the efforts, which is measured by the intensity of the effort. The units should be run so fast that an interval can just be added at the end (extensive) or another interval would no longer feel possible (intensive). It is important to concentrate on an optimal running technique, because as soon as you are no longer running "cleanly", you are travelling too fast. The individual intervals are run very quickly, but as evenly as possible (the shorter the effort, the higher the intensity and vice versa). For shorter workouts, you cannot rely completely on the heart rate for intensity levels, as the heart rate only adapts to the exertion with a slight delay at the start of the workout.
Running training with alternating exertion and recovery:
- 1000m exertion (intensity level: 3-4)
- 800m exertion (intensity level: 3-4)
- 600m exertion (intensity level: 4)
- 400m exertion (intensity level: 4)
- 600m exertion (intensity level: 4)
- 800m exertion (intensity level: 3-4)
- 1000m effort (intensity level: 3-4)
Pause: 200-400m each
Intensity level 3:
HFmax: 80-90%
Speaking rule: speak in full sentences
Intensity level 4:
HFmax: 90-95%
Speech rule: concise exchange of words
Pyramid training can be completed both on a track and off-road. Running on the track has the advantage that the runner always has control over the distance and the current running pace, which can promote the development of a sense of speed. Whether on the track or off-road, the distances to be covered must be clearly defined for the participants (distance markings). It may also be the case that a turning point is defined if the total distance is not long enough (determine running directions to avoid collisions). After the exertion phase, the participants continue to trot at a relaxed pace until they reach the marker for the next exertion phase (variation: march). To ensure that the participants have enough space for the run, it makes sense to stagger them (spread them out on the track or send them out on the track in a staggered manner). Pyramid training can be carried out as follows:
- Round course: To ensure that the participants have enough space available for the run, they can be spread out on the round course at the start. The participants/groups start the intervals independently, complete the prescribed distances and, if desired, measure the times (note the times so that the same distances are completed in approximately the same time - note-taking is almost impossible to implement in practice). The participants themselves decide how they spend the breaks (e.g. marching or relaxed trotting - however, the same form of recovery should always be maintained in a training session). During the recovery phase, care is taken to ensure that no participants who are in a stress phase are disturbed.
- Distance of at least 1600 metres: Distances are marked with signs (every 25-50 metres). Each participant/group completes the specified distances independently according to the instructions of the sports director (observe running directions so that the total length of the course is sufficient). The times for the respective sections of the course can be recorded independently by the participants if desired (comparison of identical sections). The participants/groups cover the distances to the start of the next interval by marching or at a relaxed trot (keep the same form for training). There is the option of staggering the start of the participants, whereby the running routes must be clearly defined in order to avoid collisions.
- Long-distance circuit: The distances are marked with signs (every 25-50 metres). In the recovery phases, the participants/groups march or trot until the next interval start is marked (always choose the same type of break in a training session). The participants can time the different sections of the course so that the same distances can be compared with each other. After the last interval unit, all runners return to the starting point, which takes additional time. Ideally, the running distance corresponds approximately to the distance that can be covered in the time available in order to generate as little additional displacement time as possible (e.g. 6.8km with 3x200m, 2x300m and 1x400m break sections).
Distance markers (signs with metres)
Evaluation FTA (group formation)
Participant:
1 heart rate monitor
Participant/group:
1 stopwatch
Pyramid training (long-medium): 1200-800-400-800-1200
Pyramid training
Single run or in strength groups, with the pacemaker controlling the time
Pyramid training is a special type of interval training that can be run extensively (longer sections at a brisk pace) or intensively (shorter sections at a very fast pace). As the name suggests, the effort initially increases continuously (in the form of a staircase) and is then reduced again to the same extent. There is always a trotting break between the efforts, which is measured by the intensity of the effort. The units should be run so fast that an interval can just be added at the end (extensive) or another interval would no longer feel possible (intensive). It is important to concentrate on an optimal running technique, because as soon as you are no longer running "cleanly", you are travelling too fast. The individual intervals are run very quickly, but as evenly as possible (the shorter the effort, the higher the intensity and vice versa). For shorter workouts, you cannot rely completely on the heart rate for intensity levels, as the heart rate only adapts to the exertion with a slight delay at the start of the workout.
Running training with alternating effort and recovery:
- 1200m effort (intensity level: 3-4)
- 800m effort (intensity level: 3-4)
- 400m effort (intensity level: 4)
- 800m effort (intensity level: 3-4)
- 1200m effort (intensity level: 3-4)
Pause: 200-400m each time
Intensity level 3:
HFmax: 80-90%
Rule of speech: speak in full sentences
Intensity level 4:
HFmax: 90-95%
Rule of speech: brief exchange of words
Pyramid training can be completed both on a track and off-road. Running on the track has the advantage that the runner always has control over the distance and the current running pace, which can promote the development of a sense of speed. Whether on the track or off-road, the distances to be covered must be clearly defined for the participants (distance markings). It may also be the case that a turning point is defined if the total distance is not long enough (determine running directions to avoid collisions). After the exertion phase, the participants continue to trot at a relaxed pace until they reach the marker for the next exertion phase (variation: march). To ensure that the participants have enough space for the run, it makes sense to stagger them (spread them out on the track or send them out on the track in a staggered manner). Pyramid training can be carried out as follows:
- Round course: To ensure that the participants have enough space available for the run, they can be spread out on the round course at the start. The participants/groups start the intervals independently, complete the prescribed distances and, if desired, measure the times (note the times so that the same distances are completed in approximately the same time - note-taking is almost impossible to implement in practice). The participants themselves decide how they spend the breaks (e.g. marching or relaxed trotting - however, the same form of recovery should always be maintained in a training session). During the recovery phase, care is taken to ensure that no participants who are in a stress phase are disturbed.
- Distance of at least 1600 metres: Distances are marked with signs (every 25-50 metres). Each participant/group completes the specified distances independently according to the instructions of the sports director (observe running directions so that the total length of the course is sufficient). The times for the respective sections of the course can be recorded independently by the participants if desired (comparison of identical sections). The participants/groups cover the distances to the start of the next interval by marching or at a relaxed trot (keep the same form for training). There is the option of staggering the start of the participants, whereby the running routes must be clearly defined in order to avoid collisions.
- Long-distance circuit: The distances are marked with signs (every 25-50 metres). In the recovery phases, the participants/groups march or trot until the next interval start is marked (always choose the same type of break in a training session). The participants can time the different sections of the course so that the same distances can be compared with each other. After the last interval unit, all runners return to the starting point, which takes additional time. Ideally, the running distance corresponds approximately to the distance that can be covered in the time available in order to generate as little additional displacement time as possible (e.g. 5.6km with 1x200m, 2x300m and 1x400m break sections).
Distance markers (signs with metres)
Evaluation FTA (group formation)
Participant:
1 heart rate monitor
Participant/group:
1 stopwatch
Pyramid training (long-medium): 1500-1000-500-1000-1500
Pyramid training
Single run or in strength groups, with the pacemaker controlling the time
Pyramid training is a special type of interval training that can be run extensively (longer sections at a brisk pace) or intensively (shorter sections at a very fast pace). As the name suggests, the effort initially increases continuously (in the form of a staircase) and is then reduced again to the same extent. There is always a trotting break between the efforts, which is measured by the intensity of the effort. The units should be run so fast that an interval can just be added at the end (extensive) or another interval would no longer feel possible (intensive). It is important to concentrate on an optimal running technique, because as soon as you are no longer running "cleanly", you are travelling too fast. The individual intervals are run very quickly, but as evenly as possible (the shorter the effort, the higher the intensity and vice versa). For shorter workouts, you cannot rely completely on the heart rate for intensity levels, as the heart rate only adapts to the exertion with a slight delay at the start of the workout.
Running training with alternating exertion and recovery:
- 1500m exertion (intensity level: 3-4)
- 1000m exertion (intensity level: 3-4)
- 500m exertion (intensity level: 4)
- 1000m exertion (intensity level: 3-4)
- 1500m exertion (intensity level: 3-4)
Pause: 200-400m each time
Intensity level 3:
HFmax: 80-90%
Rule of speech: speak in full sentences
Intensity level 4:
HFmax: 90-95%
Rule of speech: short exchange of words
Pyramid training can be completed both on a track and off-road. Running on the track has the advantage that the runner always has control over the distance and the current running pace, which can promote the development of a sense of speed. Whether on the track or off-road, the distances to be covered must be clearly defined for the participants (distance markings). It may also be the case that a turning point is defined if the total distance is not long enough (determine running directions to avoid collisions). After the exertion phase, the participants continue to trot at a relaxed pace until they reach the marker for the next exertion phase (variation: march). To ensure that the participants have enough space for the run, it makes sense to stagger them (spread them out on the track or send them out on the track in a staggered manner). Pyramid training can be carried out as follows:
- Round course: To ensure that the participants have enough space available for the run, they can be spread out on the round course at the start. The participants/groups start the intervals independently, complete the prescribed distances and, if desired, measure the times (note the times so that the same distances are completed in approximately the same time - note-taking is almost impossible to implement in practice). The participants themselves decide how they spend the breaks (e.g. marching or relaxed trotting - however, the same form of recovery should always be maintained in a training session). During the recovery phase, care is taken to ensure that no participants who are in a stress phase are disturbed.
- Distance of at least 1500 metres: Distances are marked with signs (every 25-50 metres). Each participant/group completes the specified distances independently according to the instructions of the sports director (observe running directions so that the total length of the course is sufficient). The times for the respective sections of the course can be recorded independently by the participants if desired (comparison of identical sections). The participants/groups cover the distances to the start of the next interval by marching or at a relaxed trot (keep the same form for training). There is the option of staggering the start of the participants, whereby the running routes must be clearly defined in order to avoid collisions.
- Long-distance circuit: The distances are marked with signs (every 25-50 metres). In the recovery phases, the participants/groups march or trot until the next interval start is marked (always choose the same type of break in a training session). The participants can time the different sections of the course so that the same distances can be compared with each other. After the last interval unit, all runners return to the starting point, which takes additional time. Ideally, the running distance corresponds approximately to the distance that can be covered in the time available in order to generate as little additional displacement time as possible (e.g. 6.7km with 1x200m, 2x300m and 1x400m break sections).
Distance markers (signs with metres)
Evaluation FTA (group formation)
Participant:
1 heart rate monitor
Participant/group:
1 stopwatch
Pyramid training (long-medium): 4-2-2-1-1-3-1
Pyramid training
Single run or in strength groups, with the pacemaker controlling the time
Pyramid training is a special type of interval training that can be run extensively (longer sections at a brisk pace) or intensively (shorter sections at a very fast pace). As the name suggests, the effort initially increases continuously (in the form of a staircase) and is then reduced again to the same extent. There is always a trotting break between the efforts, which is measured by the intensity of the effort. The units should be run so fast that an interval can just be added at the end (extensive) or another interval would no longer feel possible (intensive). It is important to concentrate on an optimal running technique, because as soon as you are no longer running "cleanly", you are travelling too fast. The individual intervals are run very quickly, but as evenly as possible (the shorter the effort, the higher the intensity and vice versa). For shorter workouts, you cannot rely completely on the heart rate for intensity levels, as the heart rate only adapts to the exertion with a slight delay at the start of the workout.
Running training with alternating exertion and recovery:
- 4 minutes of exertion (intensity level: 3-4)
- 2 minutes of exertion (intensity level: 4)
- 2 minutes of exertion (intensity level: 4)
- 1 minute of exertion (intensity level: 4-5)
- 1 minute of exercise (intensity level: 4-5)
- 3 minutes of exercise (intensity level: 3-4)
- 1 minute of exercise (intensity level: 4-5)
Break: 1-2 minutes each time
Intensity level 3:
HFmax: 80-90%
Speech rule: speaking in complete sentences
Intensity level 4:
HFmax: 90-95%
Speech rule: brief exchange of words
Intensity level 5:
HFmax: 95-100%
Speech rule: No more exchange of words possible
The pyramid training can be carried out as follows:
- Round track: To ensure that the participants have enough space for the run, they can be spread out on the round track for the start. The sports director has all participants in view and can therefore start or stop the intervals by signalling. The participants decide for themselves how to spend the breaks (e.g. on the spot, marching or at a relaxed trot).
- Distance of at least 1200 metres: Distances are marked with signs (every 25-50m). Each participant receives a stop/pulse watch, runs along the specified route for the duration of the respective exercise (observe the running directions as specified by the sports director so that the total length of the route is sufficient) and calculates the distance covered. It is possible for participants to start in stages, whereby the running routes must be determined in order to avoid collisions. If the course allows it, the sports director can give the start/stop signal for all participants (no staggering possible).
- Longer distance race: The distances are marked with signs (every 25-50m). Each participant receives a stop/pulse watch, runs the course independently and calculates the distance travelled (no staggered start of the participants necessary). During the breaks, participants wait in place or continue running at a relaxed trot until the break time has elapsed. After the last run, all runners return to the starting point, which takes additional time. Ideally, the running distance corresponds approximately to the distance that can be covered in the time available in order to generate as little additional displacement time as possible.
With the same duration of exertion, an attempt is made to ensure that the participants/groups also reach the same distance. However, there is very little time to calculate and record the distances, which makes it difficult to compare runs of the same duration in practice.
Distance markers (signs with metres)
1 signalling instrument (e.g. whistle)
FTA evaluation (group formation)
Per participant:
1 heart rate monitor
For sports leader or per participant/group:
1 stopwatch