Exercises (2296)
Rad
Floor and apparatus gymnastics


Stepping position, arms held high, pushing leg in front, lifting the swinging leg and lowering the torso, placing the front hand on the floor and turning the body to the side, pushing with the pushing leg and placing the second hand, swinging up to a straddled side handstand, quickly lowering and placing the swinging leg and then straightening up to stand upright.
Variant:
One-handed wheel, jumped wheel, wheel turn (rondat).
The participants practise the movement form independently using series of pictures or based on the instructor's demonstration of the exercise. The instructor (or a partner) gives feedback, provides support and checks that the exercise is being performed correctly.
4 soft mats (small) ► indoor version
1 row
outdoor:
turf field
Wheel turn
Floor and apparatus gymnastics


Hops, forward swing of the arms, placing the front leg on the floor, placing the arms on the floor and swinging into the side handstand (back hand parallel and front hand transverse to the direction of movement), closing the legs, push-off from the shoulders with a slight turn to land in the standing position facing the starting position.
The participants practise the movement form independently using series pictures or based on the demonstration of the exercise by the sports instructor. The instructor (or a partner) gives feedback, provides support and checks the correct execution of the exercise.
4 soft mats (small) ► indoor version
1 row
outdoor:
turf field
Reaction trapping
Coordination exercises
Partner work
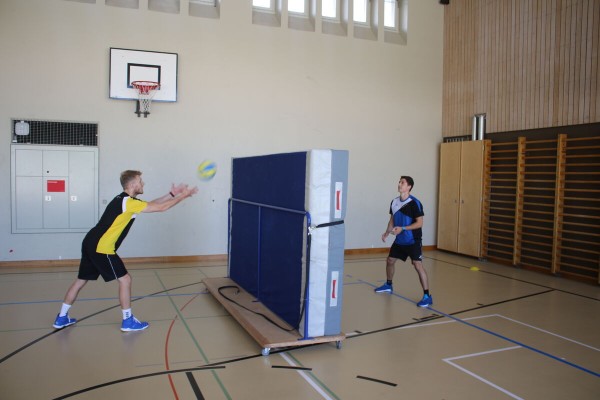
The participants throw a volleyball to each other over a thick mat into a field of approx. 5-6 metres defined by marker cones. To prevent an opponent scoring a point, the ball must be caught before it touches the ground. Throws that do not reach the playing field or get stuck on the mat result in a point for the opponent. Throws are only allowed from bottom to top.
► Reactivity
1 mat trolley (large; incl. mat)
1 volleyball
4 cones
Post setup:
The mat trolley serves as a boundary between the two halves of the playing field. The size of the playing field is marked with cones
Reaction trapping
Coordination exercises
Partner work
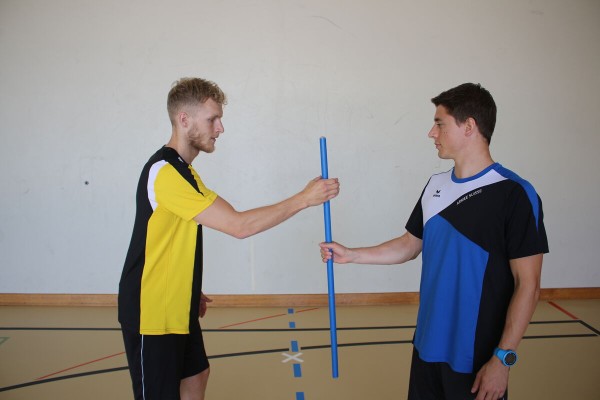
One participant supports themselves with their forearm on a vaulting box and holds their hand slightly open. His partner holds a stick (or floorball stick) in the opening of the active participant's hand (distance between palm and stick: approx. 1cm) with the end of the stick at the bottom edge of the hand. If the partner drops the stick, the active participant tries to catch it as quickly as possible.
Variant:
Perform the exercise simultaneously with both hands and one stick per hand. Only one stick is dropped at a time (choice reaction).
► Reactivity
1 vaulting box
1-2 (wooden) sticks or floorball sticks
Reaction trapping
Coordination exercises
Partner work

One participant sits on the floor with their back against the vaulting box. His legs are spread apart, his arms are held out in front of him and his gaze is fixed on a marker cone about 5-6 metres in front of him. The partner kneels/stands on the vaulting box and drops a foam/softball with their arms outstretched forwards. The seated participant tries to catch the ball before it falls to the floor. After a few attempts, the roles are swapped.
► Reactivity
1 vaulting box ► indoor version
1 marker cone/cap
1 foam/softball
Indoor set-up:
A marker cone/cap is located approximately 5-6 metres from the vaulting box.
Outdoor version:
Without vaulting box; the partner stands on the ground.
Reaction pass game
Coordination exercises
Partner work
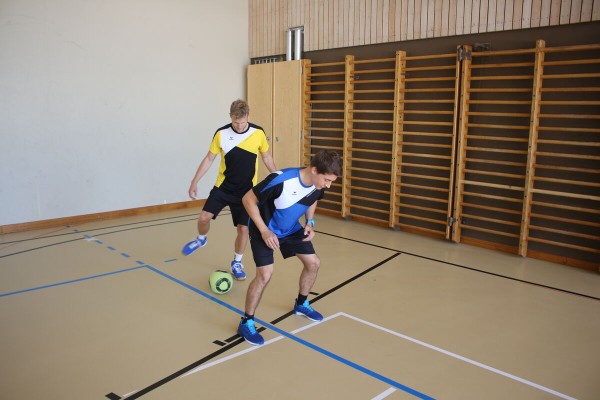
The participants stand behind each other, the participant at the back is equipped with a futsal/football. The person behind passes the ball to their partner from behind between their legs or throws it forwards over their partner's head. The partner must react as quickly as possible and intercept/stop the ball as early as possible. After a few attempts, the roles are reversed.
► Reactivity
1 Futsal/football
Reaction pass game
Coordination exercises
Partner work

A participant stands on a pommel horse. He has his hands stretched out to the side and is holding a volleyball in each hand. The second participant stands approx. 1-2 metres in front of the pommel horse and throws another volleyball to the participant standing on the horse. If the pass goes to the head, the ball is passed back with the head. If the pass comes to the feet, the ball is passed back with the left or right foot (depending on the side of the pass). If the pass comes to one of the outstretched arms, the ball held in the hands must be passed to the partner and the new ball must be caught. The passer can make the exercise easier or more difficult by looking at where the pass is made or not. After a few attempts, the roles are swapped.
► Balance and reaction skills
1 pommel horse
3 volleyballs
Rulebook
Miscellaneous
The sports manager explains the rules of the game form used in the main part to the participants (including organisational information).
Tyre guard
Forms of play / exercises
Group work
2 teams
Two teams play against each other in a limited playing area. A point is scored if a pass is made to a teammate who has at least one leg in a hoop. The defending team can block a hoop by placing a foot in it so that no points can be scored there (more hoops than defenders are needed for this type of exercise). The right to attack changes either after a certain time or after each loss of the ball or disc. The rules of the respective game form naturally apply (e.g. Smolball, Intercrosse/Lacrosse, Floorball, Frisbee Ultimate, Howler).
Variant I:
The exercise form can be played with all balls, throwing discs or game equipment. The throwing/passing technique or passing technique can be specified.
Variant II:
Use more than one ball.
Participant:
1 stick/stick ►Intercrosse/Lacross, Smolball, Floorball
1-3 balls ►Basketball, Blitzball/Touchrugby, Frisbee Ultimate, FooBaSKILL, Futsal/Football, Handball, Intercrosse/Lacross, Smolball, Tchoukball, Floorball
4 marking cones/caps ►Field markings (optional)
x hoops
x playing ribbons/rubbers ►Team identification
Tyre jumping
Coordination exercises
Individual work
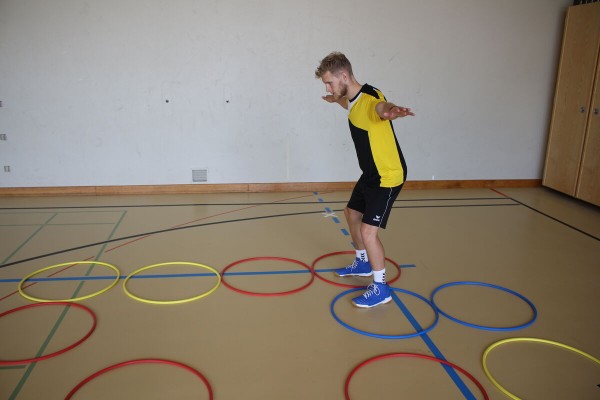
The participant hops over the tyres distributed on the floor. If two hoops are at the same height, both legs are used. Individual hoops are passed with the leg corresponding to the respective side. The hoops can be jumped through forwards or backwards. To make hoop jumping more difficult, the respective arm on the same or even opposite side can be lifted or stretched to the side at the same time when standing.
► Rhythmisation ability, orientation ability, balance ability
20-30 tyres
Post set-up:
Lay out the tyres to form a jumping course.
Tyre relay
Forms of play / exercises
Group work
4-6 participants per group
The first participant in the group runs (alone) to the turnaround, slips through a tyre there and runs back to the group. Now the first participant runs with the second participant (holding hands) to the turning point, where they have to slip through the tyre again. The hands must not be released. This scenario is repeated until the entire group has slipped through the hoop (together with constant hand grasping). After this round, the first participant (who has travelled the longest so far) is allowed to disengage and the remaining group members continue the exercise. Finally, only the participant who was the last to join the group runs. At the end, all participants in the group have completed the same number of runs. Which group was the first to complete the task?
Per group:
2 colouring sticks
1 tyre
Tyre pulling
Fighting and roughhousing games
Partner work
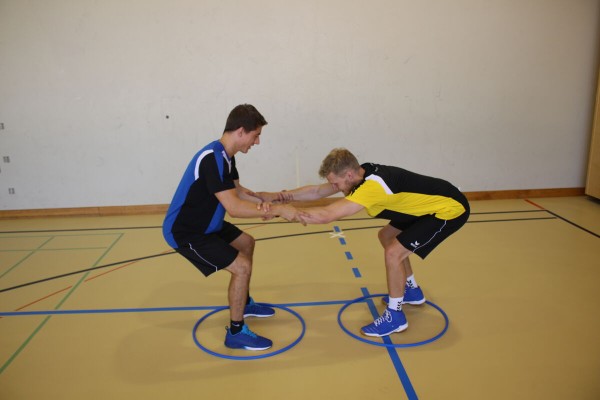
Two participants stand opposite each other in a hoop and grab each other by the hands or forearms. They try to push or pull their opponent out of the hoop. The first person to touch the ground outside the tyre loses.
2 tyres
Reserve
Miscellaneous
The sports manager plans a reserve in the main part so that there is certainly no lack of time (e.g. additional breaks are necessary, postponement time could take longer, post changes are less speedy, etc.).
Rescue and transport
Power
Partner work
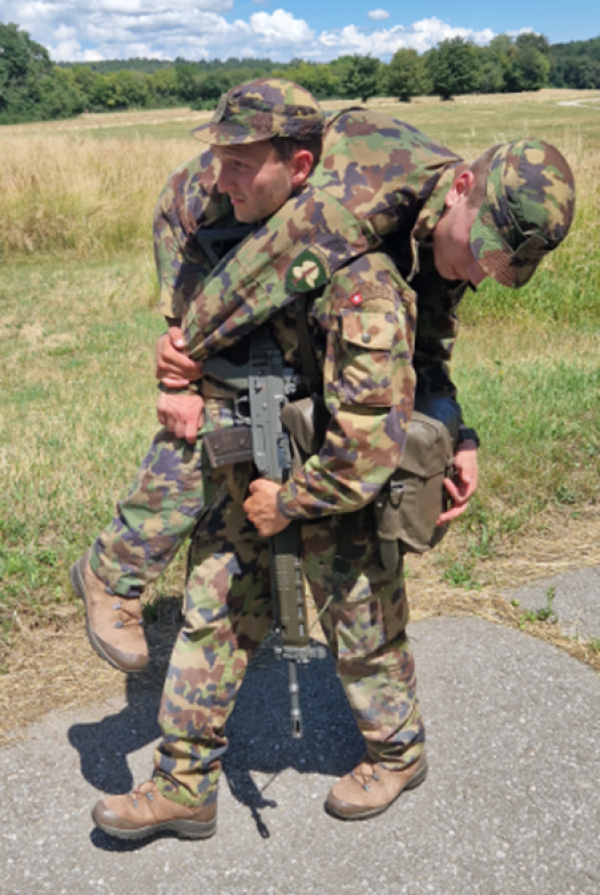
Transport your comrade from one fanjon to another (Gamstrage grip) using the transport techniques from the regulations for self-help and comrade assistance (59.005).
Attention:
The back must be straight when lifting the comrade.
Material per participant: Tenue CNG 428
Additional material: 2 fanjons
Risk run
Forms of play / exercises
Group work
4-5 participants per group
The front runners compete against each other (the group can determine the order of the runners accordingly) and collect points for their group. The runners choose between reversal points at different distances (e.g. colouring stick, marker cone or cones). More risk (further distance) is rewarded with more points (3 points, 2 points, 1 point), but only the first to arrive receives the points scored, the rest go home empty-handed only the first two (or more, depending on the number of groups, e.g. the first two teams) receive points. Which group has the most points after a run (each group member completes one run), or which group is the first to score a number of points? Each run only starts at the signal of the game leader.
Possible forms of locomotion:
- four-footed forwards/backwards
- in a push-up position with a partner holding the legs up
- gamstrage grip
Per group:
4 colouring sticks
Roll backwards
Floor and apparatus gymnastics


From a standing position, roll backwards and place your feet on the floor behind your hands as quickly and as close as possible to return to a standing position. Curl your upper body like a turtle shell during the entire rolling movement from the top of your head to your tailbone. Roll over the upper back and shoulders and not over the head.
The participants practise the form of movement independently using series of pictures or based on the instructor's demonstration of the exercise. The instructor (or a partner) gives feedback, provides support and checks that the exercise is being performed correctly.
4 soft mats (small) ► indoor version
1 row
outdoor:
turf field
Roll backwards through the handstand (Streuli)
Floor and apparatus gymnastics


Roll backwards from an upright position, placing your feet on the floor as quickly and as close as possible behind your hands. Curl your upper body like a turtle shell during the entire rolling movement from the top of your head to your tailbone. Roll over the upper back and shoulders and not over the head. At the end of the roll, push your body into a handstand (full body stretch). The arms can be bent at first and then stretched or remain stretched throughout the movement. From the handstand, place the legs on the floor to return to the standing position.
In order to be able to perform this sequence of movements, it is necessary to be able to roll forwards and backwards, have appropriate support in the arms and master the tilt kick movement.
The participants practise the form of movement independently using series pictures or based on the demonstration of the exercise by the sports leader. The sports instructor (or a partner) gives feedback, provides support and checks that the exercise is being performed correctly.
4 soft mats (small) ► indoor version
1 row
outdoor:
turf field
Roll forwards and backwards
Floor and apparatus gymnastics


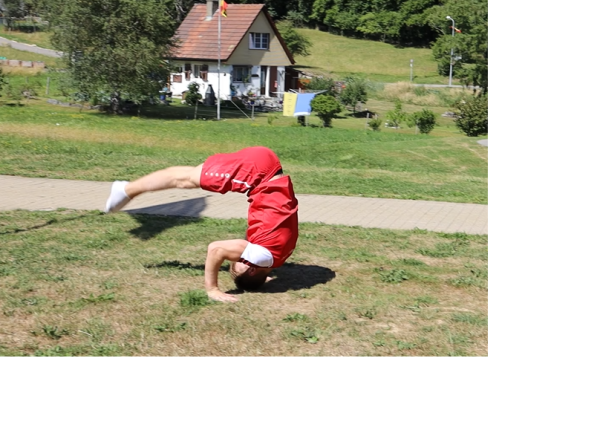


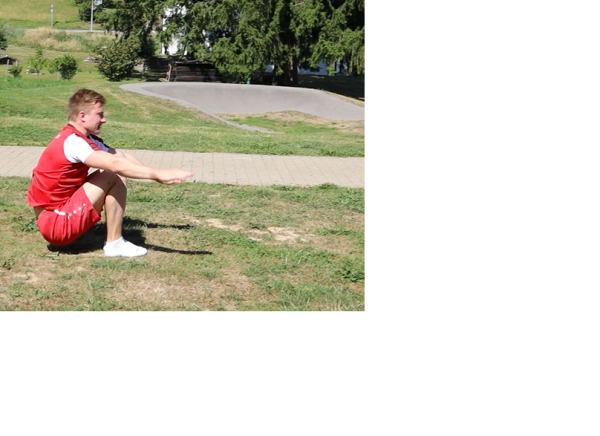


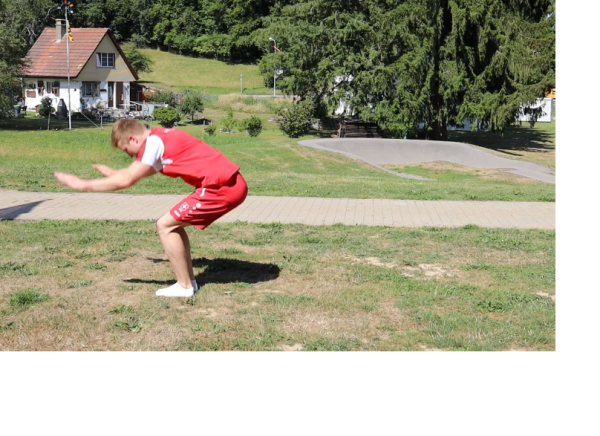


The two rolls are performed one after the other:
Roll fw:
From an upright standing position, perform a forward roll and land back on your feet without using your hands to stand up.
Roll rw:
From a standing position, roll backwards and place your feet on the floor as quickly and as close as possible behind your hands to return to a standing position. Curve the upper body from the top of the head to the tailbone like a tortoise shell during the entire rolling movement. Roll over the upper back and shoulders and not over the head.
The participants practise the form of movement independently using series of pictures or based on the instructor's demonstration of the exercise. The instructor (or a partner) gives feedback, provides support and checks that the exercise is being performed correctly.
4 soft mats (small) ► indoor version
1 row
outdoor:
turf field
Roll forwards
Floor and apparatus gymnastics


From an upright standing position, perform a forward roll and land back on your feet without using your hands when standing up.
The participants practise the movement independently using series of images or based on the instructor's demonstration of the exercise. The instructor (or a partner) gives feedback, provides support and checks that the exercise is being performed correctly.
4 soft mats (small) ► indoor version
1 row
outdoor:
turf field
Roll with raised arms and legs in lateral position left/right
Power
Individual work


Lay on your side, stretch your legs and arms and lift them slightly off the floor. Pull your navel towards your spine and consciously tense your abdomen and then change your side position without changing your body position (roll alternately to the right or left side).
Attention:
Stretched arms and legs practically form a line.
Lighten:
Just hold the position with your arms and legs raised and switch sides from time to time.
Harden:
Add weight to your arms and/or legs.
2-4 weight cuffs/2 weight balls/dumbbells ► Make the exercise more difficult (additional weight)
Rotation of the upper body in frontal stance to the wall (left) ► standing upper body rotation
Power
Individual work
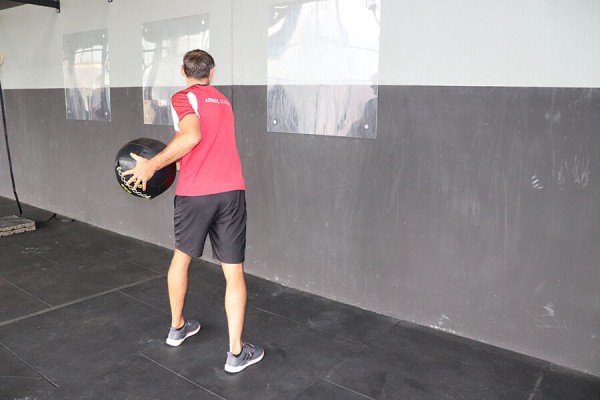
Stand upright in front of a wall, shoulder-width apart (facing the wall), with arms bent (approximately 90 degrees at the elbow joint), holding a medicine ball in front of the body with both hands slightly below chest height. The upper body is turned/rotated as far as possible to the left side (gaze follows the movement), while the legs and arms remain stable (lift the heel on the opposite side - right - as far as possible). Then swing the upper body back to the starting position and at the same time throw the ball (sideways) against the wall. Catch the ball and return to the starting position to restart the exercise.
Attention:
Tighten your stomach, keep your back straight, your pelvis remains in place and only your upper body moves.
Lighten:
Smaller movements (less rotation); lighter ball.
Harden:
Additional weight (on the arms); heavier ball; unstable base.
1 wall
1 medicine ball
1 volleyball or football ► make the exercise easier
2 weight cuffs ► make the exercise more difficult (additional weight)
1-2 balance cushions/1 balance board ► make the exercise more difficult (unstable surface)
Rotation of the upper body in frontal stance to the wall (right) ► standing upper body rotation
Power
Individual work

Stand upright in front of a wall, shoulder-width apart (facing the wall), with arms bent (approximately 90 degrees at the elbow joint), holding a medicine ball in front of the body with both hands slightly below chest height. The upper body is turned/rotated as far as possible to the right side (gaze follows the movement), while the legs and arms remain stable (lift the heel on the opposite side - left - as far as possible). Then swing the upper body back to the starting position and at the same time throw the ball (sideways) against the wall. Catch the ball and return to the starting position to restart the exercise.
Attention:
Tighten your stomach, keep your back straight, your pelvis remains in place and only your upper body moves.
Lighten:
Smaller movements (less rotation); lighter ball.
Harden:
Additional weight (on the arms); heavier ball; unstable base.
1 wall
1 medicine ball
1 volleyball or football ► make the exercise easier
2 weight cuffs ► make the exercise more difficult (additional weight)
1-2 balance cushions/1 balance board ► make the exercise more difficult (unstable surface)
Rotation of the upper body in frontal stance alternating to the wall ► standing upper body rotation
Power
Individual work


Stand upright, shoulder-width apart, in front of a wall (facing the wall), with arms bent (approximately 90 degrees at the elbow joint), holding a medicine ball in front of the body with both hands slightly below chest height. The upper body is turned/rotated as far as possible to the side (gaze accompanies the movement), while the legs and arms remain stable (lift the heel on the opposite side of the rotation movement at most). Then swing the upper body back to the starting position and at the same time throw the ball (sideways) against the wall. Catch the ball and return to the starting position to start the same exercise on the other side.
Attention:
Tighten your abdomen, keep your back straight, your pelvis stays in place and only your upper body moves.
Lighten:
Smaller movements (less rotation); lighter ball.
Harden:
Additional weight (on the arms); heavier ball; unstable base.
1 wall
1 medicine ball
1 volleyball or football ► make the exercise easier
2 weight cuffs ► make the exercise more difficult (additional weight)
1-2 balance cushions/1 balance board ► make the exercise more difficult (unstable surface)
Rotation of the upper body while standing sideways to the wall (left) ► standing upper body rotation
Power
Individual work


Stand upright in front of a wall (facing the wall horizontally, left shoulder closer to the wall), with arms bent (approximately 90 degrees at the elbow joint), hold a medicine ball in front of the body with both hands slightly below chest height. The upper body is turned/rotated to the side towards the wall in a swinging motion (gaze accompanies the movement) until the arms are facing the wall and the ball is thrown against the wall at the same time. During the rotation movement, the legs and arms remain stable (lift the heel of the foot furthest from the wall at most). Catch the ball and bring your upper body back to the starting position.
Attention:
Tighten your stomach, keep your back straight, your pelvis remains in place and only your upper body moves.
Lighten:
Smaller range of motion by pointing the stance more towards the wall (less rotation); lighter ball.
Harden:
Additional weight (on the arms); heavier ball; unstable base.
1 wall
1 medicine ball
1 volleyball or football ► make the exercise easier
2 weight cuffs ► make the exercise more difficult (additional weight)
1-2 balance cushions/1 balance board ► make the exercise more difficult (unstable surface)
Rotation of the upper body while standing sideways to the wall (right) ► standing upper body rotation
Power
Individual work


Stand upright in front of a wall (facing the wall horizontally, right shoulder closer to the wall), with arms bent (approximately 90 degrees at the elbow joint), hold a medicine ball in front of the body with both hands slightly below chest height. The upper body is turned/rotated to the side towards the wall in a swinging motion (gaze accompanies the movement) until the arms are facing the wall and the ball is thrown against the wall at the same time. During the rotation movement, the legs and arms remain stable (lift the heel of the foot furthest from the wall at most). Catch the ball and bring your upper body back to the starting position.
Attention:
Tighten your stomach, keep your back straight, your pelvis remains in place and only your upper body moves.
Lighten:
Smaller range of motion by pointing the stance more towards the wall (less rotation); lighter ball.
Harden:
Additional weight (on the arms); heavier ball; unstable base.
1 wall
1 medicine ball
1 volleyball or football ► make the exercise easier
2 weight cuffs ► make the exercise more difficult (additional weight)
1-2 balance cushions/1 balance board ► make the exercise more difficult (unstable surface)