
Exercises (3274)
Move your arms upwards while standing
Power
Individual work


Standing upright, hold two dumbbells at the side of your body with your arms hanging down, grasp the dumbbells with an underhand grip (palms facing forwards), raise your practically straight arms upwards in a circular motion so that your almost closed arms are pointing diagonally upwards in front of your head (first raise the dumbbells sideways before bringing your arms together slightly above head height at about shoulder height). While raising the dumbbells, turn your arms in so that the backs of your hands are pointing upwards in the end position. Then move your arms back to the starting position in the reverse sequence of movements.
Attention:
Keep your shoulders lowered and your back straight; always keep your arms under tension (do not let them hang completely or bring them fully together).
Lighten:
Without/less weight.
Harden:
More weight or additional weight (on the arms).
2 dumbbells
2 weight cuffs ► Make the exercise more difficult (additional weight)
Move your arms forwards and backwards in the forearm plank position ► ball plank rollout
Power
Individual work
Rest on your forearms on two exercise balls, legs straight, feet hip-width apart. Actively engage your entire body (core, glutes, legs). Roll the balls forward slowly and in a controlled manner (your body will gradually extend as you do so). Stop briefly at the point where you can no longer maintain the tension, then roll back to the starting position. The entire movement should be slow and controlled (no momentum) and the body should remain in a stable line.
Attention:
Do not arch your back when rolling forward; do not lift your bottom too high or let it drop, do not roll too quickly (momentum rather than control), do not let your shoulders roll inwards, do not rely solely on your arms (instead of your core – incorrect movement pattern), do not roll too far forward (loss of control in the lower back).
Lighten:
Smaller rolling motion (just slightly forwards and backwards); keep your knees on the floor instead of your feet (knee plank rollout); start with the ball closer to your body; perform the exercise using a gym ball.
Harden:
Roll further forwards (greater leverage); stand on one leg or with feet closer together; slow down the eccentric phase; hold the stretched position; use a high plank position instead of a forearm plank.
2 exercise balls
Move the arms forwards and backwards in a prone position ► W-extension / W-raise / W-Y-extension
Power
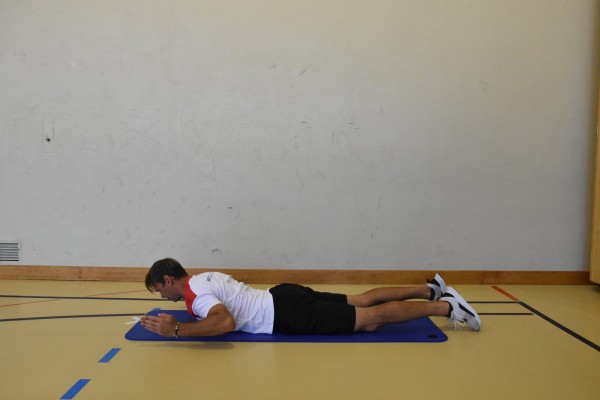
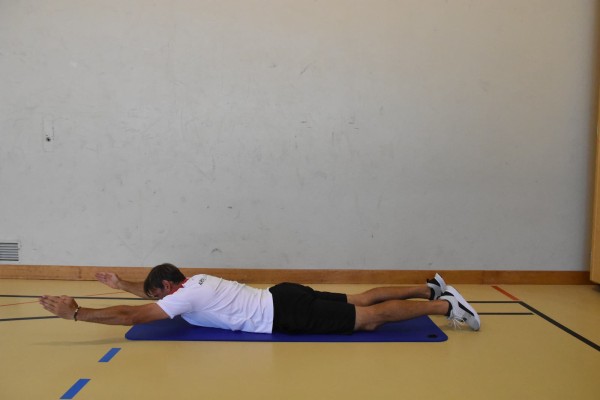
Lying on your stomach with your upper body slightly raised, feet shoulder-width apart, arms bent beside your body (hands at head height - palms facing inwards or downwards - W position), stretch your arms out diagonally forwards as an extension of your body and bend them back to the starting position.
Attention:
Do not lower your upper body and arms completely.
Lighten:
Lower your upper body/arms after each repetition or every now and then.
Harden:
Additional weight on the arms/in the hands.
Note:
The position of the hands is important for the target muscles and the position of the joints.
Palms facing down (pronated grip) = muscle activation: emphasizes the upper trapezius and the external rotators of the shoulder (e.g., infraspinatus, teres minor) / shoulder position: shoulders are more externally rotated / advantage: good posture correction, strengthens the back of the shoulders / disadvantage: can be uncomfortable or restrictive if you have shoulder problems.
Palms facing each other (neutral grip) = muscle activation: activates the middle trapezius, rhomboids, and rear deltoid muscles more strongly / shoulder position: less external rotation, easier on the joints / advantage: often more comfortable for the shoulder joints, better control / disadvantage: less targeted external rotation if that is the goal.
When to choose which: Shoulder health/rehab = neutral (palms facing each other)/focus on external rotators = pronated (palms facing down)/improve posture = both options are useful/keep movement pain-free = neutral is preferable.
Conclusion: The hand position during the W extension influences which parts of the shoulder muscles are used more and how stressful the movement is for the shoulder joints. Both variants are useful – depending on the goal or how it feels, both can be used (or even alternated during training).
Variation I:
Alternately raise one arm (instead of both at the same time).
Variation II:
Position on a flat bench or an incline bench.
2 weight cuffs/weight balls/dumbbells ► Make the exercise more difficult (additional weight)
Move the arms forwards and backwards in a prone position ► W-extension / W-raise / W-Y-extension
Power
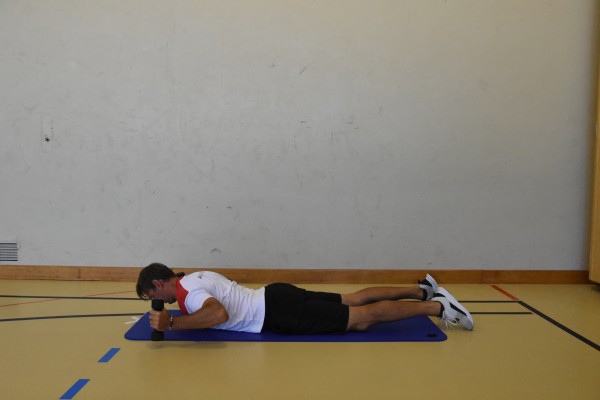
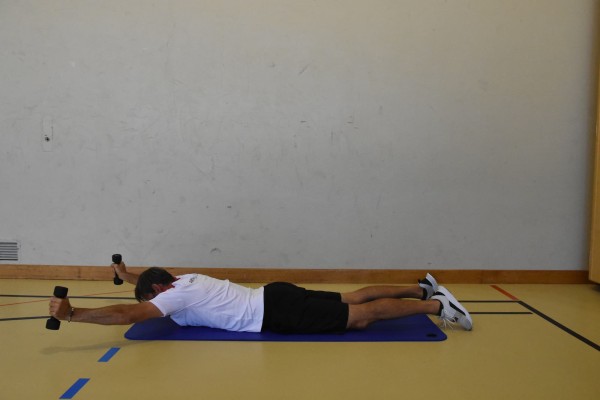
Lying on your stomach with your upper body slightly raised, feet shoulder-width apart, arms bent beside your body (hands at head height - palms facing inwards or downwards - W position), hold a (light) dumbbell in each hand, stretch your arms out diagonally forwards as an extension of your body and bend them back to the starting position.
Attention:
Do not lower your upper body and arms completely.
Lighten:
Lower your upper body/arms after each repetition or every now and then.
Harden:
Additional weight on the arms/in the hands.
Note:
The position of the hands is important for the target muscles and the position of the joints.
Palms facing down (pronated grip) = muscle activation: emphasizes the upper trapezius and the external rotators of the shoulder (e.g., infraspinatus, teres minor) / shoulder position: shoulders are more externally rotated / advantage: good posture correction, strengthens the back of the shoulders / disadvantage: can be uncomfortable or restrictive if you have shoulder problems.
Palms facing each other (neutral grip) = muscle activation: activates the middle trapezius, rhomboids, and rear deltoid muscles more strongly / shoulder position: less external rotation, easier on the joints / advantage: often more comfortable for the shoulder joints, better control / disadvantage: less targeted external rotation if that is the goal.
When to choose which: Shoulder health/rehab = neutral (palms facing each other)/focus on external rotators = pronated (palms facing down)/improve posture = both options are useful/keep movement pain-free = neutral is preferable.
Conclusion: The hand position during the W extension influences which parts of the shoulder muscles are used more and how stressful the movement is for the shoulder joints. Both variants are useful – depending on the goal or how it feels, both can be used (or even alternated during training).
Variation I:
Alternately raise one arm (instead of both at the same time).
Variation II:
Position on a flat bench or an incline bench.
2 weight cuffs/weight balls/dumbbells
Move the arms forwards and backwards in a prone position ► W-extension / W-raise / W-Y-extension
Power
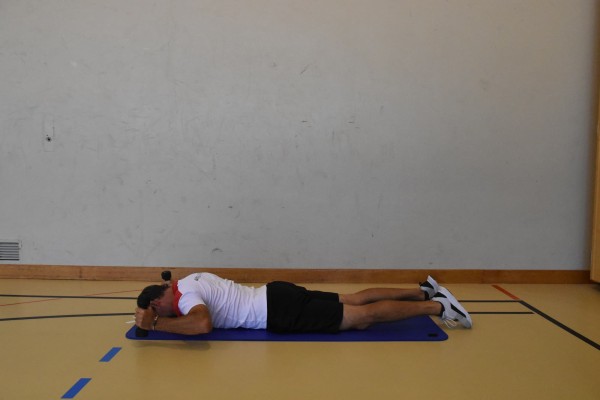
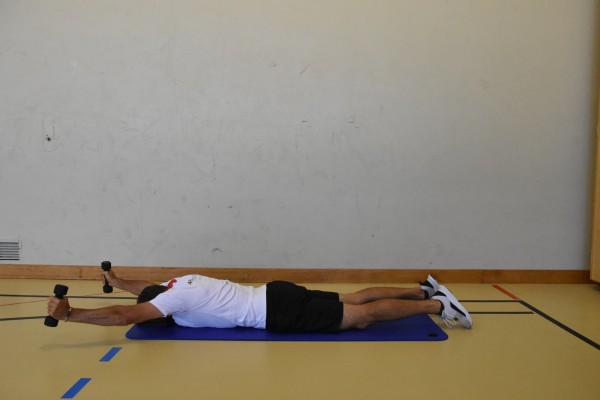
Lying on your stomach with your forehead resting on a folded cloth, feet shoulder-width apart, arms bent beside your body (hands at head height - palms facing inwards or downwards - W position), hold a (light) dumbbell in each hand, stretch your arms out diagonally forwards as an extension of your body and bend them back to the starting position.
Attention:
Do not lower your upper body and arms completely.
Lighten:
Lower your upper body/arms after each repetition or every now and then.
Harden:
Additional weight on the arms/in the hands.
Note:
The position of the hands is important for the target muscles and the position of the joints.
Palms facing down (pronated grip) = muscle activation: emphasizes the upper trapezius and the external rotators of the shoulder (e.g., infraspinatus, teres minor) / shoulder position: shoulders are more externally rotated / advantage: good posture correction, strengthens the back of the shoulders / disadvantage: can be uncomfortable or restrictive if you have shoulder problems.
Palms facing each other (neutral grip) = muscle activation: activates the middle trapezius, rhomboids, and rear deltoid muscles more strongly / shoulder position: less external rotation, easier on the joints / advantage: often more comfortable for the shoulder joints, better control / disadvantage: less targeted external rotation if that is the goal.
When to choose which: Shoulder health/rehab = neutral (palms facing each other)/focus on external rotators = pronated (palms facing down)/improve posture = both options are useful/keep movement pain-free = neutral is preferable.
Conclusion: The hand position during the W extension influences which parts of the shoulder muscles are used more and how stressful the movement is for the shoulder joints. Both variants are useful – depending on the goal or how it feels, both can be used (or even alternated during training).
Variation I:
Alternately raise one arm (instead of both at the same time).
Variation II:
Position on a flat bench or an incline bench.
2 weight cuffs/weight balls/dumbbells
Move the arms forwards and backwards in a prone position ► W-extension / W-raise / W-Y-extension
Power
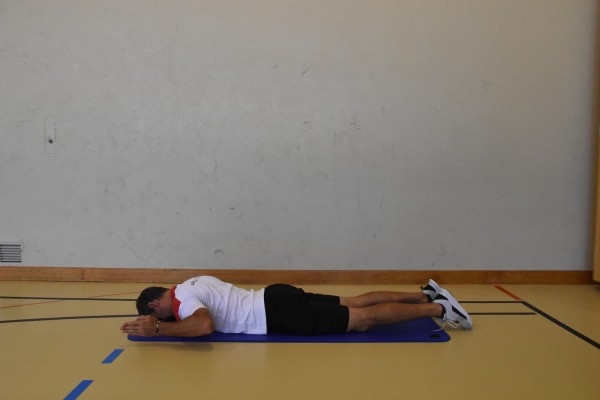
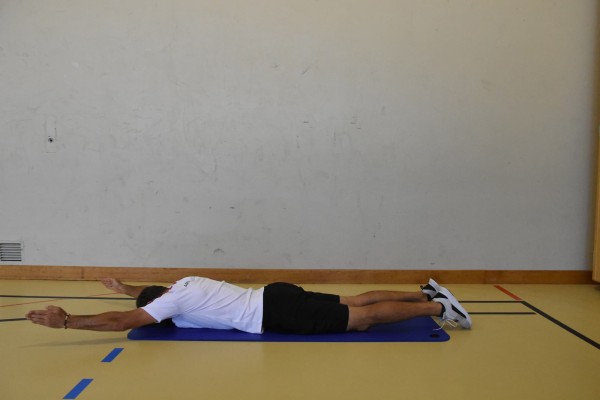
Lying on your stomach with your forehead resting on a folded cloth, feet shoulder-width apart, arms bent beside your body (hands at head height - palms facing inwards or downwards - W position), stretch your arms out diagonally forwards as an extension of your body and bend them back to the starting position.
Attention:
Do not lower your upper body and arms completely.
Lighten:
Lower your upper body/arms after each repetition or every now and then.
Harden:
Additional weight on the arms/in the hands.
Note:
The position of the hands is important for the target muscles and the position of the joints.
Palms facing down (pronated grip) = muscle activation: emphasizes the upper trapezius and the external rotators of the shoulder (e.g., infraspinatus, teres minor) / shoulder position: shoulders are more externally rotated / advantage: good posture correction, strengthens the back of the shoulders / disadvantage: can be uncomfortable or restrictive if you have shoulder problems.
Palms facing each other (neutral grip) = muscle activation: activates the middle trapezius, rhomboids, and rear deltoid muscles more strongly / shoulder position: less external rotation, easier on the joints / advantage: often more comfortable for the shoulder joints, better control / disadvantage: less targeted external rotation if that is the goal.
When to choose which: Shoulder health/rehab = neutral (palms facing each other)/focus on external rotators = pronated (palms facing down)/improve posture = both options are useful/keep movement pain-free = neutral is preferable.
Conclusion: The hand position during the W extension influences which parts of the shoulder muscles are used more and how stressful the movement is for the shoulder joints. Both variants are useful – depending on the goal or how it feels, both can be used (or even alternated during training).
Variation I:
Alternately raise one arm (instead of both at the same time).
Variation II:
Position on a flat bench or an incline bench.
2 weight cuffs/weight balls/dumbbells ► Make the exercise more difficult (additional weight)
Nordic Walking
Running training
Together in a group or individually
In a group or as an individual runner, a route defined by the sports leader is completed.
- Intensity level: 1-2
- Heart rate: 60-80%
- Speech rule: sing - chat
Variant:
The sports leader can specify the form of movement for certain sections of the route (e.g. marked with fanjons/trass tape).The sports director can specify the form of movement for certain sections of the course (e.g. marked with fanjons/tracing tape) (from fanjon 1: double pole, 2: diagonal stride, 3: hop run, 4: relaxed running stride).
Participant:
1 pair of Nordic walking poles
Fanjons/tracing tape ►Variant
Nordic walking (active recovery)
Regeneration
Together in the group
Active recovery is better than lying on the couch and doing nothing. However, it should be moderate exercise, i.e. easy cycling, jogging or Nordic walking in a more leisurely form.
In the group, a route defined by the sports leader is completed at a moderate pace.
Intensity level: 1
Heart rate: 60-70%
Rule of thumb: Singing
Participant:
1 pair of Nordic walking poles
Number run
Orienteering
Single run or 2/3 groups
In the terrain, the sports director distributes posts in advance, which the participants then run to individually or in small groups during the numbered run. For this purpose, the participants receive a control overview and a running map. All even or odd-numbered controls are run according to the 1st marked control. Depending on the time available, the 3-person rule could also be an option. The numbered run is carried out as a form of exercise, as the different running routes vary. In this variant, the participants can be sent on the course without staggering, as they do not start in the same direction. The control overview with the running map is handed out together with the start signal. For the numbered run, each participant/group has a defined amount of time to find as many or all of the controls as possible. Under certain circumstances, several runs can also be carried out (e.g. even and odd controls).
Variant I:
Prepare the control transfer point: The participants do not receive a map on which the controls are already marked, but must mark the controls themselves at a control transfer point (e.g. using coordinates, azimuth or measuring point method). The control sheets remain at the start even after the transfer. Before the participants set off on the course, the sports director checks the marked controls.
Orienteering controls (to be unplugged)
1 stopwatch
Participant/group:
1 orienteering map with control overview incl. designation (prepared in advance by the sports director)
1 running map form 30.063
1 bussole
Variation of the exercise:
Participant/group:
1 control transfer sheet
1 map scale
1 pencil and eraser
Number run
Basic training
Group work
Groups of 4 (possibly integrate new group formation)
Form groups of four and number the participants within the group. The participants run behind each other in single file with a certain distance between them and at a normal basic pace (number one at the very back, number four at the very front). Number one catches up with number two, then number two catches up with number three, before number three catches up with number four. The number four now runs back to the number one before catching up and replacing the person in front starts all over again. According to the time specified by the sports director, the participants continue to move at the basic pace and the respective pace changes without interruption.
Variant I:
Change the distance of the participants.
Variant II:
Change the basic pace.
Variant III:
Change the group size (3-8 participants).
Variant IV:
The number one picks up the number two. The pair catches up with number three together, number three now takes over from number one, etc.
Intensity level: 3 (medium)
HFmax: 80-90%
Speaking rule: speak in complete sentences
Note: the exercise form is suitable for tempo and intensity changes
No material required
Number run
Basic training
Group work
Groups of 4 (possibly integrate new group formation)
Form groups of four and number the participants within the group. The participants run behind each other in single file at a certain distance and at a normal basic pace (number four at the very back, number one at the very front). Number four overtakes all the other participants and continues to run at a faster pace until the distance to the person behind (number one) is approximately the same as the distance between the other runners. The number three then starts to overtake the runners in front (possibly with a shout from the new leader). According to the time set by the sports leader, the participants continue to move at the basic pace and the respective pace changes without interruption.
Variant I:
Change the distance of the participants.
Variant II:
Change the basic pace.
Variant III:
Change the group size (3-8 participants).
Intensity level: 3 (medium)
HFmax: 80-90%
Speaking rule: speak in complete sentences
No material required
Number race
Increase pulse
Group work
4-6 participants per group
All participants in a group are given a number and line up in a column behind the starting marker. On an acoustic signal (e.g. a number called out by the sports leader, number of beats on the tambourine or tapping with sticks), the runners matching the sound (same numbers) compete against each other by running round a turnaround and returning to the starting position. The winning group receives a point (points may be awarded to the winner as well as the second and third place finishers). After a certain number of rounds, the groups are reshuffled so that the same participants do not always compete against each other.
Variant:
Change the form of movement (e.g. one-legged hopping, four-footed gait, running backwards).
Per group:
2 colouring sticks
Depending on signal selection:
1 tambourine
2 drumsticks
Number race in a circle
Increase pulse
Group work
10-20 participants per group
Choops are distributed in a circle in the hall/area (even number and labelled with number sheets) so that one participant can stand in each hoop (number of participants = number of hoops). The two teams line up opposite each other. The tyres opposite each other are given the same number (for two teams). When an acoustic signal is given (e.g. a number is called out by the sports leader, the number of beats on the tambourine or tapping with sticks), the participants with the same number compete against each other. The first person to take the opponent's position wins the round and collects a point for their team. The game leader can decide whether the run has to go through the circle or around the circle (possibly changing the form of locomotion, e.g. one-legged hopping, four-footed gait, running backwards). After a certain number of rounds, the positions within the team are swapped so that the same participants do not always compete against each other. Which team collects more points?
Variant:
Individual competition. Each participant counts the rounds they have won. The positions must be swapped as often as possible (e.g. after each duel, one side swaps positions with its left neighbour and the other with its right neighbour) so that there are many different duels. The disadvantage of this form is that not all participants complete the same number of runs.
Per participant:
1 hoop
x number sheets
Depending on signal selection:
1 tambourine
2 drumsticks
Move upper leg forwards in lateral forearm support (left) ► knee raise lateral pillar bridge / side bridge
Power
Individual work

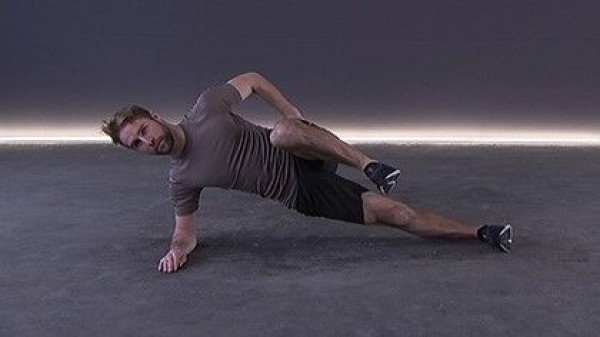
Side support on the (left) forearm, push the thigh of the upper leg straight out forwards (lower leg parallel, thigh bent at approx. 90 degrees to the body/leg) and return to the starting position.
Attention:
Head, torso, hips and knees practically form a line (pelvis does not tilt backwards or forwards), keep the shoulder above the elbow.
Lighten:
Knee on the floor; move your leg less forwards; just hold the position.
Harden:
Additional weight (for the free leg or on the hip); unstable support (possible for both the arm and the leg).
1 weight cuff/weight vest/weight disc/sandbag ► making the exercise more difficult (additional weight)
1 ball/1-2 balance cushions/1 balance board ► making the exercise more difficult (unstable surface)
Move upper leg forwards in lateral forearm support (right) ► knee raise lateral pillar bridge / side bridge
Power
Individual work


Side support on the (right) forearm, push the thigh of the upper leg straight out forwards (lower leg parallel, thigh bent at approx. 90 degrees to the body/leg) and return to the starting position.
Attention:
Head, torso, hips and knees practically form a line (pelvis does not tilt backwards or forwards), keep the shoulder above the elbow.
Lighten:
Knee on the floor; move your leg less forwards; just hold the position.
Harden:
Additional weight (for the free leg or on the hip); unstable support (possible for both the arm and the leg).
1 weight cuff/weight vest/weight disc/sandbag ► making the exercise more difficult (additional weight)
1 ball/1-2 balance cushions/1 balance board ► making the exercise more difficult (unstable surface)
Move upper leg forwards in lateral support (left) ► knee raise lateral pillar bridge / side bridge
Power
Individual work


Lateral support with outstretched (left) arm, push the thigh of the upper leg straight out forwards (lower leg parallel, thigh bent at approx. 90 degrees to the body/leg) and return to the starting position.
Attention:
Head, torso, hips and knees practically form a line (pelvis does not tilt backwards or forwards), keep shoulder above elbow.
Lighten:
Knee on the floor; move your leg less forwards; just hold the position.
Harden:
Additional weight (for the free leg or on the hip); unstable support (possible for both the arm and the leg).
1 weight cuff/weight vest/weight disc/sandbag ► to make the exercise more difficult (additional weight)
1 ball/1-2 balance cushions ► to make the exercise more difficult (unstable surface)
Move upper leg forwards in lateral support (right) ► knee raise lateral pillar bridge / side bridge
Power
Individual work


Lateral support with outstretched (right) arm, push the thigh of the upper leg straight out forwards (lower leg parallel, thigh bent at approx. 90 degrees to the body/leg) and return to the starting position.
Attention:
Head, torso, hips and knees practically form a line (pelvis does not tilt backwards or forwards), keep shoulder above elbow.
Lighten:
Knee on the floor; move your leg less forwards; just hold the position.
Harden:
Additional weight (for the free leg or on the hip); unstable support (possible for both the arm and the leg).
1 weight cuff/weight vest/weight disc/sandbag ► to make the exercise more difficult (additional weight)
1 ball/1-2 balance cushions ► to make the exercise more difficult (unstable surface)
Move upper body forwards and backwards in forearm support ► dynamic pillar bridge
Power
Individual work


Underarm support (the outstretched legs and upper body practically form a line, the legs are supported on the tips of the toes and the upper body on the forearms, the forearms lie flat on the floor parallel to each other, the upper arms are vertical), move the upper body forwards and backwards by changing the angle between the forearm and upper arm.
Attention:
Head, torso, hips and knees practically form a line (do not stretch your buttocks upwards or let them sag, tense your stomach).
Lighten:
Knees on the floor (kneeling shift).
Harden:
Additional weight (on the back); unstable support for the legs and/or arms possible.
1 weight vest/weight disc/sandbag ► make the exercise more difficult (additional weight)
1 ball/1-2 balancing cushions/balance board ► make the exercise more difficult (unstable surface)
Bend your upper body to the side whilst standing (left) ► side bend
Power
Individual work
Stand upright with your feet shoulder-width apart, holding a dumbbell in one hand (left), the other hand resting loosely at your side or on your hip, shoulders back, chest out, and looking straight ahead. Slowly lean your upper body towards the side of the dumbbell without pushing your hips backwards, feeling a gentle stretch in your oblique abdominal muscles, then return to the starting position in a controlled manner. Breathing: Exhale as you straighten up, inhale as you bend to the side.
Attention:
Do not tilt your hips backwards, avoid jerky movements, do not twist your torso (your upper body should lean to the side), do not tense your neck (keep your head in line with your spine).
Lighten:
Less or no weight; knees slightly bent (takes the strain off the lower back and makes it easier to balance); smaller movements (minimal side-to-side tilt); lean against the wall (stabilises the back and hips).
Harden:
Add more weight; stand on a raised or unstable surface (greater balance required); hold the final position for slightly longer and/or slow down the pace.
1 dumbbell/weight plate
1 Step/Box/Balance Pad ► Make the exercise more challenging (raised or unstable surface)
Bend your upper body to the side whilst standing (right) ► side bend
Power
Individual work
Stand upright with your feet shoulder-width apart, holding a dumbbell in one hand (right), the other hand resting loosely at your side or on your hip, shoulders back, chest out, and looking straight ahead. Slowly lean your upper body towards the side of the dumbbell without pushing your hips backwards, feeling a gentle stretch in your oblique abdominal muscles, then return to the starting position in a controlled manner. Breathing: Exhale as you straighten up, inhale as you bend to the side.
Attention:
Do not tilt your hips backwards, avoid jerky movements, do not twist your torso (your upper body should lean to the side), do not tense your neck (keep your head in line with your spine).
Lighten:
Less or no weight; knees slightly bent (takes the strain off the lower back and makes it easier to balance); smaller movements (minimal side-to-side tilt); lean against the wall (stabilises the back and hips).
Harden:
Add more weight; stand on a raised or unstable surface (greater balance required); hold the final position for slightly longer and/or slow down the pace.
1 dumbbell/weight plate
1 Step/Box/Balance Pad ► Make the exercise more challenging (raised or unstable surface)
Orientation artist
Coordination exercises
Partner work
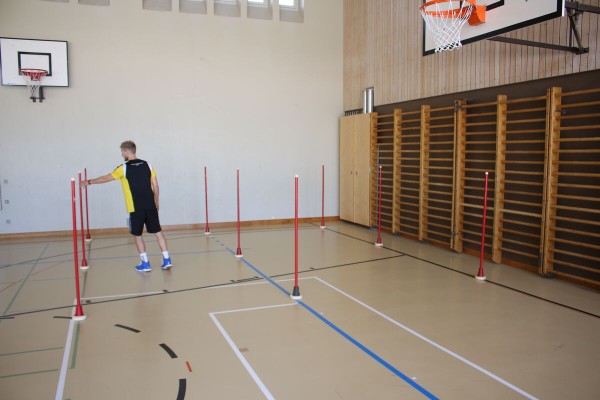
One participant gives their partner a route to run around the stakes to the opposite side. With their eyes closed, they try to run the specified route. After feedback on the execution of the exercise, the roles are swapped.
Variant:
Individual work: the participant imagines a route for themselves and tries to complete it with their eyes closed (blind route).
►Orientation skills
9 stakes
Post setup:
Place the stakes in a rectangle (3x3).
Orienteering
Orienteering
Single run or groups of 2/3
Send participants/groups onto the course in staggered formation (note the distance to the first starter/starting group on the run card)
In the terrain, the sports leader distributes the control points in advance, which the participants then approach individually or in small groups during the orienteering run. Participants receive an overview of the posts and a route map. The participants decide for themselves the order in which they mark off the controls (or the order can also be defined). The orienteering run can be carried out both as an exercise and as a competition. It is worth staggering both variants so that each participant/group has to work independently and does not simply follow a forerunner/group (note the time intervals/difference to the first start time on the run card for the evaluation). The control overview with the running map can either be handed out together with the start signal or distributed to the runners/groups a certain time before the start. For the orienteering run, each participant/group has a defined amount of time to find as many or as many controls as possible.
Variant:
Prepare the control transfer point: The participants do not receive a map on which the controls are already marked, but must mark the controls themselves at a control transfer point (e.g. using coordinates, azimuth or measuring point method). The control sheets remain at the start even after the transfer. Before the participants set off on the course, the sports director checks the marked controls.
Orienteering controls (to be unplugged)
1 stopwatch
Participant/group:
1 orienteering map with control overview incl. designation (prepared in advance by the sports director)
1 running map form 30.063
1 bussole
Variation of the exercise:
Participant/group:
1 control transfer sheet
1 map scale
1 pencil and eraser
Pair catching
Stimulate circulation
Group work
Groups of 2
Two players form a team. They are connected to each other with a rope, which they wrap once around their wrist (or simply hold the rope) or by holding a stick (Siamese twins). The binomial must never let go of the rope/stick. One pair (labelled with bibs) chases the other pairs. If a pair is caught, the roles (hunter & catcher) are swapped. The game can also be played with several pairs of catchers.
Variant:
Fix the legs of the pairs together with the rope.
Per group of 2:
1 skipping rope/stick ►Intercrosse/lacrosse, floorball, Nordic walking
2-6 game ribbons/leashes ►catcher (variant)
Parkour
Parkour
Group work
Various equipment/posts are distributed around the hall (e.g. uneven bars, horizontal bars at different heights, wall bars, vaulting box, soft mats, horse, etc.). The participants think independently about how to pass/overcome the obstacles and put together a small course. After a short preparation time, each participant demonstrates their run to the rest of the group.
According to the selected item selection
Partner massage
Regeneration
Partner work
Groups of 2
The participants perform massages with a tennis ball or throwing body on their partner. During the circular movements with the ball, the circumference (small-large) and the pressure (no pressure on joints) are varied.
Participant in supine position, massage by partner of:
- Front thigh muscles
- Abdominal muscles
- Chest muscles
- Arms
Participant in prone position, massage by partner of:
- Calf muscles
- Back thigh muscles
- Buttock muscles
- Back muscles
- Arms
Per group:
1 tennis ball
1 soft mat