
Exercises (1641)
Support backwards
Power
Individual work

Inverted support (inverted push-up position, the outstretched legs and upper body practically form a line, support the upper body on the outstretched arms) with the feet (calves) placed on the exercise ball and the buttocks pressed upwards (full body stretch). Hold the position you have assumed.
Attention:
Head, torso, hips and knees practically form a line (do not let your buttocks sag, tense your stomach), place your hands under your shoulders.
Lighten:
Exercise ball closer to your buttocks.
Harden:
Additional weight (on the hips).
1 exercise ball
1 weight vest/weight disc/sandbag ► Make the exercise more difficult (additional weight)
Support backwards
Power
Individual work

Inverted support (inverted push-up position, the outstretched legs and upper body practically form a line, the legs are supported by the heels on the balance board and the upper body on the outstretched arms, so the face/gaze is pointing upwards). Hold the position.
Attention:
Head, torso, hips and knees form a line (don't let your buttocks sag, tighten your stomach), place your hands under your shoulders.
Lighten:
Without the balance board; bend your legs slightly.
Harden:
Additional weight (on the hips).
1 balance board
1 weight vest/weight disc/sandbag ► Make the exercise more difficult (additional weight)
Support backwards ► reverse plank/straight bridge
Power
Individual work

Sit on the floor with your legs stretched out, hands placed behind your body (fingers pointing forwards or slightly outwards, hands roughly under your shoulders). Push yourself upwards until your body forms a straight line from head to heel. Actively ‘open’ your chest upwards, keep your head in a neutral position (or tilt it slightly back without straining), and keep your shoulders stable without pulling them towards your ears. The buttocks (important), the hamstrings and the back are actively engaged. Hold the position isometrically.
Attention:
The pelvis should not sag (glutes not engaged, lack of tension), no hyperextension in the lower back (incorrect strain, glutes not working enough), no slumping or forward tilting of the shoulders, wrist pain due to incorrect positioning, do not tilt your head back too far (unnecessary strain on the neck).
Lighten:
Bend your knees (bent knee reverse plank); rest on your forearms instead of your hands to take the pressure off your wrists (reverse forearm plank); lift your pelvis only slightly (partial movement – to build up technique).
Harden:
Lift one leg to engage the core and glutes more (single-leg reverse plank); raise your feet (e.g. onto a bench or box); keep your weight on your pelvis.
1 bench/box ► Make the exercise more challenging (position)
1 weight vest/weight plate/dumbbell/sandbag ► Make the exercise more challenging (additional weight)
Supination of the forearm in the sitting position (left)
Power
Individual work


While seated, place an elasticated band around the (left) thigh and grasp the band with the (left) hand, with the back of the hand pointing upwards. The arm holding the band is bent so that the upper arm is against the body and the lower arm is pointing forwards (90 degree angle at the elbow joint). The other (right) arm fixes the training arm by holding the forearm at the elbow. From this position, perform an outward rotation (supination) with the arm so that the back of the hand points downwards in the end position.
Attention:
The movement only takes place in the forearm, the upper arm remains stable.
Lighten:
Choose an elastic band with less resistance.
Harden:
Choose an elastic band with greater resistance.
1 mini-band
1 seating option (e.g. chair, plyo box or vaulting box)
Supination of the forearm in the sitting position (right)
Power
Individual work
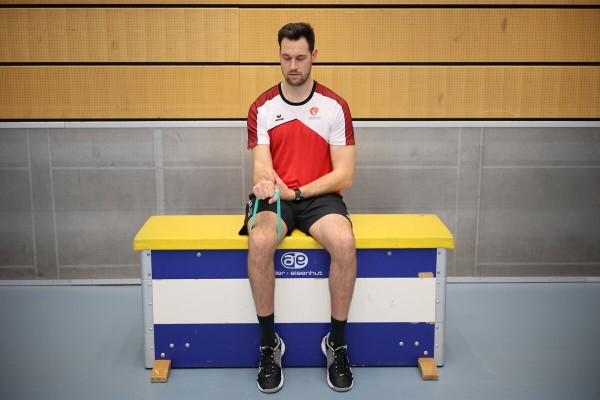

While seated, place an elasticated band around the (right) thigh and grasp the band with the (right) hand, with the back of the hand pointing upwards. The arm holding the band is bent so that the upper arm is against the body and the lower arm is pointing forwards (90 degree angle at the elbow joint). The other (left) arm secures the training arm by holding the forearm at the elbow. From this position, perform an outward rotation (supination) with the arm so that the back of the hand points downwards in the end position.
Attention:
The movement only takes place in the forearm, the upper arm remains stable.
Lighten:
Select an elastic band with less resistance.
Harden:
Select an elastic band with greater resistance.
1 mini-band
1 seating option (e.g. chair, plyo box or vaulting box)
Skip
Power
Individual work

Round race with (3) obstacles (e.g. hurdles or a rope stretched between two stakes). The aim is to jump over the obstacles.
Attention:
Suspend the landing with your legs (lower your buttocks).
Lighten:
Lower obstacles.
Harden:
Higher obstacles.
Variant:
Jump up again immediately after landing (explosive power) or take a roughly right angle with your knees when landing and hold this position briefly before jumping off again.
2 stakes/1 rope or 1 hurdle = 1 obstacle
Alternating skipping and crawling under
Power
Individual work


Round course with (2) obstacles (e.g. hurdles or a rope stretched between two stakes). The aim is to alternately jump over and crawl under the obstacle once.
Attention:
Suspend the landing.
Lighten:
Lower speed; lower obstacle for jumping over; higher obstacle for crawling under.
Harden:
Higher speed; higher obstacle for jumping over; lower obstacle for crawling under.
2 stakes/1 rope or 1 hurdle = 1 obstacle
2 marking cones/caps
Alternating skipping and crawling under
Power
Individual work


Round course with various obstacles: The horse/swinging box is jumped over, at the single swinging box element you crawl/crawl through the opening.
Lighten:
Lower speed; lower elements to jump over/higher elements to crawl under.
Harden:
Higher speed; higher elements to jump over/lower elements to crawl under.
1-2 pommel horses
1-2 vaulting boxes
or instead of pommel horses and vaulting boxes, skipping ropes can be stretched between two painting sticks at different heights for jumping over/crawling under
4-8 painting sticks
2-4 ropes
3-6 soft mats (small)
2 painting sticks (optionally as a reversible pole)
Overcoming an obstacle
Power
Individual work
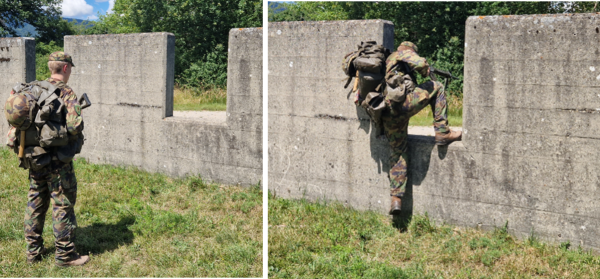
Overcoming a wall or opening using house and location fighting techniques (regulation 53.008.01 - chapter 6.3).
Lighten:
Without equipment;
Less high wall;
Without opening.
Harden:
With a protective waistcoat;
Higher wall.
Material per participant: Tenue CNK 420
Additional material: small wall/ruins, 1 protective vest
Bring your forearm in front of your body while standing (left)
Power
Individual work


Stand upright, shoulder-width apart, sideways (90 degrees) to the wall bars (or e.g. to a tree). Fix the elastic band at elbow height on the wall bars (on the tree), with the upper arm (left, far side of the fixation) resting against the body and the forearm stretched forwards at a right angle. Move the forearm outwards/away from the body and back to the starting position, whereby the movement takes place exclusively in the forearm (the other arm can fix the training arm).
Attention:
Always keep the arm bent at a right angle and the upper arm fixed to the body (rotation in the forearm).
Lighten:
Choose a rubber band with less resistance.
Harden:
Choose a rubber band with greater resistance.
1 elasticated rubber band
1 wall bar/tree
Bring your forearm in front of your body while standing (right)
Power
Individual work


Stand upright, shoulder-width apart, sideways (90 degrees) to the wall bars (or e.g. to a tree). Fix the elastic band at elbow height on the wall bars (on the tree), with the upper arm (right, far side of the fixation) resting against the body and the forearm stretched forwards at a right angle. Move the forearm outwards/away from the body and back to the starting position, whereby the movement takes place exclusively in the forearm (the other arm can fix the training arm).
Attention:
Always keep the arm bent at a right angle and the upper arm fixed to the body (rotation in the forearm).
Lighten:
Choose a rubber band with less resistance.
Harden:
Choose a rubber band with greater resistance.
1 elasticated rubber band
1 wall bar/tree
Bring forearm towards body in standing position (left)
Power
Individual work


Stand upright, shoulder-width apart, sideways (90 degrees) to the wall bars (or e.g. to a tree). Fix the elastic band at elbow height on the wall bars (on the tree), with the upper arm (left, side of the fixation) resting against the body and the forearm stretched forwards at a right angle. Grasp the elastic band with your hand, move the forearm inwards/to the body and back to the starting position, whereby the movement takes place exclusively in the forearm (the other arm can fix the training arm).
Attention:
Always keep the arm bent at right angles and the upper arm fixed to the body (rotation in the forearm).
Lighten:
Choose an elastic band with less resistance.
Harden:
Choose an elastic band with greater resistance.
1 elasticated rubber band
1 wall bar/tree
Bring forearm towards body while standing (right)
Power
Individual work


Stand upright, shoulder-width apart, sideways (90 degrees) to the wall bars (or e.g. to a tree). Hold the elastic band at elbow height on the wall bars (on the tree), with the upper arm (right, side of the fixation) resting against the body and the forearm stretched forwards at a right angle. Grasp the elastic band with your hand, move the forearm inwards/to the body and back to the starting position, whereby the movement takes place exclusively in the forearm (the other arm can fix the training arm).
Attention:
Always keep the arm bent at right angles and the upper arm fixed to the body (rotation in the forearm).
Lighten:
Choose an elastic band with less resistance.
Harden:
Choose an elastic band with greater resistance.
1 elasticated rubber band
1 wall bar/tree
Forearm support
Power
Individual work


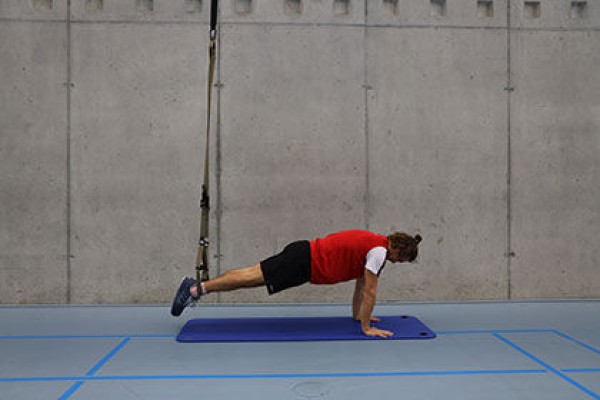
Progression I:
Adjust the sling trainer to mid-lower leg length (when standing), support your forearms with your feet vertically under the attachment point in the slings and hold the position.
Progression II:
Analogue to progression I, but supported on your hands.
Attention:
Keep body tension, do not let hips sag, back straight, hands under shoulders (for both progressions).
Harden:
The further the head is from the attachment point, the more challenging the exercise becomes.
1 sling trainer
Forearm support
Power
Individual work
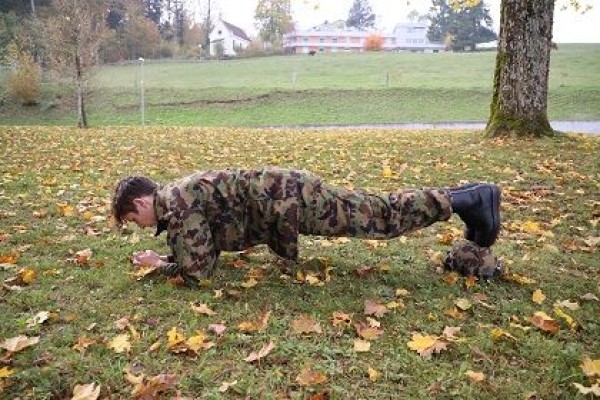

In the forearm support, the outstretched legs and upper body practically form a line. The legs are placed on the tips of the toes on the helmet and the upper body is supported on the forearms. The forearms lie flat on the floor parallel to each other and the upper arms are vertical (90 degree angle at the elbow joint).
Attention:
Head, torso, hips and knees form a line (do not stretch your buttocks upwards or let them sag, tense your stomach), the hands should not touch each other/be closed.
Lighten:
Knees on the floor (feet held up instead of placed on the object).
Harden:
Additional weight (on the back); unstable support (for the arms).
Variant:
Alternate by raising one leg slightly (foot at heel height).
1 helmet
1 weight vest/weight disc/sandbag/fighting rucksack ► to make the exercise more difficult (additional weight)
1 balance board ► to make the exercise more difficult (unstable base)
Unterarmstütz ► elbow plank / front plank
Power
Individual work

Start in a forearm plank position, with your elbows directly beneath your shoulders, forearms parallel to the floor, legs straight, feet hip-width apart, and your head in a neutral position (looking down at the floor). Lift the body so that a straight line is formed from head to heels, keeping the abdomen, buttocks and legs actively engaged. Push gently from the shoulders (do not sag), hold the position, and continue to breathe calmly and evenly.
Attention:
Avoid arching your back (lower back sagging – lack of core and gluteal engagement), do not raise your hips too high (pike position), do not let your shoulders slump or drop, do not let your head hang or push it forwards (strain on the neck), and ensure you maintain sufficient body tension throughout (otherwise the exercise loses its effectiveness).
Lighten:
Knees on the floor (knee plank); hands raised (e.g. on a bench or box); feet placed wider apart.
Harden:
Feet closer together; hold the position on one arm or one leg; weight on the back; unstable surface (possible for both arms and legs); high plank or extended plank (longer lever).
1 bench/box ► Makes the exercise easier (position)
1 weight vest/weight plate/sandbag ► Makes the exercise harder (additional weight)
1 ball/balance cushion/balance board ► Makes the exercise harder (unstable surface)
Unterarmstütz ► elbow plank / front plank
Power
Individual work

In the forearm support, the outstretched legs and upper body practically form a line. The legs are supported on the tips of the toes and the upper body on the forearms, with the forearms resting on a medicine ball/balance ball in this exercise.
Attention:
Head, torso, hips and knees form a line (do not stretch your buttocks upwards or let them sag, tense your stomach), the elbows are under the shoulders.
Lighten:
Knees on the floor (feet held high).
Harden:
Additional weight (on the back); unstable support for the legs.
Variation:
Push the feet forwards and backwards or lift one arm/leg at a time.
1 medicine ball/balance hemisphere
1 weight vest/weight disc/sandbag ► to make the exercise more difficult (additional weight)
1 ball/balance cushion/balance board ► to make the exercise more difficult (unstable base)
Forearm support on a gym ball with a stirring motion ► swiss ball stir-the-pot
Power
Individual work
Place both forearms on the exercise ball, shoulder-width apart, and stretch your legs out behind you so that your feet, pelvis and shoulders form a straight line (plank position). Stand on your tiptoes with your feet about hip- to shoulder-width apart, press your elbows actively into the ball and keep your shoulders pulled back and down. Tighten your core and glutes firmly, whilst keeping your gaze directed straight down. Now use your forearms to make slow, controlled and small circular movements on the ball, as if you were stirring a pot. The movement comes exclusively from the shoulder girdle; the torso, pelvis and legs remain completely still and stable. Only make circles as large as you can whilst keeping the lumbar spine in a neutral position and ensuring the lower back does not sag. After a few repetitions, change the direction of the stirring motion.
Attention:
The lumbar spine sags and the body slumps into a hollow back; the buttocks shift far upwards to relieve pressure on the abdominal muscles (roof position); the pelvis wobbles or rotates sharply from side to side with the stirring movements; the shoulder girdle slumps and the shoulder blades protrude upwards like wings; the stirring circles become too large, are performed frantically or with too much momentum, resulting in a loss of control; the breath is held (pressing breathing); the head drops down or is tilted back so that the neck is overextended.
Lighten:
Place your knees on the floor and perform the support with a shortened lever; Position your feet significantly wider than shoulder-width apart to increase your base of support; hold a static forearm plank on the ball without making circular movements; instead of circles, perform only minimal forward and backward movements of a few centimetres.
Harden:
Place your feet very close together or stand with your feet on a narrow Swedish bench; deliberately make the circular movements larger and slow the pace down significantly; hold each position for 2 seconds at the turning points of the movement; wear a weighted vest.
1 exercise ball
1 weighted vest ► makes the exercise more difficult (additional weight)
Forearm support with arm and leg raised crosswise (left-right)
Power
Individual work

Lift one arm (left) and one leg (right) crosswise in a forearm support and stretch out in a body extension. Hold the position you have assumed.
Attention:
Head, torso, hips and knees form a line (do not stretch your buttocks upwards or allow them to sag, tense your stomach).
Lighten:
Knee on the floor; raise your arm and leg only briefly, then return to the position in the forearm support.
Harden:
Additional weight (on the back or on the arms/legs).
Variation:
Bring the elbow and knee together under the body, then extend the arm and leg again.
1-2 weight cuffs/1 weight vest/weight disc/sandbag ► Make the exercise more difficult (additional weight)
Forearm support with arm and leg raised crosswise (right-left)
Power
Individual work

Lift one arm (right) and one leg (left) crosswise in a forearm support and stretch out in a body extension. Hold the position you have assumed.
Attention:
Head, torso, hips and knees form a line (do not stretch your buttocks upwards or allow them to sag, tense your stomach).
Lighten:
Knee on the floor; raise your arm and leg only briefly, then return to the position in the forearm support.
Harden:
Additional weight (on the back or on the arms/legs).
Variation:
Bring the elbow and knee together under the body, then extend the arm and leg again.
1-2 weight cuffs/1 weight vest/weight disc/sandbag ►Make the exercise more difficult (additional weight)
Back forearm support
Power
Individual work

In the inverted forearm support, the outstretched legs and upper body practically form a line. The legs are supported on the heels and the upper body on the forearms (face/look upwards), the forearms lie flat on the floor parallel to each other (90 degree angle at the elbow joint).
Attention:
Head, torso, hips and knees practically form a line (do not let the buttocks sag, tense the abdomen), do not hyperextend the knee joints.
Lighten:
Bend your legs slightly.
Harden:
Additional weight (on the hips); unstable support for the legs (arms probably too heavy).
1 weight vest/weight disc/sandbag ► to make the exercise more difficult (additional weight)
1 ball/balance cushion/balance board ► to make the exercise more difficult (unstable surface)
Back forearm support
Power
Individual work
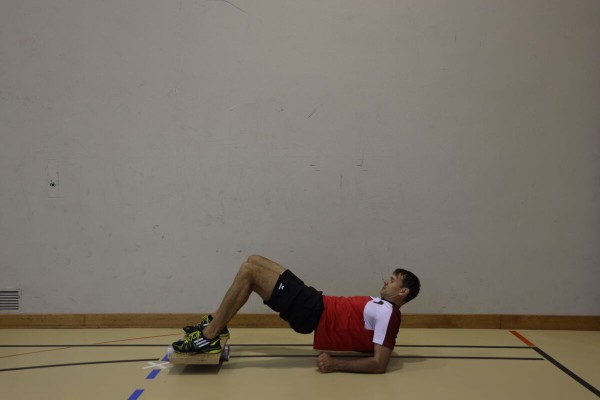
In the inverted forearm support, the outstretched legs and upper body practically form a line. The legs are supported on the heels and the upper body on the forearms (face/look upwards), the forearms lie flat on the balance board parallel to each other (90 degree angle in the elbow joint).
Attention:
Head, torso, hips and knees practically form a line (do not let the buttocks sag, tense the abdomen), do not hyperextend the knee joints.
Lighten:
Without a balance board; bend your legs slightly; use a balance board for your legs, as it may be too difficult for your arms.
Harden:
Additional weight (on your hips); unstable surface for your legs too (probably too difficult).
1 balance board
1 weight vest/weight disc/sandbag ► to make the exercise more difficult (additional weight)
1 ball/balance cushion/balance board ► to make the exercise more difficult (unstable base)
Move lower leg forwards in lateral forearm support (left)
Power
Individual work


Side support on the (left) forearm, pull the lower leg of the lower leg in (approx. 90 degrees) so that the body weight is only distributed on the foot of the upper supporting leg and the forearm. Bring the bent leg forwards (lower leg parallel, thigh approx. 90 degrees to the body) and back to the starting position.
Attention:
Head, torso, hips and knees practically form a line (pelvis does not tilt backwards or forwards), keep the shoulder above the elbow.
Lighten:
Lower the leg forward; just hold the position.
Harden:
Additional weight (for the free leg or on the hip); unstable support (possible for both the arm and the leg).
1 weight cuff/weight vest/weight disc/sandbag ► making the exercise more difficult (additional weight)
1 ball/1-2 balance cushions/1 balance board ► making the exercise more difficult (unstable surface)
Move lower leg forwards in lateral forearm support (right)
Power
Individual work


Side support on the (right) forearm, pull the lower leg of the lower leg in (approx. 90 degrees) so that the body weight is only distributed on the foot of the upper supporting leg and the forearm. Bring the bent leg forwards (lower leg parallel, thigh approx. 90 degrees to the body) and back to the starting position.
Attention:
Head, torso, hips and knees practically form a line (pelvis does not tilt backwards or forwards), keep the shoulder above the elbow.
Lighten:
Lower the leg forward; just hold the position.
Harden:
Additional weight (for the free leg or on the hip); unstable support (possible for both the arm and the leg).
1 weight cuff/weight vest/weight disc/sandbag ► making the exercise more difficult (additional weight)
1 ball/1-2 balance cushions/1 balance board ► making the exercise more difficult (unstable surface)
Move lower leg forwards in side support (left)
Power
Individual work


Side support with outstretched (left) arm, pull the lower leg of the lower leg in (approx. 90 degrees) so that the body weight is only distributed on the foot of the upper supporting leg and the arm. Bring the bent leg forwards (lower leg parallel, thigh approx. 90 degrees to the body) and back to the starting position.
Attention:
Head, torso, hips and knees practically form a line (pelvis does not tilt backwards or forwards), keep the shoulder above the elbow.
Lighten:
Lower the leg forward; just hold the position.
Harden:
Additional weight (for the free leg or on the hip); unstable support (possible for both the arm and the leg).
1 weight cuff/weight vest/weight disc/sandbag ► to make the exercise more difficult (additional weight)
1 ball/1-2 balance cushions ► to make the exercise more difficult (unstable surface)