Exercises (1874)
Abduction and adduction of the leg in lateral position (right) ► abduction / adduction sidelying
Power
Individual work

Lying on your side, place your right leg bent on the vaulting box element. Raise and lower the leg.
Attention:
The lower leg remains parallel to the support. When raising and lowering the leg, always keep the knee and ankle at the same height.
Lighten:
Lift the training leg less.
Harden:
Do not lower the active leg completely; add weight to the leg.
1 vaulting box top
1 weight cuff ► to make the exercise more difficult (additional weight)
Abduction and adduction of the ankle joint in the sitting position
Power
Individual work
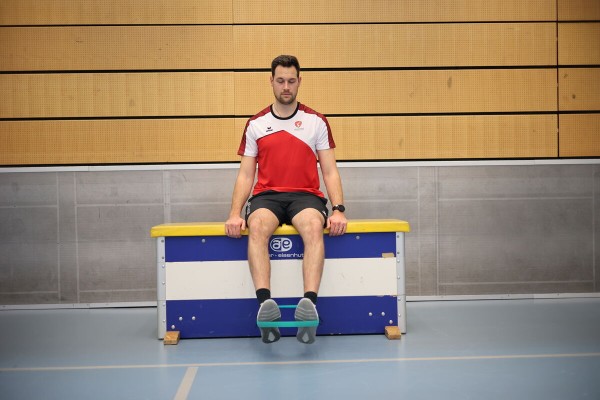
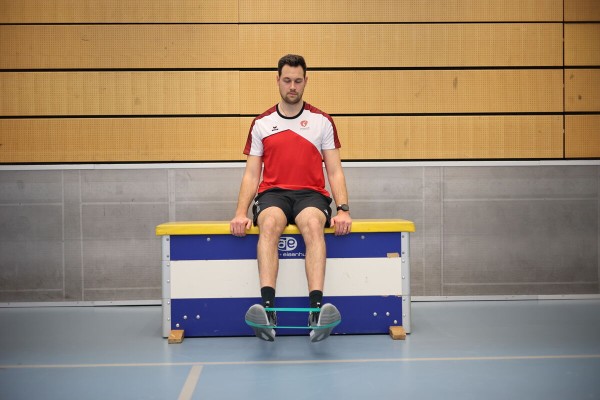
In the seated position, the upper body is tilted slightly backwards, both feet are lifted off the floor and the slightly bent legs are pointing diagonally forwards. Stretch an elasticated band between the legs (place the band around the instep/soles of the feet). From this position, rotate the ankles so that the feet point towards each other (big toes together) and away from each other (toes pointing diagonally upwards away from the body).
Attention:
The movement only takes place in the ankle joint (both legs and upper body remain stable).
Lighten:
Choose a rubber band with less resistance.
Harden:
Choose a rubber band with greater resistance.
1 mini-band
1 seating option (e.g. chair, plyo box or vaulting box)
Alternating abduction and adduction of one leg while standing ► skater pushes
Power
Individual work


Easy squat position (legs shoulder-width apart) with upper body leaning forwards, arms bent (approx. 90 degree angle at the elbow joint - upper arms close to the body, forearms pointing forwards at the level of the navel, possibly clasp hands / or rest hands on the hips), stretch an elasticated rubber band between the legs (place band around the ankles). From this position, alternately push one leg out diagonally backwards (abduction of the leg and extension of the hip) and return to the starting position. The movement can be compared to speed skating (skater pushes).
Attention:
The movement takes place exclusively in the leg/hip (upper body remains stable).
Lighten:
Choose a rubber band with less resistance.
Harden:
Choose a rubber band with more resistance.
1 mini-band
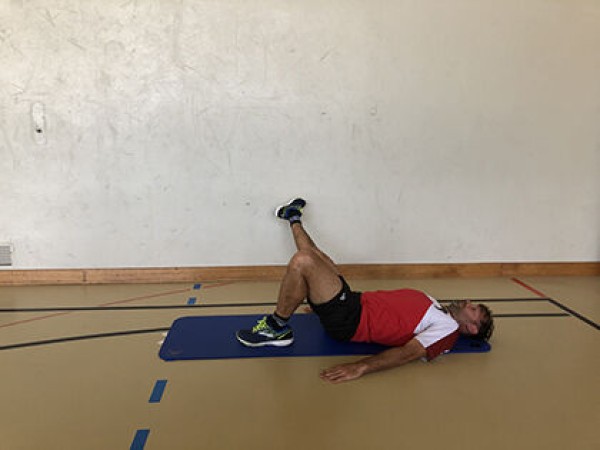
Abduction and adduction of one leg in supine position (circular movement) (left) ► one leg circle
Power


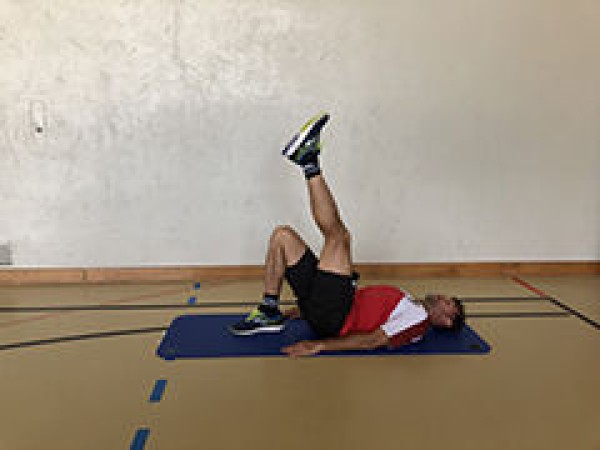
Back position, one leg stretched out in a high hold (left), the other leg (right) lying flat on the floor or bent with the foot flat on the floor. The greater the mobility, the more vertically the leg can be raised into the hold-up position. Place your arms flat on the floor at your sides or place your hands under your buttocks. Perform circular movements (in both directions) with the raised leg (spread the leg apart and bring it back to the centre).
Attention:
Keep the (lower) back in constant contact with the floor (no hollow back, consciously tense the abdomen), do not put the leg down.
Lighten:
Just hold the position (leg extended slightly off the floor); smaller range of motion.
Harden:
Additional weight for the leg.
Variant I:
Spread the leg without circular movements and bring it back to the centre.
Variant II:
Move the leg up and down.
1 weight cuff ► Make the exercise more difficult (additional weight)
Abduction and adduction of one leg in supine position (circular movement) (right) ► one leg circle
Power
Individual work


Supine position, one leg stretched out in an upright position (right), the other leg (left) lying flat on the floor or bent with the foot flat on the floor. The greater the mobility, the more vertically the leg can be raised into the hold-up position. Place your arms flat on the floor at your sides or place your hands under your buttocks. Perform circular movements (in both directions) with the raised leg (spread the leg apart and bring it back to the centre).
Attention:
Keep the (lower) back in constant contact with the floor (no hollow back, consciously tense the abdomen), do not put the leg down.
Lighten:
Just hold the position (leg extended slightly off the floor); smaller range of motion.
Harden:
Additional weight for the leg.
Variant I:
Spread the leg without circular movements and bring it back to the centre.
Variant II:
Move the leg up and down.
Weight cuff ► Make the exercise more difficult (additional weight)
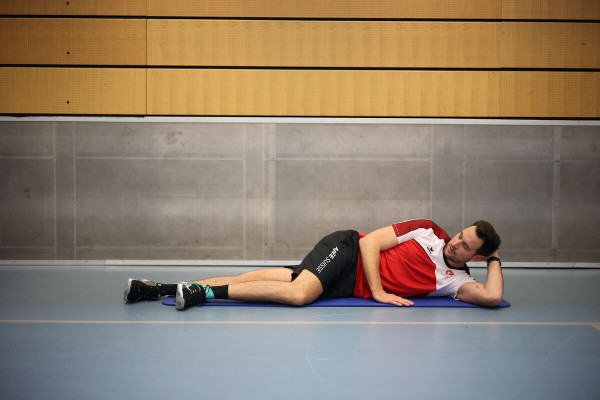
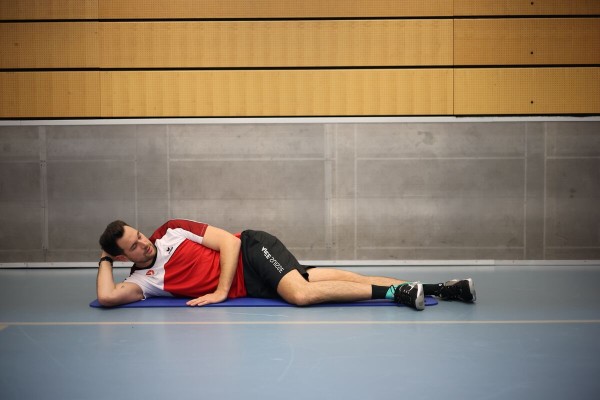
Abduction and adduction of a leg in supine position (left)
Power
Individual work


Lie on your back, one leg (left) raised off the floor (pointing diagonally upwards in front), the other leg (right) lying flat on the floor or bent with the foot flat on the floor. Place your arms flat on the floor at your sides or place your hands under your buttocks. Spread the raised leg apart and return to the starting position. The greater the flexibility, the more vertical the leg can be brought into the raised position.
Attention:
Keep your (lower) back in constant contact with the floor (no hollow back, consciously tense your abdomen), do not put your leg down.
Lighten:
Just hold the position (leg extended slightly off the floor); smaller range of motion.
Harden:
Additional weight for the leg.
Variant I:
Execute circular movements with the free leg.
Variant II:
Move the leg up and down.
1 weight cuff ► Make the exercise more difficult (additional weight)
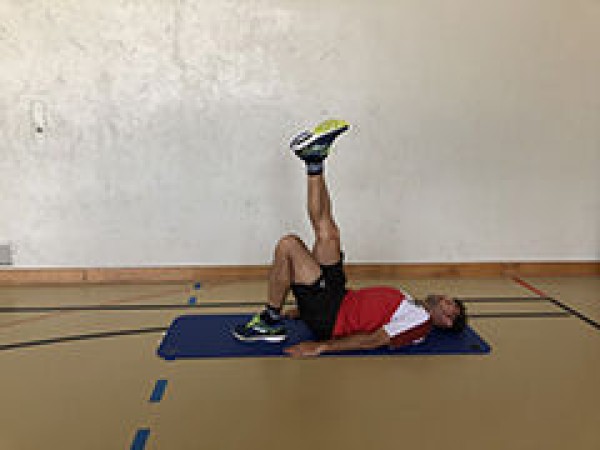
Abduction and adduction of a leg in supine position (right)
Power
Individual work

Lie on your back, one leg (right) raised off the floor (pointing diagonally upwards in front), the other leg (left) lying flat on the floor or bent with the foot flat on the floor. Place your arms flat on the floor at your sides or place your hands under your buttocks. Spread the raised leg apart and return to the starting position. The greater the flexibility, the more vertical the leg can be brought into the raised position.
Attention:
Keep your (lower) back in constant contact with the floor (no hollow back, consciously tense your abdomen), do not put your leg down.
Lighten:
Just hold the position (leg extended slightly off the floor); smaller range of motion.
Harden:
Additional weight for the leg.
Variant I:
Execute circular movements with the free leg.
Variant II:
Move the leg up and down.
1 weight cuff ► Make the exercise more difficult (additional weight)
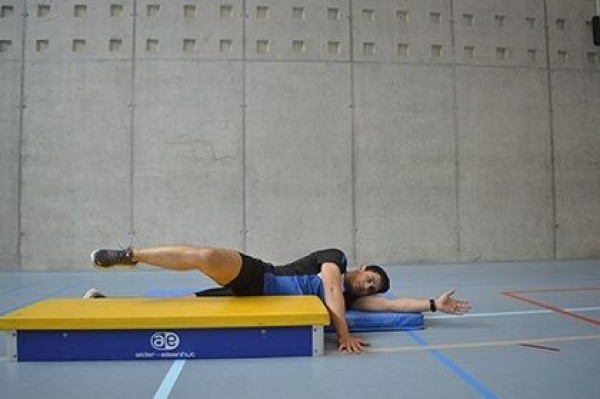
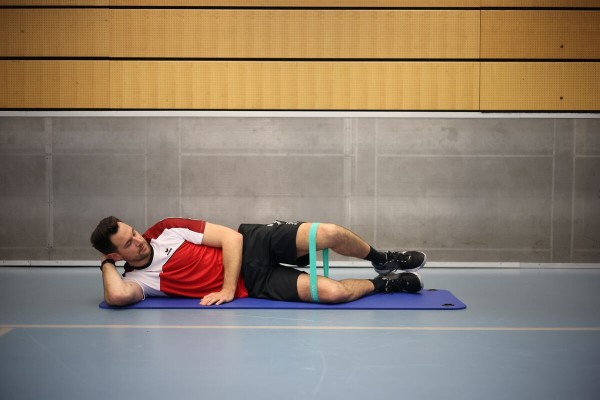
Abduction and adduction of a leg in lateral position (left) ► clamshell
Power
Individual work
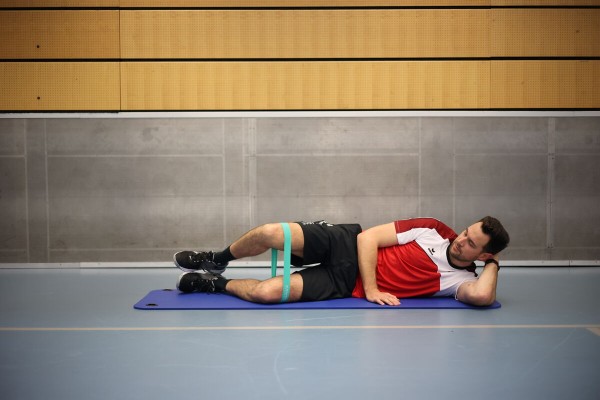
Sideways position on the left side of the body, with the legs pointing diagonally backwards. The upper (right) leg is supported on the lower leg (or slightly lifted off the lower leg). An elasticated band is stretched between the legs (place the band around the thighs slightly above the knees). The lower arm supports the head, the upper bent arm supports the upper body by placing the hand on the floor at the level of the navel. From this position, spread the upper (slightly bent) leg apart (stretch/stretch the band further) to perform an external rotation in the hip. Then lower the upper leg back to the starting position.
Attention:
For greater intensity, do not rest the upper leg completely on the lower leg (always at a slight angle).
Lighten:
Choose a rubber band with less resistance.
Harden:
Choose a rubber band with more resistance.
1 mini-band
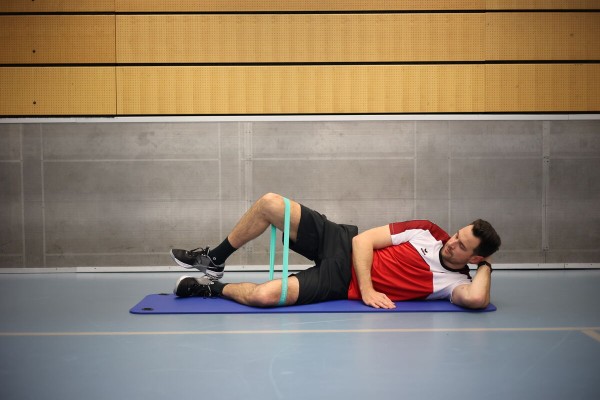
Abduction and adduction of a leg in lateral position (right) ► clamshell
Power
Individual work
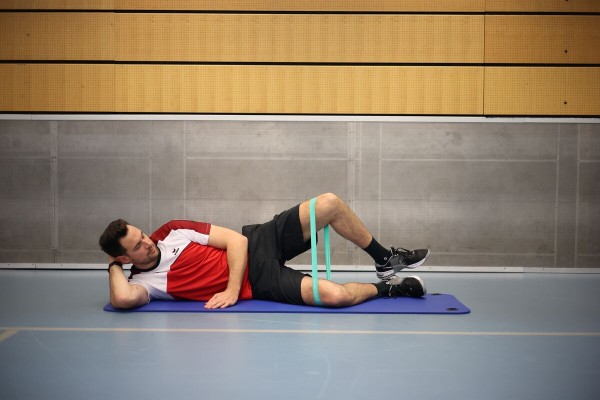
Lying on your side on the right side of your body with your legs pointing diagonally backwards. The upper (left) leg is supported on the lower leg (or slightly lifted off the lower leg). An elasticated band is stretched between the legs (place the band around the thighs slightly above the knees). The lower arm supports the head, the upper bent arm supports the upper body by placing the hand on the floor at the level of the navel. From this position, spread the upper (slightly bent) leg apart (stretch/stretch the band further) to perform an external rotation in the hip. Then lower the upper leg back to the starting position.
Attention:
For greater intensity, do not rest the upper leg completely on the lower leg (always at a slight angle).
Lighten:
Choose a rubber band with less resistance.
Harden:
Choose a rubber band with more resistance.
1 mini-band
Figure of eight
Basic training
Group work
6-24 participants per post
At the corner points of the route (the route symbolises a square number "8"; this results in 6 corner points, as the intersection/intersection point is not included), the participants spread out as individual runners or in small groups of 2-4 people. The running direction is the same for all participants and is predetermined (it may be necessary to change direction from time to time). The runners at the corner points 1/4 start simultaneously to the next corner point, where a handover to the next runner/group takes place (in the case of group work, the start only takes place as soon as all previous runners have reached the corner point). According to the time set by the sports director, the runners continue uninterrupted on the circuit (apart from the respective breaks at the corner points).
Course: 400m course in the form of a square number "8" (approx. 50m per section)
Intensity level: 3 (medium)
Hmax: 80-90%
Speech rule: speak in full sentences
Note: When meeting in the centre, observe the right of way
Variant:
Integrate additional tasks for the waiting runners at the corner points: e.g. push-ups, squats, trunk bends, jumps, etc.
8 marking cones/caps
Isometric adduction of the legs in the kneeling position
Power
Individual work
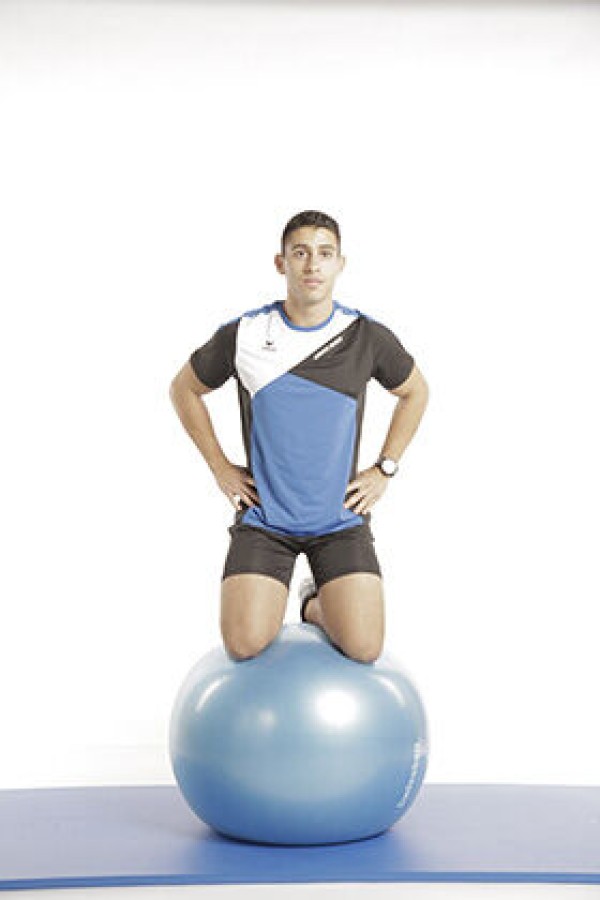
Balance kneeling on an exercise ball (possibly supporting your arms on a wall to help you keep your balance), actively squeeze your knees together and keep your buttocks high (no sitting on your heels/the ball)
Attention:
Upper body upright.
Lighten:
Press your legs less together.
Harden:
-
1 exercise ball
Isometric adduction of the legs while seated
Power
Individual work

Sit upright on the floor with your arms supporting your upper body, which is bent slightly backwards. Bend your legs and place them on the floor, place a softball between your knees and press your legs/knees together. Release and resume the tension from time to time.
Lighten:
Softer ball, exert less pressure.
Harden:
Harder ball, exert more pressure
1 volleyball / foam ball / softball / basketball / football
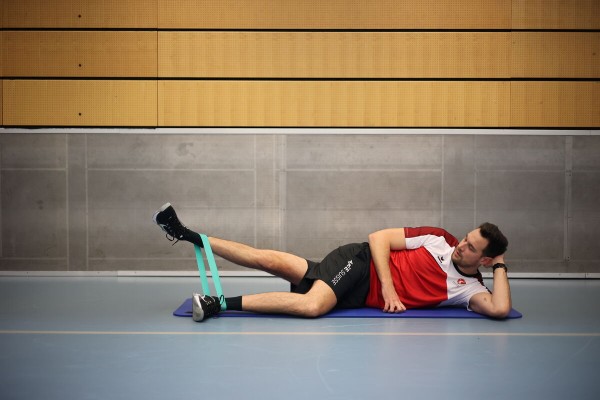
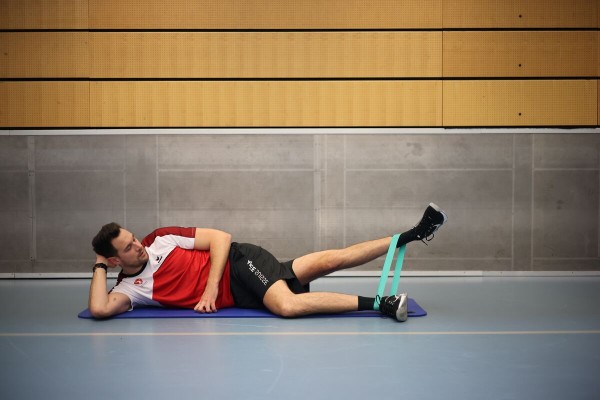
Alternating adduction of one leg while standing ► adduction
Power
Individual work

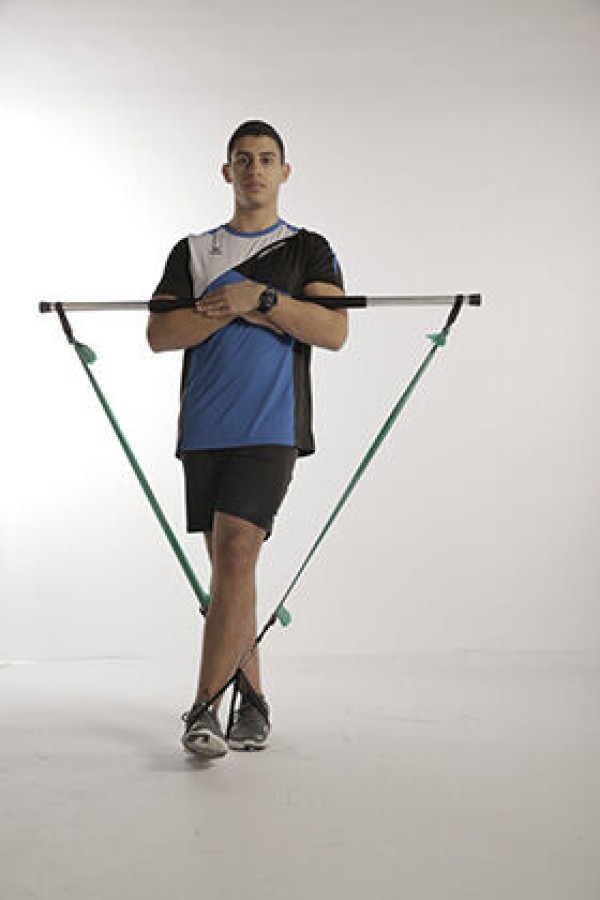
Stand upright with your feet in the loops of the gymnastics pole. Hold the gymnastics pole in front of your body with your forearms bent and parallel (baby pose). Now alternately place the heel of each foot crosswise in front of the foot of the standing leg and return to the starting position.
Attention:
Consciously keep the gymnastics pole straight.
Lighten:
Select less strong elastic bands; roll up the elastic bands less.
Harden:
Choose stronger elastic bands; roll up the elastic bands more.
Variant:
Alternately move the respective foot behind the foot of the supporting leg and back to the starting position.
1 gymnastic bar with elasticated straps
Adduction and abduction of the legs in the seat ► adduction / abduction
Power
Individual work


From the pre-stretched position with legs spread, the legs are closed/compressed against the resistance and then returned to the starting position.
Starting position:
- Sitting with legs spread (slight stretch in the adductors)
- Stretched straight back
Finishing position:
- Legs closed/compressed
1 strength machine
Adduction and abduction of the leg in single-leg stance (left) ► adduction / abduction
Power
Individual work


Fasten the elastic band knotted into a loop at ankle height on the wall bars (or e.g. on a tree). Stand upright on one leg sideways (90 degree angle) to the wall bars (to the tree), while the standing leg (right) is facing away from the wall bars (the tree). Step into the loop of the elastic band with the training leg (left), spread the leg sideways (move it over the standing leg) and then return to the starting position.
Attention:
Do not put your training leg down, keep your upper body upright (tense your stomach).
Lighten:
Choose an elastic band with less resistance.
Harden:
Choose an elastic band with greater resistance.
Variant:
Perform the exercise without the aid of a wall bar (tree), fixing the elastic band in place with the help of the supporting leg.
1 elasticated rubber band
1 wall bar/tree
Adduction and abduction of the leg in single-leg stance (right) ► adduction / abduction
Power
Individual work


Fasten the elastic band knotted into a loop at ankle height on the wall bars (or e.g. on a tree). Stand upright on one leg sideways (90 degree angle) to the wall bars (to the tree), while the standing leg (right) is facing away from the wall bars (the tree). Step into the loop of the elastic band with the training leg (left), spread the leg sideways (move it over the standing leg) and then return to the starting position.
Attention:
Do not put your training leg down, keep your upper body upright (tense your stomach).
Lighten:
Choose an elastic band with less resistance.
Harden:
Choose an elastic band with greater resistance.
Variant:
Perform the exercise without the aid of a wall bar (tree), fixing the elastic band in place with the help of the supporting leg.
1 elasticated rubber band
1 wall bar/tree
Adduction and abduction of the leg in standing position (left) ► adduction / abduction
Power
Individual work


The foot loop of the cable pulley is attached around the training leg. In a standing position, to the side of the cable pulley, the leg is pulled away against the weight and returned in a controlled manner.
Starting position:
- Stand upright to the side of the machine.
- Foot loop on the ankle of the left leg positioned closer to the machine.
End position:
- Pull your training leg in towards your body (legs crossed).
Attention:
The upper body and hips remain stable (tighten your stomach).
1 weight tower/machine ► Cable pulley (deep)
Adduction and abduction of the leg in standing position (right) ► adduction / abduction
Power
Individual work
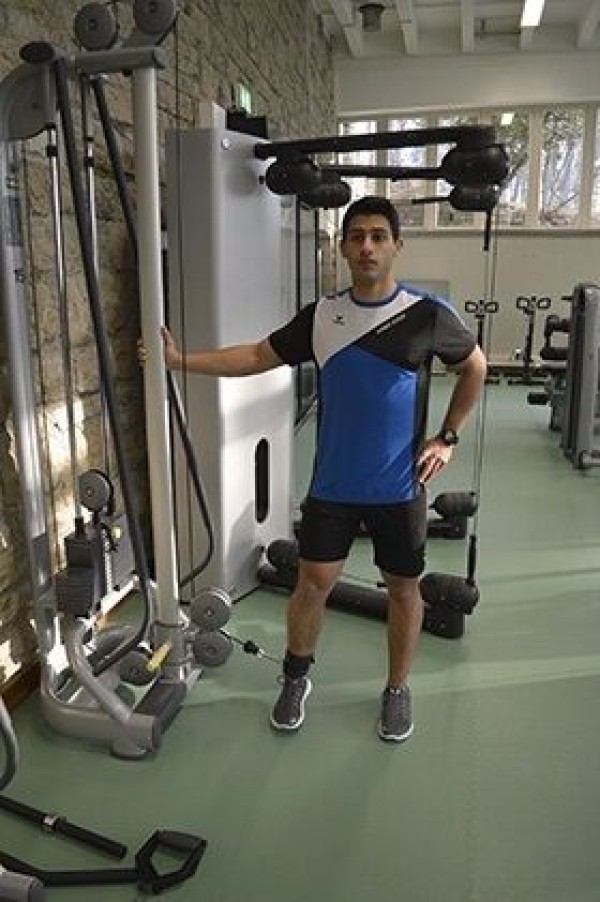

The foot loop of the cable pulley is attached around the training leg. In a standing position, to the side of the cable pulley, the leg is pulled away against the weight and returned in a controlled manner.
Starting position:
- Stand upright to the side of the machine.
- Foot loop on the ankle of the right leg positioned closer to the machine.
End position:
- Pull your training leg in towards your body (legs crossed).
Attention:
The upper body and hips remain stable (tighten your stomach).
1 weight tower/machine ►Cable pulley (deep)
Adduction and abduction of a leg in lateral position (left)
Power
Individual work
Position on the left side of the body, with the lower straight leg pointing backwards as an extension of the body, the upper slightly bent leg is placed over the lower leg so that the knee, lower leg (also pointing backwards) and the inner instep of the foot are also placed on the floor. An elasticated band is stretched between the legs (place the band around the ankles). The lower arm supports the head, the upper bent arm supports the upper body by placing the hand on the floor at the level of the navel. From this position, raise the lower (stretched) leg (stretch/stretch the band further) and lower it back to the starting position.
Attention:
For greater intensity, do not lower the training leg completely.
Lighten:
Choose an elastic band with less resistance.
Harden:
Choose an elastic band with greater resistance.
1 mini-band
Adduction and abduction of a leg in lateral position (right)
Power
Individual work
Position on the right side of the body, with the lower straight leg pointing backwards as an extension of the body, the upper slightly bent leg is placed over the lower leg so that the knee, the lower leg (also pointing backwards) and the inner instep of the foot are also placed on the floor. An elasticated band is stretched between the legs (place the band around the ankles). The lower arm supports the head, the upper bent arm supports the upper body by placing the hand on the floor at the level of the navel. From this position, raise the lower (stretched) leg (stretch/stretch the band further) and lower it back to the starting position.
Attention:
For greater intensity, do not lower the training leg completely.
Lighten:
Choose an elastic band with less resistance.
Harden:
Choose an elastic band with greater resistance.
1 mini-band
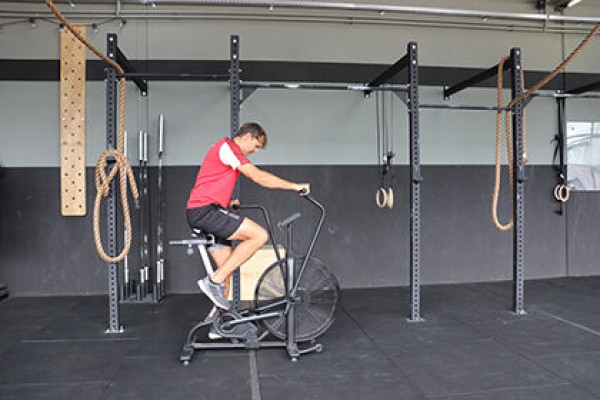
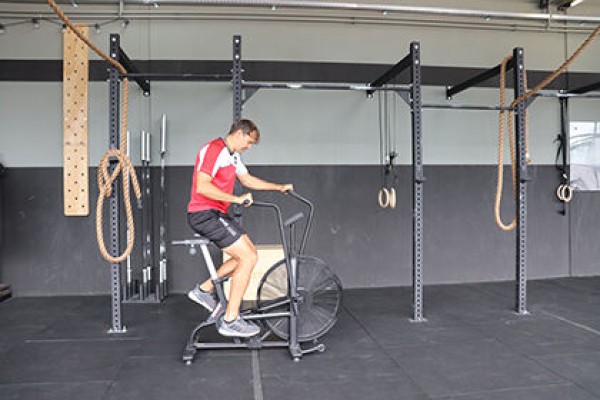
Air-Bike
Power
Individual work


At first glance, the air bike looks similar to a bicycle ergometer or a spinning bike. However, the difference lies in the fact that not only the legs but also the arm and core muscles are used, as these are required for the movement of the air bike. As the handles are pulled along with the hands, the legs and arms move simultaneously.
As the name suggests, the special feature of the air bike is the air resistance. The intensity of the training is regulated solely by the air resistance. The faster the pedalling movement, the greater the air resistance, and therefore the more strenuous the training. On the one hand, this ensures intuitive operation of the device, which is an additional fun factor for many athletes, and on the other hand, the air resistance ensures that the joints are protected.
1 Air-Bike
Air-Bike (m: 1000m/1km - 30k; f: 800m - 21k)
Power
Individual work


At first glance, the air bike looks similar to a bicycle ergometer or a spinning bike. However, the difference lies in the fact that not only the legs but also the arm and core muscles are used, as these are required for the movement of the air bike. As the handles are pulled along with the hands, the legs and arms move simultaneously.
As the name suggests, the special feature of the air bike is the air resistance. The intensity of the training is regulated solely by the air resistance. The faster the pedalling movement, the greater the air resistance, and therefore the more strenuous the training. On the one hand, this ensures intuitive operation of the device, which is an additional fun factor for many athletes, and on the other hand, the air resistance ensures that the joints are protected.
1 Air-Bike
Air-Bike (m: 1600m/1.6km/1 Mile - 45k; f: 1200m/1.2km - 30k)
Power
Individual work

At first glance, the air bike looks similar to a bicycle ergometer or a spinning bike. However, the difference lies in the fact that not only the legs but also the arm and core muscles are used, as these are required for the movement of the air bike. As the handles are pulled along with the hands, the legs and arms move simultaneously.
As the name suggests, the special feature of the air bike is the air resistance. The intensity of the training is regulated solely by the air resistance. The faster the pedalling movement, the greater the air resistance, and therefore the more strenuous the training. On the one hand, this ensures intuitive operation of the device, which is an additional fun factor for many athletes, and on the other hand, the air resistance ensures that the joints are protected.
1 Air-Bike
Air-Bike (m: 2000m/2km - 60k; f: 1600m/1.6km/1 Mile - 42k)
Power
Individual work

At first glance, the air bike looks similar to a bicycle ergometer or a spinning bike. However, the difference lies in the fact that not only the legs but also the arm and core muscles are used, as these are required for the movement of the air bike. As the handles are pulled along with the hands, the legs and arms move simultaneously.
As the name suggests, the special feature of the air bike is the air resistance. The intensity of the training is regulated solely by the air resistance. The faster the pedalling movement, the greater the air resistance, and therefore the more strenuous the training. On the one hand, this ensures intuitive operation of the device, which is an additional fun factor for many athletes, and on the other hand, the air resistance ensures that the joints are protected.
1 Air-Bike
Air-Bike (m: 2500m/2.5km - 75k; f: 2000m/2km - 50k)
Power
Individual work


At first glance, the air bike looks similar to a bicycle ergometer or a spinning bike. However, the difference lies in the fact that not only the legs but also the arm and core muscles are used, as these are required for the movement of the air bike. As the handles are pulled along with the hands, the legs and arms move simultaneously.
As the name suggests, the special feature of the air bike is the air resistance. The intensity of the training is regulated solely by the air resistance. The faster the pedalling movement, the greater the air resistance, and therefore the more strenuous the training. On the one hand, this ensures intuitive operation of the device, which is an additional fun factor for many athletes, and on the other hand, the air resistance ensures that the joints are protected.
1 Air-Bike