Exercises (1874)
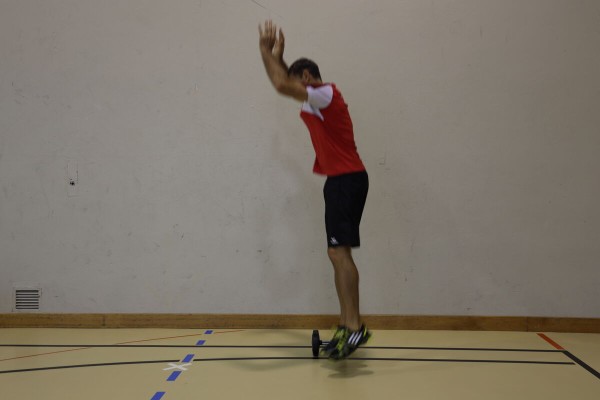
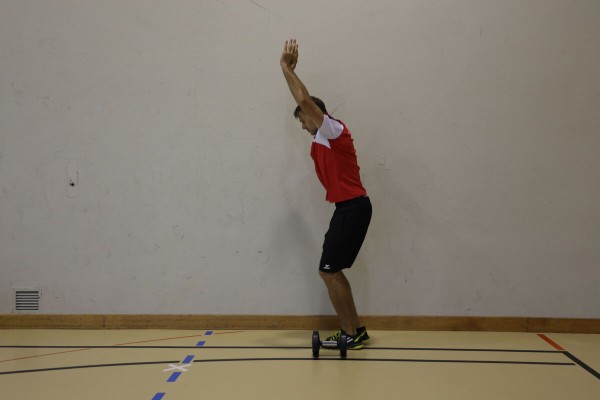
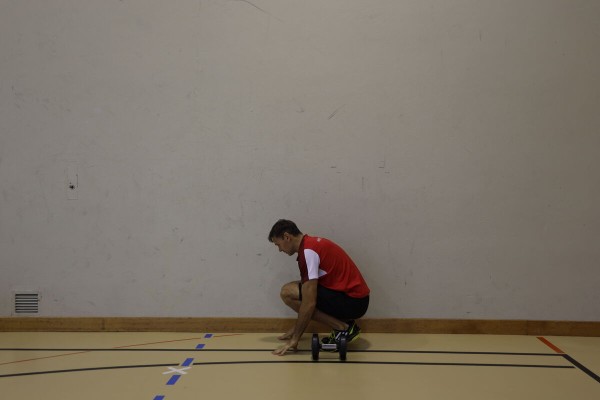
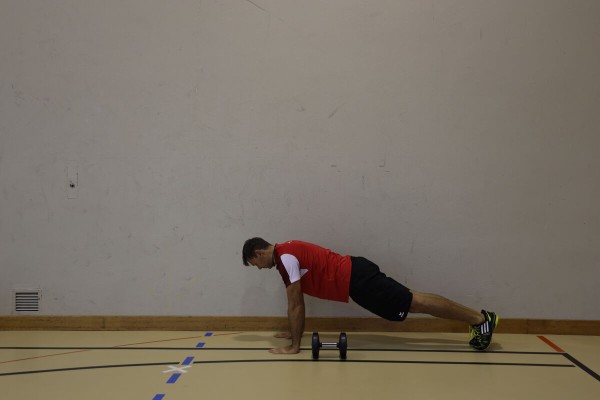
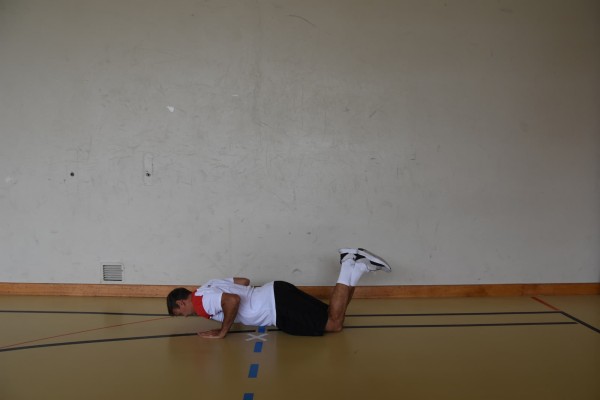
Alternating push-up and jump onto an object ► burpee & box jump
Power
Individual work


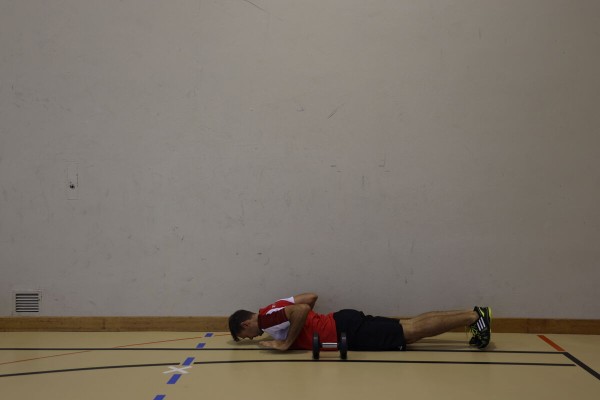
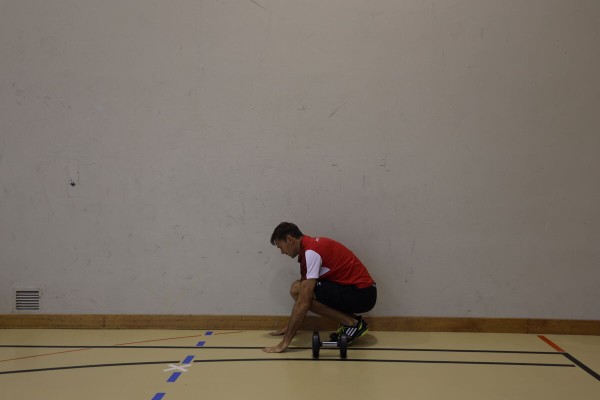
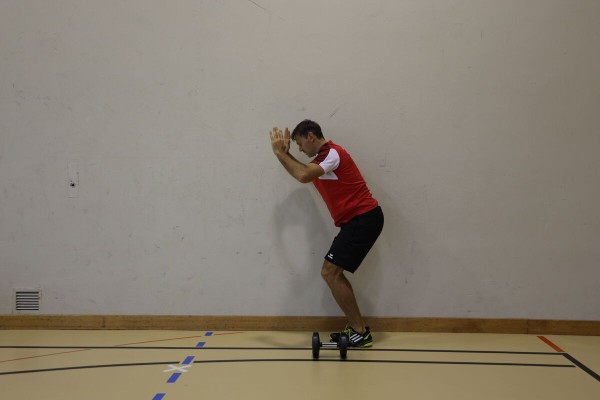
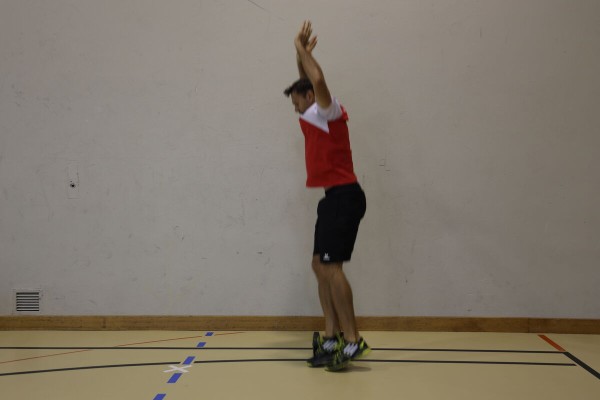
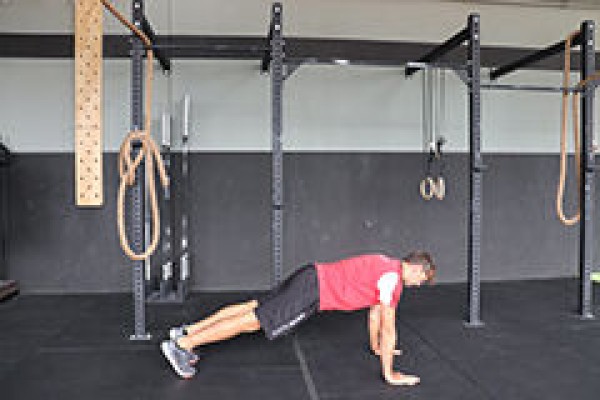
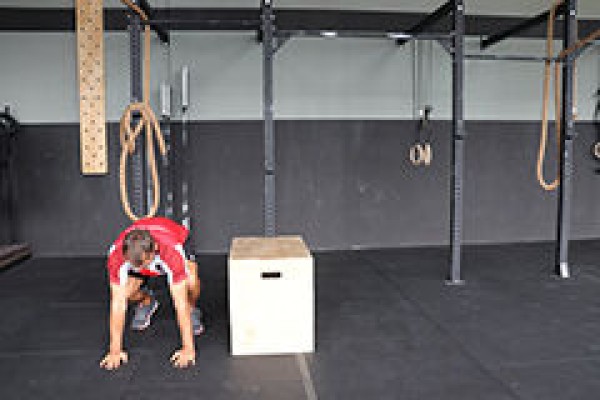
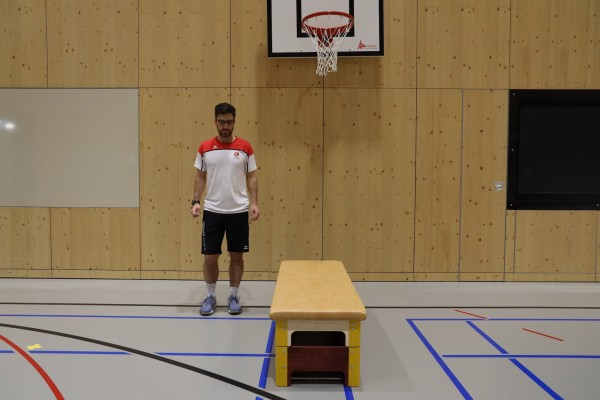
From a standing position, bend your legs and place your hands next to your feet to get into a squat position. Support yourself with your hands and jump backwards with both legs to get into a push-up position. Bend your arms to fully lower your upper body (prone position). From the prone position, push back into the push-up position with both arms and jump back into the squat position. From the squat position, tilt your upper body slightly forwards, stretch your arms backwards at an angle to your body (like a ski jumper on a ski jump), push off the floor powerfully to perform a jump onto the plyo box (using the momentum of your arms), straighten your upper body (standing on the box) and jump back to the starting position (possibly the other side of the box).
Attention:
No hollow back in the push-up position (body tension); land on the box as softly as possible (cushion the jump with your knees).
Lighten:
Lower intensity between the individual exercises; lower the height of the box.
Harden:
Additional weight; higher plyo box.
Variation:
Bouncing from one side of the plyo box to the other by jumping sideways.
1 flat bench/plyo box/swivel box
2-4 weight cuffs/1 weight waistcoat ► Make the exercise more difficult (additional weight)
Push-up and jump over the rower ► burpee over rower
Power
Individual work


From a standing position, bend your legs and place your hands next to your feet to get into a squat position. Support yourself with your hands and jump backwards with both legs to get into a push-up position. Bend your arms to fully lower your upper body (prone position). From the prone position, push back into the push-up position with both arms and jump back into the squat position. In the squat position, the upper body is tilted slightly forwards, stretch your arms backwards at an angle to your body (like a ski jumper on a ski jump), push off the floor powerfully to perform a jump (lateral-sided) over the back of the rowing machine (use the momentum of the arms). Straighten your upper body and restart the exercise (assume the push-up position) to finally jump back to the starting position.
Attention:
Do not arch your back in the push-up position (body tension); land on the floor as softly as possible (cushion the jump with your knees); be careful with the jump height when jumping over the rowing machine.
Lighten:
Lower intensity between the individual exercises; only jump into the push-up position and back into the squat (without prone position/push-up).
Harden:
Additional weight; higher intensity between the individual exercises.
Variant I:
Jump frontally over the rowing machine.
Variant II:
Integrate rowing units (defined distance, time or watts).
1 rowing machine
2-4 weight cuffs / 1 weight waistcoat ► Make the exercise more difficult (additional weight)
Push-up and jump over the dumbbell ► burpee over dumbbell
Power
Individual work

From a standing position, bend your legs and place your hands next to your feet to get into a squat position. Support yourself with your hands and jump backwards with both legs to get into a push-up position. Bend your arms to fully lower your upper body (prone position). From the prone position, push back into the push-up position with both arms and jump back into the squat position. In the squat position, the upper body is tilted slightly forwards, stretch your arms backwards at an angle to your body (like a ski jumper on a ski jump), push off the floor powerfully to perform a jump (lateral-sided) over the dumbbell (use the momentum of the arms). Straighten your upper body and restart the exercise (assume a push-up position) to finally jump back to the starting position.
Attention:
Do not arch your back in the push-up position (body tension); land on the floor as softly as possible (cushion the jump with your knees).
Lighten:
Lower intensity between the individual exercises; only jump into the push-up position and back into the squat (without prone position/push-up).
Harden:
Additional weight; higher intensity between the individual exercises.
Variant I:
Frontal jump over the dumbbell.
1 dumbbell (kettlebell)
2-4 weight cuffs / 1 weight waistcoat ► Make the exercise more difficult (additional weight)
Push-up and jump over the barbell ► burpee over bar
Power
Individual work


From a standing position, bend your legs and place your hands next to your feet to get into a squat position. Support yourself with your hands and jump backwards with both legs to get into a push-up position. Bend your arms to fully lower your upper body (prone position). From the prone position, push back into the push-up position with both arms and jump back into the squat position. In the squat position, the upper body is tilted slightly forwards, stretch your arms backwards at an angle along your body (like a ski jumper on a ski jump), push off the floor powerfully to perform a jump (lateral-sided) over the barbell (use the momentum of the arms). Straighten your upper body and restart the exercise (assume a push-up position) to finally jump back to the starting position.
Attention:
Do not arch your back in the push-up position (body tension); land on the floor as softly as possible (cushion the jump with your knees); be careful with the jump height when jumping over the barbell.
Lighten:
Lower intensity between the individual exercises; only jump into the push-up position and back into the squat (without prone position/push-up).
Harden:
Additional weight; higher intensity between the individual exercises.
Variant I:
Jump over the barbell from the front.
1 barbell
2-4 weight cuffs / 1 weight waistcoat ► Make the exercise more difficult (additional weight)
Alternating push-ups and stretch jumps ► burpee
Power
Individual work


From a standing position, bend your legs and place your hands next to your feet to get into a squat position. Support yourself with your hands, jump backwards with both legs to get into the push-up position. Bend your arms to fully lower your upper body (prone position). From the prone position, push back into the push-up position with both arms and jump back into the squat position. From the squat position, perform a stretch jump and land back in the starting position (standing).
Attention:
Do not arch your back in the push-up position (body tension).
Lighten:
Lower intensity between the individual exercises; lower height for the stretch jump (or just straighten your upper body); place your knees on the floor for the push-ups (feet held high).
Harden:
Additional weight.
2-4 weight cuffs/1 weight waistcoat ► Make the exercise more difficult (additional weight)
Push-up and moving an object to the side in the push-up position ► drag push up position
Power
Individual work


Push-up position, place an object (e.g. combat rucksack) on one side next to the hand (next to the little finger). Perform a push-up, grab the object and pull/push it to the other side, perform another push-up before returning the object to the starting position.
Attention:
Do not arch your back, tense your core.
Lighten:
Support in place; place your knees on the floor; only move the object between your arms.
Harden:
Additional weight (on your shoulders or for moving); unstable support for your legs.
1 combat backpack
1 weight vest/weight disc/sandbag/(additional) combat backpack ► making the exercise more difficult (additional weight)
1 sandbag ► making the exercise more difficult (load)
1 ball/1-2 balance cushions/1 balance board ► making the exercise more difficult (unstable base)
Push-up position
Power
Individual work


Progression I:
Adjust the sling trainer to mid-lower leg length (standing), support position with outstretched arms on the balance board with the feet vertically under the attachment point in the slings, hold position.
Progression II:
Integrate push-ups.
Caution:
Keep body tension, do not let hips sag, back straight, hands under shoulders (for both progressions).
1 sling trainer
1 balance board
Push-up position
Power
Individual work


Push-up position, legs (shins) placed on the exercise ball, alternately lift one leg slightly and return to the starting position.
Attention:
Head, shoulders, buttocks and feet form a line, no hollow back, actively tense the torso. To prevent the ball from rolling away, you can lean it against a wall.
Lighten the load:
Support yourself in place (without lifting and lowering your legs); exercise ball closer to your hips.
Lighten the load:
Additional weight (on your back); unstable support for your arms.
1 exercise ball
1 medicine ball/helmet/balance hemisphere
1 weight vest/weight disc/sandbag ►Make the exercise more difficult (additional weight)
Push-up position ► hand over push up position
Power
Partner work


Both participants stand at a distance of approx. 1 metre from each other in a frontal push-up position with their feet wide apart. The partners pass a ball back and forth (straight or crosswise) without it touching the floor. From time to time or after each pass, the participants change supporting hand.
Attention:
Keep the trunk stable and do not let it sag (constant tension).
Lighten:
Roll the ball on the floor to the partner; lighter ball.
Harden:
Heavier ball; additional weight (on the back).
1 weight ball
1 ball (e.g. volleyball/football/basketball) ► Make the exercise easier
1 weight ball/medicine ball ► Make the exercise more difficult (additional weight)
1 weight vest/weight disc/sandbag ► Make the exercise more difficult (additional weight)
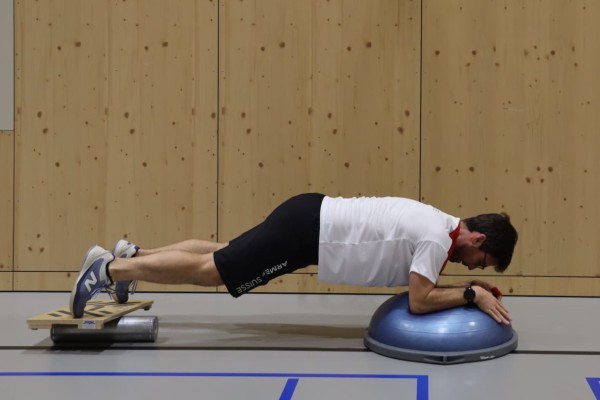
Push-up position on knees low ► knee push up hold / kneeling push up hold (normal grip)
Power
Individual work
In the knee push-up position (knees on the floor, feet held high with toes raised, body forming a straight line from head to knees, hands slightly more than shoulder-width apart under the shoulders), bend the arms and hold the position. In the deep push-up position, the elbows are at the side of the body (no outward movement of the elbows).
Attention:
No hollow back and elbows bent at an angle of approx. 45° from the upper body ("A" shape with the arms). Keep your shoulders fixed and pull them down towards your hips.
Lighten:
Lower your upper body less (hardly bend your arms); support your arms on a raised surface.
Harden:
Additional weight (on the back); unstable support for the arms and/or legs; perform normal push-ups without knee support.
Variant:
Vary the position of the hands/arms (e.g. wide, narrow, together).
1 weight vest/weight disc/sandbag/fighting backpack ► Make the exercise more difficult (additional weight)
1 ball/1-2 balance cushion/balance board ► Make the exercise more difficult (unstable base)
1 raised base ► Make the exercise easier or more difficult (position)
Push-up position high ► high plank hold
Power
Individual work

Push-up position (high plank), hands directly beneath the shoulders, arms straight, legs straight, feet hip-width apart. Actively engage the core, glutes and legs, keeping the body in a straight line from head to heel. Look down (neck in a neutral position). Continue breathing calmly, hold the position.
Attention:
Do not let your hips sag (this puts strain on your lower back), buttocks too high (reduces core engagement), shoulders do not slump (actively push outwards, stabilise shoulder blades), no hollow back (gently pull navel inwards), head not overextended (keep neck in line with the spine).
Lighten:
Place your knees on the floor (knee plank); rest your hands on a bench or box (less body weight).
Harden:
Lift one leg (less stable base); alternately touch your shoulders with one hand (shoulder tap = dynamic exercise); Place additional weight on the back; plank with arms reaching forwards (plank reach); place legs on a raised surface; unstable surface for the arms and/or legs; hold a lower push-up position.
Variation:
Vary the position of your hands/arms (e.g. wide, narrow, together).
1 weight vest/weight disc/sandbag ► Make the exercise more difficult (additional weight)
1 ball/1-2 balance cushion/balance board ► Make the exercise more difficult (unstable base)
1 raised base ► Make the exercise easier or more difficult (position)
Alternating push-up position and upright standing position ► jump back
Power
Individual work


From a standing position, bend your legs, place your hands in front of your feet and jump backwards with both legs at the same time to get into a push-up position. Then jump back forwards with both legs to the starting position of the legs, from this squatting position straighten back up to standing. Cross your arms behind your head and push your pelvis forwards (hollow back) before returning to the starting position in an upright position to start the exercise again.
Attention:
No hollow back in the push-up position (body tension).
Lighten:
Lower intensity between the individual exercises.
Harden:
Additional weight (on the legs).
2 weight cuffs/1 weight waistcoat ► Make the exercise more difficult (additional weight)
Push-up position and jump to the side alternating ► burpee & box jump over / side jump
Power
Individual work


Stand upright and stand next to a raised object (plyo box or vaulting box element incl. top). From a standing position, bend your legs and place your hands next to your feet to get into a squat position. Support yourself with your hands, jump backwards with both legs to get into the push-up position. Bend your arms to fully lower your upper body (prone position). From the prone position, push back into the push-up position with both arms and jump back into the squat position. From the squat position, powerfully push your legs off the floor to perform a sideways jump onto the raised object (use the momentum of your arms). Without straightening the upper body and stretching the legs (again in the squat position), immediately jump again to the other side of the raised object. After landing (no need to stand upright), restart the exercise sequence from the squat position and then jump back to the starting position.
Attention:
Land as softly as possible on the box and then immediately jump again.
Lighten:
Lower intensity between each execution; lower height to jump over.
Harden:
Additional weight; higher object to jump over.
Variation:
Frontal jumps up and down from the object.
1 flat bench/plyo box/swivel box
2-4 weight cuffs/1 weight waistcoat ► Make the exercise more difficult (additional weight)
Push-up position and jump to the side alternating ► burpee & box jump over / side jump
Power
Individual work

Stand upright next to an elevated surface (plyo box or Swedish box element including the top). From the standing position, bend your legs and place your hands next to your feet to move into a squat. Brace with your hands and jump both legs backward to get into the push-up position. Bend your arms to lower your upper body fully to the floor (prone position). From the prone position, push with both arms to return to the push-up position, then jump back into the squat. From the squat, push forcefully with your legs to perform a lateral jump over the elevated surface (using the swing of your arms). After landing (no need to stand upright), restart the movement sequence from the squat position, then jump again to return to the starting position.
Attention:
Land as softly as possible.
Lighten:
Lower intensity between each execution; step onto the box, do not jump; lower height to jump over.
Harden:
Additional weight; higher object to jump over.
Variation:
Frontal jumps up and down from the object.
1 flat bench/plyo box/swivel box
2-4 weight cuffs/1 weight waistcoat ► Make the exercise more difficult (additional weight)
Push-up position and stretch jump alternating ► half burpee
Power
Individual work


From a standing position, bend your legs, place your hands in front of your feet and jump backwards with both legs at the same time to get into a push-up position. Then jump back forwards with both legs to the starting position of the legs, perform a stretch jump from this crouching position (optionally cross your arms briefly behind your head during the flight phase) and land back in the starting position to begin the exercise again.
Attention:
No hollow back in the push-up position (body tension).
Lighten:
Lower intensity between the individual exercises; lower height during the stretch jump (or only straighten the upper body).
Harden:
Additional weight.
2-4 weight cuffs/1 weight waistcoat ► Make the exercise more difficult (additional weight)
Alternating push-up position and stretch jump ► scaled burpee
Power
Individual work


From a standing position, bend your legs and place your hands next to (in front of) your feet to assume the squat position. Support yourself with your hands and alternately move one leg backwards to reach the push-up position. Bend your arms to fully lower your upper body (prone position). From the prone position, use both arms to push yourself back into the push-up position, then alternately move one leg back into the squat position. From this squatting position, perform a stretch jump (optionally cross your arms briefly behind your head during the flight phase) and land back in the starting position to begin the exercise again (change which leg is moved backwards or forwards first for each exercise).
Attention:
No hollow back in the push-up position (body tension).
Lighten:
Lower intensity between the individual exercises; lower height during the stretch jump (or only straighten the upper body).
Harden:
Additional weight.
2-4 weight cuffs/1 weight waistcoat ► Make the exercise more difficult (additional weight)
Deep push-up position ► push up plank hold
Power
Individual work

Deep push-up position, hold position.
Attention:
No hollow back, elbows bent approx. 45° from upper body ("A" shape with arms), shoulders are fixed and pulled down towards hips.
Lighten:
Place knees on floor (feet in high position); lower upper body less (arms barely bent); support arms on raised surface.
Harden:
Additional weight (on the back); place legs on a raised surface; unstable surface for the arms and/or legs.
Variant:
Vary the position of the hands/arms (e.g.: wide, narrow, together).
1 weight vest/weight disc/sandbag ► Make the exercise more difficult (additional weight)
1 ball/1-2 balance cushion/balance board ► Make the exercise more difficult (unstable surface)
1 raised surface Make the exercise easier or ► Make the exercise more difficult (position)
Push-up position and forearm support alternating ► push up position & elbow plank / push up position & front plank / push up position to elbow plank / push up position to front plank
Power
Individual work


Switch from the push-up position to the forearm support and back (bend and stretch one arm at a time).
Attention:
Head, torso, hips and knees practically form a line (do not stretch your buttocks upwards or let them sag, tense your stomach).
Lighten:
Knees on the floor.
Harden:
Additional weight (on the back); unstable base for the legs.
1 weight vest/weight disc/sandbag ► to make the exercise more difficult (additional weight)
1 ball/balance cushion/balance board ► to make the exercise more difficult (unstable surface)
Liegestützposition und Unterarmstütz alternierend ► push up position & elbow plank / push up position & front plank / push up position to elbow plank / push up position to front plank
Power
Individual work

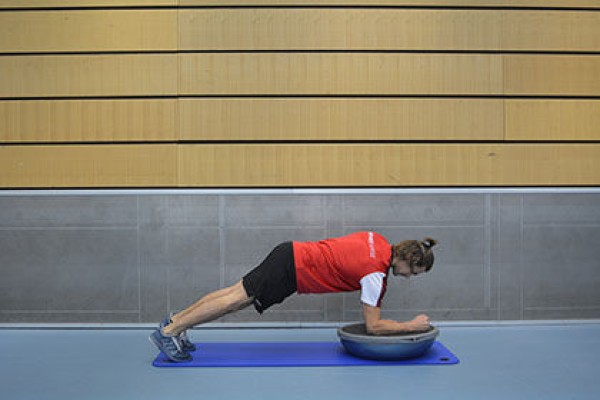

Switch from the push-up position to the forearm support and back (bend and stretch one arm at a time), placing the hands or forearms on a balance ball.
Attention:
Head, torso, hips and knees practically form a line (do not stretch your buttocks upwards or let them sag, tense your stomach).
Lighten:
Perform the exercise without the balancing hemisphere; knees on the floor.
Harden:
Additional weight (on the back); unstable base for the legs.
1 balance hemisphere
1 weight vest/weight disc/sandbag ► to make the exercise more difficult (additional weight)
1 ball/balance cushion/balance board ► to make the exercise more difficult (unstable base)
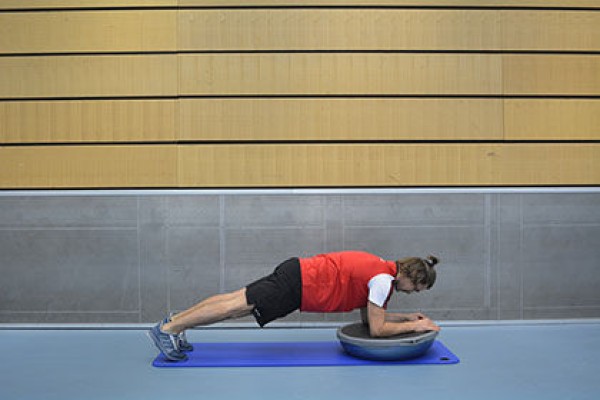
Liegestützposition und Unterarmstütz alternierend ► push up position & elbow plank / push up position & front plank / push up position to elbow plank / push up position to front plank
Power
Individual work


Switch from the push-up position to the forearm support and back (bend and stretch one arm at a time), with the hands or forearms placed on a balance hemisphere and the feet in the sling trainer (adjust the sling trainer to the length of the centre of the lower leg - while standing; feet vertically under the attachment point).
Attention:
Head, torso, hips and knees practically form a line (do not stretch your buttocks upwards or allow them to sag, tense your stomach).
Lighten:
Perform the exercise without the sling trainer and/or balance half-ball.
1 balance hemisphere
1 sling trainer
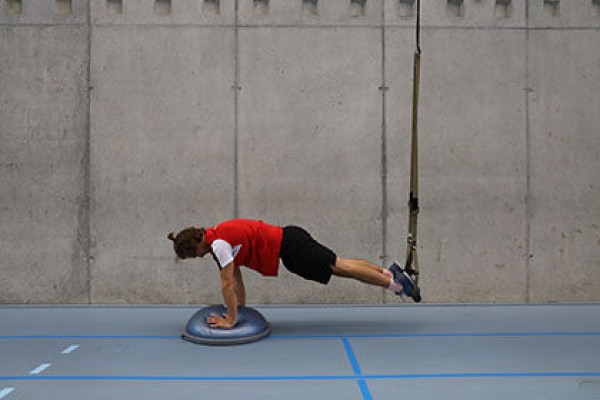
Alternating push-up position and forearm plank ► push up position & elbow plank / push up position & front plank / push up position to elbow plank / push up position to front plank
Power
Individual work
From the push-up position, alternate between the forearm plank and the push-up position (bending and extending one arm at a time). The hands or forearms are placed on the balance half-ball. The legs are positioned on an unstable surface.
Attention:
Feet, knees, pelvis and shoulders form nearly a straight line (body engaged, pelvis pushed slightly upward). Do not fully extend the arms. In the final position, actively pull the shoulder blades together.
Lighten:
Perform the exercise without the balance board.
Harden:
Add additional weight (on the back).
1 balance hemisphere
1 ball/balance cushion/balance board
1 weight vest/weight disc/sandbag ► to make the exercise more difficult (additional weight)
Alternating push-up position and forearm plank ► push up position & elbow plank / push up position & front plank / push up position to elbow plank / push up position to front plank
Power
Individual work
Switch from the push-up position to the forearm support and back (bend and stretch one arm at a time), placing the hands or forearms on a balance ball.
Attention:
Head, torso, hips and knees practically form a line (do not stretch your buttocks upwards or let them sag, tense your stomach).
Lighten:
Perform the exercise without the balancing hemisphere; knees on the floor.
Harden:
Additional weight (on the back); unstable base for the legs.
1 balance hemisphere
1 weight vest/weight disc/sandbag ► to make the exercise more difficult (additional weight)
1 ball/balance cushion/balance board ► to make the exercise more difficult (unstable base)
Push-up competition
Fighting and roughhousing games
Partner work

Two participants assume the push-up position (facing each other). The participants try to unbalance each other by pulling their arms away (or dodging). Whoever leaves the push-up position first (e.g. knees touch the floor) loses.
No material required
Push-up competition
Fighting and roughhousing games
Group work
The participants assume the push-up position and try to make another participant fall (knees on the floor) (pull hands away, push, dodge, unbalance, etc.). Whoever leaves the push-up position is eliminated and performs an additional exercise (e.g. wall sit, push-ups, forearm support). Which participant remains in the push-up position until the end?
No material required
Line drawing
Fighting and roughhousing games
Partner work

Two participants stand opposite each other on a line and grab each other by one hand or forearm. The participants try to pull their opponent over the line. Whoever crosses the line first loses.
Variant:
Whoever has to lift one leg off the ground first loses.
2 marking cones/caps (optional) ►Pitch marking
Post setup:
Caps mark the centre line.