Exercises (3237)
Stroke combinations
Light-Contact
Partner work


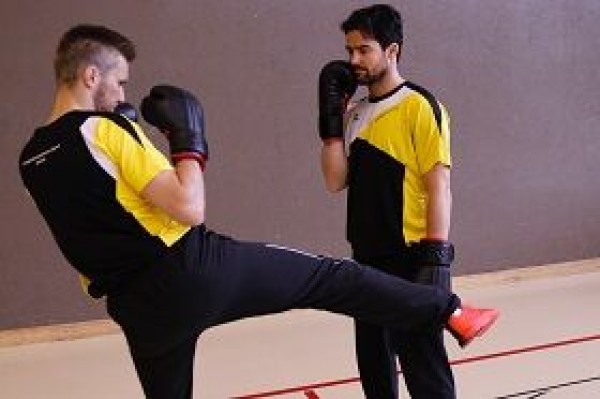


► Uppercut (crosswise, i.e. left fist to the opponent's left hand)
The passive participant can occasionally execute punching movements to which the active participant must react appropriately (e.g. evasive movements). This ensures that the defence is not neglected.
Variant:
Integrate footwork as well:
- Place the hand on the side of the body - back of the hand facing outwards (vary the height)
► Kick sideways onto the back of the hand - Cross the arms in front of the body - palms facing downwards
► Knee kick between the hands - Place both hands on the stomach - back of the hand facing the opponent
► Push off (leg pushed out forwards)
Participant:
1 pair of boxing gloves
Stroke combinations
Light-Contact
Partner work
Three marker cones are distributed in front of a punching bag (left-centre-right). The active participant moves from position to position (back and forth) without crossing their legs. He stops at each position to execute any combination of 2-5 punches. The partner holds the punching bag. The roles are swapped on the next round.
1 punching bag
3 marking hats
Participant:
1 pair of boxing gloves
Stroke combinations
Light-Contact
Partner work
Both participants have a punching bag at their disposal to perform any combination of 2-5 punches. A distinction is made between soft (light-contact) and hard combinations.
2 punching bags (one punching bag per participant)
Participant:
1 pair of boxing gloves
Stroke combinations
Light-Contact
Partner work
Two elasticated bands are attached at approximately chest height (to a wall bar, boxing ring or similar). The participant stands with their back facing the attachment in a stepping position (staggered stance) and grasps one end of each band with their hands. The distance should be chosen so that the straps are slightly taut. From this position, the participant takes a step forwards and strikes any combination of 2-5 strokes. Then take a step back to the starting position to begin the exercise again.
Caution:
Grab the bands correctly.
4 elasticated rubber bands (2 per participant)
Snake catching
Stimulate circulation
Group work
Two participants designated for catching hold hands and start chasing the other participants. Each participant who is caught joins the "hunters". The resulting snake must always remain intact. The game ends when the last player has been caught.
Variant:
If the snake is larger than three participants, the snake is split up (4 participants make two new snakes with two participants each).
No material required
Snake run
Stimulate circulation
Group work
8-15 participants per column
A single column with a distance of approx. 2 metres between the participants moves at a relaxed pace. The runner at the back moves to the front (also possible in a slalom). After the runner at the back has passed a few other runners, the next runner can start.
Some forms of movement can be integrated into the snake run (crossing legs, arm circles, hopping run, etc.), which are determined either by the runner at the front or by the sports leader.
No material required
Snap ball
Stimulate circulation
Group work
2 teams
Two teams play against each other in a limited playing area. The team with the ball/disc tries to keep the ball in their own ranks for as long as possible by passing the ball (back passes may be prohibited). You are not allowed to move with the ball/disc (star step allowed). The opposing team tries to intercept the ball. If this is successful, the roles are changed. There is also a change of roles/ball/disc if the ball/disc falls to the ground (both when a teammate drops it and when an opponent knocks the ball/disc to the ground/intercepts the pass), the ball leaves the playing field or, if necessary, after a point is scored. Ways to win points:
- 10 consecutive passes
- Pass between the legs to a teammate (both feet on the ground)
- Pass behind the back to a teammate
- Header to a teammate after a pass
Variant:
The teams try to score as many points as possible in a given time. There is no change of roles/ball in this form of the game
1 ball/throwing disc (Frisbee) ►Basketball, Frisbee Ultimate, FooBaSKILL, Rugby/Football, Handball, Tchoukball
4 marking cones/caps ►Field markings
One group:
x game ribbons/ribbons ►Team identification
Sport leader:
Stopwatch ►Variant
Wheelbarrow defect
Fighting and roughhousing games
Group work
Groups of 2
Two participants form a team, with one of the participants representing the wheelbarrow (leaning on their hands and being held by their partner's thighs). The different groups try to make the other "wheelbarrows" collapse. Which group remains at the end?
An additional exercise (e.g. wall sits, press-ups, forearm support, etc.) can be determined for the "broken" wheelbarrows.
No material required
Shoe hit
Stimulate circulation
Group work
The aim is to hit the other participants on the shoes with the floorball. Whoever is hit completes an additional task (e.g. a strength exercise such as push-ups, trunk bends or five double jumps over the stick lying on the ground).
Variant I:
2 teams, with one team trying to hit the opposing team's shoes in a limited playing area (integrate several balls into the game, but not too many so that the game leader can keep an overview). Which team will score more goals in a given time?
Variant II:
2 teams, with one team trying to hit the opposing team's shoes in a limited playing area (integrate several balls into the game, but not too many so that the game leader can keep an overview). If a player is hit, he leaves the pitch until the end of the game and performs an additional task outside the pitch (e.g. forearm support or sitting on the wall). Which team has eliminated all participants faster?
Participants:
1 stick ►unihockey
1 ball ►unihockey
4 marking cones/caps ►court markings (variant)
x playing ribbons/bibs ►team identification (variant)
4-5 balls ►unihockey (variant)
Shoulder thrust
Fighting and roughhousing games
Partner work
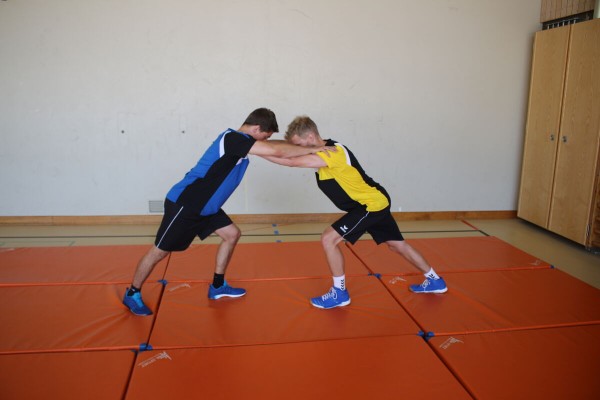
Two participants line up in the centre of a mat/grass field (or without a field boundary) and grab each other by the shoulders. Both participants try to push/pull their opponent out of the field. The first person to put a foot next to the field loses.
Variant:
Playing field size varies; exercise is also possible on a small field (1-4 mats).
9-12 soft mats (small) ► indoor version
4 marking cones/caps ► indoor and outdoor version
Indoor post set-up:
form a rectangular field of mats using soft mats.
Indoor/outdoor post set-up:
define a rectangular field using caps.
Shoulder thrust with restriction
Fighting and roughhousing games
Partner work
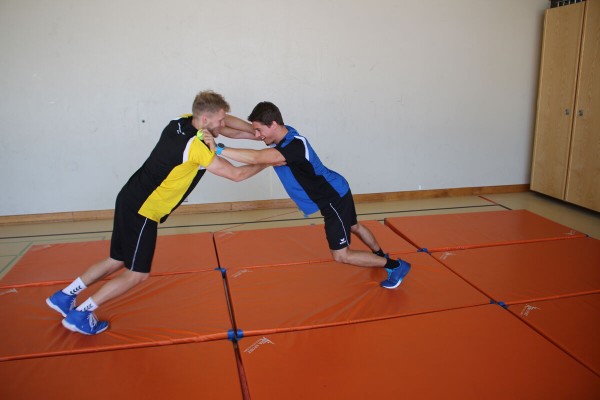
Two participants line up in the centre of a mat/lawn area and try to push each other off a mat/lawn area. The participants each hold a tennis ball in their hands. The tennis balls restrict the participants in their fighting behaviour, which should prevent scratches and/or abrasions. The first person to put a foot next to the court loses.
9 soft mats (small) ► indoor version
4 tennis balls
4 marking cones/caps ► indoor and outdoor version
Indoor post set-up:
form a rectangular mat field using soft mats.
Indoor/outdoor post set-up:
define a rectangular field using caps.
Suspended push-off
Fighting and roughhousing games
Partner work

Two participants sit opposite each other in a suspended position (legs and upper body raised off the floor, only the buttocks touch the floor, arms possibly crossed in front of the body). With the support of their legs, the participants try to unbalance their opponent. As soon as a participant touches the floor with their back, hands or feet, they lose. The competition can be performed with or without permanent contact between the legs/feet.
Caution:
Despite any fatigue, a hollow back position must be avoided (actively tense the torso).
No material required
Swing box dismantling
Increase pulse
Group work
2 teams
The game is played with the ball in the hands. Swedish boxes act as goals. When a group has scored a goal, they can take away one of the opponent's goal boxes to make it smaller. The winner is the group that scores a goal on the last box element.
You are not allowed to move with the ball. The opposing team tries to intercept the ball. If they succeed, the roles change. Ball changes also occur when the ball falls to the ground, the ball leaves the playing field or, if necessary, after a point is scored.
2 vaulting boxes
1 ball (hand/soft or smolball)
x bibs
Swing box dismantling
Increase pulse
Group work
2 teams
The game is played with the ball in the hands or on the foot. Swedish boxes act as goals. When a group has scored a goal, they can take away one of the opponent's goal boxes to make it smaller. The winner is the team that scores a goal on the last box element.
You are not allowed to move with the ball. The opposing team tries to intercept the ball. If they succeed, the roles change. Ball changes also occur when the ball falls to the ground, when the ball leaves the pitch or, if necessary, after a point is scored.
2 Swedish box
1 ball (foot-, hand-, soft- or smolball)
x jersey
Swing box dismantling
Increase pulse
Group work
2 teams
Swedish boxes act as goals. When a group has scored a goal, they can take away a box element from the opponent's goal so that this goal becomes smaller. The winner is the group that scores a goal on the last box element.
2 Swedish box
1 floorball
x bibs
Participant:
1 floorball stick
Swing box dismantling
Increase pulse
Group work
2 teams
Swedish boxes act as goals. When a group has scored a goal, they can take away a box element from the opposing goal so that this goal becomes smaller. The winner is the group that scores a goal on the last box element.
The following rules apply to the game form:
- The ball, which is balanced on the stick, may be carried a maximum of 4 steps and must then be passed immediately.
- The ball may be touched a maximum of 4 times before it is played on.
- The ball at rest on the stick, without movement of the player, may be held for a maximum of 4 seconds.
- The ball may not be covered with the racket or the body, but must be played on immediately.
- It is not permitted to actively play the ball with the foot or lower leg, with the hand, the arm or the head (free hit).
- If the ball leaves the field of play, it is put back into play by a free hit by the opposing team at the place of action.
2 Swedish box
1 Smolball
x bibs
Per Tn:
1 Smolball bat
Scorelauf
Orienteering
Single run or groups of 2/3
Send participants/groups onto the course in staggered formation (note the distance to the first starter/starting group on the run card)
In the terrain, the sports director distributes the controls in advance, which the participants run to individually or in small groups during the scorelace. For this purpose, the participants receive a control overview and a running map. Each control gives a certain number of points. Logically, the easier, obvious controls score the fewest points. The scorelace can be run both as an exercise and as a competition. It is worth staggering both variants so that each participant/group has to work independently and cannot simply follow a runner/group in front (note the time intervals/difference to the first start time on the run card for the evaluation). The control overview with the running map can either be handed out together with the start signal or distributed to the runners/groups a certain time before the start. The participants collect as many points as possible in the time provided. Points will be deducted if they are late at the finish (e.g. 5 points deducted for every minute started after the agreed finish time).
Variant:
Prepare the post transfer point: The participants do not receive a map on which the controls are already marked, but must mark the controls themselves at a control transfer point (e.g. using coordinates, azimuth or measuring point method). The control sheets remain at the start even after the transfer. Before the participants set off on the course, the sports director checks the marked controls.
Orienteering controls (to be unplugged)
1 stopwatch
Participant/group:
1 orienteering map with control overview incl. designation and scoring (prepared in advance by the sports director)
1 running map form 30.063
1 bussole
Variation of the exercise:
Participant/group:
1 control transfer sheet
1 map scale
1 pencil and eraser
Seasickness relay
Increase pulse
Group work
4-5 participants per group
A marker cone is located at the reversal point, which must be circled 15 times. During the turns, both hands grasp the cone (alternatively, the head can also be placed on the hands). The group counts the number of laps out loud and calls the runner back after the last turn, who probably tries to reach the group while staggering to send the next runner onto the course.
Releases: Run over a line (with a handshake), through a gate, around the group with a handshake (on the back), crawl through the legs of the next runner, hand over an object, etc.
Per group:
2 marking cones
Seasickness relay
Increase pulse
Group work
4-5 participants per group
The runners run to the reversal point equipped with a Smolball stick, floorball/intercrosse stick or Nordic walking stick. At the turning point, the stick/stick is held vertically to the ground. Then make 15 rotations (as quickly as possible) around the stick/stick. During the rotations, both hands hold the stick/stick blade and the head is placed on the upper hand. The group counts the number of turns out loud and, after the last turn, calls the runner back, who probably tries to reach the group while staggering, in order to hand the stick/stick to the next runner and send them on their way.
Per group:
1 Nordic walking, intercrosse or floorball stick
1 Smolball stick
Seasickness relay
Forms of play / exercises
Group work
4-5 participants per group
The runners run to the reversal point equipped with a Smolball stick, floorball/intercrosse stick or Nordic walking stick. At the turning point, the stick/stick is held vertically to the ground. Then make 15 rotations (as quickly as possible) around the stick/stick. During the rotations, both hands hold the stick/stick blade and the head is placed on the upper hand. The group counts the number of turns out loud and, after the last turn, calls the runner back, who probably tries to reach the group while staggering, in order to hand the stick/stick to the next runner and send them on their way.
Per group:
1 Nordic walking, intercrosse or floorball stick
1 Smolball stick
Rope/rope pulling ► rope pulling
Power
Partner work
1 trainee & 1 helper ► Note change of position
(= double the time required; for lesson planner see Organisation Kraft: Info button Execution)


► Exercise only suitable in the gym!
Trainee: Pulls their partner towards them by pulling on the rope/rope. As soon as both participants are in the same position, the trainee distances themselves until the rope/rope is stretched to its full length so that they can pull their partner towards them again.
Partner: Stands in a squatting position (stable torso; stomach tensed) on the carpet remnants and holds on to the end of the rope/rope.
Attention:
Both participants ensure a straight back.
Lighten:
Lighter partner.
Harden:
Heavier partner (partner with additional weight).
1 rope/rope
2 carpet remnants
1 weight waistcoat ► to make the exercise more difficult (additional weight)
rope catching
Stimulate circulation
Group work
All participants stuff a rope down the back of their trousers so that half of the halved rope hangs out visibly. Each participant then tries to grab as many ropes as possible. Even those who have no more rope continue to take part in the game. A playing field limit that may not be exceeded can be set if necessary. The winner is the player who has grabbed the most ropes at the end.
Variant:
Whoever loses their rope is eliminated and performs an additional exercise at the edge of the playing field (e.g. forearm support or wall sitting). From time to time, the playing field is reduced in size (as the number of participants decreases). Who can hold on to their rope until the end?
Per participant:
1 skipping rope
4 marking cones/caps ►Field boundary (optional)
Rope swinging
Stimulate circulation
Group work
Group of 3
Two participants swing the rope (2-3 skipping ropes knotted together). One participant goes to the centre from one side, jumps over the rope a few times and runs out on the other side. The jumper runs behind the swinger and returns to the centre. The jumper thus moves in the shape of an eight. Once the participant has completed a few rounds, the positions are swapped.
Attention:
Depending on the direction of the swing, there is an easier and more difficult side to get to the centre.
Variant I:
In the centre, try to pick up an object (e.g. a hat or a coin) and put it down again.
Variant II:
Start in the centre, starting position sitting or in the push-up position. In these positions, try to jump over the rope as it swings past.
Per group:
2-3 skipping ropes or 1 rope/rope
1 marking cone ►Variant
Skipping rope
Increase pulse
Group work
4-6 participants per group
At the start, a dice is rolled to determine how many jumps must be performed with the skipping rope at the reversal point (e.g. number of dice x 5 = number of jumps). After rolling the dice, the runner runs to the reversal point and performs the number of jumps determined by the dice before being allowed to return to the group to hand over to the next runner, who in turn defines the number of jumps with the dice.
Per group:
1 skipping rope
1 dice
2 colouring sticks
Skipping rope
Increase pulse
Individual work
At a signal from the instructor, the participants switch from leisurely rope jumping to very fast rope jumping on the spot until the instructor gives another signal. The exercise is repeated a few times to increase the heart rate several times.
Variant:
Pull the knees up to the navel while jumping rope (skipping) or supplement the rope jumping with other short intensive exercises (e.g. integrate a push-up and a stretch jump on a signal).
Participant:
1 skipping rope