
Exercises (3274)
Type of stroke: Uppercut
Light-Contact
Partner work
Uppercut:
The uppercut is the most difficult punch in terms of structure. It is triggered by hip rotation. In preparation, the fist and upper body are dropped slightly. The forearm is then brought up vertically in front of the body and the legs, hips and torso are stretched at the same time. The fist should hit the chin from below.
Exercise:
From the starting position, the partner stretches one hand slightly towards the other participant and raises the elbow so that the palm is pointing down towards the floor (open fist). The upper and lower arm are approximately at right angles. The attacker strikes an uppercut crosswise into the palm of the partner's hand. After a few punches, the roles are reversed. Caution: the attacker makes sure that the palm of the hand is facing their own body during the uppercut and that the upper body is dropped slightly before the punch.
Participant:
1 pair of boxing gloves
Type of stroke: Straight
Light-Contact
Individual work


Staggered stance frontally to the raised (large) soft mat. Alternate straight punches with both arms on the soft mat (against the opponent's chin, nose or forehead). The strike is straight and horizontal, the opposite hand remains on the face for protection/defence.
Straight punch:
The straight punch is delivered from the starting position in the most direct way to the target. This is done with an extension of the arm, at the same time as the hip rotates and the ball of the foot presses down on the same side. The elbow points towards the floor for as long as possible. As the punching fist is brought forward, the second fist goes back to the cheek (cover). The upper body and knees bend at the same time as the punch. The fist is at head height of the punching boxer. The head is thus protected by the shoulder. The boxing stance should then be resumed in a flash.
1 pair of boxing gloves
1 soft mat (large)
Type of stroke: Straight
Light-Contact
Partner work
Straight:
The straights are brought from the starting position to the target in the most direct way. This is done by stretching the arm while rotating the hips and pushing off the balls of the feet on the same side. The elbow points towards the floor for as long as possible. As the punching fist is brought forward, the second fist goes back to the cheek (cover). The upper body and knees bend at the same time as the punch. The fist is at head height of the punching boxer. The head is thus protected by the shoulder. Afterwards, the boxing stance should be assumed again in a flash.
Exercise:
The partner stretches one arm slightly towards the other participant from the starting position and turns the arm so that the palm is facing the other person (open fist). The attacker strikes a straight cross into the palm of the partner's hand, whereby the lead hand is referred to as a "jab". After a few punches, the roles are swapped. Watch out for possible mistakes: Head turned away, rear leg lifted off the ground or back position during the punching movement.
Participant:
1 pair of boxing gloves
Type of stroke: Straight (hard strokes)
Light-Contact
Partner work
Stance offset frontally to the punching bag. Strike the punching bag as hard as possible (1st pass: lead hand, 2nd pass: punching hand). The punch is straight and horizontal, the opposite hand remains on the face for protection/defence.
Straight line:
The straight lines are delivered from the starting position in the most direct way to the target. This is done by stretching the arm while rotating the hips and pushing off the ball of the foot on the same side. The elbow points towards the ground for as long as possible. When the punching fist is brought forward, the second fist goes back to the cheek (cover). The upper body and knees bend at the same time as the punch. The fist is at head height of the punching boxer. The head is thus protected by the shoulder. The boxing stance should then be resumed in a flash.
2 punching bags (one punching bag per participant)
Participant:
1 pair of boxing gloves
Type of stroke: Straight (fast strokes)
Light-Contact
Partner work
Both participants stand facing the raised (large) soft mat. Strike the soft mat with the highest possible cadence (1st pass: lead hand, 2nd pass: punching hand). The punch is straight and horizontal, the opposite hand remains on the face for protection/defence.
1 soft mat (large)
Participant:
1 pair of boxing gloves
Type of stroke: Sideways hook
Light-Contact
Individual work

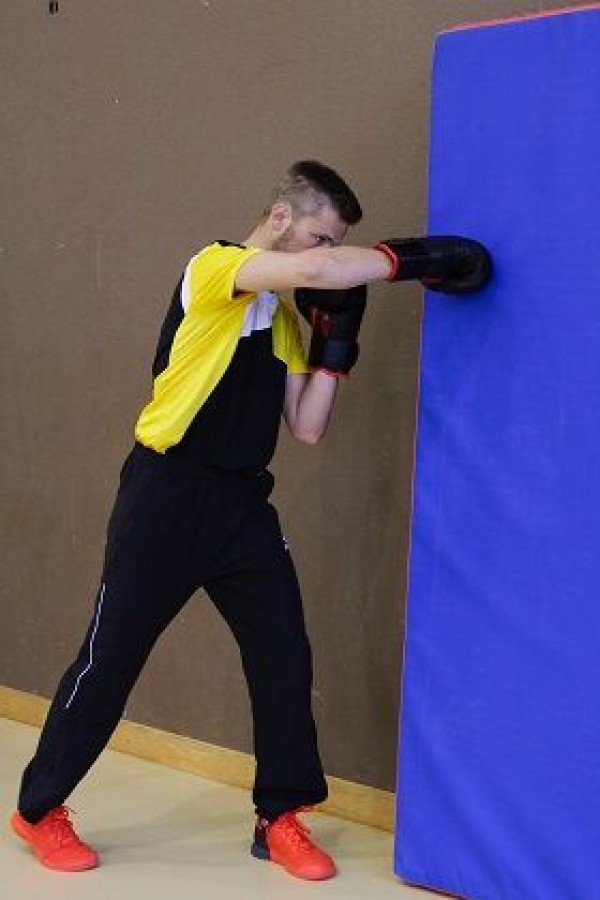
Stance offset frontally to the raised (large) soft mat (position of the boxer at the end of the soft mat). Strike the edge of the soft mat with the arm facing away from the mat (against the opponent's head). During the punch (semi-circular movement), the elbow remains at shoulder height and the back of the hand points upwards, with the opposite hand remaining on the face for protection/defence.
Sideways hook:
The sideways hook is triggered by pressing down on the ball of the foot and simultaneously pushing the hips forwards. The body rotates around the longitudinal axis. The arm is not stretched, but tilted 90 degrees during the rotation so that the fist, elbow and shoulder are at the same height. The fist should hit the side of the opponent's head. The chin is covered by the shoulder. The elbow and shoulder joints are at a 90 degree angle. The second hand lies at the side of the cheekbone, the forearm vertically in front of the torso.
1 pair of boxing gloves
1 soft mat (large)
Type of stroke: Sideways hook
Light-Contact
Partner work
Sideways hook:
The sideways hook is triggered by pressing down on the ball of the foot and pushing the hips forwards at the same time. The body rotates around the longitudinal axis. The arm is not stretched, but tilted 90 degrees during the rotation so that the fist, elbow and shoulder are at the same height. The fist should hit the side of the opponent's head. The chin is covered by the shoulder. The elbow and shoulder joints are at a 90 degree angle. The second hand lies at the side of the cheekbone, the forearm vertically in front of the torso.
Exercise:
The partner stretches one arm slightly towards the other participant from the starting position and opens the fist so that the back of the hand points to the respective side (e.g.: left hand is moved forwards, so the palm points to the right side). The attacker strikes a sideways cross into the palm of the partner's hand. After a few punches, the roles are reversed. Caution: the distance to the opponent is slightly closer with the sideways hook than with the straight punch. Also make sure that the elbow is held high at shoulder height (forearm and upper arm at a 90 degree angle).
Participant:
1 pair of boxing gloves
Impact types
Light-Contact
Individual work
Present - imitate
The participants practise independently, the instructor corrects
Introduction:
All punches are executed in such a way that the permitted target area is hit with the knuckle area. The punching boxer should remain as well covered as possible and at the same time have an efficient transfer of power. To do this, the weight is shifted to the second leg and the torso, hips and heel are rotated outwards until the shoulder protects the chin. The impact is made on the ball of the foot, with most of the power coming from the core muscles. As soon as the fist approaches the target, it is closed and the wrist is firmly tensed. Straight punches are struck from a long distance, hooks in close combat, i.e. when the opponents are body to body. Any punch can be thrown to the head or body.
The instructor demonstrates the different types of punch and the participants then practise them independently (shadow boxing). The instructor checks and corrects the exercises.
Strikes:
Target = nose, chin or forehead of the opponent.
The strikes are delivered from the starting position in the most direct way to the target (movement as straight as possible). This is done by stretching the arm, simultaneously rotating the hips and pressing down on the ball of the foot on the same side. The elbow points towards the floor for as long as possible. As the punching fist is brought forward, the second fist goes back to the cheek (cover). The upper body and knees bend at the same time as the punch. The fist is at head height of the punching boxer. The head is thus protected by the shoulder. Afterwards, the boxing stance should be assumed again in a flash.
Sideways punch:
Target = cheek.
Pre-exercise: Upper arms in a line, right angle in the elbow and only rotation from the torso.
The sideways punch is triggered by pressing down on the ball of the foot and simultaneously pushing the hips forwards. The body rotates around the longitudinal axis (circular movement). The arm is not stretched, but tilted 90 degrees during the rotation so that the fist, elbow and shoulder are at the same height. The fist should hit the side of the opponent's head. The chin is covered by the shoulder. The elbow and shoulder joints are at a 90 degree angle. The second hand is positioned at the side of the cheekbone, the forearm vertically in front of the torso.
Upward punch:
Target = underside of the chin.
The upward punch is the most difficult punch in terms of structure. It is triggered by hip rotation. In preparation, the fist and upper body are dropped slightly. The forearm is then brought up vertically in front of the body (elbows remain in front of the body) and at the same time the legs, hips and torso are stretched. The fist should hit the chin from below.
No material required
Stroke combinations
Light-Contact
Partner work
The instructor specifies a certain sequence of movements or, in the case of experienced participants, the combinations can be freely chosen (varied).
The passive participant (with the claws) keeps the partner (with the boxing gloves) busy for a certain period of time (2-3 minutes). After a breather, a new stress phase begins. Only after several rounds (2-4) are the roles changed (depending on the desired intensity).
The passive competitor shows the active competitor how to strike:
- Paw next to the head - claw surface points forwards
► Straight punch (crosswise, i.e. left fist to the opponent's left hand) - Paw in front of the face at head height - claw surface points inwards/to the face
► Sideways punch (crosswise, i.e. left fist to the opponent's left hand) - Paw in front of the chin - claw surface points downwards
► Uppercut (crosswise, i.e. left fist to the opponent's left hand) - Paw in front of the chin - claw surface points downwards
► Uppercut (crosswise, i.e. left fist to the opponent's left hand) - Paw to the side of the body - claw surface facing the body
► Strike to the body (same side)
From time to time, the passive participant can perform striking movements to which the active participant must react appropriately (e.g. evasive movements). This ensures that the defence is not neglected.
Variant:
Integrate footwork as well:
- Paws sideways in front of the body, upper arms against the body - claw surface points diagonally away from the body (vary height)
►Kick sideways (same side) - Paws in front of the body - claw surfaces point downwards, place one claw edge on the body and the other claw underneath
►knee kick - claw in front of the body - place one claw edge on the body (surface facing downwards) and the other claw above it (surface facing forwards)
►kick away (kick foot out forwards)
Possible combinations:
A common combination can be performed very smoothly. Typically, the hips can always "rotate" back and forth. If you punch twice on the same side, this rotation is no longer possible, but such a sequence of movements can still be incorporated into a combination (breaking the rhythm).
The jab is performed with the weaker hand, i.e. the lead hand (left or right, depending on the delivery). The punch corresponds to the stronger hand.
- Straight jab (left) - sideways punch (right) - uppercut (left) - knee strike
- Straight jab (left) - straight punch (right) - sideways punch (left) - sideways punch (right) - kick
- . kick
- straight jab (left) - straight/punch (right) - body hook (left) - knee strike
- straight jab (left) - side hook (right) - body hook (right) - knee strike
- straight jab (left) - side hook (right) - kick
- straight jab (left) - side hook (right or left) - body hook (right) - knee strike Straight/punch (right) - side-hook (right or left)
- Straight jab (left) - kick - straight/punch (right) - kick
- Side-hook (left) - knee - side-hook (right) - knee strike
- Kick (left) - straight/punch (right) - side-hook (left) - knee kick
- Kick away - straight/punch (right) - sideways hook (left) - uppercut (right) - knee kick (2x)
- Sideways hook (left) - straight/punch (right) - body hook (left) - knee kick - kick
- Each type of punch 2x in succession (straight, side-hook, uppercut, body-hook)
- 4 quick punches (alternating, starting with the jab), punch again (i.i.e. the stronger side follows 2x at the end) - knee (plus pushing away) - kick
- 10x straight (alternating left/right with high frequency) & 2 hooks, 10x straight & 4 hooks, 10x straight & 6 hooks...
2 claws
1 pair of boxing gloves
Stroke combinations
Light-Contact
Partner work


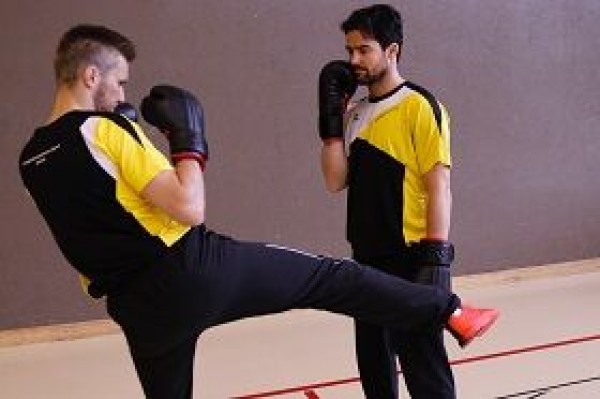


► Uppercut (crosswise, i.e. left fist to the opponent's left hand)
The passive participant can occasionally execute punching movements to which the active participant must react appropriately (e.g. evasive movements). This ensures that the defence is not neglected.
Variant:
Integrate footwork as well:
- Place the hand on the side of the body - back of the hand facing outwards (vary the height)
► Kick sideways onto the back of the hand - Cross the arms in front of the body - palms facing downwards
► Knee kick between the hands - Place both hands on the stomach - back of the hand facing the opponent
► Push off (leg pushed out forwards)
Participant:
1 pair of boxing gloves
Stroke combinations
Light-Contact
Partner work
Three marker cones are distributed in front of a punching bag (left-centre-right). The active participant moves from position to position (back and forth) without crossing their legs. He stops at each position to execute any combination of 2-5 punches. The partner holds the punching bag. The roles are swapped on the next round.
1 punching bag
3 marking hats
Participant:
1 pair of boxing gloves
Stroke combinations
Light-Contact
Partner work
Both participants have a punching bag at their disposal to perform any combination of 2-5 punches. A distinction is made between soft (light-contact) and hard combinations.
2 punching bags (one punching bag per participant)
Participant:
1 pair of boxing gloves
Stroke combinations
Light-Contact
Partner work
Two elasticated bands are attached at approximately chest height (to a wall bar, boxing ring or similar). The participant stands with their back facing the attachment in a stepping position (staggered stance) and grasps one end of each band with their hands. The distance should be chosen so that the straps are slightly taut. From this position, the participant takes a step forwards and strikes any combination of 2-5 strokes. Then take a step back to the starting position to begin the exercise again.
Caution:
Grab the bands correctly.
4 elasticated rubber bands (2 per participant)
Snake catching
Stimulate circulation
Group work
Two participants designated for catching hold hands and start chasing the other participants. Each participant who is caught joins the "hunters". The resulting snake must always remain intact. The game ends when the last player has been caught.
Variant:
If the snake is larger than three participants, the snake is split up (4 participants make two new snakes with two participants each).
No material required
Snake run
Stimulate circulation
Group work
8-15 participants per column
A single column with a distance of approx. 2 metres between the participants moves at a relaxed pace. The runner at the back moves to the front (also possible in a slalom). After the runner at the back has passed a few other runners, the next runner can start.
Some forms of movement can be integrated into the snake run (crossing legs, arm circles, hopping run, etc.), which are determined either by the runner at the front or by the sports leader.
No material required
Snap ball
Stimulate circulation
Group work
2 teams
Two teams play against each other in a limited playing area. The team with the ball/disc tries to keep the ball in their own ranks for as long as possible by passing the ball (back passes may be prohibited). You are not allowed to move with the ball/disc (star step allowed). The opposing team tries to intercept the ball. If this is successful, the roles are changed. There is also a change of roles/ball/disc if the ball/disc falls to the ground (both when a teammate drops it and when an opponent knocks the ball/disc to the ground/intercepts the pass), the ball leaves the playing field or, if necessary, after a point is scored. Ways to win points:
- 10 consecutive passes
- Pass between the legs to a teammate (both feet on the ground)
- Pass behind the back to a teammate
- Header to a teammate after a pass
Variant:
The teams try to score as many points as possible in a given time. There is no change of roles/ball in this form of the game
1 ball/throwing disc (Frisbee) ►Basketball, Frisbee Ultimate, FooBaSKILL, Rugby/Football, Handball, Tchoukball
4 marking cones/caps ►Field markings
One group:
x game ribbons/ribbons ►Team identification
Sport leader:
Stopwatch ►Variant
Wheelbarrow defect
Fighting and roughhousing games
Group work
Groups of 2
Two participants form a team, with one of the participants representing the wheelbarrow (leaning on their hands and being held by their partner's thighs). The different groups try to make the other "wheelbarrows" collapse. Which group remains at the end?
An additional exercise (e.g. wall sits, press-ups, forearm support, etc.) can be determined for the "broken" wheelbarrows.
No material required
Shoe hit
Stimulate circulation
Group work
The aim is to hit the other participants on the shoes with the floorball. Whoever is hit completes an additional task (e.g. a strength exercise such as push-ups, trunk bends or five double jumps over the stick lying on the ground).
Variant I:
2 teams, with one team trying to hit the opposing team's shoes in a limited playing area (integrate several balls into the game, but not too many so that the game leader can keep an overview). Which team will score more goals in a given time?
Variant II:
2 teams, with one team trying to hit the opposing team's shoes in a limited playing area (integrate several balls into the game, but not too many so that the game leader can keep an overview). If a player is hit, he leaves the pitch until the end of the game and performs an additional task outside the pitch (e.g. forearm support or sitting on the wall). Which team has eliminated all participants faster?
Participants:
1 stick ►unihockey
1 ball ►unihockey
4 marking cones/caps ►court markings (variant)
x playing ribbons/bibs ►team identification (variant)
4-5 balls ►unihockey (variant)
Shoulder thrust
Fighting and roughhousing games
Partner work
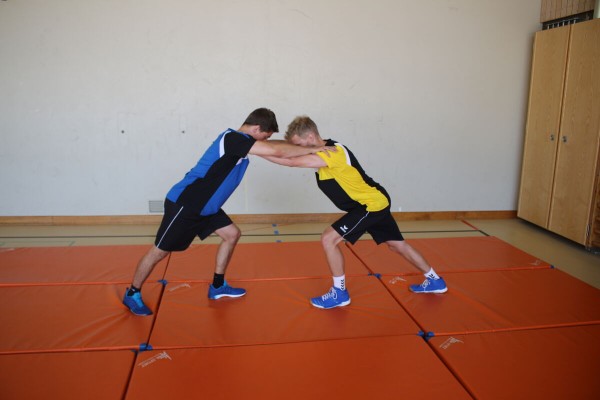
Two participants line up in the centre of a mat/grass field (or without a field boundary) and grab each other by the shoulders. Both participants try to push/pull their opponent out of the field. The first person to put a foot next to the field loses.
Variant:
Playing field size varies; exercise is also possible on a small field (1-4 mats).
9-12 soft mats (small) ► indoor version
4 marking cones/caps ► indoor and outdoor version
Indoor post set-up:
form a rectangular field of mats using soft mats.
Indoor/outdoor post set-up:
define a rectangular field using caps.
Shoulder thrust with restriction
Fighting and roughhousing games
Partner work
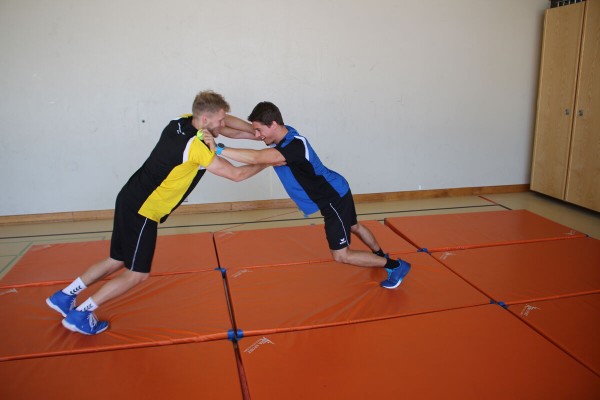
Two participants line up in the centre of a mat/lawn area and try to push each other off a mat/lawn area. The participants each hold a tennis ball in their hands. The tennis balls restrict the participants in their fighting behaviour, which should prevent scratches and/or abrasions. The first person to put a foot next to the court loses.
9 soft mats (small) ► indoor version
4 tennis balls
4 marking cones/caps ► indoor and outdoor version
Indoor post set-up:
form a rectangular mat field using soft mats.
Indoor/outdoor post set-up:
define a rectangular field using caps.
Suspended push-off
Fighting and roughhousing games
Partner work

Two participants sit opposite each other in a suspended position (legs and upper body raised off the floor, only the buttocks touch the floor, arms possibly crossed in front of the body). With the support of their legs, the participants try to unbalance their opponent. As soon as a participant touches the floor with their back, hands or feet, they lose. The competition can be performed with or without permanent contact between the legs/feet.
Caution:
Despite any fatigue, a hollow back position must be avoided (actively tense the torso).
No material required
Swing box dismantling
Increase pulse
Group work
2 teams
The game is played with the ball in the hands. Swedish boxes act as goals. When a group has scored a goal, they can take away one of the opponent's goal boxes to make it smaller. The winner is the group that scores a goal on the last box element.
You are not allowed to move with the ball. The opposing team tries to intercept the ball. If they succeed, the roles change. Ball changes also occur when the ball falls to the ground, the ball leaves the playing field or, if necessary, after a point is scored.
2 vaulting boxes
1 ball (hand/soft or smolball)
x bibs
Swing box dismantling
Increase pulse
Group work
2 teams
The game is played with the ball in the hands or on the foot. Swedish boxes act as goals. When a group has scored a goal, they can take away one of the opponent's goal boxes to make it smaller. The winner is the team that scores a goal on the last box element.
You are not allowed to move with the ball. The opposing team tries to intercept the ball. If they succeed, the roles change. Ball changes also occur when the ball falls to the ground, when the ball leaves the pitch or, if necessary, after a point is scored.
2 Swedish box
1 ball (foot-, hand-, soft- or smolball)
x jersey
Swing box dismantling
Increase pulse
Group work
2 teams
Swedish boxes act as goals. When a group has scored a goal, they can take away a box element from the opponent's goal so that this goal becomes smaller. The winner is the group that scores a goal on the last box element.
2 Swedish box
1 floorball
x bibs
Participant:
1 floorball stick
Swing box dismantling
Increase pulse
Group work
2 teams
Swedish boxes act as goals. When a group has scored a goal, they can take away a box element from the opposing goal so that this goal becomes smaller. The winner is the group that scores a goal on the last box element.
The following rules apply to the game form:
- The ball, which is balanced on the stick, may be carried a maximum of 4 steps and must then be passed immediately.
- The ball may be touched a maximum of 4 times before it is played on.
- The ball at rest on the stick, without movement of the player, may be held for a maximum of 4 seconds.
- The ball may not be covered with the racket or the body, but must be played on immediately.
- It is not permitted to actively play the ball with the foot or lower leg, with the hand, the arm or the head (free hit).
- If the ball leaves the field of play, it is put back into play by a free hit by the opposing team at the place of action.
2 Swedish box
1 Smolball
x bibs
Per Tn:
1 Smolball bat