
Exercises (3274)
Squat as well as extension and flexion of the arms ► squat & shoulder press
Power
Individual work


Squat in a low position with your feet pointing slightly outwards, holding a weighted disc between your legs with your arms stretched out (disc horizontal to the floor). When squatting, look forwards in a neutral position and ensure that you do not lose stability in your back. From the squat position, straighten your legs to stand upright and simultaneously bend your arms to move the upper edge of the weight disc to approximately chin height (elbows close to the body, forearms pointing upwards, disc aligned horizontally to the floor). Then extend your arms overhead (hold them up), keeping the disc horizontal to the floor. Under certain circumstances, the weight can also be pushed upwards in a fluid movement in order to benefit from the momentum of the legs (thruster). Reverse the sequence of movements to return to the starting position in the squat.
Attetion:
Distribute the weight over the entire foot, push the knees outwards (do not tilt inwards). Always make sure your back is straight (torso tension).
Lighten:
Less weight.
Harden:
More weight.
1 weight disc
Squat and extension and flexion of the arms ► wall ball
Power
Individual work


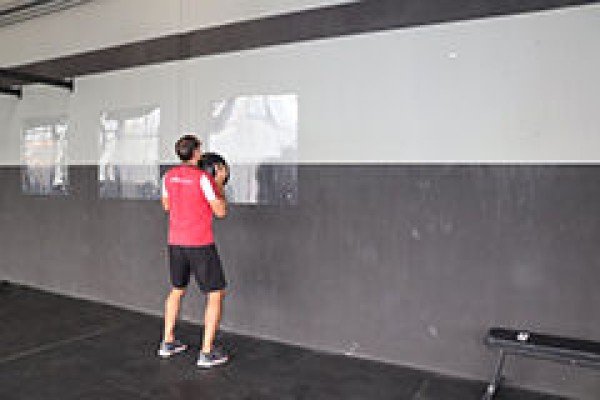

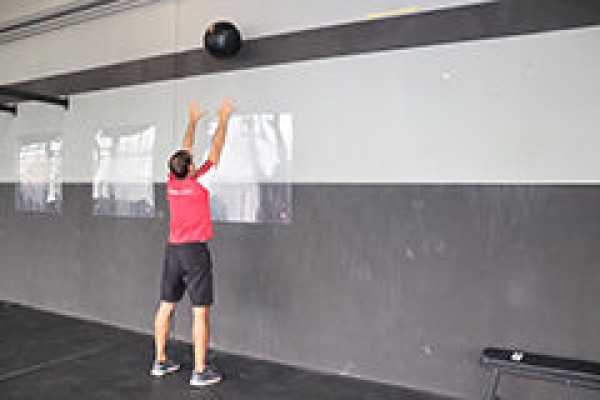


Stand upright shoulder-width apart in front of a wall (facing the wall) with your feet pointing slightly outwards, holding a medicine ball in front of your chest with your arms bent (elbows close to your body and pointing backwards, place both hands under the ball). Bend your knees and lower your buttocks as far as possible without losing stability in your back (always look forwards towards the wall in a neutral position). Then straighten your legs again and at the same time straighten your arms to powerfully push the ball upwards against the wall (utilise the momentum of your legs). Standing upright with your arms stretched upwards, catch the ball and return to the starting position by bending your arms to restart the exercise.
Attention:
Distribute the weight over the entire foot, push your knees outwards (do not tilt inwards). Always keep your back straight (torso tension).
Lighten:
Do not lower your buttocks too low (greater angle in the knees); lighter medicine ball.
Harden:
Additional weight (on the arms).
1 wall
1 medicine ball
2 weight cuffs/1 weight waistcoat ► Make the exercise more difficult (additional weight)
Squat and extension and flexion of one arm (shoulder press) (left) ► thruster
Power
Individual work


Stand upright with your feet pointing slightly outwards, grasp the weight (kettlebell or dumbbell) with one hand (left) (neutral grip) and hold it at shoulder height with your arm bent (forearm horizontal, elbow pointing downwards and close to your body so that the weight is right next to your shoulder). Bend your knees and lower your buttocks as far as possible without losing stability in your back (always look forwards in a neutral position). Then straighten your legs again and at the same time straighten your arm to push the weight powerfully up overhead (utilise the momentum of your legs). Standing upright with your arm not fully extended and holding it up, return the weight to the starting position in a controlled manner by bending your training arm (left).
Starting position:
- Deep squat, feet pointing slightly outwards
- Weight in neutral grip at shoulder height (arm bent)
- Abdominal and gluteal muscles tensed, back straight
- Gaze (always) straight ahead in neutral position
Finishing position:
- Stand upright shoulder-width apart, legs stretched
- Weight is held overhead with one arm almost fully extended (held high)
- Back (still) straight
Attention:
Distribute weight over the whole foot, push knees outwards (no tipping inwards). This exercise is only for advanced users and requires a high level of knowledge, mobility and stability. Always make sure your back is straight (torso tension).
1 dumbbell/kettlebell
Squat and extension and flexion of one arm (shoulder press) (right) ► thruster
Power
Individual work


Stand upright with your feet pointing slightly outwards, grasp the weight (kettlebell or dumbbell) with one hand (right) (neutral grip) and hold it at shoulder height with your arm bent (forearm horizontal, elbow pointing downwards and close to your body so that the weight is right next to your shoulder). Bend your knees and lower your buttocks as far as possible without losing stability in your back (always look forwards in a neutral position). Then straighten your legs again and at the same time straighten your arm to push the weight powerfully up overhead (utilise the momentum of your legs). Standing upright with your arm not fully extended and holding it up, return the weight to the starting position in a controlled manner by bending your training arm (right).
Starting position:
- Deep squat, feet pointing slightly outwards
- Weight in neutral grip at shoulder height (arm bent)
- Abdominal and gluteal muscles tensed, back straight
- Gaze (always) straight ahead in neutral position
Finishing position:
- Stand upright shoulder-width apart, legs stretched
- Weight is held overhead with one arm almost fully extended (held high)
- Back (still) straight
Attention:
Distribute weight over the whole foot, push knees outwards (no tipping inwards). This exercise is only for advanced users and requires a high level of knowledge, mobility and stability. Always make sure your back is straight (torso tension).
1 dumbbell/kettlebell
Squat and jump in the air (squat jump) alternating ► squat tuck jump
Power
Individual work


Stand upright shoulder-width apart with your arms outstretched in front of you at chest height, bend your knees to approximately a right angle at the knee joints (squat position, buttocks approximately at knee height), push your legs off the floor to jump upwards (raise your arms horizontally as a swing). During the jump, pull your knees up towards your chest as far as possible (squat jump). Then land in a controlled manner (cushion the jump; bend your knees), straighten your legs and straighten your upper body to return to the starting position.
Attention:
Keep your back straight, cushion the jump when landing, keep your whole foot on the ground without bending your knees and keep your knees behind your toes while your legs are in contact with the floor. The palms of your hands touch your knees with every jump.
Lighten:
Smaller/less intense jumps, pull your knees up less.
Harder:
Additional weight; jump on a soft surface.
2-4 weight cuffs/shorter weights/1 weight waistcoat ► making the exercise more difficult (additional weight)
1 small/large soft mat ► making the exercise more difficult (base)
Squat and jump to the side alternating ► squat & side jump
Power
Individual work


Get into a squat position with one leg on the balance half sphere, straighten your legs and simultaneously jump to the other side of the half sphere so that you change your standing leg on the sphere. With the landing movement, perform another squat and then jump back to the starting position in a fluid transition. In this way, the trainee jumps continuously from one side of the balance half-ball to the other and changes their standing leg on the training device with each exercise. In the lower squat position, the arms are bent and brought together in front of the body (landing), while the arms hang next to the body (flight phase) when the body is extended.
1 balance hemisphere
Squat and lunge alternating in jump (alternating jump) ► squat & jumping lunge
Power
Individual work
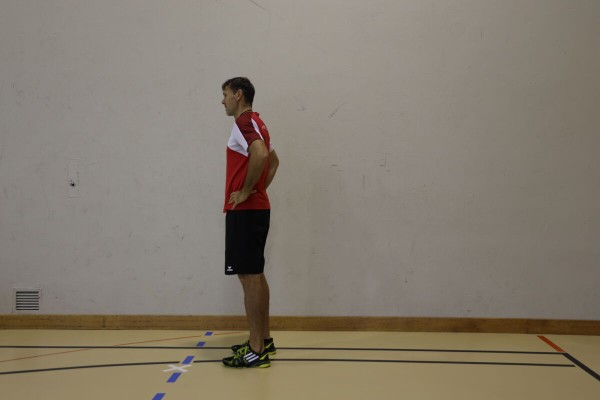
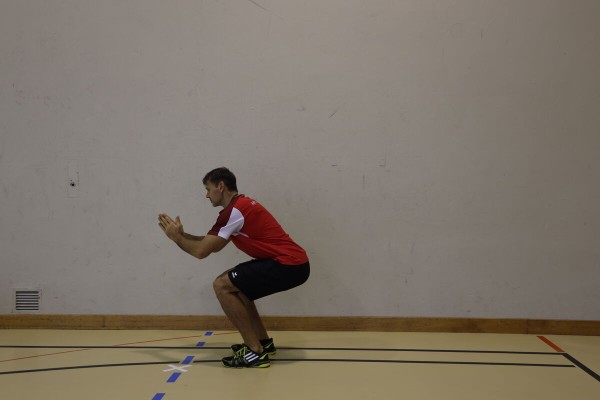
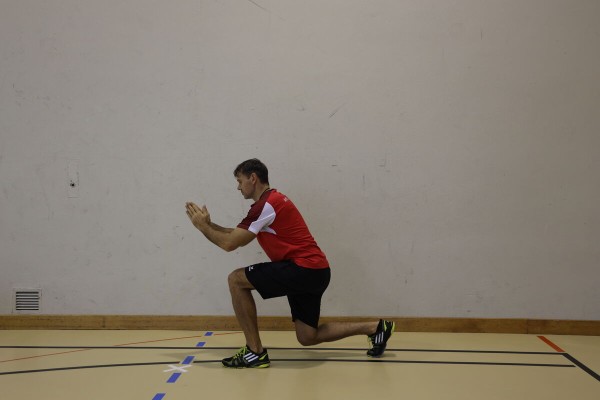

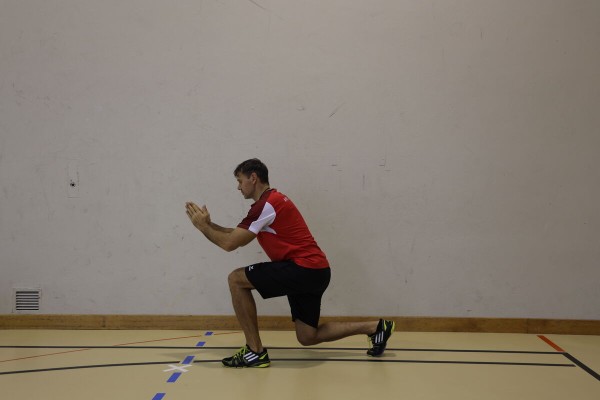
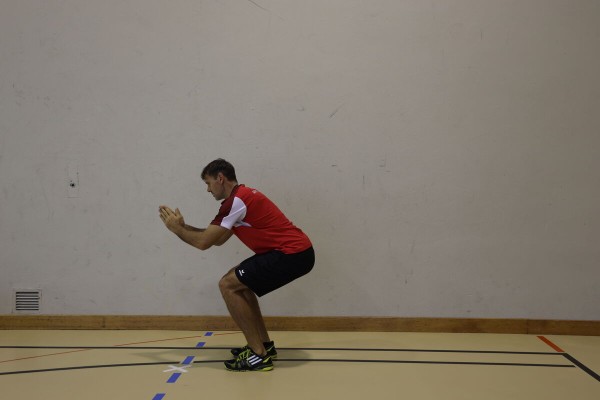


Stand with your feet shoulder-width apart, arms supported on your hips, bent or in front of you at chest height, bend your knees to approximately a right angle at the knee joints (buttocks at about knee height). From the deep squat position, perform a lunge backwards (upper body upright, abdomen tensed), arms again supported on the hips, folded on the chest, bent in front or at an angle, front (and back) leg bent to a right angle, two-legged jump to change leg position during the jump (move back leg forwards and front leg backwards - body position remains low), new alternating jump to return to the starting position in the lunge. Move the back leg forwards to the deep squat position before stretching the legs back to the starting position in a shoulder-width stance. After the new squat, change the side of the lunge compared to the previous version.
Attention:
When squatting, move your buttocks backwards, not your knees forwards. Keep your knees behind your toes. Keep your back straight at all times (tense your core), distribute your weight over your entire foot, push your knees outwards (do not tilt them inwards). When lunging, always keep the front knee behind the toe and centred over the foot. Keep your upper body as stable as possible.
Lighten:
Do not lower your buttocks too low (greater angle in the knees) when squatting. Higher basic position/lower upper body less (greater angle at the knees) when doing lunges.
Harden:
Additional weight (on the shoulders, with hanging arms or in a forward or upright position).
Variation:
Jump height can be varied: high jumps with plenty of time to change leg position or only small jumps with quick leg shifts.
1 weight vest/weight disc/(medicine) ball/sandbag/fighting backpack/2 dumbbells ► Make the exercise more difficult (additional weight)
Squat and straddle jump alternating ► sumo squat jump
Power
Individual work

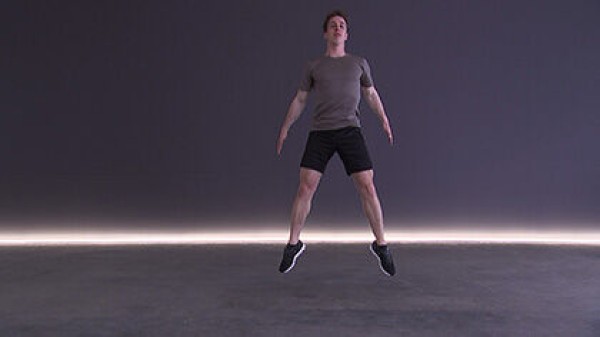
Stand with your feet shoulder-width apart, bend your knees to approximately a right angle at the knee joints (buttocks at about knee height), arms supported on your hips, folded across your chest, bent or in front of you at chest height, jump up and simultaneously spread and stretch your legs (straddle jump), cushion the jump (bend your knees slightly) and return to the starting position.
Attention:
Bring your buttocks back, not your knees forwards. Keep your knees behind your toes. Keep your back straight at all times.
Lighten:
Do not lower your buttocks too low (larger angle in the knees), smaller/less intense/higher jumps.
Harden:
Hold additional weight (on your shoulders, in front of you or with your arms hanging in your hands); larger, more intense/higher jumps.
2-4 weight vest/1 (medicine) ball/weight disc/sandbag/1-2 dumbbells ► Make the exercise more difficult (additional weight)
Knee bend and body extension alternating
Power
Individual work


Stand with your feet shoulder-width apart, arms bent in front of your body (hands at chest height), bend your knees to a right angle at the knee joints (buttocks at knee height, deep squat), stretch one arm overhead at the same time as you stretch your legs (slightly crosswise, hand approximately at the height of the opposite shoulder), squat down again and stretch the other arm upwards with the next body stretch.
Attention:
Move your buttocks backwards, not your knees forwards. Keep your knees behind your toes. Keep your back straight at all times.
Lighten:
Do not lower your body too low (greater angle in the knees).
Harden:
Additional weight (hold on the arms or in the hands).
2 weight cuffs/weight balls/dumbbells/1 weight waistcoat ► Make the exercise more difficult (additional weight)
Squat and jump onto an object alternately ► squat jump
Power
Individual work


Sit on an object lying on the floor (e.g. tyre - both legs inside or one leg inside and one leg outside the tyre), jump off with both legs to stand on the object, jump back to the starting position in the seat.
Attention:
Upright upper body, do not put all your weight down, keep your knees behind the tips of your feet.
Lighten:
Jump straight up from the seat without landing on the object in between (sit with both legs outside the tyre); lower your buttocks less (do not touch the object); lower cadence.
Harden:
Jump up after standing on the object with a direct landing on the seat; additional weight (on the shoulders); higher cadence.
1 tyre (10DM)
1 weight vest/sandbag/fighting rucksack ► to make the exercise more difficult (additional weight)
Squat and jump onto an object alternately ► squat jump
Power
Individual work
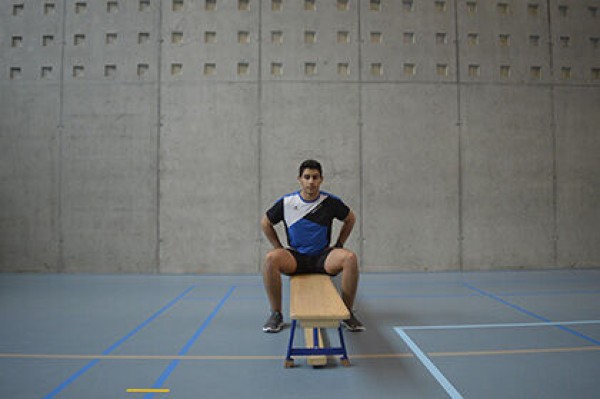

Sit on the long bench (one leg on each side of the bench), arms supported on the hips or in front, jump off with both legs to stand on the long bench, jump back to the starting position in the seat.
Attention:
Upright upper body, do not put all your weight down, keep your knees behind the tips of your feet.
Lighten:
Sit with both legs on the same side of the bench, only jump straight up from the seat without landing on the long bench in between; lower your buttocks less (do not touch the long bench); lower cadence.
Harden:
After standing on the long bench, jump up with a direct landing to the seat; choose a higher element (squat less intense, but jump up more difficult); additional weight (on the shoulders); higher cadence.
1 long bench
2 vaulting box elements (incl. top section) ► Make the exercise more difficult (position)
2 weight cuffs/1 weight vest/sandbag ► Make the exercise more difficult (additional weight)
Squat and stretch jump alternating ► squat jump
Power
Individual work


Stand with your feet shoulder-width apart, bend your knees to approximately a right angle at the knee joints (buttocks approximately at knee height), arms supported on your hips, folded across your chest or in front of you at chest height, jump up slightly, cushion the jump (bend your knees slightly) and return to the starting position.
Attention:
Bring your buttocks back, not your knees forwards. Keep your knees behind your toes. Keep your back straight at all times.
Lighten:
Do not lower your buttocks too low (larger angle in the knees), smaller/less intense/higher jumps.
Harden:
Hold additional weight (on your shoulders, in front of you or with your arms hanging in your hands); larger, more intense/higher jumps.
1 weight vest/(medicine) ball/weight disc/sandbag/1-2 dumbbells ► Make the exercise more difficult (additional weight)
Squat and stretch jump alternating ► squat jump
Power
Individual work
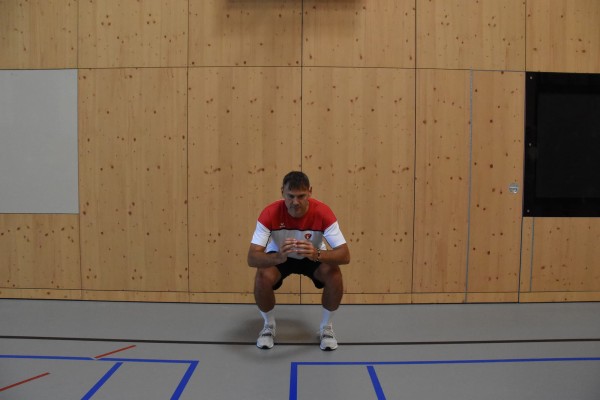
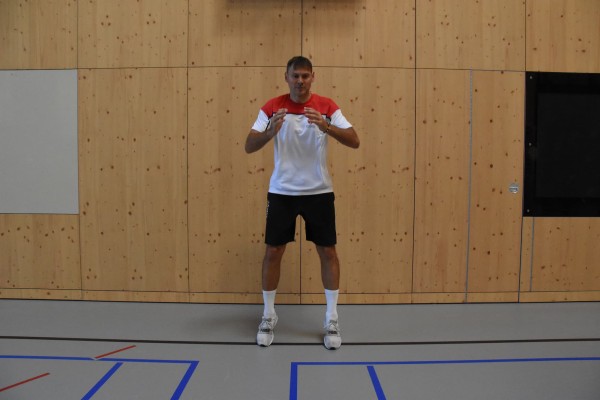
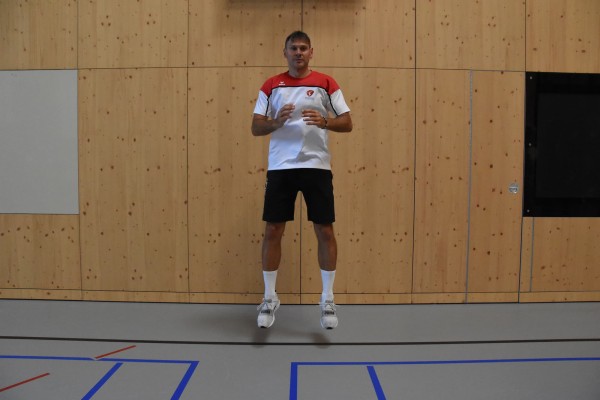
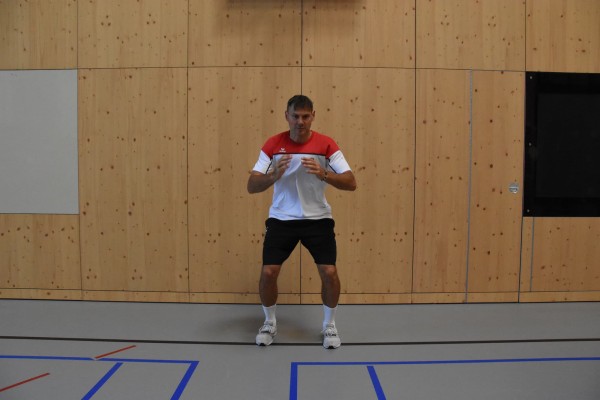
Stand shoulder-width apart, bend your knees almost to a right angle at the knee joints (buttocks slightly above knee height), arms supported on your hips, folded across your chest or in front of you at chest height (possibly with bent arms including hands), jump upwards, cushion the jump and return to the starting position. Repeat the sequence of movements continuously.
Attention:
Bring your buttocks back, not your knees forwards. Keep your knees behind your toes.
Lighten:
Do not lower your buttocks too low (larger angle in the knees), smaller/less intense/higher jumps.
Harden:
Hold additional weight (on your shoulders, in front of you or with your arms hanging in your hands); larger, more intense/higher jumps.
1 weight vest/(medicine) ball/weight disc/sandbag/1-2 dumbbells ► Make the exercise more difficult (additional weight)
Knee lift (skipping) / jump in place incl. knee to chest jump ► high knees / high knee jump (knee to chest tuck jump)
Increase pulse
Individual work
Running very quickly on the spot, with the knees raised to at least the level of the navel (skipping). At a signal from the instructor, the participants perform a few jumps on the spot. The knees are also brought to the chest during the jumps. After the jumps (3-5x), continue with fast skipping.
Variant:
Replace the jumps with other short, intensive exercises (e.g. quick jumping jacks or a push-up and a stretch jump on the signal).
No material required
Knee raises on the spot with arms held overhead ► knee raise with overhead plate hold (high knees)
Power
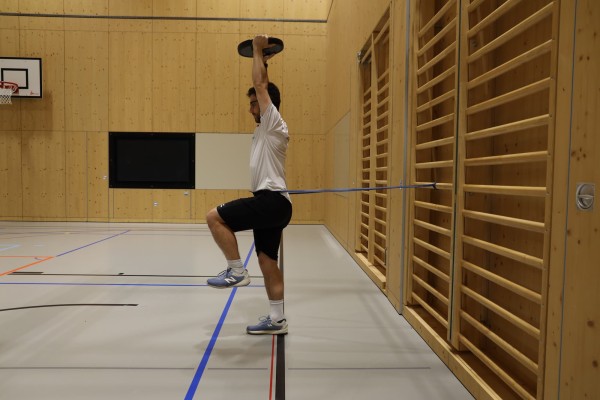
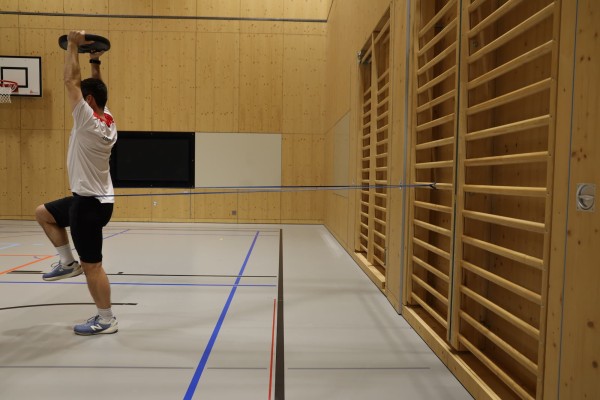
A fixed elasticated band (e.g. on the wall bars, on a post or candelabra) is worn around the hips. Move away from the attachment of the elastic band so that the band is well tensioned. Knee lift (lift your knees alternately with high intensity up to the level of your navel), holding a weight disc overhead with your arms almost outstretched.
Lighten:
Lift your knees less; less weight or no weight at all in the hold-up position.
Harden:
Stronger elastic band; more weight in the hold-up position; additional weights on the legs; knee lift on a soft surface (e.g. small soft mat).
1 wall of bars
1 elastic band
1 weight disc/medicine ball/dumbbell/kettlebell
1 small soft mat ► to make the exercise more difficult (support)
Knee raises on the spot with arms held overhead ► knee raise with overhead plate hold (high knees)
Power
Individual work
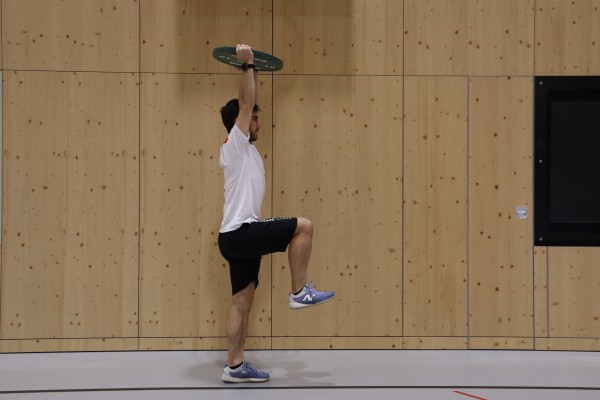
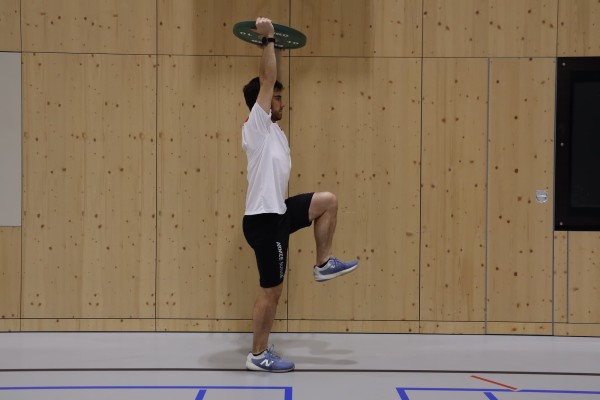
Stand upright with your feet hip-width apart, holding the weight plate above your head with both hands, arms almost fully extended. Keep your shoulders low and actively engage your core and glutes. Look straight ahead. Alternately lift one knee dynamically to approximately hip height. The other leg remains firmly on the floor. Keep the weight plate in the raised position throughout the exercise. Lift the knees rhythmically and in a controlled manner, alternating between them. Keep your upper body as upright and stable as possible.
Attention:
Do not lower the weight plate forwards or backwards; do not arch your back; do not raise your shoulders; keep your pelvis as still as possible; keep your supporting leg slightly bent and stable; actively lift your knee and do not simply swing it from the hip.
Lighten:
Lift your knees less high; use a lighter weight or no weight at all; hold the weight plate at forehead or shoulder height.
Harden:
Use more weight whilst holding the barbell aloft; perform knee-lift runs on a soft surface; lift your knees above hip height; increase your pace (high knees) / bounce slightly on your supporting leg.
Variation:
Use 2 dumbbells instead of a weight plate.
1 weight disc/medicine ball/dumbbell/kettlebell
1 small soft mat ► to make the exercise more difficult (support)
Kneecap ► kneedrop
Coordination exercises
Individual work
Position your front foot straight and bend your leg. With your back leg, hook your shin onto the strap and try to push your knee under the slackline.
Lighten the load:
Perform the exercise close to the attachment.
Harden the load:
Touch the slackline with one hand (line grab); stand up again from the kneedrop position, take a step forwards and perform another kneedrop (different forefoot).
1 Slackline
Kneeling position and jumping onto an object ► kneeling position & box jump
Power
Individual work


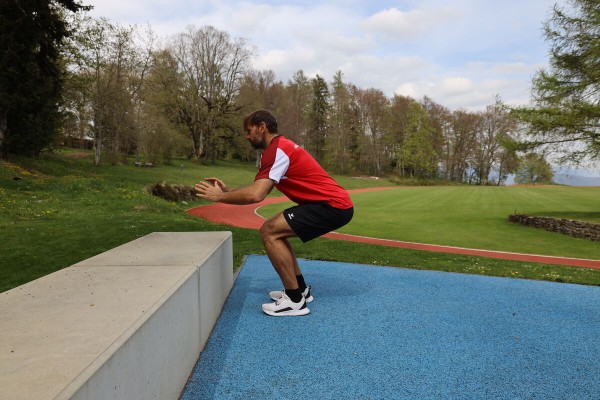

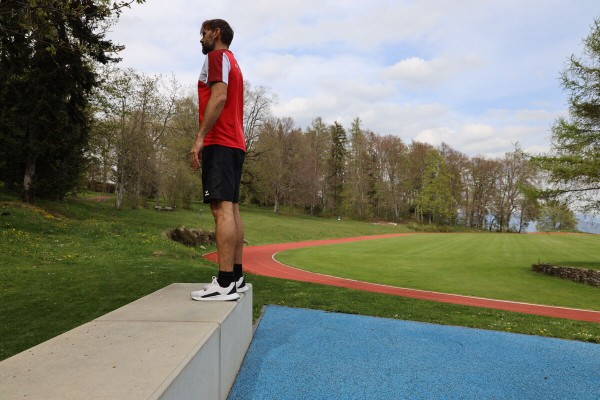
Stand on one knee, alternate between standing on one leg and assuming a deep squat position. From the squat position, tilt your upper body slightly forwards, stretch your arms backwards at an angle to your body (like a ski jumper on a ski jump), push off the floor powerfully to perform a jump onto a raised object (plyo box or swinging box element incl. top) (use the momentum of the arms), straighten your upper body (stand on the object) and jump back to the starting position (possibly the other side of the object), then return to the kneeling position. Change the starting leg with each execution.
Attention:
Land as softly as possible (cushion the jump with your knees).
Lighten:
Lower intensity between each execution; lower the height of the object.
Harden:
Additional weight; higher object.
1 flat bench/plyo box/swivel box
2-4 weight cuffs/1 weight waistcoat ► Make the exercise more difficult (additional weight)
Tricky turns
Stimulate circulation
Individual work
Each participant practises various movement tasks with the frisbee:
- Fingerspin: The aim is to make the disc spin vertically or horizontally around the index finger (middle finger). In the starting position, the disc is held vertically with the index finger at the edge. Now the disc is spun from the wrist (spin). The index finger always remains stretched on the edge of the disc.
Variations:
Switch fingers while spinning, spin a disc with both hands simultaneously or throw the disc up from the spin, catch it with one finger and continue spinning.
- Thumb flip: This trick involves spinning the disc once around its longitudinal axis around the thumb. Starting position: hold the disc in your hand with the underside facing up. The thumb is on top, the remaining four fingers are under the disc. The disc is rotated around the resting thumb to the left and stopped again. The rotation of the disc is triggered by a slight twist of the wrist. At this moment, the fingers are released from the underside of the disc. Once the disc has rotated once around the hand, it is stopped again with the thumb at the top and four fingers at the bottom.
Variant:
Turn the disc to the right, turn it once to the left and then to the right or perform two double thumb flips without stopping.
- Chest roll: Hold your arms horizontally outwards. Hold the disc in one hand with the underside facing upwards. With a light kick from the wrist, the disc is rolled over the arm, chest and other arm to the opposite hand.
- Blind catch: Throw the disc up with a spin and catch it behind the back with one or both hands.
Per participant:
1 throwing disc (frisbee)
1 additional throwing disc (frisbee) per participant ►Variant
Coconut thieves
Fighting and roughhousing games
Group work
2 teams
The participants in the "pinch team" face each other in pairs and each pinch a medicine ball between their backs/upper body. One after the other, the participants from the "capture team" try to capture the trapped medicine balls. Which team needs less time to conquer the medicine balls?
x medicine balls
1 stopwatch
Column run
Leakage
Group work
Together in the group
The participants easily run 2-3 laps in the hall/outdoors and integrate some relaxation exercises (e.g. shaking out arms and legs, moving legs sideways or trotting backwards). The last part of the route is completed by marching. Participants make themselves as tall as possible from time to time (running on tiptoe with arms outstretched and held high), breathing in deeply while doing so and exhaling fully when lowering their arms and heels.
No material required
Column run
Leakage
Group work
Together in the group
Participants complete 2-3 laps of the indoor/off-road course while jumping rope. The last part of the course is completed marching. Participants make themselves as tall as possible from time to time (running on tiptoe with arms outstretched and held high), breathing in deeply while doing so and exhaling completely when lowering their arms and heels.
Pro Tn:
1 skipping rope
Conditioning and coordination course (KKP)
Forms of play / exercises
Game idea:
The fitness and coordination course is used to train coordination skills and fitness abilities. The participants move under pressure in a polysportive manner within the specifications. The KKP cannot be moved outside and the posts are precisely prescribed. Securing the elements and considering the risk of injury are the responsibility of the sports director and have the highest priority.
The participants complete the course in 12 minutes and collect as many points as possible in the allotted time. One point is awarded for each obstacle completed (1 lap = 10 points).
Facility:
The course is run outside the volleyball court in an anti-clockwise direction. One colouring stick is placed in each corner of the volleyball court, 0.5m away from the baseline, in the extension of the sideline. The following 10 positions must be prepared:
1. Low jump: 2 long benches suspended from a bar. The inner long bench is 0.5m away from the sideline of the volleyball court. There is a distance of 1m between the benches. The bar height from the floor is 1.20m. The long benches must be secured to the parallel bars with ropes. Behind the parallel bars, 2 small mats are placed next to each other in the direction of travel.
2. Balancing: 2 long benches next to each other with the narrow side facing up. The inner long bench is 0.5m away from the sideline of the volleyball court. There is a distance of 1m between the long benches.
3. Ball catching: Passing a volleyball from a distance of 3m by an assistant (possibly a dispensed person). Reserve balls in a ball trolley / inverted vaulting box top.
4. Dribbling slalom: 7 painting sticks are set up lengthways in the volleyball court to form a slalom. The first stick is 3m from the baseline and 2m from the sideline of the volleyball court. The second marker is placed 5 metres from the baseline and 3 metres from the sideline. The third marker is positioned at a distance of 4m from the first marker and again 2m from the sideline, etc.
5. Football slalom: Analogue dribbling slalom, but in the other direction. The last marker stick is on the baseline.
6. Forward roll: 2 small mats next to each other, parallel to the baseline; the inner mat is 0.5m away from the baseline.
7. Skipping-crawling: 4 vaulting box elements are placed on the floor at a distance of 1.5m each (the opening points forwards/backwards). The first element to be used is the upper part of the box, which is located in the extension of the baseline. 4 small mats between the elements are used as protection.
8. Running backwards: 2 painting sticks next to each other at the height of the centre line, the first is 0.5m from the side line of the volleyball court, the second 1m from the first painting stick.
9. Roll backwards: 2 mats next to each other parallel to the sideline, level with the baseline.
10. Support: A bar in the centre of the front of the volleyball court. The distance to the baseline is 1m. The entry and exit is to be fixed at a height of 70 centimetres using a power hose. The bar height is 1.20 metres.
Execution:
The participants start one after the other at a start interval to be defined (e.g. every 30 seconds). The aim is to complete as many laps as possible within 12 minutes. For example, if a participant starts at 2:30, the course is finished after 14:30. The sports director must therefore always announce the split times.
Depending on the number of participants, the course can be run in one or two groups. In one group, each participant counts their laps independently. In two groups, the course is run in teams of two, with one team member completing the course and the other team member counting the laps completed. After completing the course, the points achieved are recorded on a flipchart or whiteboard.
The following obstacles have to be mastered during the course:
1. Low jump: Balancing over the long benches and low jump over the parallel bars onto the small mats.
2. Balancing: Balancing on the narrow side of the long benches. Anyone who falls off must repeat the element.
3. Ball catching: Catching the ball. A ball that is not caught must be retrieved by the runner.
4. Dribbling slalom: Bounce a ball with the hand around the painting sticks. Knocked over sticks must be set up again by the runner. In the event of a dribbling error, thread the ball back in where the error occurred.
5. Football slalom: Transfer the ball from hand to foot when moving from one side of the slalom course to the other. Guide the ball with the foot in a slalom around the colouring sticks. The runner must put up the sticks again if they are knocked over. In the event of a dribbling error, thread the ball back in where the error occurred. At the end of the slalom course, place the ball back in the container of the pass player.
6. Roll forwards: Perform a roll on the mat.
7. Skip-crawl: The first element is skipped, then alternate between crawling under and skipping.
8. Running backwards: Running backwards begins after bypassing the marker bar.
9. Roll backwards: From the backwards run on the small mats.
10. Support: Anyone who touches the bar floor between entry and exit must repeat the element.
Condition and coordination test (KKT)
Examinations
Time ratios (25 min.) correspond to a group size of approx. 30 participants.
Of course, each participant is tested individually.
The fitness and coordination test (KKT) is used to test fitness and coordination skills. This test checks whether the participant is able to perform polysportive movements within the specifications under load.
Execution regulations
Facility:
The KKT must always be carried out indoors and cannot be moved outside. At the KKT, all posts are precisely prescribed and are located at a clearly defined location. A volleyball court should be marked out in the hall, as the posts are distributed according to certain measurement specifications starting from this
court. The controls are located both inside and outside the volleyball court. Securing the elements to minimise the risk of injury is the responsibility of the test leader and has the highest priority.
Post description:
Low jump: The long bench is attached to the bar rail facing the participant. The wide long bench side points upwards. The (inclined) long bench must be secured to the parallel bars with ropes. The height of the parallel bars from the floor is 1.10 metres. A small soft mat is placed behind the parallel bars to cushion the participant's low jump.
Balancing: The narrow side of the long bench points upwards.
Ball catching: A volleyball is passed from a distance of 3 metres. A participant who was not used in the test acts as the passer.
Slalom 1: Seven painting sticks serve as slalom poles.
Slalom 2: Eight painting sticks serve as slalom poles.
Forward roll: The forward roll is performed on a small soft mat.
Skipping/crawling under: A vaulting box top section and three centre sections are used for jumping over/crawling under. The first element to be used is the top section. The three centre sections are placed between four small soft mats and distributed evenly (fix the mats in place with adhesive tape). The foremost mat lies flush with the top section.
Walking backwards: Walking backwards begins after going round a painting stick.
Rolling backwards: The roll backwards is performed on a small soft mat.
Supporting on the parallel bars: The bar height from the floor is 1.20 metres. When getting in and out, a power hose/rope is fixed at a height of 70 cm. A long bench is required for the "penalty post".
Two lanes are installed at almost all posts so that overtaking is possible. Two long benches are therefore provided for the low jump and balancing (controls 1 and 2), two small soft mats are placed for the forward and backward roll (controls 6 and 9), two colouring sticks are set up for running backwards (control 8) and two Swedish boxes are required for jumping over/crawling under (control 7). There is enough space available for the slalom so that the participants can overtake each other. Two lanes can also be set up for the support (item 10), but there are usually not enough (more than two parallel bars) available in the sports halls.
Execution:
Low jump: The participant runs up the sloping long bench and jumps over the bars of the parallel bars onto the small soft mat placed behind them.
Balancing: The participant balances over the narrow side of the long bench. If the participant falls down, the element must be repeated.
Ball catching: The participant catches the volleyball pass from the passer. A ball that is not caught is retrieved by the participant (no new pass).
Slalom 1: The participant bounces the volleyball around the marker poles. In the event of a dribbling error, the participant threads the ball back into the slalom where the error occurred. The volleyball is placed on the floor between the last marker stick of slalom 1 and the first marker stick of slalom 2.
Slalom 2: The participant guides the volleyball around the marker sticks with their foot. In the event of a dribbling error, the participant threads the slalom back to where the error occurred. Before the last pole (between the 7th and 8th pole), the ball is picked up by hand and placed back in the ball trolley (container) of the passer.
Forward roll: The participant performs a forward roll on the small soft mat.
Skipping/crawling under: The participant crawls under the first and third centre sections of the vaulting box. The second centre section and the top section of the vaulting box are jumped over.
Running backwards: The participant circles around the painting stick once. The participant then runs backwards to the next position.
Roll backwards: The participant performs a roll backwards on the small soft mat.
Support on the parallel bars: The participant supports or swings from one side of the parallel bars to the other. The floor of the parallel bars between the entry and exit must not be touched. If the participant touches the floor between the two power tubes/ropes that define the entry and exit, the element must be repeated. If a participant is unable to support/swing from one side of the bar to the other several times (3 attempts), a "penalty position" must be completed. This involves performing a tricep press on the long bench 4 times - heel stand, legs stretched, upper body supported on the long bench (arms behind the back), hands pointing towards the body, arms bent and stretched (upper body raised and lowered). The triceps exercise can be performed directly on each subsequent round. This alternative is an exceptional variant and is only used if the participant is obviously unable to pass the element (no option/choice of participant - determined by the test leader).
Attempts:
One.
Measurement:
Time: The participant has 12 minutes to collect as many points as possible.
Points: Each completed item scores one point (1 round = 10 points).
Control:
The test leader explains all the execution rules to the participants beforehand and demonstrates the items if necessary (however, all participants should be familiar with the test from training). During the KKT, the test leader remains at the start. The test leader sends the participants onto the course in stages and starts the stopwatch from the first participant. It is important to ensure that there are never more than a maximum of 10 participants on the course. To do this, the test leader can either form groups of max. 10 participants or send the next participant onto the course from the twelfth minute as soon as the first participant has finished the test. The test leader makes a note of the start number and start time for each participant. Start intervals of 10, 20 or 30 seconds make sense. During the KKT, the test leader keeps track of whether the participants are passing through the controls correctly. As soon as the 12 minutes have elapsed for a participant (note the start intervals), the test leader stops them and records where they are, as each completed control adds up to one point. If the start intervals are very short, the participants can wait next to the control point at the end of the KKT without hindering the other participants until all participants have completed the test. The test leader therefore has more time to stop the participants according to the start intervals and can award the points for the last round at the end. The result is recorded directly electronically or transferred later from an evaluation sheet to an electronic device.
Evaluation:
Evaluation forms and electronic evaluation programmes are available for all sports tests:
www.armee.ch/sportausbildung
-> Downloads -> Sports tests -> Evaluation -> KKT
21 stakes, 5 long benches, 2 parallel bars, 10 small soft mats, 2 power hoses/ropes, additional ropes to secure the long benches at control 1, 2 Swedish boxes, 1 measuring tape, 1-2 stopwatches, KKT control sheet including writing materials, possibly a device for electronic data collection.
King's abduction
Fighting and roughhousing games
Group work
2 teams
Two teams each have a castle (a large mat or simply a defined zone). Each team appoints one of their team-mates as king. The king is not known to the opposing team. Each team tries to identify the king of the opposing team and pull him into their own castle. Of course, the other players are allowed to help the king if he is about to be kidnapped. Only pulling, pushing and carrying the opponent is permitted.
2 soft mats (large) ► indoor version
8 marking cones/caps ► indoor and outdoor versions