
Exercises (3274)
Minigolf: u-turn
Forms of play / exercises


Pass the ball around the boxes and place it in the hole.
Attention:
If the ball leaves the lane (outside the benches), it is moved back to the starting point. If the ball comes to a stop within the lane, play may continue from there.
Per participant:
1 stick & ball (floorball)
2 benches plus wall corner
2 Swedish boxes
3 stakes
1 ground socket for post
Minigolf: overpass
Forms of play / exercises

Move the ball over the bench and place it in the box.
Attention:
If the ball leaves the lane (bench), it is moved back to the starting point.
Per participant:
1 stick & ball (floorball)
1 long bench
1 Swedish box
Minigolf: underpass
Forms of play / exercises

Place the ball in the hole through the underpass (box section).
Caution:
If the ball misses the underpass or stops in the underpass, it is moved back to the starting point. If the ball stops behind the underpass, play may continue from there. If the ball leaves the lane (rope) behind the underpass, it is placed directly behind the underpass. If no hole in the ground is available, a club can be used as an alternative target.
Per participant:
1 stick & ball (floorball)
1 Swedish box
1 rope
4 balance cushions
1 ground socket for post/club
Minigolf: underpass
Forms of play / exercises

Place the ball in the hole through the underpass (box section).
Caution:
If the ball misses the underpass or stops in the underpass, it is moved back to the starting point. If the ball stops behind the underpass, play may continue from there. If the ball leaves the lane behind the underpass, it is placed directly behind the underpass. If no hole in the ground is available, a club can be used as an alternative target.
Per participant:
1 stick & ball (floorball)
1 Swedish box
1 piece of floorball rink (corner)
4 gymnastics sticks (wood)
1 ground socket for post/club
Minigolf: long shot
Forms of play / exercises

Place the ball between the two box sections so that it touches the hall wall.
Caution:
If the ball is played into one of the box sections, it is moved back to the starting point. If the ball comes to a stop in front of or between the box sections, play can continue from there.
Per participant:
1 stick & ball (floorball)
2 centre sections of Swedish box
Minigolf: zigzag
Forms of play / exercises

Pass the ball between the boxes and place it in the hoop.
Caution:
If the ball comes to a stop between the boxes, play can continue from there.
Per participant:
1 stick & ball (floorball)
2 long benches
1 Swedish box (small if available)
1 hoop
Minigolf: zigzag
Forms of play / exercises

Pass the ball between the boxes and place it in the hole.
Caution:
If the ball comes to a stop between the boxes, play can continue from there.
Per participant:
1 stick & ball (floorball)
2 long benches
1 Swedish box (small if available)
1 ground socket for post
1 stake
Minigolf: zigzag
Forms of play / exercises

Pass the ball between the stakes and place it in the hole.
Per participant:
1 stick & ball (floorball)
1 ground socket for post
8-10 stakes
Raising and lowering the pelvis in the shoulder position (hip bridge/pelvic lift) ► glute bridge
Power
Individual work

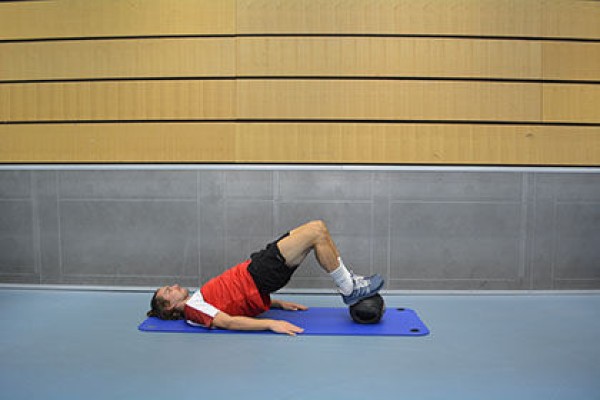
Lie on your back on the floor. Place your heels on a stable raised surface. Choose a surface that allows you to maintain a comfortable and controlled position. Your knees should be bent and your heels positioned approximately hip-width apart. You can either slightly curl your toes or keep them relaxed. Your arms should rest at your sides on the floor and can be pressed lightly into the surface for stability. Keep your head and shoulders relaxed on the floor. Actively engage your abdominal and gluteal muscles and stabilise your pelvis. From the supine position, actively press your heels into the surface. Lift the pelvis off the floor in a controlled manner. Gradually extend the hips until the thighs and upper body form an almost straight line. At the top of the movement, consciously tense the gluteal muscles. The pelvis remains straight and does not tilt to one side. Hold the top position briefly. Then slowly and controlled lower the pelvis back towards the floor. End the movement in a controlled manner just before or upon reaching the floor, without completely losing body tension. Then lift the pelvis upwards again by extending the hips.
Attention:
The hips are not stretched sufficiently; the pelvis is pushed too far upwards and the lower back is severely overextended; the movement originates mainly from the lower back rather than the hips; the knees collapse significantly inwards or splay outwards sharply; the pelvis tilts or rotates to one side during the movement; the heels lose contact with the floor; the movement is performed too quickly or with too much momentum; the head and neck are unnecessarily tensed; the feet or heels are so far away from the body that the position can no longer be maintained in a controlled manner.
Lighten:
Place your feet flat on the floor rather than on a raised surface; use a lower raised surface; after each repetition, briefly lower your pelvis completely to the floor; reduce the range of motion; hold the top position for a shorter time; press your arms more firmly into the floor for stabilisation.
Harden:
Place a weight plate or sandbag on your hips in a controlled manner; hold the top position for 2–3 seconds and consciously tense your glutes as much as possible; slow the downward movement over 3–4 seconds; perform the exercise on one leg; Place your heels on a medicine ball or another unstable surface; combine the additional weight with a slow downward movement; lift your arms off the floor or cross them in front of your chest to reduce support from your upper body.
1 medicine ball/helmet
1 weight disc/sandbag ► make the exercise more difficult (additional weight)
Step onto an object alternately ► step up
Power
Individual work


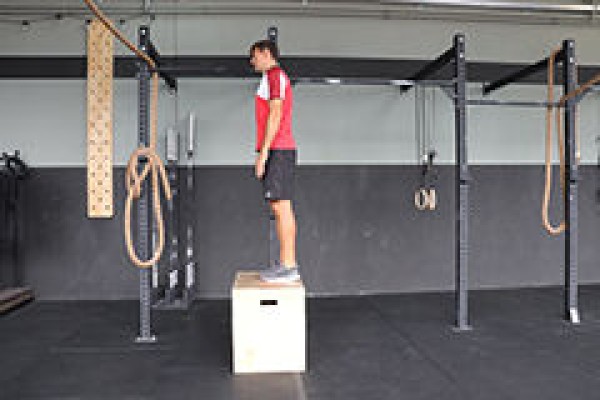


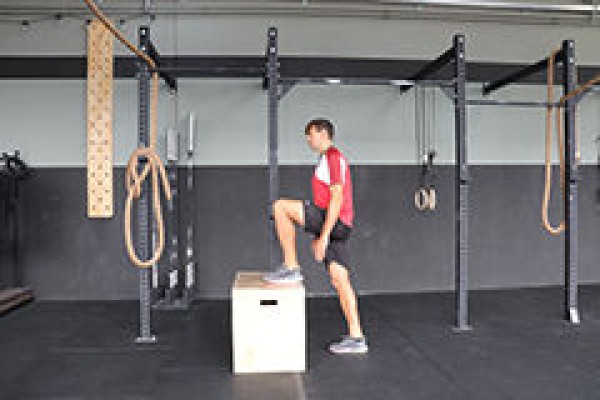


Stand upright with your feet about shoulder-width apart in front of a plyo box, a Swedish box, or a similar stable raised surface. Your feet should point forward as much as possible, and your weight should be evenly distributed. Keep your upper body upright, look straight ahead, and lightly engage your abdominal muscles. Your arms should hang loosely at your sides or be used to help maintain balance. Choose a distance from the raised surface that allows you to place your foot completely on it without leaning your upper body forward excessively. Place one foot completely and steadily on the raised surface, ensuring that both the ball of the foot and the heel are firmly supported. Gradually shift your body weight onto the standing leg. Press firmly into the surface with your entire foot and lift your body upward in a controlled manner. The knee of the rising leg remains stable during the movement and follows the direction of the toes. Next, place the second leg on the raised surface as well and briefly stabilize the upper position. Then lower yourself back down in a controlled manner on one leg and subsequently bring the second leg back down. Begin with the other leg for the next repetition. Throughout the entire movement, keep the upper body, pelvis, and leg axis as stable as possible.
Attention:
The foot is not placed fully on the step, and the heel hangs off the edge; the knee of the ascending leg turns significantly inward or veers sharply outward; the upper body leans sharply forward or to the side while stepping up; the lower leg pushes off the floor too forcefully, thereby relieving pressure on the actual working leg; when stepping up, the pelvis rotates or shifts noticeably to the side; the descent is too fast or uncontrolled; the heel of the supporting leg lifts significantly off the surface during the push-up; the chosen step is so high that the movement can only be performed with compensatory movements; choose only a height at which the entire foot can be placed securely and the movement can still be performed in a controlled and pain-free manner; especially when stepping down, actively slow down the movement and do not simply let yourself fall to the ground.
Lighten:
Use a lower plyo box or a lower Swedish box; reduce the range of motion by using a lower platform; if you have balance issues, lightly brace yourself against a wall, bar, or partner; start by performing the exercise slowly and holding a short pause at the top of the movement; perform the exercise without additional weight; start by doing several repetitions with the same leg and only then switch sides.
Harden:
Choose a higher elevation, provided that the setup remains stable; hold dumbbells or kettlebells in your hands; Use a weight vest or sandbag for additional weight; use an unstable surface; consciously slow the downward movement over 2–4 seconds; hold the top position for 2–3 seconds and stabilize your balance; lift the free leg at the top with a controlled knee lift without setting it down on the platform; perform the exercise on one leg in a more controlled manner by using the free leg for support as little as possible.
1 plyo box/swing box
2 dumbbells/kettlebells/1 medicine ball ► make the exercise more difficult (additional weight)
2 weight cuffs/1 weight waistcoat ► make the exercise more difficult (additional weight)
2 unstable surface ► make the exercise more challenging (unstable surface)
Lunge backwards alternating ► reverse lunge
Power
Individual work


Stand upright with your feet approximately hip- to shoulder-width apart. Your feet should point forwards as much as possible, and your weight should be distributed evenly between them.
Keep your upper body upright, look straight ahead and engage your abdominal muscles. Your pelvis should be in a neutral and stable position. The arms can be rested on the hips, held in front of the body or used to aid balance. Move one foot controlledly backwards and land on the front foot or the ball of the foot. Choose a step length that allows both legs to be bent in a controlled manner afterwards. Bend both knees and lower your body as vertically as possible. Bring the back knee towards the floor without letting it drop uncontrollably. The front foot remains fully on the floor and the weight is distributed evenly across it. Guide the front knee towards the tips of the toes in a controlled manner. From the bottom position, press firmly into the floor through the entire front foot. Bring the back leg forwards again and return to the starting position. Switch sides for the next repetition.
Attention:
The front knee falls noticeably inwards; the knee and the tip of the foot of the front leg point clearly in different directions; the upper body leans sharply forwards or to one side; the stride length is too short or too long, thereby preventing stable movement; the heel of the front foot lifts noticeably off the ground. The back knee is placed on the ground in an uncontrolled manner; when pushing up, the movement is generated mainly through the back leg; the pelvis rotates or shifts noticeably to one side; ensure your posture is stable and move your front knee in a controlled manner towards the tips of your toes; the entire front of your foot should remain as stable as possible on the floor during the loading phase.
Lighten:
Reduce the range of motion and lower your body less far; choose a stride length that feels comfortable and stable for you; lean lightly against a wall, pole or other stable object; Perform the movement slowly and return fully to the starting position after each repetition; start by doing several repetitions with the same leg and then switch sides.
Harden:
Hold dumbbells or kettlebells in your hands; use a weighted vest or sandbag; Use a barbell on your shoulders; deliberately slow the downward movement over 3–4 seconds; hold the bottom position steady for 2–3 seconds; combine the reverse lunge with a subsequent knee lift of the rear leg; carry additional weight on one side, thereby increasing the demands on core stability.
1 weight vest/sandbag/barbell/2 dumbbells ► make the exercise more difficult (additional weight)
Lunge sideways alternating ► lateral lunge
Power
Individual work


Stand upright with your feet approximately hip- to shoulder-width apart. Your feet should point forwards as much as possible, with your weight distributed evenly between them.
Keep your upper body upright and your abdominal muscles slightly tensed. Look straight ahead. Your arms can rest on your hips, be held in front of your chest, or be used to help maintain balance. Take a sufficiently large and controlled step to the side with one leg. Place your foot flat on the floor. Then bend the knee of the leg moved to the side whilst simultaneously moving the hip backwards and downwards. Keep the opposite leg as straight as possible. The entire foot of the bent leg remains on the floor, with weight distributed evenly. The knee should follow the direction of the toes. Keep your upper body as upright as possible, although a slight forward lean from the hips is acceptable. Then press firmly into the floor with the entire foot of the bent leg and return your body to the starting position. Change sides for the next repetition.
Attention:
The knee of the bent leg turns significantly inwards; the knee and the tip of the foot point in distinctly different directions; the heel of the bent leg lifts off the floor; body weight is mainly shifted onto the forefoot; the hips are not moved back far enough; the upper body leans heavily forwards or to one side; the opposite leg is bent unnecessarily sharply; the lateral step is too small, thereby preventing the movement from being performed cleanly; guide the knee of the bent leg in the direction of the toes and bear weight on the whole foot; perform the movement only as deeply as a stable and pain-free position can be maintained.
Lighten:
Reduce your range of motion and bend the affected leg less; Keep your hands on your hips rather than lowering them towards the floor; use a wall, pole or other stable object for light support; perform the movement slowly and in a controlled manner; return fully to the starting position after each repetition; start by performing several repetitions on the same side.
Harden:
Increase the range of motion and lower the hips further, provided the position remains stable; hold dumbbells or kettlebells in your hands; hold a weight plate or medicine ball in front of your chest; Use a weight vest, sandbag or barbell as additional weight; deliberately slow the downward movement over 3–4 seconds; hold the bottom position for 2–3 seconds; hold the additional weight on one side to increase the demands on core stability.
Variation:
Place a slide mat, a piece of carpet or a similar non-slip surface under one foot; let the corresponding leg slide out to the side in a controlled manner, whilst bending the supporting leg and moving the hip backwards; then bring the sliding leg back towards the centre of the body in a controlled manner.
1 weight vest/weight disc/(medicine) ball/barbell/sandbag/fighting backpack/2 dumbbells ► make the exercise more difficult (additional weight)
2 carpet remnants/felt slippers/gliders ► variation of the exercise
Chest press with an elastic band ► band chest press
Power
Individual work
Secure the elastic band behind your body at approximately chest height to a stable anchor point. Grasp one end of the elastic band in each hand. Take a controlled step forwards into a stable stance so that the band is already slightly taut. Your feet should be planted firmly on the floor and your knees slightly bent. Your hands should be at chest height at your sides, with your elbows bent and positioned slightly below your shoulders. Keep your wrists as straight as possible. Tighten your abdominal and gluteal muscles and keep your upper body upright and stable. From the stable starting position, push both hands forwards in a controlled manner. As you do so, extend your elbows almost fully without jerking them through. Move your hands forwards in parallel or slightly towards the centre of your body. During the pushing movement, keep your upper body and pelvis as still as possible.
Keep your shoulders low and do not pull them up towards your ears. Briefly check your final position. Then slowly bend your elbows again and guide your hands back towards the starting position in a controlled manner. Actively slow down the return movement and prevent the resistance band from pulling your arms back uncontrollably. Maintain tension in the resistance band throughout the entire movement.
Attention:
The upper body is tilted sharply forwards or backwards; a pronounced hollow back results from a lack of core stability; the shoulders are pulled up significantly towards the ears; the elbows are raised excessively high; the movement is supported by momentum from the upper body; the arms are pulled back uncontrollably as they return; the wrists bend noticeably backwards or to the side; the stance is too unstable and the body is pulled backwards by the band; actively tense your abdomen and buttocks and keep your upper body stable throughout the entire movement; the elastic band must be securely fastened and must not come loose under load.
Lighten:
Use a resistance band with lower tension; stand closer to the attachment point to reduce the pre-tension; slightly reduce the range of motion; perform the movement deliberately slowly; pause briefly between repetitions and return to the stable starting position.
Harden:
Use a resistance band with greater tension; stand further away from the anchor point to increase the tension; hold the end position with your arms almost fully extended for 2–3 seconds; Consciously slow down the return movement over 3–4 seconds; perform the exercise with one arm and stabilise the torso against the resulting rotation; perform the exercise with one arm whilst keeping the opposite leg forward to increase the demands on whole-body stability.
1 elastic band
1 wall bars/tree
Extension and flexion of the arms / moving the arms upwards while standing (shoulder press) ► shoulder press
Power
Individual work
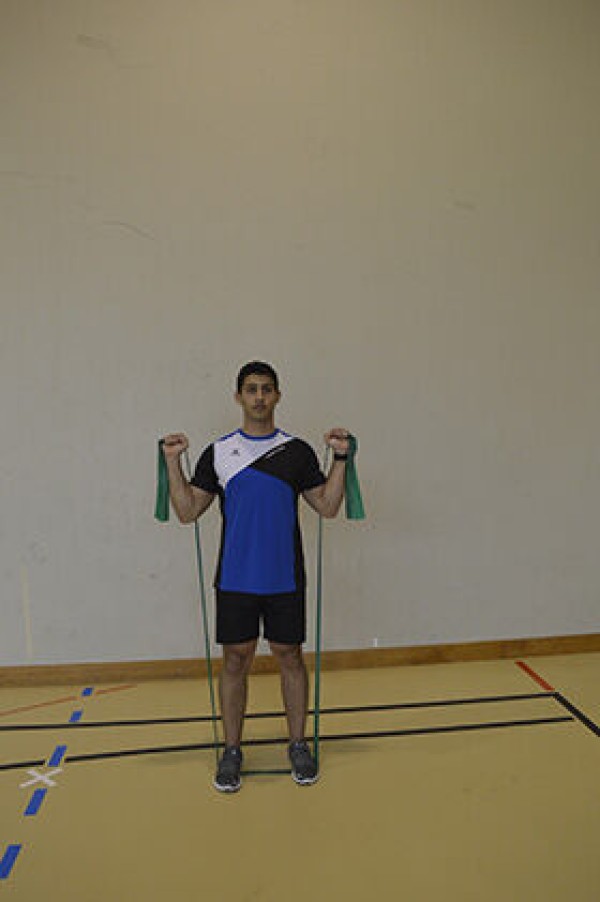

Stand upright with your feet approximately shoulder-width apart in the centre of the resistance band. Both feet should be firmly and stably planted on the band or the floor. Grasp one end of the resistance band in each hand and position your hands at approximately shoulder height. Your elbows should be bent and pointing slightly downwards or forwards to the side.
Keep your wrists as straight as possible. Tense your abdominal and gluteal muscles so that your pelvis and spine remain stable. Keep your chest in a controlled position and do not lift it excessively. Look straight ahead. From this stable starting position, press both arms upwards in a controlled manner. Gradually straighten the elbows and lead the hands upwards past the sides of the head. The arms are extended almost fully, without jerking the elbows through. In the top position, the hands are approximately above or slightly to the side of the shoulders. The torso remains stable throughout the entire pushing movement. The shoulders move in a controlled manner, without being deliberately pulled excessively towards the ears. Hold the top position briefly. Then slowly bend the elbows again and guide the hands back to shoulder height in a controlled manner. Actively control the downward movement and do not let the resistance band dictate the motion.
Attention:
When pushing upwards, the lower back arches excessively; the upper body leans significantly backwards; core and gluteal engagement is lost during the movement; the chest is raised excessively; the arms are pushed upwards unevenly; the wrists bend sharply backwards or to the side; the elbows are pulled sharply backwards in the starting position; the band pulls the arms downwards uncontrollably as they are lowered.
Lighten:
Use a rubber band with less resistance; Apply less tension to the band; reduce the range of motion and raise your arms only as far as you can whilst maintaining a stable posture; take a short break between repetitions; perform the exercise whilst sitting on a stable surface, provided this allows for better control of your upright position.
Harden:
Use a resistance band with greater resistance; pre-tension the band more; hold the end position with your arms almost fully extended for 2–3 seconds; Consciously slow down the return movement over 3–4 seconds; perform the exercise with one arm whilst stabilising the torso against a sideways tilt; carry out several repetitions without fully releasing the tension in the band.
Variation:
The exercise can be performed in a standing position or on your knees; this changes the starting position and the demands placed on the body’s stability; the kneeling variation, in particular, reduces the ability to use the legs to support the movement.
1 elasticated rubber band
Extension and flexion of the arms in a seated position (rowing pull) ► row
Power
Individual work
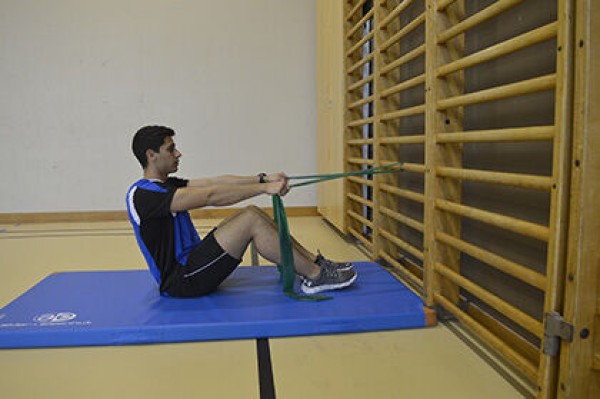
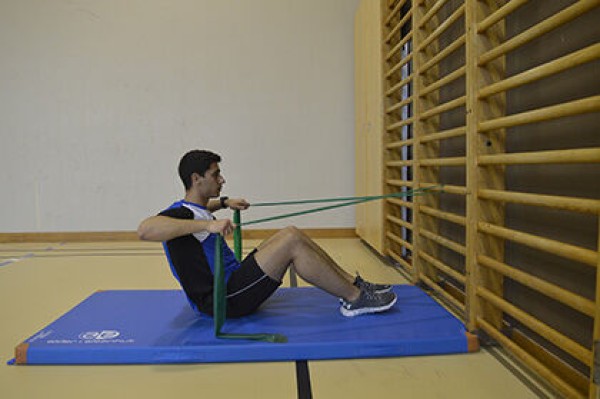
Sit facing the wall bars or another stable anchor point. Secure the resistance band firmly at approximately shoulder height. Keep your legs apart and your feet firmly planted on the floor. Lean your upper body slightly backwards without rounding your back. Actively engage your abdominal muscles and keep your chest upright. Grasp one end of the resistance band in each hand. To begin with, your arms are stretched out in front of you and the resistance band is already under slight tension. Keep your shoulders relaxed and as far away from your ears as possible. From the stable starting position, pull both elbows back in a controlled manner. Move your elbows to the sides of your body, keeping them at approximately shoulder height or slightly below. At the same time, actively move your shoulder blades backwards and slightly downwards. Bring your hands towards your chest in a controlled manner.
The movement ends when the elbows are positioned at the sides or slightly behind the upper body and the shoulder blades have been actively drawn together. Hold the end position briefly. Then slowly and in a controlled manner, extend your arms forwards again. The shoulder blades may move forwards in a controlled manner without the upper body slumping. Throughout the entire movement, the upper body remains as still as possible and the core is engaged.
Attention:
The back becomes rounded or is severely overextended; the upper body moves noticeably forwards and backwards during the pull; momentum from the upper body is used to overcome the resistance; the shoulders are pulled up significantly towards the ears during the pull; the shoulder blades are not actively drawn back; the elbows are moved uncontrollably far upwards or downwards; the arms are pulled forwards by the resistance band as they return to the starting position; the tension in the resistance band is completely lost between repetitions; tighten your stomach and keep your upper body stable throughout the entire movement; the resistance band must be securely attached to the anchor point and must not be able to come loose during the exercise.
Lighten:
Use a resistance band with less tension; sit closer to the anchor point to reduce the pre-tension; Slightly reduce the range of motion; perform the movement more slowly and take a short pause between repetitions; initially practise only the shoulder blade movement before performing the full rowing stroke.
Harden:
Use a resistance band with greater tension; sit further away from the anchor point to increase the tension; hold the end position of the pull for 2–3 seconds; deliberately slow down the return movement over 3–4 seconds; perform the exercise with one arm whilst keeping the torso stable to prevent rotation; carry out several repetitions in succession without fully releasing the tension in the band.
1 elasticated rubber band
1 wall bar/tree
Extension and flexion of one leg and arm in supine position alternating ► dead bug
Power
Individual work


Lie on your back on the floor. Rest your head relaxed on the floor and look upwards. Stretch your arms straight up so that your hands are roughly level with your shoulders. Lift your legs and bend your hips and knees to approximately 90 degrees. Your thighs should be pointing upwards, whilst your lower legs are roughly parallel to the floor. Keep your pelvis in a stable position and consciously engage your abdominal muscles. Your lower back should remain stable throughout the exercise and should not progressively arch into a hollow back during the stretching movement. Extend one arm and the opposite leg simultaneously and in a controlled manner, in line with the body. Slowly bring the arm behind the head and the opposite leg forwards or downwards at the same time. Lower the arm and leg towards the floor only as far as the position of the pelvis and lower back can be maintained in a controlled manner. Hold the stretched position briefly. Then slowly return the arm and leg to the starting position. For the next repetition, use the opposite arm and leg. Alternate sides evenly. Continue to breathe calmly throughout the entire movement and maintain core tension.
Attention:
The lower back gradually lifts off the floor, resulting in a pronounced hollow back; abdominal tension is lost during the extension movement; the arm and leg are lowered further than the stability of the torso allows; the pelvis tilts or rotates noticeably to one side; the movement is performed too quickly or with momentum; the arm or leg is placed completely flat on the floor, thereby losing active tension; the head and shoulders are unnecessarily tensed or lifted off the floor; breathing is held during the exertion; maintain stable control of the lumbar spine throughout the entire movement; the key is not to lower your arm and leg as far as possible, but to perform the movement only within a controllable range of motion.
Lighten:
Lower your arm and leg less far towards the floor; keep the moving leg more bent, thereby shortening the lever; move only your legs alternately and keep your arms in the starting position; move only your arms alternately and keep your legs stable in the starting position; pause briefly between each repetition and re-engage your core; initially move only one limb at a time.
Harden:
Lower your arms and legs closer to the floor to increase the range of motion; fully extend your leg to increase the lever arm; Use weighted cuffs on your arms or legs; deliberately slow the lowering movement to 3–4 seconds; hold the extended position for 2–3 seconds; perform repetitions alternately without a break in between, whilst maintaining constant core tension.
2-4 weight cuffs/2 weight balls/dumbbells ► make the exercise more difficult (additional weight)
Alternating upper-body rotations to one side ► slam ball
Power
Individual work
Stand upright with your feet approximately shoulder-width apart. Hold the slam ball in front of your body with both hands. Keep your feet firmly and stably on the floor. Your knees should be slightly bent and your hips in an upright position. Actively engage your abdominal muscles and keep your upper body stable. Keep your gaze directed forwards or towards the ball. Using both hands, lead the slam ball upwards in an arc-shaped movement past your side. As you do so, rotate your upper body in a controlled manner towards the corresponding side. The movement results from the coordinated action of your arms, shoulder girdle and trunk rotation. Raise the ball until it is roughly level with your head. Then reverse the direction of movement powerfully and throw the ball explosively onto the floor in front of your body or slightly to the corresponding side. During the throw, bend your hips and knees and actively engage your core in the movement. Throw the ball onto the floor at a sufficient distance from your feet. After it bounces, catch the ball in a controlled manner. As you catch it, bend your knees and hips and keep your back as stable as possible. For the next repetition, lead the ball upwards over the opposite side of your body. Alternate the direction of movement with each repetition.
Attention:
The ball is raised vertically in front of the body rather than to the side; the back rounds significantly when catching or throwing; the movement comes almost exclusively from the arms; the rotation of the upper body is uncontrolled or jerky; the knees collapse significantly inwards when lowering the body; the ball is thrown too close to one’s own feet; when catching, the back is bent rather than using the knees and hips; the rotational movement becomes so pronounced that the pelvis and spine can no longer be stabilised in a controlled manner.
Lighten:
Use a lighter slam ball; minimise lateral movement and rotation; raise the ball only to approximately head or shoulder height; throw with less intensity; take a short break between each repetition; practise the movement slowly at first, without an explosive throw.
Harden:
Use a heavier slam ball; throw the ball onto the floor with greater explosiveness; perform the movement more dynamically and increase the rotational speed without losing control of your core and pelvis; Alternate sides immediately without a break; rise explosively from a slight squat and transition straight into the lateral upward movement; perform several repetitions in succession with high, yet controlled, intensity of movement.
1 slam ball/medicine ball
Jump forwards and shift backwards in a four-footed stance alternating ► bear crawl jump
Power
Individual work


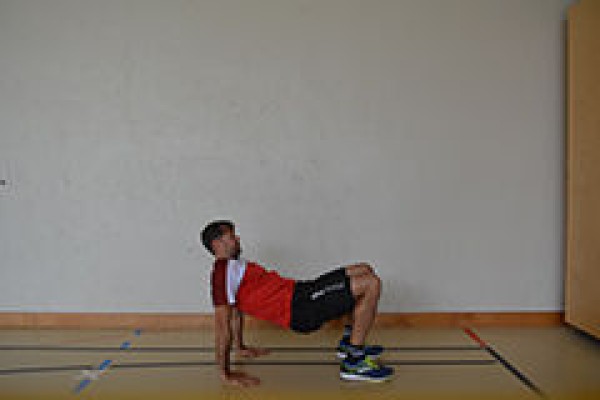


Start on all fours. Place your hands about shoulder-width apart, directly beneath your shoulders. Your fingers should point forwards or slightly outwards, and your hands should be fully supported on the floor. Your knees should be roughly level with your hips and bent at about 90 degrees. Point your toes and lift your knees a few centimetres off the floor. Keep your back as stable and neutral as possible. Your head should be in line with your spine.
Actively engage your abdominal muscles and align your pelvis parallel to the floor. From this stable starting position, move one hand and the opposite foot forwards simultaneously, or almost simultaneously. Then repeat the movement with the other hand and the opposite foot. Crawl forwards in this way, moving evenly and in a controlled manner. Keep the steps with your hands and feet as small as possible. Keep your knees just above the floor whilst moving. Keep your upper body as parallel to the floor as possible.
Your hips and shoulders should rotate as little as possible to the side with each step. Distribute your body weight evenly between your arms and legs. Continue to breathe calmly during the movement and maintain constant core tension.
Attention:
From a stable starting position, move one hand and the opposite foot forwards simultaneously, or almost simultaneously; then repeat the movement with the other hand and the opposite foot; in this way, crawl forwards in a steady and controlled manner; keep the steps with your hands and feet as small as possible; keep your knees just above the floor whilst moving; keep your upper body as parallel to the floor as possible; the hips and shoulders should rotate as little as possible to the side with each step; body weight is distributed evenly between the arms and legs; continue to breathe calmly during the movement and maintain constant core tension; in this variation of the exercise, move your hand and the opposite foot together or almost simultaneously; actively tense your abdominal muscles and keep your pelvis and back as stable as possible throughout the movement.
Lighten:
Cover a shorter distance; take smaller, slower steps; hold briefly in the stable starting position between each step; start by performing the exercise statically, keeping your knees just a few centimetres above the floor; pause briefly after a few steps and re-establish the position; Keep your knees slightly higher if you are not yet able to lower yourself into the deep position in a controlled manner.
Harden:
Cover a longer distance without a break; perform the bear crawl backwards; add sideways movements; alternate between forwards, backwards and sideways movements; Use a weight vest for additional resistance; use a light resistance band around the thighs; perform the exercise for a longer, specified duration without interruption; change the direction of movement spontaneously on a signal.
2-4 weight cuffs/1 weight waistcoat ► make the exercise more difficult (additional weight)
Mobilisation
Mobilisation of the joints / dynamic stretching
Individual work
Mobilisation of the following joints:
- Ankle
- Knee
- Hip
- Spine
- Shoulder
- Elbow
- Wrist
- Cervical vertebra
Variant:
In place of the sports leader, one participant gives the exercise. After each exercise, another participant takes on the role of leader.
No material required
Mobilisation
Mobilisation of the joints / dynamic stretching
Partner work
Mobilise the following joints together with your partner:
- Ankle
- Knee
- Hip
- Spine
- Shoulder
- Elbow
- Wrist
- Cervical vertebra
Variant:
In place of the sports leader, one participant gives the exercise. After each exercise, another participant takes on the role of leader
.No material required
Mobilisation
Mobilisation of the joints / dynamic stretching
Individual work
Mobilisation of the following joints with the use of an aid:
- Ankle
- Knee
- Hip
- Spine
- Shoulder
- Elbow
- Wrist
- Cervical vertebra
Variant:
In place of the sports leader, one participant gives the exercise. After each exercise, another participant takes on the role of leader
Per Tn:
1 ball ►baseball, blitzball/rugby/football, fistball, futsal/football, handball, FooBaSKILL, volleyball
1 stick ► floorball, intercrosse/lacrosse, Nordic walking
1 racket ►badminton/speedminton, smolball
1 throwing disc (frisbee) ►frisbee ultimate
1 elasticated rubber band/power tube/skipping rope/playing rope
1 gymnastics stick with elastic band
Mobilisation
Mobilisation of the joints / dynamic stretching
Partner work
Mobilisation of the following joints together with a partner and using an aid:
- Ankle
- Knee
- Hip
- Spine
- Shoulder
- Elbow
- Wrist
- Cervical vertebra
Variant:
Instead of the instructor, one participant leads the exercise. After each exercise, another participant takes on the role of leader.
Per group of 2:
1 ball ►baseball, blitzball/rugby/football, fistball, futsal/football, handball, FooBaSKILL, volleyball
1 stick ► floorball, intercrosse/lacrosse, Nordic walking
1 racket ►badminton/speedminton, smolball
1 throwing disc (frisbee) ►frisbee ultimate
1 elasticated rubber band/power tube/skipping rope/playing rope
1 gymnastics stick with elastic band
Mobilisation: Elbow
Mobilisation of the joints / dynamic stretching
Individual work
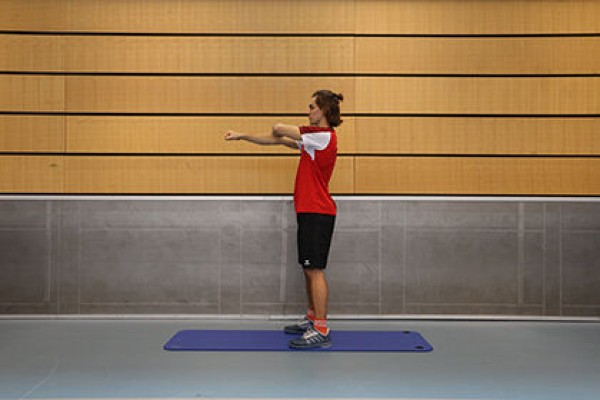

Hold one arm outstretched at chest height. The hand of the other arm grasps the elbow of the outstretched arm from below (bend the arm in front of the body). Alternately bend the playing arm over and under the bent arm/the pivot point formed and then extend it again. Switch sides from time to time (rotate the other arm).
Variant:
Exercise can also be performed in a seated or kneeling position.
No material required
Mobilisation: Elbow
Mobilisation of the joints / dynamic stretching
Individual work

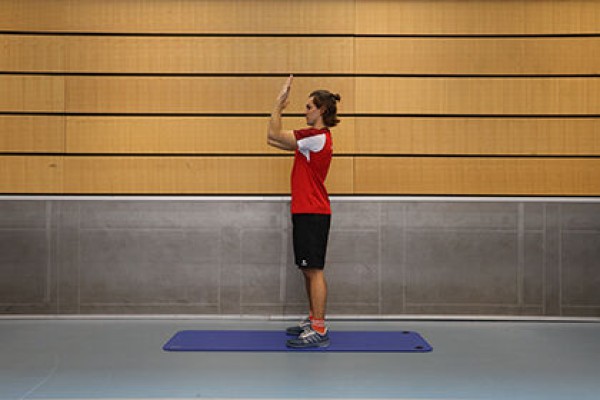
Stretch your arms out in front of you at chest height (palms facing down). Bend your arms (palms facing your face, forearms pointing upwards, upper arms remain stable) and return to the starting position (bend and stretch your arms). Change the position of the arms from time to time (e.g. after three repetitions) (palms of outstretched arms pointing upwards or downwards).
Variant:
Exercise can also be performed in a seated or kneeling position.
No material required
Mobilisation: Elbow
Mobilisation of the joints / dynamic stretching
Individual work


Hold one arm outstretched at chest height (with the aid in your hand). The hand of the other arm grasps the elbow of the outstretched arm from below (bend the arm in front of the body). Alternately bend the playing arm over and under the bent arm/the pivot point formed and then extend it again. Switch sides from time to time (rotate the other arm).
Variant:
Exercise can also be performed in a seated or kneeling position.
Pro Tn:
1 ball ►blitzball/rugby/football, handball, volleyball, floorball, intercrosse/lacrosse
1 racket ►badminton/speedminton, smolball
1 throwing disc (frisbee) ►frisbee ultimate
1 elastic rubber band//power tube/skipping rope/spinbond