
Exercises (1641)
Rowing ► row
Power
Individual work


Sitting with your legs bent and arms stretched forwards, first push off and stretch your legs, then pull your arms towards your head with your upper body leaning slightly backwards. Return to the starting position in exactly the opposite way: first stretch your arms, then move your upper body forwards and finally pull your legs forwards. In theory, the rowing movement sequence sounds complicated, but many of the individual movement sequences are already performed correctly unconsciously:
Starting position:
Upper body bent forwards towards the thighs.
Back muscles relaxed.
Lower back straight, upper back (trapezius muscle) may make a slight hump.
Arms stretched (triceps remain relaxed).
Tummy muscles slightly tensed.
Starting the pull-through:
Legs lead the movement by stretching them.
At the same time as stretching your legs, slightly tense your lower back and bring it into a straight position.
The phase ends when your legs are almost fully extended.
Middle phase of the pull-through:
From this phase, the upper body also comes into play.
The arms and back now dictate the movement, with both parts of the body being pulled backwards almost simultaneously (between the chest and belly button). The strength comes from the back and not the arms.
The abdominal muscles and thigh muscles remain tensed the whole time.
The phase ends with the upper body leaning slightly backwards and the arms slightly raised. The back shoulder is already working slightly.
Final move:
Pull your arms completely towards your body.
The upper body leans back a little further in the same move. The back shoulder is now even more involved.
Tighten all the muscles involved (buttocks, thighs, abdomen, arms and shoulders).
Rolling:
Arms lead the way.
Stretch your arms forwards again. The upper body and legs follow the arms.
The buttocks pull the seat forwards.
The phase ends in the starting position.
1 rowing machine
Rowing ► row (300m)
Power
Individual work
Sitting with your legs bent and arms stretched forwards, first push off and stretch your legs, then pull your arms towards your head with your upper body leaning slightly backwards. Return to the starting position in exactly the opposite way: first stretch your arms, then move your upper body forwards and finally pull your legs forwards. In theory, the rowing movement sequence sounds complicated, but many of the individual movement sequences are already performed correctly unconsciously:
Starting position:
Upper body bent forwards towards the thighs.
Back muscles relaxed.
Lower back straight, upper back (trapezius muscle) may make a slight hump.
Arms stretched (triceps remain relaxed).
Tummy muscles slightly tensed.
Starting the pull-through:
Legs lead the movement by stretching them.
At the same time as stretching your legs, slightly tense your lower back and bring it into a straight position.
The phase ends when your legs are almost fully extended.
Middle phase of the pull-through:
From this phase, the upper body also comes into play.
The arms and back now dictate the movement, with both parts of the body being pulled backwards almost simultaneously (between the chest and belly button). The strength comes from the back and not the arms.
The abdominal muscles and thigh muscles remain tensed the whole time.
The phase ends with the upper body leaning slightly backwards and the arms slightly raised. The back shoulder is already working slightly.
Final move:
Pull your arms completely towards your body.
The upper body leans back a little further in the same move. The back shoulder is now even more involved.
Tighten all the muscles involved (buttocks, thighs, abdomen, arms and shoulders).
Rolling:
Arms lead the way.
Stretch your arms forwards again. The upper body and legs follow the arms.
The buttocks pull the seat forwards.
The phase ends in the starting position.
1 rowing machine
Shooting position - crouching
Power
Individual work

From the patrol position to the crouch position in accordance with regulation 53.096:
1. position the hips at an angle of 35° to the direction of fire, the weak shoulder to the front;
2. bend both knees simultaneously and move into the crouch position;
3. the feet remain flat on the ground;
4. place the weapon against the shoulder;
5. the strong hand grasps the pistol grip without tensing, the strong arm pulls the stock into the shoulder cavity;
6. both elbows rest in front of the knees;
7. the weak hand grasps the hand guard and presses the weapon against the shoulder;
8. The body is slightly bent forwards.
Lighten:
Without a combat backpack
Harden:
Combat backpack loaded with an additional 3kg (water bottles)
Material per participant: Tenue CNK 420
Additional material: 1 F-disc with peg, 2 PET bottles (1.5l)
Shooting position - kneeling
Power
Individual work

From the patrol position to the kneeling shooting position according to regulation 53.096:
1. Take a step forward with the weak foot, crossing the imaginary line between the tip of the strong foot and the target;
2. Bend both knees simultaneously;
3. If possible, sit on the strong heel;
4. Align the strong knee at a 45° angle to the direction of the shot;
5. Support the weak elbow slightly in front of or behind the weak knee. Avoid resting the elbow exactly on it, as the elbow and knee joints are round and this affects stability. Support the weapon at the shoulder;
6. The strong arm pulls the stock into the shoulder cavity, the strong hand grips the pistol grip without cramping;
7. The weak hand grips the hand guard and presses the weapon against the shoulder.
Lighten:
Without a combat backpack
Harden:
Combat backpack loaded with an additional 3kg (water bottles)
Material per participant: Tenue CNK 420
Additional material: 1 F-disc with peg, 2 PET bottles (1.5l)
Shooting position - prone
Power
Individual work

From the patrol position to the kneeling shooting position in accordance with regulation 53.096:
1. Bend both knees simultaneously;
2. Kneel in line with the hips;
3. Bend the upper body forwards and support it with the weak hand;
4. Lie down so that the weapon and the body form a line (avoid contact between the weapon and the ground);
5. the strong hand grips the pistol grip without tensing, the strong arm pulls the stock into the shoulder cavity;
6. the weak forearm is as vertical as possible, the weak hand clasps the hand guard and presses the weapon against the shoulder;
7. Place your feet on the ground if possible.
Lighten:
Start from point 2 (see above)
Harden:
With a protective waistcoat;
With the weapon shouldered.
Material per participant: Tenue CNK 420
Additional material: 1 F-disc with peg; 1 protective vest
Shooting position - sitting
Power
Individual work

Lying on your back, assume the seated shooting position with legs apart according to regulation 53.096:
1. The strong hand grasps the pistol grip without tensing, the strong arm pulls the stock into the shoulder cavity;
2. Both elbows rest on the inside of the knees;
3. the weak hand grasps the hand guard and presses the weapon against the shoulder;
4. the body is slightly bent forwards.
Repeat the exercise without resting the shoulders on the ground.
Lighten:
Without material
Harden:
With combat backpack
Material per participant: Tenue CNK 420
Additional material: 1 F-disc with peg
Shoulder press with rotation on a gym ball ► swiss ball arnold press
Power
Individual work
Sit upright on the exercise ball, centred on it, with your feet firmly planted on the floor. Keep your upper body upright, your chest out and your core muscles firmly engaged. Hold a dumbbell in each hand in front of your chest at collarbone height, with your palms facing inwards and your elbows bent and positioned close to your torso. Now, in one fluid, controlled movement, press the dumbbells vertically upwards over your head, whilst continuously rotating your forearms outwards so that, at the top of the movement, your palms are facing forwards and your arms are straight (upper arms alongside your ears). The core actively compensates for the ball’s wobble throughout the movement, whilst the back remains stable and neutral. Any tendency to arch the lower back is consistently prevented. Then, whilst rotating the wrists in the opposite direction in a controlled manner, slowly lower the weights back to the starting position in front of the chest and repeat the movement smoothly without using momentum.
Attention:
The lower back arches excessively into a hollow back when pressing the dumbbells upwards; the shoulders are passively pulled upwards towards the ears during the lift; the dumbbells move far forwards in front of the head during the lift, rather than being guided in a vertical line above the centre of gravity; in the starting position, the elbows drop too low or splay outwards uncontrollably; the movement is initiated with momentum from the legs or the torso, rather than being performed in a controlled manner using the shoulders and arms; the head is thrust forward or the neck is hyperextended.
Lighten:
Choose a lighter dumbbell weight; position your feet significantly wider apart to create a broader and more stable base on the floor; perform the exercise whilst seated on a stable Swedish bench or a box; omit the rotation and perform a classic, straight-arm shoulder press; press the dumbbells alternately to have more control on each side.
Harden:
Choose heavier dumbbells; place your feet very close together or stand on your heels/toes to drastically reduce your base of support; lift one leg slightly off the floor throughout the entire movement (one-legged sit on the ball); place both feet on an unstable surface (e.g. one balance pad under each foot); deliberately slow down the downward movement (eccentric phase) to take 3–4 seconds.
1 exercise ball
2 dumbbells
1 bench/Swedish box ► makes the exercise easier (stable support surface)
2 dumbbells (light) ► makes the exercise easier (reduced weight)
2 dumbbells (heavy) ► makes the exercise more difficult (additional weight)
1 balance cushion ► makes the exercise more difficult (unstable support surface)
Rope/rope pulling ► rope pulling
Power
Partner work
1 trainee & 1 helper ► Note change of position
(= double the time required; for lesson planner see Organisation Kraft: Info button Execution)


► Exercise only suitable in the gym!
Trainee: Pulls their partner towards them by pulling on the rope/rope. As soon as both participants are in the same position, the trainee distances themselves until the rope/rope is stretched to its full length so that they can pull their partner towards them again.
Partner: Stands in a squatting position (stable torso; stomach tensed) on the carpet remnants and holds on to the end of the rope/rope.
Attention:
Both participants ensure a straight back.
Lighten:
Lighter partner.
Harden:
Heavier partner (partner with additional weight).
1 rope/rope
2 carpet remnants
1 weight waistcoat ► to make the exercise more difficult (additional weight)
Lateral forearm support (left) ► forearm side plank / lateral pillar bridge / side bridge
Power
Individual work
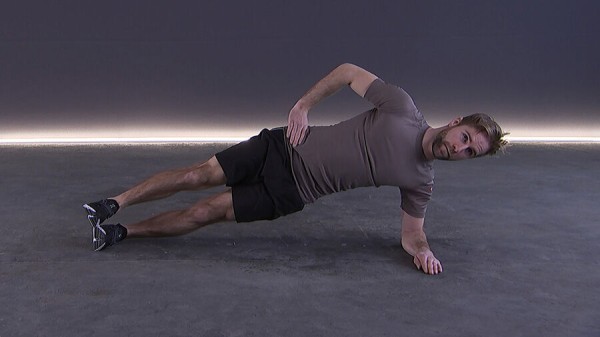
Side plank on the (left) forearm, with the elbow directly beneath the shoulder, the forearm on the floor, and the legs stretched out, either one on top of the other or staggered for greater stability; lift the pelvis until the body forms a straight line from head to toe. The oblique abdominal muscles, glutes and legs should be actively engaged. Hold the position isometrically and continue to breathe calmly.
Attention:
The pelvis does not sag (insufficient tension in the lateral core muscles), the hips do not rotate forwards or backwards, the shoulders do not collapse (sinking in the joint), the head does not droop or tilt (straining the neck), and there is not too much pressure in the lower back instead of the core (incorrect distribution of tension).
Lighten:
Knees on the floor (knee-side-plank); place the top leg slightly in front of the bottom leg, or position the feet staggered rather than stacked.
Harden:
Feet close together (stacked position); upper leg raised (side plank leg raise); additional load on the hips (e.g. weight on the pelvis); free upper hand above the head or holding a weight; unstable surface (possible for both the arm and the legs).
1 soft mat (small)
1 weighted vest/weight plate/dumbbell/sandbag ► Increases the difficulty of the exercise (additional weight)
1 ball/1–2 balance cushions/1 balance board ► Increases the difficulty of the exercise (unstable surface)
Lateral forearm support (left) ► lateral pillar bridge / side plank / side bridge
Power
Individual work

Side support with the left forearm on the balance board. Raise your upper leg slightly off the floor (in extension of your body) and bend your lower leg on the floor (kneeling, foot pointing backwards). Hold the position you have assumed.
Attention:
Head, torso, hips and knees practically form a line (pelvis does not tilt backwards or forwards), keep shoulder above elbow.
Lighten:
Lateral forearm support without balance board; support upper leg extended on the floor as an extension of the body.
Harden:
Both legs stretched out in extension of the body (outer instep of the lower foot supports the overlapping legs).
Variant:
Lift and lower the pelvis.
1 balance board incl. roller
Lateral forearm support (right) ► forearm side plank / lateral pillar bridge / side bridge
Power
Individual work

Side plank on the (left) forearm, with the elbow directly beneath the shoulder, the forearm on the floor, and the legs stretched out, either one on top of the other or staggered for greater stability; lift the pelvis until the body forms a straight line from head to toe. The oblique abdominal muscles, glutes and legs should be actively engaged. Hold the position isometrically and continue to breathe calmly.
Attention:
The pelvis does not sag (insufficient tension in the lateral core muscles), the hips do not rotate forwards or backwards, the shoulders do not collapse (sinking in the joint), the head does not droop or tilt (straining the neck), and there is not too much pressure in the lower back instead of the core (incorrect distribution of tension).
Lighten:
Knees on the floor (knee-side-plank); place the top leg slightly in front of the bottom leg, or position the feet staggered rather than stacked.
Harden:
Feet close together (stacked position); upper leg raised (side plank leg raise); additional load on the hips (e.g. weight on the pelvis); free upper hand above the head or holding a weight; unstable surface (possible for both the arm and the legs).
1 soft mat (small)
1 weighted vest/weight plate/dumbbell/sandbag ► Increases the difficulty of the exercise (additional weight)
1 ball/1–2 balance cushions/1 balance board ► Increases the difficulty of the exercise (unstable surface)
Lateral forearm support (right) ► lateral pillar bridge / side plank / side bridge
Power
Individual work

Side support with the right forearm on the balance board. Lift the top leg slightly off the floor (in extension of the body) and bend the bottom leg on the floor (kneeling, foot pointing backwards). Hold the position you have assumed.
Attention:
Head, torso, hips and knees practically form a line (pelvis does not tilt backwards or forwards), keep shoulder above elbow.
Lighten:
Lateral forearm support without balance board; support upper leg extended on the floor as an extension of the body.
Harden:
Both legs stretched out in extension of the body (outer instep of the lower foot supports the overlapping legs).
Variant:
Lift and lower the pelvis.
1 balance board incl. roller
Lateral forearm support / lateral support (left) ► side plank / lateral pillar bridge / side bridge
Power
Individual work


Progression I:
Side support on the left forearm with the legs in the foot supports (crossed over, top leg in front). Support the upper right arm on the floor in front of the body, lift the pelvis off the floor and hold the position. To increase the intensity, support the free arm on the hip or extend it vertically upwards.
Progression II:
Analogue to Progression I, but only supported on one hand. Increase the intensity according to progression I.
Attention:
Keep body tension, do not let hips sag, back straight, forearm under shoulder (for both progressions).
Harden:
The further away the head is from the attachment point, the more challenging the exercise becomes.
Variant I:
Lift and lower the pelvis.
Variant II:
Alternately bring the upper arm under the body and extend it upwards, accompanying the movement with the head.
1 sling trainer
Lateral forearm support / lateral support (right) ► side plank / lateral pillar bridge / side bridge
Power
Individual work


Progression I:
Side support on the right forearm with the legs in the foot supports (crossed over, top leg in front). Support the upper left arm on the floor in front of the body, lift the pelvis off the floor and hold the position. To increase the intensity, support the free arm on the hip or extend it vertically upwards.
Progression II:
Analogue to Progression I, but only supported on one hand. Increase the intensity according to progression I.
Attention:
Keep body tension, do not let hips sag, back straight, forearm under shoulder (for both progressions).
Harden:
The further away the head is from the attachment point, the more challenging the exercise becomes.
Variant I:
Lift and lower the pelvis.
Variant II:
Alternately bring the upper arm under the body and extend it upwards, accompanying the movement with the head.
1 sling trainer
Lateral forearm support with raised leg (left) ► lateral pillar bridge / side plank / side bridge
Power
Individual work

Side support on the left forearm (possibly on a wall for the correct straight position). Raise the top leg, extend the free arm in a high position (starfish) or support it on the hip and hold the position.
Attention:
Head, torso, hips and knees form a line (pelvis does not tilt backwards or forwards), keep the shoulder above the elbow.
Lighten:
Knee on the floor; spread the upper leg less.
Harden:
Additional weight (on the hip, on the upper leg for additional training of the leg muscles); unstable base (possible for both supporting arm and supporting leg).
1 weight cuff/weight vest/weight disc/dumbbell/sandbag ► make the exercise more difficult (additional weight)
1 ball/1-2 balance cushions/1 balance board ► make the exercise more difficult (unstable surface)
Lateral forearm support with raised leg (right) ► lateral pillar bridge / side plank / side bridge
Power
Individual work

Side support on the right forearm (possibly on a wall for the correct straight position). Raise the top leg and stretch the free arm upwards (starfish) or support it on the hip and hold the position.
Attention:
Head, torso, hips and knees form a line (pelvis does not tilt backwards or forwards), keep the shoulder above the elbow.
Lighten:
Knee on the floor; spread the upper leg less.
Harden:
Additional weight (on the hip, on the upper leg for additional training of the leg muscles); unstable base (possible for both supporting arm and supporting leg).
1 weight cuff/weight vest/weight disc/dumbbell/sandbag ► make the exercise more difficult (additional weight)
1 ball/1-2 balance cushions/1 balance board ► make the exercise more difficult (unstable surface)
Alternating lateral tilting of the upper body while standing
Power
Individual work

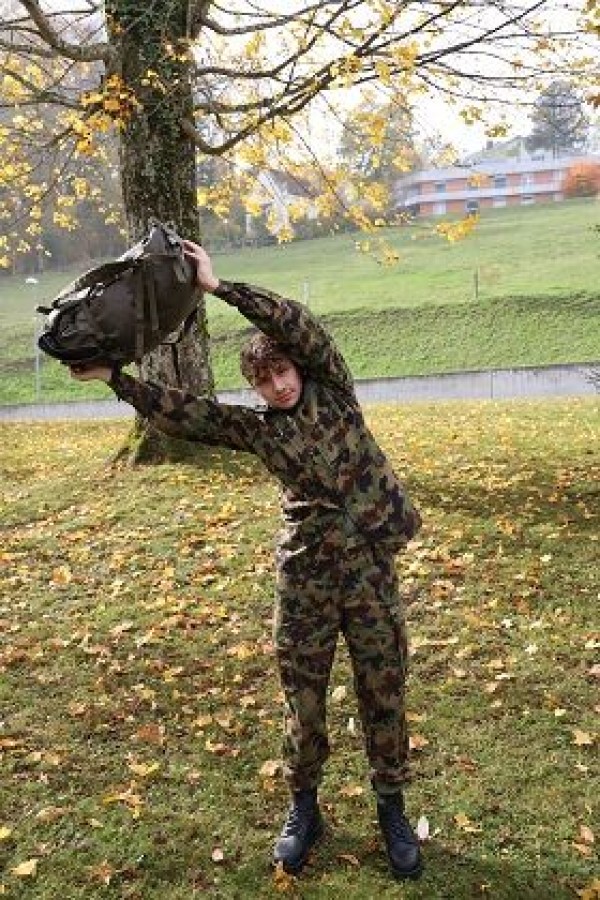
Stand upright with your hips wide apart, hold the object high above your head and then tilt your upper body alternately to the left and right side.
Attention:
Do not lean your upper body forwards or backwards, no hollow back (tense your torso).
Lighten:
No additional weight; lean your upper body less to the side.
Harden:
Additional weight (e.g. place stones in the helmet or a combat backpack)
1 helmet/(medicine) ball
1 combat rucksack/tyre (PUCH)/3-4 stones ► Make the exercise more difficult (additional weight)
Alternating lateral tilting of the upper body while standing ► side bend
Power
Individual work


Stand upright, shoulder-width apart with your feet in the loops. The gymnastics pole is held on the shoulders behind the head and the upper body is tilted alternately to the left and right side.
Attention:
Do not lean your upper body forwards or backwards, no hollow back (tense torso).
Lighten:
Select less strong elastic bands; roll up the elastic bands less.
Harden:
Select stronger elastic bands; roll up the elastic bands more.
1 gymnastic bar with elasticated straps
Lateral tilting of the upper body in forearm support ► pillar bridge / plank rolls
Power
Individual work
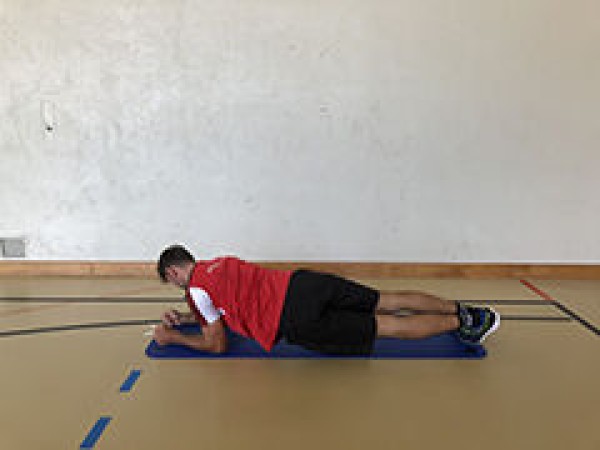
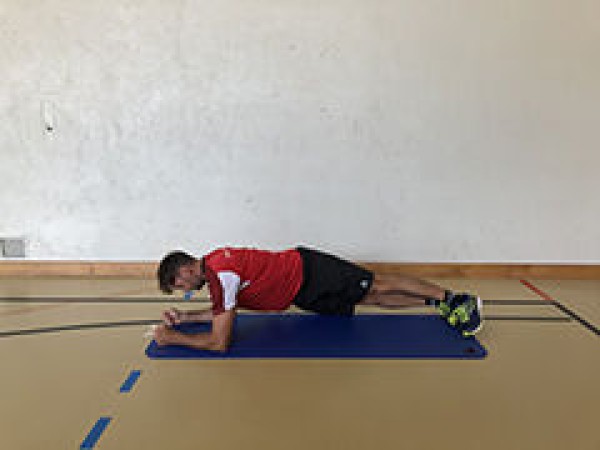

In the forearm support (the stretched legs and upper body practically form a line, the legs are supported on the tips of the toes and the upper body on the forearms, the forearms lie flat on the floor parallel to each other, the upper arms are vertical) tilt the upper body to the left or right side and return to the starting position.
Attention:
Head, torso, hips and knees practically form a line (do not stretch your buttocks upwards or allow them to sag, tense your stomach).
Lighten:
Knees on the floor.
Harden:
A stable base for the legs and/or arms is possible.
1-2 balls/balance cushions/balance boards ► Make the exercise more difficult (unstable surface)
Lateral raising of the arms in prone position ► prone T hold
Power
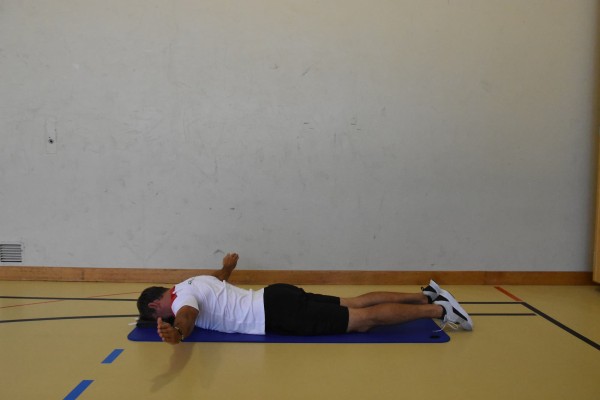
Lie on your stomach with your forehead resting on a folded sheet, feet shoulder-width apart, arms pointing to either side (T-position). From this position, pull the shoulder blades together and raise the arms until the elbows are at shoulder height and the arms are parallel to the floor (palms facing forward or downward). Keep your arms straight and hold the position.
Attention:
Only the arms should be raised, nothing else - aim to isolate the upper back.
Harden:
Hold additional weight in your hands or on your arms.
2 weight cuffs/2 weight balls/dumbbells ► Make the exercise more difficult (additional weight)
Lateral raising of the arms in prone position ► prone T raise hold / prone lateral raise hold
Power
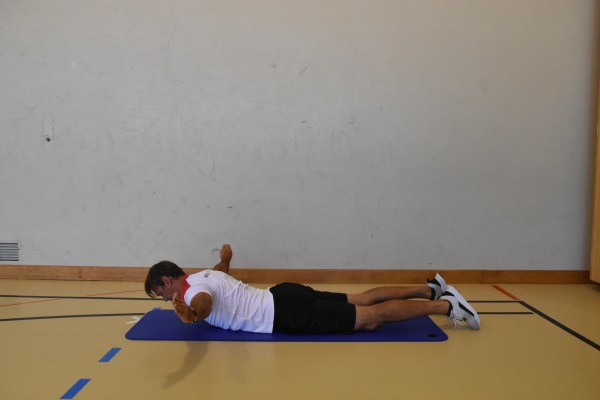
Lie on your stomach with your upper body slightly raised, feet shoulder-width apart, arms pointing to either side (T-position). From this position, pull your shoulder blades together and raise your arms until your elbows are at shoulder height and your arms are parallel to the floor (palms facing forward or downward). Keep your arms straight and hold the position.
Attention:
Only the arms should be raised, nothing else - aim to isolate the upper back.
Harden:
Hold additional weight in your hands or on your arms.
2 weight cuffs/2 weight balls/dumbbells ► Make the exercise more difficult (additional weight)
Lateral raising of the arms in prone position ► prone W hold
Power
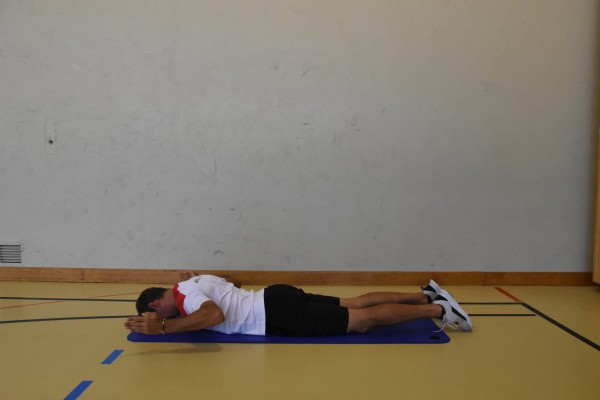
Lie on your stomach with your forehead resting on a folded sheet, feet shoulder-width apart, arms bent, elbows close to your body, arms pointing diagonally forwards to the respective side (W position). From this position, pull the shoulder blades together and raise the arms until the elbows are at shoulder height and the arms are parallel to the floor (palms facing inwards at an angle). Keep your arms straight and hold the position.
Attention:
Only the arms should be raised, nothing else - aim to isolate the upper back.
Harden:
Hold additional weight in your hands or on your arms.
2 weight cuffs/2 weight balls/dumbbells ► Make the exercise more difficult (additional weight)
Lateral raising of the arms in prone position ► prone raise hold
Power
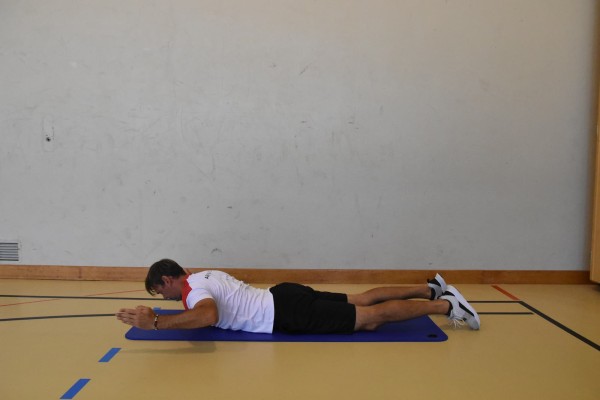
Lie on your stomach with your upper body slightly raised, feet shoulder-width apart, arms bent, elbows close to your body, arms pointing diagonally forwards to each side (W position). From this position, pull the shoulder blades together and raise the arms until the elbows are at shoulder height and the arms are parallel to the floor (palms facing inwards at an angle). Hold the position.
Attention:
Only the arms should be raised, nothing else - aim to isolate the upper back.
Harden:
Hold additional weight in your hands or on your arms.
2 weight cuffs/2 weight balls/dumbbells ► Make the exercise more difficult (additional weight)
Lateral raising and lowering of the arms while standing ► lateral arm raise
Power
Individual work


Stand upright with your feet shoulder-width apart, arms outstretched to the side (shoulder height), raise and lower your arms or perform circular movements with your arms (vary the range).
Attention:
Do not circle your arms below hip height or above head height (tension).
Lighten:
Just hold the position.
Harden:
Hold additional weight on your arms or in your hands.
2 weight cuffs/weight balls/dumbbells ► Make the exercise more difficult (additional weight)
Lateral raising and lowering of the arms while standing ► lateral raise
Power
Individual work

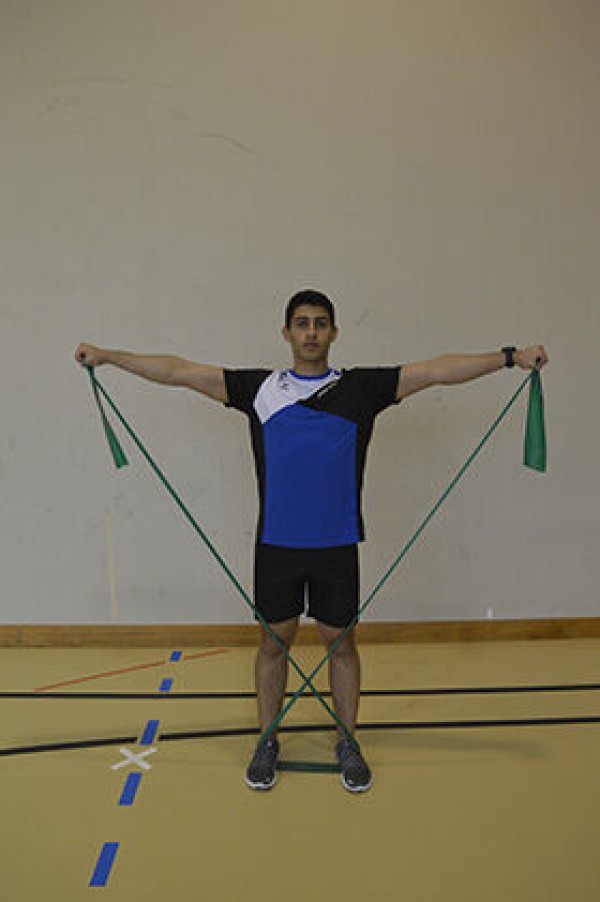
Stand shoulder-width apart in the centre of the elastic band, with your upper body tilted far forward and your arms hanging down at the side of your body (shoulders set) Cross the elastic band and grasp one end with each hand, raise your arms sideways to approximately shoulder height and lower them back to the starting position.
Attention:
The upper body remains stable.
Lighten:
Choose an elastic band with less resistance.
Harden:
Choose an elastic band with greater resistance.
1 elasticated rubber band