
Exercises (3274)
Extension and flexion of the leg in supine position (right) ► leg press
Power
Individual work


Long bench attached to the wall bars/swinging box, lying on your back on a soft mat, hands stretched out to the side on the floor (grasping the soft mat), one foot (right) supports the free end of the long bench (leg bent, knee pointing towards the chest), the other (left) leg is positioned on the floor (or slightly bent), (almost) straighten the active leg and bend it back to the starting position (raise and lower the long bench).
Attention:
Do not fully straighten the leg, put weight on the whole foot.
Lighten:
Bend the leg less.
Harden:
Additional weight (weight disc on the long bench).
Additional weight (one partner sits at the other end of the long bench; the further forward towards the trainee he moves, the greater the weight to be lifted) - organisation = partner work.
1 vaulting box or wall bars
1 long bench
1 soft mat (small)
1 weight disc/sandbag ► to make the exercise more difficult (additional weight)
Extension and flexion of the leg in shoulder position (left) ► glute bridge & leg press
Power
Individual work


Shoulder position, place your arms on the floor at the side of your body, one leg (right) bent with the foot/heel on the floor (place the heel slightly in front of the knee, approximately 90 degree angle in the knee joint), the other (left) leg is also bent but lifted off the floor, the pelvis is also lifted. With the heel of the leg in the raised position, step into the loop of an elasticated rubber band, fix the other end of the band by placing the band around the lower leg (just below the knee) of the leg that has been set down. From this position, extend the training leg (left) (one-sided leg press - knee extension) and return to the starting position.
Attention:
In the end position, the upper body, thigh and extended leg practically form a line, with the upper body only resting on the shoulders and the pelvis parallel to the floor (do not let it hang to the side).
Lighten:
Choose a rubber band with less resistance.
Harden:
Choose a rubber band with more resistance.
1 mini-band
Extension and flexion of the leg in shoulder position (left) ► leg curl
Power
Individual work


Shoulder position, one leg (right) stretched out in a high position, the other leg (left) resting with the lower leg on the exercise ball, buttocks raised (push hips up), pull the ball over the heel of the training leg towards the body and return to the starting position (bend and stretch leg).
Attention:
Buttocks and passive leg always remain in a high position (actively push buttocks upwards).
Lighten:
Only hold the starting position (without bending and extending the leg); bend the leg less (hardly move the ball towards the body).
Harden:
Additional weight (on the hips).
Variation:
Free leg not extended in the high position but bent (knee pulled towards the chest).
1 exercise ball
1 weight disc/dumbbell/sandbag ► Make the exercise more difficult (additional weight)
Extension and flexion of the leg in shoulder position (left) ► leg curl
Power
Individual work


Shoulder position, arms at your sides on the floor, one leg (left) stretched out with the heel supported on a slippery surface, the other (right) leg stretched out in extension of the body lifted off the floor, bend the free leg (left) and stretch back to the starting position.
Attention:
Lower back, buttocks and legs always slightly raised (body tension).
Lighten:
Just hold the position (also possible with end pose); bend the free leg less.
1 carpet remnant/felt slipper/glider
Extension and flexion of the leg in shoulder position (right) ► glute bridge & leg press
Power
Individual work
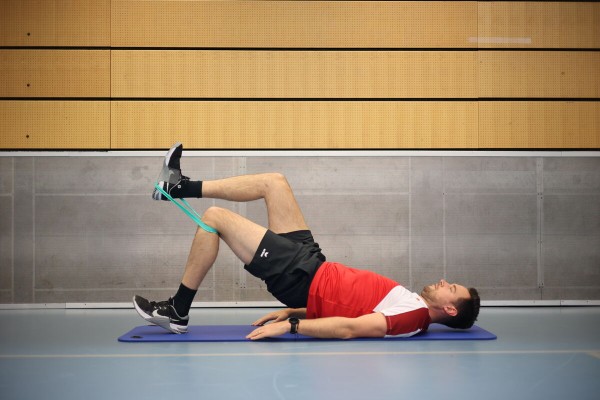

Shoulder position, place your arms on the floor at the side of your body, one leg (left) bent with the foot/heel on the floor (place the heel slightly in front of the knee, approximately 90 degree angle in the knee joint), the other (right) leg is also bent but lifted off the floor, the pelvis is also lifted. With the heel of the leg in the raised position, step into the loop of an elasticated rubber band, fix the other end of the band by placing the band around the lower leg (just below the knee) of the leg that has been set down. From this position, stretch the training leg (right) (one-sided leg press - knee extension) and return to the starting position.
Attention:
The upper body, thigh and extended leg practically form a line in the end position, the upper body only rests on the shoulders, keep the pelvis parallel to the floor (do not let it hang sideways).
Lighten:
Choose a rubber band with less resistance.
Harden:
Choose a rubber band with more resistance.
1 mini-band
Extension and flexion of the leg in shoulder position (right) ► leg curl
Power
Individual work
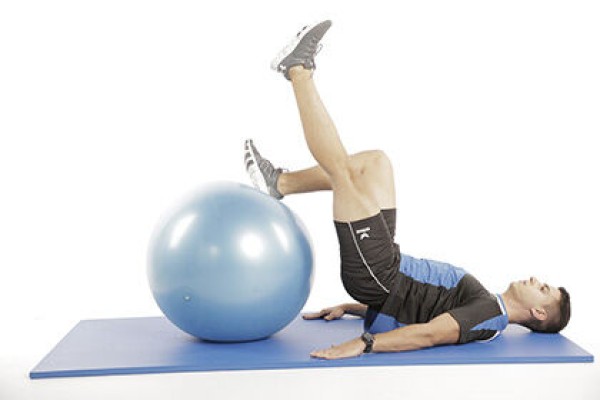

Shoulder position, one leg (left) stretched out in a high position, the other leg (right) resting with the lower leg on the exercise ball, buttocks raised (push hips up), pull the ball over the heel of the training leg towards the body and bring it back to the starting position (bend and stretch leg).
Attention:
Buttocks and passive leg always remain in a high position (actively push buttocks upwards).
Lighten:
Only hold the starting position (without bending and stretching the leg); bend the leg less (hardly move the ball towards the body).
Harden:
Additional weight (on the hips).
Variation:
Free leg not extended in the high position but bent (knee pulled towards the chest).
1 exercise ball
1 weight cuff/dumbbell/sandbag ► Make the exercise more difficult (additional weight)
Extension and flexion of the leg in shoulder position (right) ► leg curl
Power
Individual work
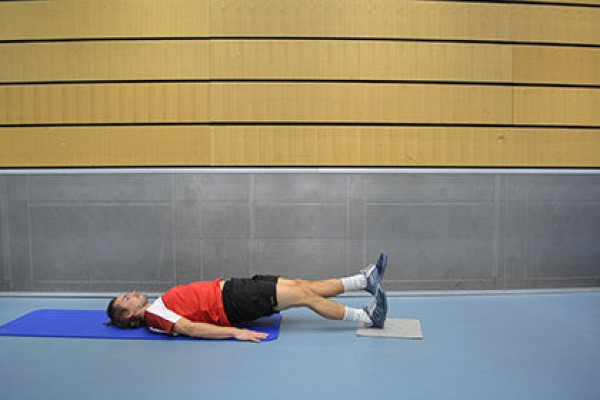

Shoulder position, arms at your sides on the floor, one leg (right) stretched out with the heel supported on a slippery surface, the other (left) leg stretched out in extension of the body lifted off the floor, bend the free leg (right) and stretch back to the starting position.
Attention:
Lower back, buttocks and legs always slightly raised (body tension).
Lighten:
Just hold the position (also possible with end position); bend the free leg less.
1 carpet remnant/felt slipper/glider
Extension and flexion of the ankle joint in single-leg stance (left) ► calf raise
Power
Individual work


Stand on one leg (left) with your toes on one of the lower rungs of the wall bars, hold on to one of the upper rungs with your hands (chest height), raise and lower your foot on the wall bar (push your upper body up).
Attention:
Arms do not provide support (possibly grasp the rung with an underhand grip).
Lighten:
Arms as support.
Heavier:
Additional weight (hold with one hand on the shoulders).
1 wall bars
1 weight vest/sandbag ►to make the exercise more difficult (additional weight)
Extension and flexion of the ankle in single-leg stance (right) ► calf raise
Power
Individual work

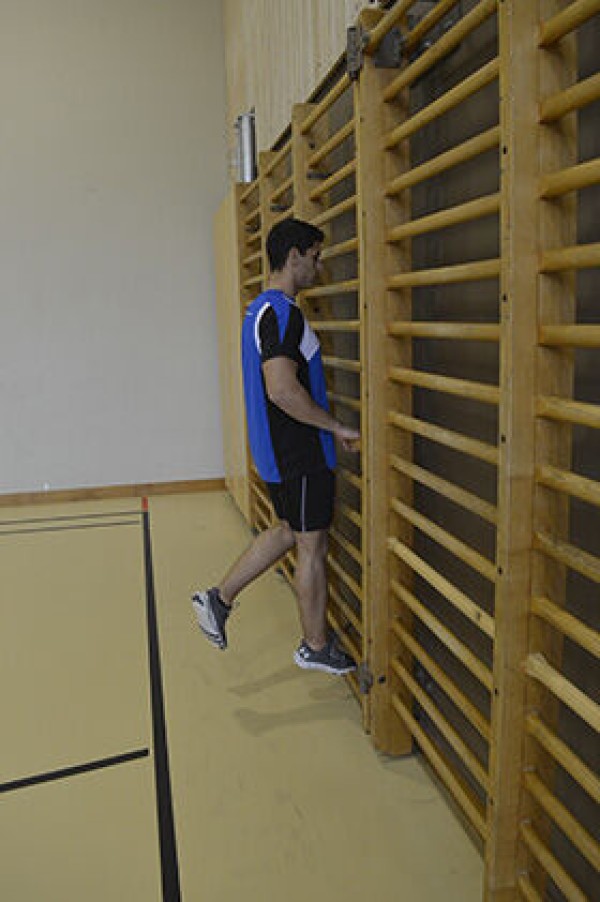
Stand on one leg (right) with the tips of your toes on one of the lower rungs of the wall bars, hold on to one of the upper rungs with your hands (chest height), raise and lower your foot on the wall bar (push your upper body up).
Attention:
Arms do not provide support (possibly grasp the rung with an underhand grip).
Lighten:
Arms as support.
Harden:
Additional weight (hold with one hand on the shoulders).
1 wall bars
1 weight vest/sandbag ► to make the exercise more difficult (additional weight)
Extension and flexion of the ankle in the sitting position (left)
Power
Individual work
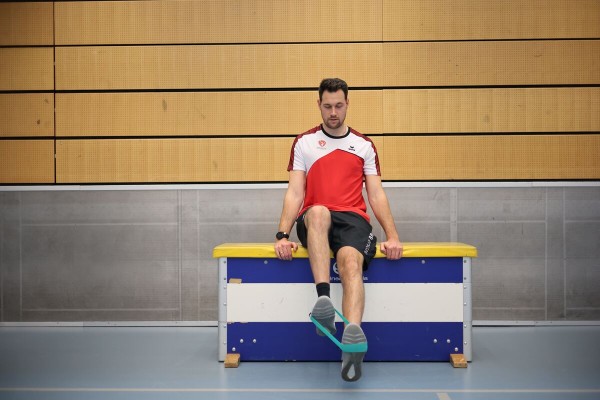
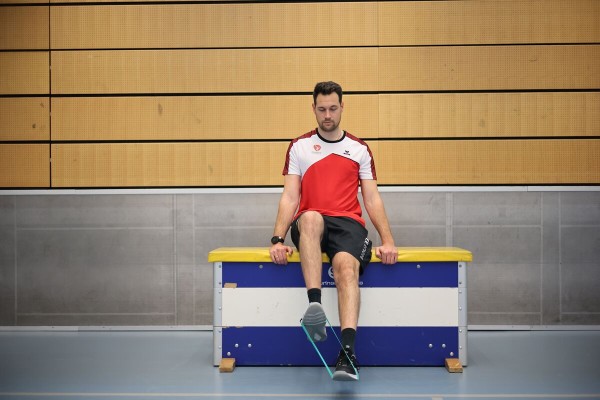
When seated, the upper body is tilted slightly backwards, both feet are lifted off the floor, with one leg (right) bent and the other leg (left) slightly bent (almost stretched). The lower legs point diagonally forwards. Stretch an elasticated band between the legs (place the band around the instep/sole of the foot). From this position, bend and stretch the foot of the training leg (left) (pull the tip of the foot towards your body and tilt it forwards in the direction of your gaze).
Attention:
The movement only takes place in the ankle joint (both legs and upper body remain stable).
Lighten:
Choose a rubber band with less resistance.
Harden:
Choose a rubber band with greater resistance.
1 mini-band
1 seating option (e.g. chair, plyo box or vaulting box)
Extension and flexion of the ankle in the sitting position (left)
Power
Individual work
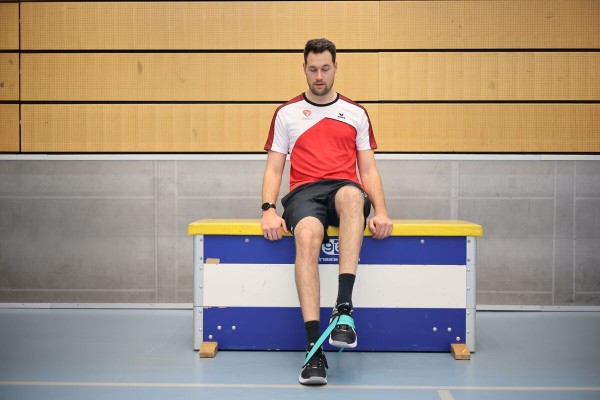
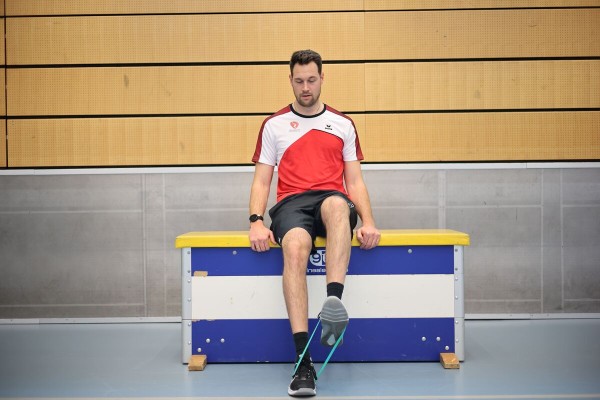
When seated, the upper body is tilted slightly backwards, one foot (right) is placed on the floor, the training leg (left) is lifted off the floor (both lower legs are practically pointing vertically downwards). An elasticated rubber band is stretched between the legs by standing on one end of the band with the foot placed on the floor (fixation), the other end is placed around the instep of the raised leg. From this position, bend and stretch the foot of the training leg (left) (pull the tip of the foot towards the body and tilt it forwards in the direction of gaze).
Attention:
The movement only takes place in the ankle joint (both legs and upper body remain stable).
Lighten:
Choose a rubber band with less resistance.
Harden:
Choose a rubber band with more resistance.
1 mini-band
1 seating option (e.g. chair, plyo box or vaulting box)
Extension and flexion of the ankle joint in the sitting position (right)
Power
Individual work
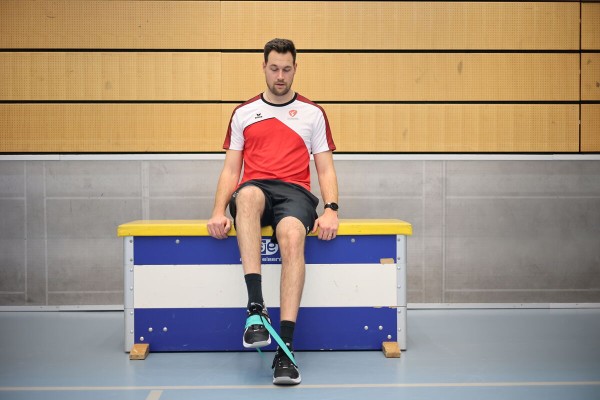
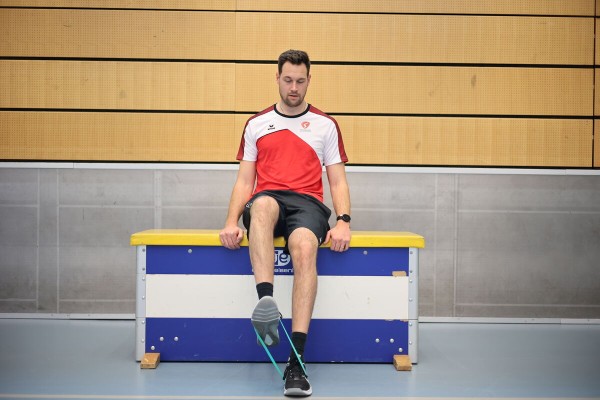
When seated, the upper body is tilted slightly backwards, one foot (left) is placed on the floor, the training leg (right) is lifted off the floor (both lower legs are practically pointing vertically downwards). An elasticated rubber band is stretched between the legs by standing on one end of the band with the foot placed on the floor (fixation), the other end is placed around the instep of the raised leg. From this position, bend and stretch the foot of the training leg (right) (pull the tip of the foot towards the body and tilt it forwards in the direction of gaze).
Attetion:
The movement only takes place in the ankle joint (both legs and upper body remain stable).
Lighten:
Choose a rubber band with less resistance.
Harden:
Choose a rubber band with more resistance.
1 mini-band
1 seating option (e.g. chair, plyo box or vaulting box)
Extension and flexion of the ankle joint in the sitting position (right)
Power
Individual work
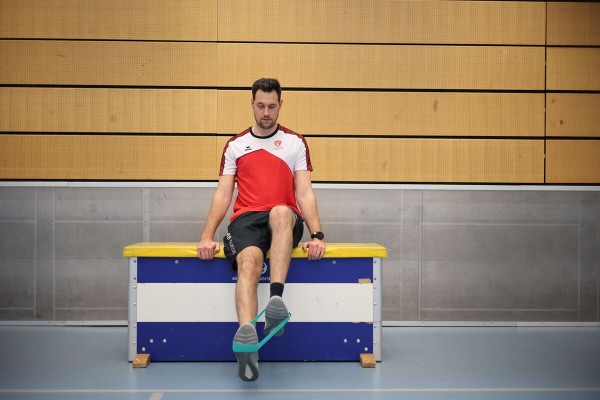
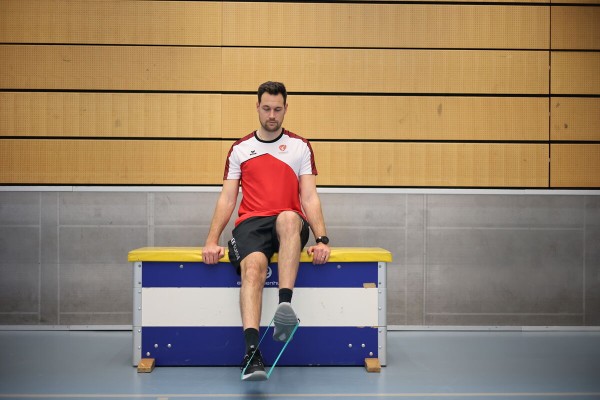
When seated, the upper body is tilted slightly backwards, both feet are lifted off the floor, with one leg (left) bent and the other leg (right) slightly bent (almost stretched). The lower legs point diagonally forwards. Stretch an elasticated band between the legs (place the band around the instep/sole of the foot). From this position, bend and stretch the foot of the training leg (right) (pull the tip of the foot towards your body and tilt it forwards in the direction of your gaze).
Attention:
The movement only takes place in the ankle joint (both legs and upper body remain stable).
Lighten:
Choose a rubber band with less resistance.
Harden:
Choose a rubber band with greater resistance.
1 mini-band
1 seating option (e.g. chair, plyo box or vaulting box)
Extension and flexion of the wrist in the sitting position (left)
Power
Individual work
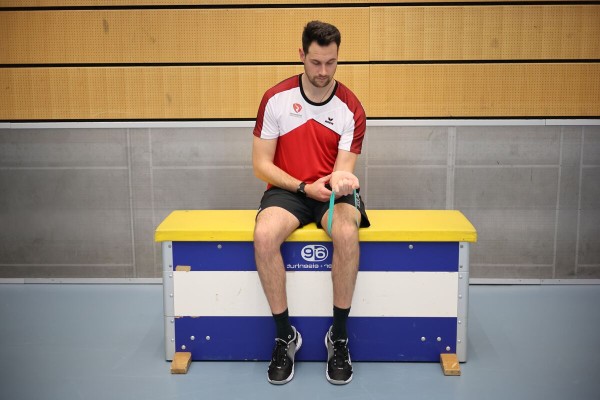
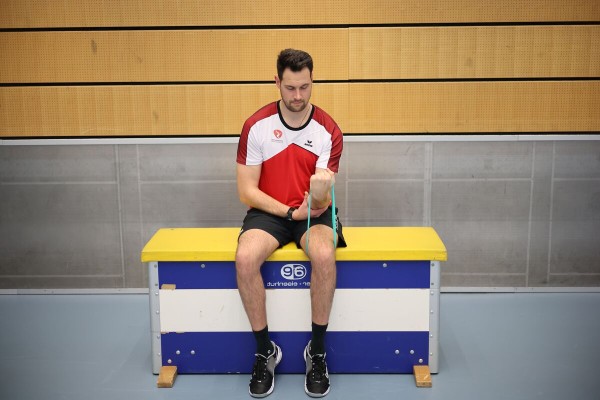
While seated, place an elasticated band around the (left) thigh and grasp the band with the (left) hand, with the back of the hand pointing downwards. The arm holding the band is bent so that the upper arm is against the body and the lower arm is pointing forwards (90 degree angle at the elbow joint). The other (right) arm fixes the training arm by holding the forearm by the elbow (inside). From this position, raise and lower the hand (extension and flexion in the wrist).
Attention:
The movement only takes place in the wrist, the forearm remains stable.
Lighten:
Choose a rubber band with less resistance.
Harden:
Choose a rubber band with greater resistance.
1 mini-band
1 seating option (e.g. chair, plyo box or vaulting box)
Extension and flexion of the wrist in the sitting position (left)
Power
Individual work
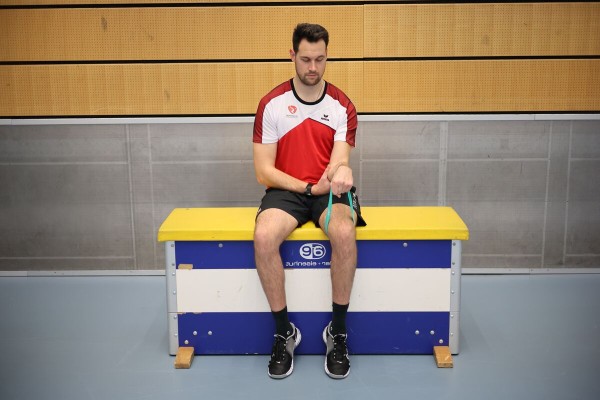
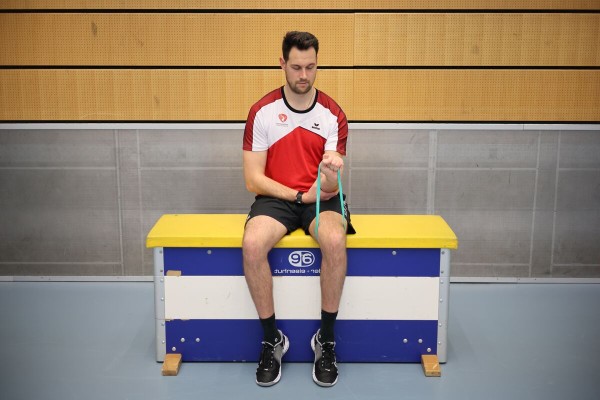
While seated, place an elasticated band around the (left) thigh and grasp the band with the (left) hand, with the back of the hand pointing upwards. The arm holding the band is bent so that the upper arm is against the body and the lower arm is pointing forwards (90 degree angle at the elbow joint). The other (right) arm fixes the training arm by holding the forearm at the elbow. From this position, raise and lower the hand (extension and flexion in the wrist).
Attention:
The movement only takes place in the wrist, the forearm remains stable.
Lighten:
Choose a rubber band with less resistance.
Harden:
Choose a rubber band with greater resistance.
1 mini-band
1 seating option (e.g. chair, plyo box or vaulting box)
Extension and flexion of the wrist in the sitting position (right)
Power
Individual work
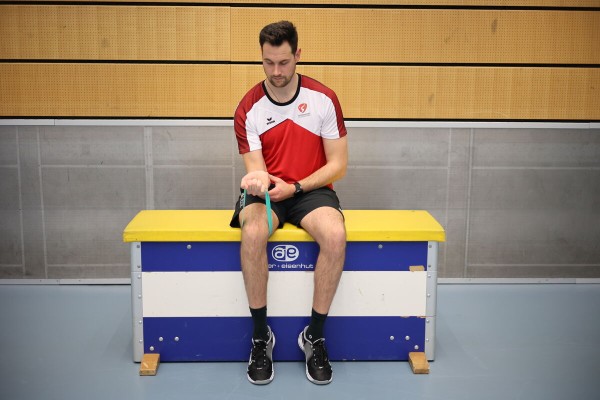
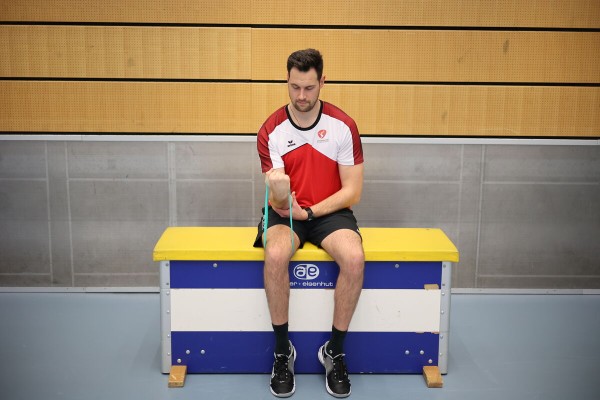
While seated, place an elasticated band around the (right) thigh and grasp the band with the (right) hand, with the back of the hand pointing downwards. The arm holding the band is bent so that the upper arm is against the body and the lower arm is pointing forwards (90 degree angle at the elbow joint). The other (left) arm fixes the training arm by holding the forearm by the elbow (inside). From this position, raise and lower the hand (extension and flexion in the wrist).
Attention:
The movement only takes place in the wrist, the forearm remains stable.
Lighten:
Choose a rubber band with less resistance.
Harden:
Choose a rubber band with greater resistance.
1 mini-band
1 seating option (e.g. chair, plyo box or vaulting box)
Extension and flexion of the wrist in the sitting position (right)
Power
Individual work

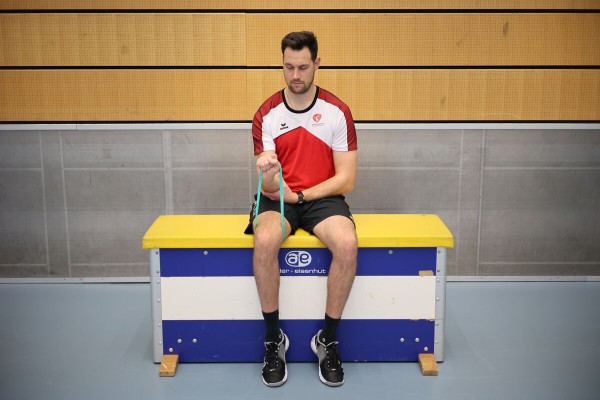
While seated, place an elasticated band around the (right) thigh and grasp the band with the (right) hand, with the back of the hand pointing upwards. The arm holding the band is bent so that the upper arm is against the body and the lower arm is pointing forwards (90 degree angle at the elbow joint). The other (left) arm fixes the training arm by holding the forearm at the elbow. From this position, raise and lower the hand (extension and flexion in the wrist).
Attention:
The movement only takes place in the wrist, the forearm remains stable.
Lighten:
Choose a rubber band with less resistance.
Harden:
Choose a rubber band with greater resistance.
1 mini-band
1 seating option (e.g. chair, plyo box or vaulting box)
Extension and flexion of the upper body while standing
Power
Partner work
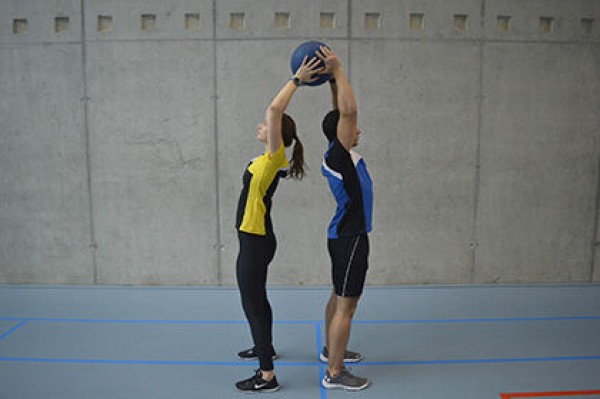

With some distance between them, the partners stand back to back and the two exercisers alternately pass a weighted ball/disc to each other once above their heads and once between their legs (stretching and bending the upper body). The direction of the ball/disc transfer is changed from time to time.
Lighten:
Lighter ball; without ball (hands touching).
Harden:
Transfer heavier object.
1 weight ball/weight disc/medicine ball
1 ball (e.g. volleyball/football/basketball) ► Make the exercise easier
1 weight ball/weight disc/sandbag/medicine ball ► Make the exercise more difficult (additional weight)
Extension and flexion of the arm (arm pull) in the side forearm plank (left) ► side plank with pull
Power
Individual work
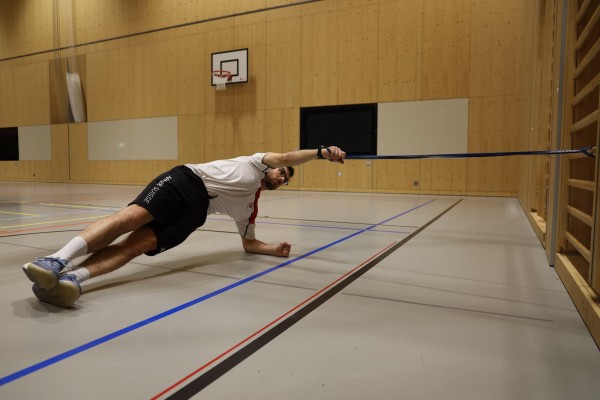
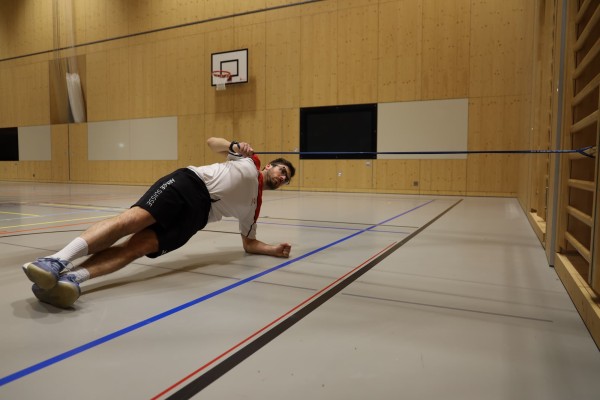
Attach the elastic band to the wall bars at about shoulder height. Move into a forearm plank position to the side of the wall bars (side plank on your right forearm). Your lower elbow should be below your shoulder. Keep your legs straight, with your feet either one on top of the other or staggered. Grasp the resistance band with your upper (left) hand and extend your arm towards the wall bars. Keep your body in a straight line. From the outstretched arm position, pull the resistance band towards your body in a controlled manner. As you do so, bring your elbow back and move your shoulder blade down and back. Then slowly straighten your arm again. Maintain a stable side plank position throughout the entire arm pull.
Note:
Do not let your pelvis sink or shift backwards; keep your body as straight as possible; do not pull the shoulder of the pulling arm towards your ear; keep your torso stable during the arm pull; do not pull on the elastic band with momentum; Avoid rotating the upper body as far as possible; keep the forearm and wrist of the supporting arm stable.
Lighten:
Use a lighter resistance band / position it closer to you; place your top leg in front of your bottom leg; bend your knees and perform the side plank over your knees; do the side plank without any pulling movement (just hold the position).
Harden:
Use a stronger elastic band / position it further away; place your feet one on top of the other rather than staggered; keep your top leg raised throughout the exercise; perform the contraction and return phases particularly slowly.
1 resistance band
1 wall bars
Extension and flexion of the arm (arm pull) in the side forearm plank (right) ► side plank with pull
Power
Individual work
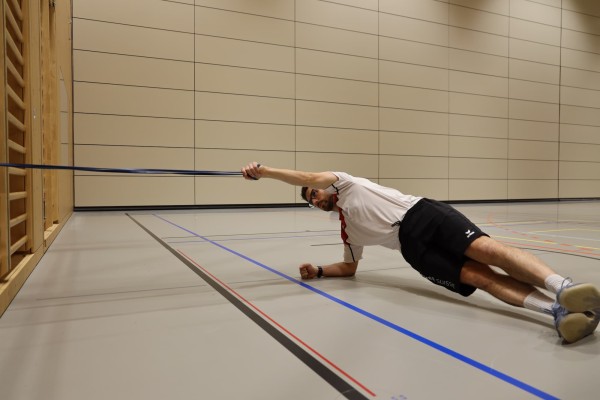

Attach the elastic band to the wall bars at about shoulder height. Move into a forearm plank position to the side of the wall bars (side plank on your left forearm). Your lower elbow should be below your shoulder. Keep your legs straight, with your feet either one on top of the other or staggered. Grasp the resistance band with your upper (right) hand and extend your arm towards the wall bars. Keep your body in a straight line. From the outstretched arm position, pull the resistance band towards your body in a controlled manner. As you do so, bring your elbow back and move your shoulder blade down and back. Then slowly straighten your arm again. Maintain a stable side plank position throughout the entire arm pull.
Note:
Do not let your pelvis sink or shift backwards; keep your body as straight as possible; do not pull the shoulder of the pulling arm towards your ear; keep your torso stable during the arm pull; do not pull on the elastic band with momentum; Avoid rotating the upper body as far as possible; keep the forearm and wrist of the supporting arm stable.
Lighten:
Use a lighter resistance band / position it closer to you; place your top leg in front of your bottom leg; bend your knees and perform the side plank over your knees; do the side plank without any pulling movement (just hold the position).
Harden:
Use a stronger elastic band / position it further away; place your feet one on top of the other rather than staggered; keep your top leg raised throughout the exercise; perform the contraction and return phases particularly slowly.
1 resistance band
1 wall bars
Extension and flexion of one arm in half kneeling position (left) ► biceps curl
Power
Individual work


Half kneeling with the upper body leaning slightly forwards, with the (right) foot placed on the floor, an elasticated rubber band is fixed in place. The outstretched left arm holds the free end of the elastic band on the side of the kneeling leg (left) at shin height of the lowered leg. From this position, bend the arm (stretch/tension the elastic band further) by bringing the hand towards the chest. Then stretch your arm back to the starting position.
Attention:
Always make sure your back is straight (keep your core tensed). The angle of the back and thighs remains unchanged throughout the exercise. Keep your elbows close to your body.
Lighten:
Choose a rubber band with less resistance.
Harden:
Choose a rubber band with greater resistance.
Variation:
Grab the band with both arms on the side of the kneeling leg (organisation = 1 exercise).
1 mini-band
Extension and flexion of one arm in half kneeling position (right) ► biceps curl
Power
Individual work
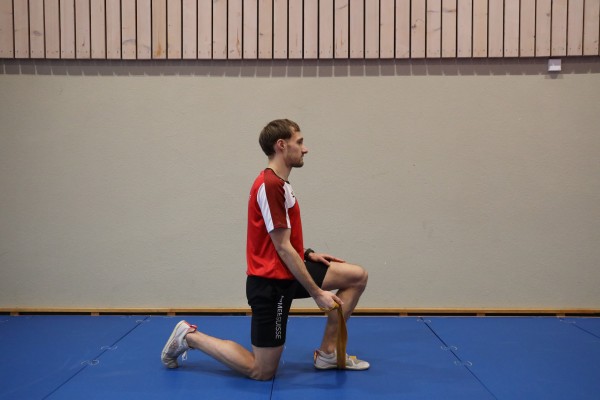

Half kneeling with the upper body leaning slightly forwards, with the (left) foot placed on the floor, an elasticated rubber band is fixed in place. The stretched right arm holds the free end of the elastic band on the side of the kneeling leg (right) at shin height of the lowered leg. From this position, bend the arm (stretch/tension the elastic band further) by bringing the hand towards the chest. Then stretch your arm back to the starting position.
Attention:
Always make sure your back is straight (keep your core tensed). The angle of the back and thighs remains unchanged throughout the exercise. Keep your elbows close to your body.
Lighten:
Choose a rubber band with less resistance.
Harden:
Choose a rubber band with greater resistance.
Variation:
Grab the band with both arms on the side of the kneeling leg (organisation = 1 exercise).
1 mini-band
Alternating extension and flexion of an arm while standing (rowing pull) ► row
Power
Individual work


Stand upright, shoulder-width apart, both arms stretched out in front of you at chest height, hands gripping the elastic band shoulder-width apart, alternately bring one hand to your chest (pull your elbow behind your body at shoulder height) and back to the starting position.
Attention:
Keep your upper body stable, do not arch your back (tighten your stomach).
Lighten:
Choose an elastic band with less resistance.
Harden:
Choose an elastic band with more resistance.
Variation:
Bend and stretch both arms simultaneously.
1 elasticated rubber band
Extension and flexion of the arm in a push-up position (left) ► renegade row
Power
Individual work
High plank position, hands directly beneath your shoulders, feet set fairly wide apart for stability. Shift your weight slightly to the right, pulling the elbow of your now-free left hand backwards (simulating a rowing motion); lift your hand briefly off the floor, then lower it back down in a controlled manner.
Attention:
Do not tilt or twist the hips too much (aim for stability, not weight transfer), do not raise the buttocks too high or let the back sag (hollow back), do not move too quickly (loss of control), do not shift your weight too much (unstable), do not let your shoulders slump inwards, do not have too little body tension, do not use too heavy a weight (movement becomes sloppy).
Lighten:
Hands slightly raised (e.g. on a bench): feet wider apart for greater stability.
Harden:
Narrower foot stance (more core engagement); added weight (starting position on two dumbbells); combine with push-ups; slower repetitions (more control); unstable surface (e.g. balance tools); one-legged variation (very challenging).
Variation:
Raise your hand and tap the opposite shoulder (shoulder tap).
1 raised surface (e.g. box) ► Make the exercise easier (position)
1 balance tools ► Make the exercise harder (unstable surface)
2 dumbbells ► Make the exercise harder (additional weight)
Extension and flexion of the arm in a push-up position (right) ► renegade row
Power
Individual work
High plank position, hands directly beneath your shoulders, feet set fairly wide apart for stability. Shift your weight slightly to the right, pulling the elbow of your now-free right hand backwards (simulating a rowing motion); lift your hand briefly off the floor, then lower it back down in a controlled manner.
Attention:
Do not tilt or twist the hips too much (aim for stability, not weight transfer), do not raise the buttocks too high or let the back sag (hollow back), do not move too quickly (loss of control), do not shift your weight too much (unstable), do not let your shoulders slump inwards, do not have too little body tension, do not use too heavy a weight (movement becomes sloppy).
Lighten:
Hands slightly raised (e.g. on a bench): feet wider apart for greater stability.
Harden:
Narrower foot stance (more core engagement); added weight (starting position on two dumbbells); combine with push-ups; slower repetitions (more control); unstable surface (e.g. balance tools); one-legged variation (very challenging).
Variation:
Raise your hand and tap the opposite shoulder (shoulder tap).
1 raised surface (e.g. box) ► Make the exercise easier (position)
1 balance tools ► Make the exercise harder (unstable surface)
2 dumbbells ► Make the exercise harder (additional weight)