
Exercises (3274)
Group Sumo
Fighting and roughhousing games
Group work
6-10 participants
In group sumo, everyone fights against everyone else. The participants try to stay on the field of mats as long as possible (the field can also be defined with marking cones/caps without mats). Anyone whose body part protrudes over the edge of the mat/field must leave the fighting area. The participant who is the last to remain on the mat area/(grass) field wins, whereby only pulling and pushing the opponent is permitted.
x soft mats (small) ► indoor version
4 marking cones/caps ► indoor and outdoor versions
Group formation
Stimulate circulation
Groups of 3-6
As a small group, you move freely in the hall/area. The sports leader can specify various forms of movement (crossing legs, circling arms, crouching, touching the floor, hopping, one-legged hopping, etc.).
- As soon as the sports leader calls out a number, the group stops and forms up so that as many limbs (legs, arms, head or buttocks) touch the floor as specified by the sports leader (e.g. number 5 = 3 legs and 2 arms). Number 5 = 3 legs and 2 arms).
Variant:
The sports leader can request "mandatory limbs" (e.g. 1 head or max. 1 leg).
- As soon as the sports leader calls out a number, corresponding groups must be formed (e.g. number 7 = groups of 7). Each participant only looks after themselves. Whoever remains performs an additional exercise defined by the sports leader (e.g. 3 stretch jumps, 5 jumping jacks, 4 push-ups, etc.). If the group size is not correct, all participants in the group must perform the additional exercise; if the group is complete, it is advisable to send newcomers away. After a check of the group formation and execution of the additional exercises, new small groups are formed, which move freely again.
Variant:
The sports leader can define how the group joins together (back to back, prone position and outstretched arms meet at a centre point, one-legged stand and the hands are placed on the shoulders of a group member).
- It is also possible to combine both forms of exercise by having the sports leader define the group size and the number of limbs that are allowed to touch the floor (e.g. group of 6 - 5 limbs).
No material required
Group formation
Stimulate circulation
Group work
Each participant moves freely in the hall/area to the music. The sports leader can specify various forms of movement (crossing legs, circling arms, crouching, touching the floor, hopping, hopping with one leg, etc.). During a break in the music, the sports leader calls out a number so that the corresponding groups must be formed (e.g. number 7 = groups of 7). Whoever remains performs an additional exercise defined by the sports leader (e.g. 3 stretch jumps, 5 jumping jacks, 4 push-ups, etc.). If the group size is not correct, all participants in the group must perform the additional exercise. When the music starts again, the participants move freely around the room again, matching the music.
Variant I:
The instructor can define how the group joins together (back to back, prone position and outstretched arms meet to form a centre, one-legged stand and hands are placed on the shoulders of a group member).
Variant II:
In addition to the group formation, define the number of limbs that may touch the floor (e.g. group of 6 - 5 limbs).
1 music system incl. music (various)
Cockfighting
Fighting and roughhousing games
Partner work
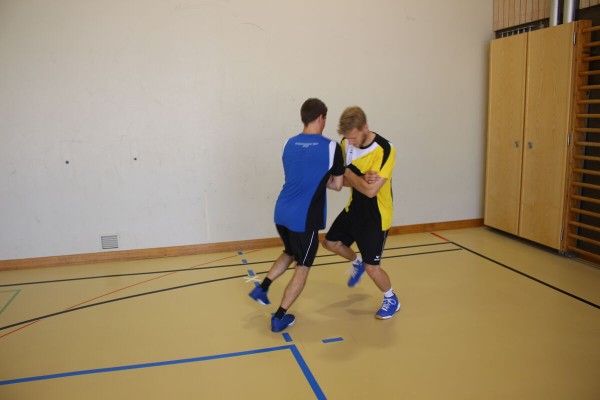
Two participants line up in a defined area (e.g. the centre circle of the basketball court or an area marked with cones). Both participants stand on one leg (one-legged stance) and have their arms crossed in front of their chest. The participants try to unbalance their opponent by jostling or dodging. The first person to put down their raised leg, fall over or leave the playing field loses. Change legs after each round.
4 marking cones (optional) ►Playing field marking
Post setup:
Define a square-shaped field using cones.
Cockfighting
Fighting and roughhousing games
Group work
The participants stand on one leg (one-legged stance) and have their arms crossed in front of their chest (the leg may be changed from time to time; if necessary, this is determined by the sports director). They try to unbalance their opponents by jostling or dodging them. Whoever touches the ground with both legs or falls over is eliminated. Which participant still hops on one leg at the end?
An additional exercise (e.g. wall sits, press-ups, forearm support) can be determined for the fallen "cocks".
4 marking cones (optional) ►Field markings
Shark catching
Stimulate circulation
Group work
The participants ("fish") try to get past the catchers ("sharks") to the other side of the hall or to the end zone defined in the area (2-3 catchers at the start). If a "fish" is eaten (touched) by a "shark", this in turn becomes a catcher. The "fish" are safe in the zones behind two defined (base) lines. The game continues back and forth until all the "fish" have been eaten.
No material required
Shark catching
Stimulate circulation
Group work
The participants ("fish") try to get past the catchers ("sharks") to the other side of the hall or the end zone defined in the area (2-3 catchers to start). In doing so, they guide a ball (with their hand, foot or playing equipment). Anyone who loses the ball or has it stolen by a "shark" also becomes a catcher. The "sharks" chase the "fish" without carrying a ball. The "fish" are safe in the zones behind two defined (base) lines. The game continues back and forth until all the "fish" have been eaten.
Per participant:
1 stick ► Smolball, floorball
1 ball ► Basketball, FooBaSKILL, Futsal/Football, Handball, Smolball, floorball
Half turn
Coordination exercises
Individual work
In the starting position, the front foot is turned inwards and the back foot is straight on the band. Your body weight is on the front foot. Now turn the back foot 180 degrees and simultaneously change your gaze in a quick movement (similar to a pirouette).
Lighten up:
Help a partner by holding their hand (always go with the balancing movement and only stabilise if the slackliner is about to fall).
1 Slackline
Cross your hand over your bent leg while standing
Power
Individual work


Bend your legs in a standing position, upper body tilted forwards, bend one leg alternately and touch the tip of each foot with your hand crosswise.
Attention:
Knees always remain behind the tips of the feet and point forwards.
Lighten:
Lower your upper body less (touch your knees instead of the top of your feet).
Harden:
Add weight to your arms and/or legs.
2-4 weight cuffs/2 weight balls to make the exercise more difficult (additional weight)
Bring your hand crosswise to your knee in push-up position ► knee touch / knee tap push up position
Power
Individual work


Push-up position (high support, face/gaze downwards), buttocks slightly raised, touch the opposite foot or knee with one hand, without lifting the legs. Switch sides after each exercise.
Attention:
Keep your upper body stable (tense your stomach).
Lighten:
Just hold the basic position (push-up position).
Harden:
Additional weight on the arms; unstable support.
2 weight cuffs ► making the exercise more difficult (additional weight)
2 balance cushions/1 balance board ► making the exercise more difficult (unstable base)
Bring your hand crosswise to your shoulder in push-up position ► Shoulder tap push up position
Power
Individual work


Push-up position (high support, face/look down), bring one hand crosswise to the shoulder. Switch sides after each exercise.
Attention:
Head, torso, hips and knees practically form a line (do not stretch your buttocks upwards or let them sag, tense your stomach).
Lighten:
Just hold the basic position (push-up position); place your knees on the floor.
Harden:
Additional weight (on your back or arms); unstable base.
2 weight cuffs/1 weight vest/weight disc/sandbag ► Make the exercise more difficult (additional weight)
1-2 balance cushions/1 balance board ► Make the exercise more difficult (unstable surface)
Bring hand and foot together crosswise while standing
Power
Individual work


Stand upright on the balls of your feet, shoulder-width apart, alternately lift one foot while hopping and touch it with your hand crosswise in front of your body at hip level.
Attention:
Do not put your heels down completely (keep jumping on your toes).
Lighten:
Lift your foot less (possibly without touching it with your hand).
Harden:
Lift your foot higher; additional weight (on your legs).
2 weight cuffs/1 weight waistcoat ► Make the exercise more difficult (additional weight)
Bring hand and foot together crosswise in four-footed stance backwards alternating ► toe tap / toe touch
Power
Individual work
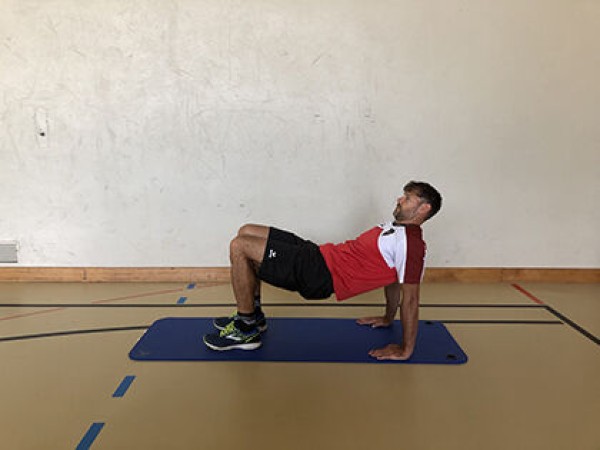

Inverted four-foot stance (chest pointing upwards, body supported on hands and feet, fingertips pointing forwards). Raise one arm and one leg crosswise and bring the hand and foot together. Switch sides after each exercise.
Lighten:
Just hold the position or raise your arm and leg only slightly (without bringing your hand and foot together).
Harden:
Additional weight.
2-4 weight cuffs/1 weight waistcoat ► Make the exercise more difficult (additional weight)
Bring hand and foot together crosswise in push-up position ► mountain climber toe touch / toe tap (climber tap)
Power
Individual work


Push-up position (high support, face/gaze downwards), bring one hand and one foot together crosswise, keeping the arm stretched and the leg bent (knee approximately at chest height). Switch sides after each exercise.
Attention:
Keep your upper body as stable as possible (tense your stomach).
Lighten:
Just hold the basic position (push-up position).
Harden:
Additional weight on arms and legs; unstable base.
Variant:
Cross your elbows to your knees.
2-4 weight cuffs ► Make the exercise more difficult (additional weight)
1-2 balance cushions ► Make the exercise more difficult (unstable base)
Bring hand and knee together in lateral forearm support (left) ► knee raise lateral pillar bridge / side bridge
Power
Individual work


Side support on the (right) forearm (possibly on a wall for the correct straight position), bring the upper hand (or elbow) and upper knee together (approximately at the level of the navel) and back to the starting position.
Attention:
Head, torso, hips and knees practically form a line (pelvis does not tilt backwards or forwards), keep the shoulder above the elbow.
Lighten:
Place the lower knee on the floor; bend the leg less; only hold the position.
Harden:
Additional weight for the arm and/or training leg; unstable base (possible for both the supporting arm and the supporting leg).
2 weight cuffs/1 weight ball/dumbbell ► Make the exercise more difficult (additional weight)
1 ball/1-2 balance cushions/1 balance board ► Make the exercise more difficult (unstable surface)
Bring hand and knee together in lateral forearm support (right) ► knee raise lateral pillar bridge / side bridge
Power
Individual work

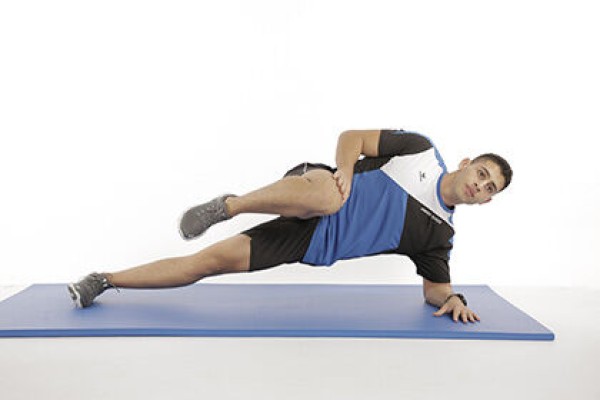
Side support on the (left) forearm (possibly on a wall for the correct straight position), bring the upper hand (or elbow) and upper knee together (approximately at the level of the navel) and back to the starting position.
Attention:
Head, torso, hips and knees practically form a line (pelvis does not tilt backwards or forwards), keep the shoulder above the elbow.
Lighten:
Place the lower knee on the floor; bend the leg less; only hold the position.
Harden:
Additional weight for the arm and/or training leg; unstable base (possible for both the supporting arm and the supporting leg).
2 weight cuffs/1 weight ball/dumbbell ► Make the exercise more difficult (additional weight)
1 ball/1-2 balance cushions/1 balance board ► Make the exercise more difficult (unstable surface)
Move hand to heel in supine position alternating ► heel touch / heel tap
Power
Individual work

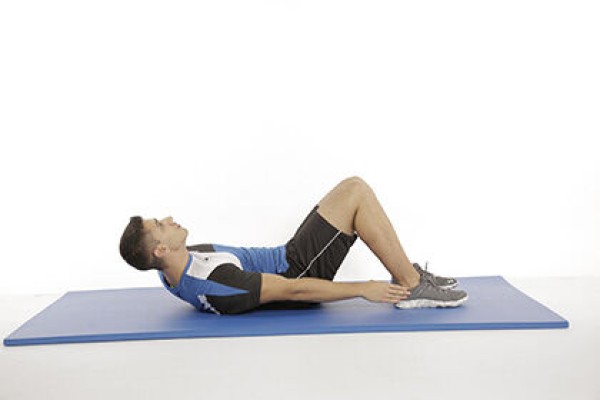
Lie on your back with your legs bent (feet also bent or flat on the floor), arms outstretched and slightly raised next to your body, hands alternately on your left and right heels (tilt your upper body sideways).
Attention:
Do not lower your shoulders completely (constant tension).
Lighten:
Lower your hands forward; only hold the centre position with your upper body raised.
Harden:
Hold additional weight on your arms/in your hands.
2 weight cuffs/weight balls/dumbbells ► Make the exercise more difficult (additional weight)
Bring hand to shoulder crosswise in push-up position alternating ► biceps curl push up position
Power
Individual work


In the push-up position, hold a dumbbell in each hand and alternately move one dumbbell to the opposite shoulder by bending one arm (return to the push-up position in between).
Caution:
Keep the torso stable and don't let it sag (actively tense the torso muscles).
Lighten:
Less weight.
Harden:
More weight; additional weight (on the back).
Variant:
Combine exercise with push-ups (i.e. bend and stretch left arm, push-up, bend and stretch right arm, push-up, etc.).
2 dumbbells
1 weight vest/weight disc/sandbag ► Make the exercise more difficult (additional weight)
Handball
Games / Tournament
Game idea:
Two teams with several outfield players and a goalkeeper each throw the ball into the opponent's goal through skilful attacking. Good defensive behaviour should prevent the opponent from scoring goals.
Scoring:
A goal is scored when the ball crosses the opponent's goal line in its entirety.
Playing field:
Handball field (20mx45m) with goal circle.
Number of participants:
7 against 7 (6 outfield players plus 1 goalkeeper).
Playing rules:
The game is started by a kick-off by one team in the centre of the field. The ball carrier may take a maximum of three steps with the ball in his hands. In order to move, the ball must therefore be bounced or passed to each other. If a player is in possession of the ball, he may catch the ball a maximum of two times. If the ball is picked up after being bounced, it may not be bounced again. The ball may not be held in the hands for longer than 3 seconds and may not touch the body below the knees ("foot rule").
It is forbidden to snatch or knock away the held ball. It is also prohibited to hold the opponent by the body or clothing. Such fouls result in a free throw at the place of the incident. If the foul occurs between the free-throw line and the goal circle, the free throw is taken from the free-throw line. No attacking player may be between the free-throw line and the goal circle when the free-throw is taken. If the foul prevents a clear scoring opportunity, a 7m throw is awarded (direct goal kick from the 7m line; the front foot must not be moved).
The goal circle may not be entered by the field players. However, jumping into the goal circle is permitted, provided the ball is played/thrown before touching the ground. The goalkeeper may move freely within the goal circle and prevent hits with all limbs.
If the ball leaves the pitch over the touchlines, the ball is returned into play by the opposing team with a throw-in (normal pass with the front foot on the line). If the ball crosses the baseline, a throw-in is taken by the goalkeeper (exception: a defender touches the ball before it leaves the pitch over the baseline; in this case, a throw-in is taken in the respective corner of the pitch by an attacker).
After a goal, the right to attack changes. The kick-off is taken in the centre of the field by the team that scored the goal.
Handball: 7 against 4
Forms of play / exercises
7 against 4
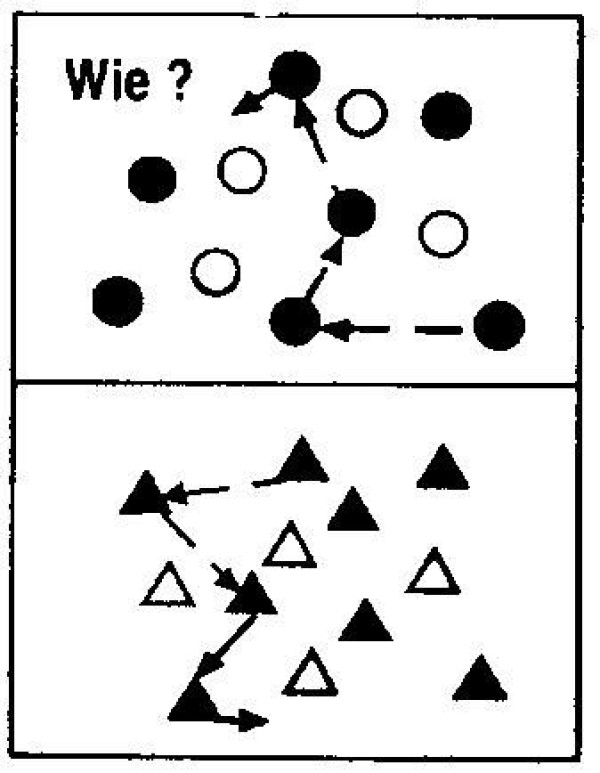
On two or more pitches, 7 attackers play against 4 defenders. The attackers try to play 20 passes, for example. The defenders simultaneously aim to touch an attacker who is in possession of the ball. If they succeed, the game starts again. Change function after 5 attempts.
Objective: free running, precise passing, cover work, anticipation.
Pitch:
4 armbands / covers
1 handball
Handball: Rolling goals
Forms of play / exercises
2 Teams

Both teams (4-6 players) have a rolling goal (ball track, Swedish box). The goalkeeper can kick this goal around freely. The game is played with a ball. The aim is to put the ball into the moving goal. The handball rules apply. The own goal may not be defended with the body. The court can also be divided into several playing fields.
Objective: Orientation in space
Pitch:
4 armbands / covers
1 handball
Handball: Slalom and goal scoring
Forms of play / exercises
Group work
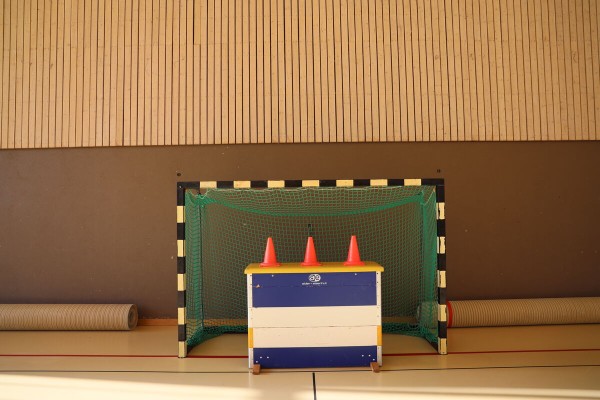
The participants bounce the ball through a slalom course consisting of marker cones and then take a shot on goal (jump shot or core shot) from a defined line.
Additional strengthening task:
Those who do not hit the target complete a strength exercise: 20x knee lift on the spot (skipping)
1 vaulting box
3 marking cones
6-8 colouring sticks
2-4 handballs (depending on the number of participants)
Handball: Stressball
Forms of play / exercises
2 teams of 4-6 players each

Two teams of 4-6 players each play handball against each other. The game continues seamlessly after goals are scored. The goalkeeper has 2-3 additional balls for this purpose.
Objective: High intensity; increasing the load
Pitch:
6 armbands / covers
1 handball
2 goals
Handball: Goal area egg laying
Forms of play / exercises
2 teams of 4-5 players each

Two teams of 4-5 players each try to place the ball in the opponent's goal area or behind the opponent's baseline. If the ball carrier is touched, he must pass the ball and can no longer score.
Objective: Run free, offer yourself, take advantage of the surplus situation
Variant:
A joker supports the team in possession of the ball
Pitch:
4-5 armbands / covers
1 handball
Place your hands further forward than your shoulders in a push-up position ► extended plank hold
Power
Individual work
Push-up position, but with hands placed well in front of the shoulders (10–30 cm or more, depending on your level). Arms are straight, elbows ‘soft’, legs also straight, feet hip-width apart or closer together. Abdomen, buttocks and legs actively tensed. Push actively from the shoulders (protraction), maintain a straight body line as far as possible (head in a neutral position – gaze towards the floor) and continue to breathe calmly.
Attention:
Avoid arching your back too much, do not let your shoulders slump or sag, do not raise your hips too high (compensatory movement), do not lean forward too far without control, do not overextend your elbows, and do not lift your head or look straight ahead.
Lighten:
Place your hands further back or simply hold a push-up position (high plank); keep your knees on the floor (knee plank); place your hands on a raised surface (e.g. a bench or box); widen your stance.
Harden:
Move your hands further forward; bring your feet closer together; shift your weight onto your back: hold the position on one leg, one arm, or with an arm and leg crossed; move dynamically forwards and backwards; transition into a proper planche lean (hands remain under the shoulders, but actively lean your body forwards).
1 Weight vest/weight plate ► To make the exercise more challenging (additional weight)