Exercises (1874)
Rotation of the upper body while standing ► standing upper body rotation
Power
Individual work


Stand upright, hold the assault rifle at shoulder height with arms almost outstretched, barrel pointing to the side (or down/up), move/rotate the assault rifle (including upper body) from one side to the other.
Attention:
Tense stomach, straight back, pelvis remains in place and only the upper body moves.
Harden:
Smaller movements (less rotation).
1 assault rifle (neutralised)
Rotation of the upper body while standing ► standing upper body rotation
Power
Individual work


Stand upright, hold an object (e.g. combat backpack or weight disc) at chest height with your arms almost outstretched in front of your body, move your arms from side to side (rotate your upper body left/right).
Attention:
Tighten your stomach, straight back, pelvis remains in place and only the upper body moves.
Lighten:
Less weight/load.
Harden:
More weight/greater load.
1 combat rucksack/weight plate
1-2 PET bottles (1.5 litres)/1 helmet ► Make the exercise easier
1 tyre (PUCH)/sandbag ► Make the exercise more difficult (additional weight)
Rotation of the upper body while standing ► standing upper body rotation
Power
Individual work


Stand upright, hold the weight disc in front of your body at chest height with your arms almost outstretched, move your arms from side to side (rotate your upper body left/right).
Attention:
Tighten your stomach, keep your back straight, keep your pelvis in place and only move your upper body.
Lighten:
Less weight.
Harden:
More weight.
1 weight disc
Rotation of the upper body in forearm support ► rotational pillar bridge
Power
Individual work


Underarm support, lift one arm off the floor and hold it vertically upwards (twisting the upper body/forming an arc with the arm), the upper body follows the movement of the arm and the gaze is directed upwards. Switch sides for the next exercise.
Attention:
Head, torso, hips and knees form a line (do not stretch your buttocks upwards or let them sag, tense your stomach).
Lighten:
Knees on the floor.
Harden:
Additional weight (for the arms); unstable surface (for the legs).
Variant:
Exercise performed in the push-up position (it is also possible to change position between forearm support and push-up position).
2 weight cuffs ► to make the exercise more difficult (additional weight)
1 ball/balance cushion/balance board ► to make the exercise more difficult (unstable surface)
Rotation of the upper body in forearm support ► rotational pillar bridge
Power
Individual work


Underarm support, place the pistol between the hands, grasp the pistol with one hand, lift the respective arm and raise it vertically upwards (turn the upper body out/execute an arc with the arm), the upper body follows the movement of the arm and the gaze is directed upwards. Switch sides for the next repetition.
Attention:
Head, torso, hips and knees form a line (do not stretch your buttocks upwards or let them sag, tense your stomach).
Lighten:
Knees on the floor.
Harden:
Stable base for the legs.
Variant:
Exercise performed in the push-up position
1 pistol (neutralised)
1 ball/balance cushion/balance board ► Make the exercise more difficult (unstable surface)
Rotation of the upper body in knee bend position ► bent knee hand over
Power
Partner work


Both participants stand back to back with their knees bent (approx. 90 degrees), both exercisers turn their upper body to the same side (one left rotation and one right rotation) and alternately hand each other a weighted/medicine ball. The direction of movement is changed from time to time.
Lighten:
Without ball (hands touching); lighter ball.
Harden:
Heavier object; additional weight (on the thighs).
1 weight ball/medicine ball
1 ball (e.g. volleyball/football/basketball) ► Make the exercise easier
1 weight ball/medicine ball/weight disc/sandbag ► Make the exercise more difficult (additional weight)
Rotation of the upper body in push-up position alternating ► rotation push up position
Power
Individual work


Push-up position, hands resting on an object (e.g. helmet), legs slightly wider than hip-width, alternately raise one arm vertically upwards in an arching motion, turning the body sideways, gaze following the outstretched arm.
Attention:
Head, torso, hips and knees practically form a line (do not stretch your buttocks upwards or let them sag, tense your stomach).
Lighten:
Support your knees on the floor (feet held high).
Harden:
Additional weight for the arm (place the weight in front of the helmet when bringing the arm back, place both hands on the helmet, grasp the weight with the other hand to perform the exercise on the other side).
Variant:
Place your feet on the object (push-up position or forearm support).
1 helmet
2 weight cuffs/1 PET bottle (1.5 litres)/dumbbell ► Make the exercise more difficult (additional weight)
Rotation of the upper body in supine position ► anti-rotation
Power
Partner work


Trainee: Lying on their back with their legs bent and closed, arms stretched straight out in front (upwards) at chest height and palms pressed firmly against each other, intercept the rotational movement triggered by the partner and guide the arms and legs back to the starting position.
Partner: Pushes the arms and legs of the active participant alternately or in random order to the side (intensity can be varied)
No material required
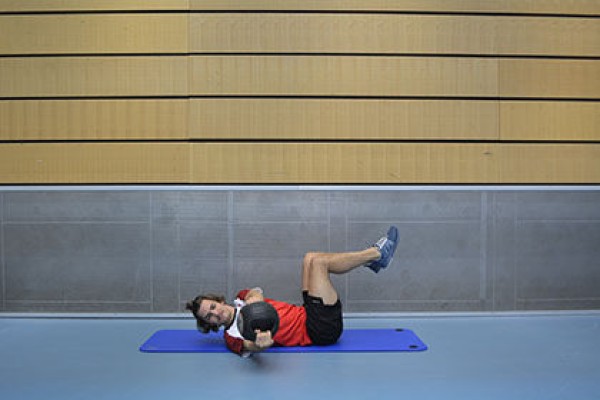
Rotation of the upper body in supine position ► upper body rotation dead bug
Power
Individual work


Lying on your back, legs bent on the floor, exercise ball with arms outstretched in front of you (ball centre at eye level), move the exercise ball from one side to the other (left and right rotation of the upper body).
Attention:
Keep your head in a neutral position (no double chin).
Lighten:
Lower the exercise ball less to the side.
Harden:
Additional weight for the arms.
Variation:
Legs bent in a high position.
1 exercise ball
2 weight cuffs ► to make the exercise more difficult (additional weight)
Rotation of the upper body in supine position ► upper body rotation dead bug
Power
Individual work

Supine position, legs bent and held high (approximately 90 degrees at the knee joint, lower legs parallel to the floor), weight held out in front of you (chest height) with outstretched arms, move outstretched arms/weight from one side to the other (left/right rotation of the upper body - always looking towards the weight).
Attention:
Keep your back in contact with the floor (consciously tense your abdomen).
Lighten:
Lower the weight less to the side; place your feet on the floor; do not hold any additional weight in your hands.
Harden:
More weight.
1 weight disc/dumbbell/kettlebell
Rotation of the upper body with lifting of one arm and leg from a four-footed stance ► break dancer
Power
Individual work


Four-foot stance (high support with bent legs, face/gaze downwards), stretch one leg out to the side under the body and at the same time turn the upper body out and stretch the arm backwards and upwards (chest pointing diagonally upwards), bring the arm and leg back to the starting position. Switch sides after each exercise.
Attention:
Do not lift your buttocks too high or allow them to sag (tighten your stomach).
Lighten:
Just hold the starting position (four-foot stance); rotate your upper body less.
Harden:
Add weight to your arms and/or legs.
2-4 weight cuffs ► Make the exercise more difficult (additional weight)
Rotation of the upper body with extension and flexion of the arm while standing (left)
Power
Individual work


Stand upright, slightly turned to the side (right leg in front), arms bent and held high (elbows pointing downwards at chest height), extend the rear (left) arm forwards (hand edge downwards) and simultaneously turn the upper body (to the right), rotate the upper body as far as possible (outstretched arm 90 degrees to the front standing leg) and return to the starting position.
Attention:
Always keep your arms raised (hands at shoulder height).
Lighten:
smaller movements (less rotation).
Harden:
additional weight (on the arm(s), hold in the hand(s) or hold with both hands and stretch/flex both arms at the same time).
Variant:
Hold an additional weight (e.g. weight disc or dumbbell) in both hands and extend/flex the arms simultaneously while rotating the upper body.
2 weight cuffs/weight balls/dumbbells ► Make the exercise more difficult (additional weight)
1 weight disc ► Variation of the exercise
Rotation of the upper body with extension and flexion of the arm while standing (right)
Power
Individual work


Stand upright, slightly turned to the side (left leg in front), arms bent and held high (elbows pointing downwards at chest height), extend the back (right) arm forwards (hand edge downwards) and simultaneously turn the upper body (to the left), rotate the upper body as far as possible (outstretched arm 90 degrees to the front standing leg) and return to the starting position.
Attention:
Always keep your arms raised (hands at shoulder height).
Lighten:
smaller movements (less rotation).
Harden:
additional weight (on the arm(s), hold in the hand(s) or hold with both hands and stretch/flex both arms at the same time).
Variant:
Hold an additional weight (e.g. weight disc or dumbbell) in both hands and extend/flex the arms simultaneously while rotating the upper body.
2 weight cuffs/weight balls/dumbbells ► Make the exercise more difficult (additional weight)
1 weight disc ► Variation of the exercise
Rotation of the upper body with outstretched arms ► standing upper body rotation
Power
Individual work
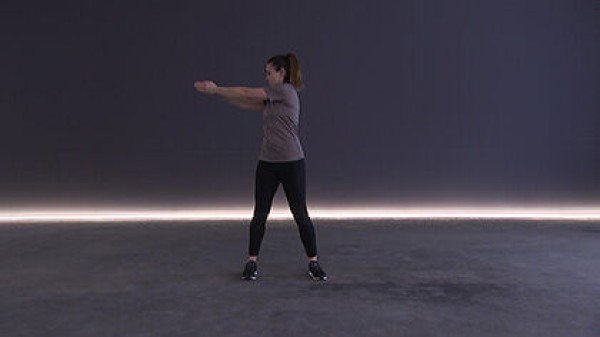

Stand upright, legs slightly wider than shoulder-width apart, arms outstretched in front of you (palms pressed together), move your upper body (arms) as far as possible from one side to the other.
Attention:
Always keep your arms in front of you (shoulder height).
Lighten:
Smaller movements (less rotation).
Harden:
Additional weight (hold on the arms or in the hands); unstable base.
2 weight cuffs/weight balls/1 weight disc/medicine ball/1-2 dumbbells ► Make the exercise more difficult (additional weight)
1-2 balance cushions/1 balance board ► Make the exercise more difficult (unstable surface)
Rotation of the upper body with legs crossed in push-up position ► twist push-up position
Power
Individual work


Push-up position (high support, face/look down), extend one leg under the body (crosswise) to the other side. Switch sides after each exercise.
Attention:
Stay stable (tense your stomach).
Lighten:
Just hold the basic position (push-up position); rotate your upper body less.
Harden:
Additional weight on the legs; unstable support for the arms.
Variant:
Underarm support (instead of push-up position).
2 weight cuffs ► to make the exercise more difficult (additional weight)
1 balance cushion/balance board ► to make the exercise more difficult (unstable surface)
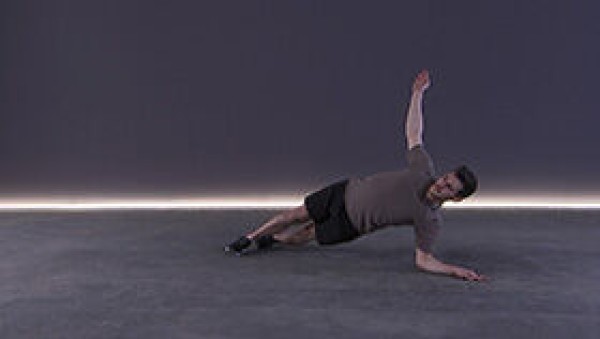
Rotate the upper body and move the lower leg forwards in side plank (left) ► side plank crunch
Power
Individual work


Side support with outstretched (left) arm, the other arm bent and the hand placed next to the nearer ear, the body weight is supported only by the foot of the upper leg (right) and the arm (left), the other leg (left) is held slightly raised in front of the foot placed on the floor. Tighten the lower leg (left) and at the same time rotate/turn the upper body so that the elbows and knees are brought together crosswise. Then return to the starting position (straighten the leg again, rotate/turn the upper body back out).
Attention:
Head, torso, hips and knees practically form a line in the starting position (pelvis does not tilt backwards or forwards), keep the shoulder above the elbow; do not fully lower the free leg.
Lighten:
Lower the free leg (without bringing the elbow and knee together); lower the free leg after each movement; only hold the starting position.
Harden:
Additional weight (for the free leg).
Variation:
Lower foot placed on the floor with the outside instep and the upper leg brought to the elbow (free leg).
1 weight cuff/weight waistcoat ► Make the exercise more difficult (additional weight)
Rotate the upper body and move the lower leg forwards in side plank (right) ► side plank crunch
Power
Individual work


Side support with outstretched (right) arm, the other arm bent and the hand placed next to the nearer ear, the body weight is supported only by the foot of the upper leg (left) and the arm (right), the other leg (right) is held slightly raised in front of the foot placed on the floor. Tighten the lower leg (right) and at the same time rotate/turn the upper body so that the elbows and knees are brought together crosswise. Then return to the starting position (straighten the leg again, rotate/untwist the upper body back).
Attention:
Head, torso, hips and knees practically form a line in the starting position (pelvis does not tilt backwards or forwards), keep the shoulder above the elbow; do not fully lower the free leg.
Lighten:
Lower the free leg (without bringing the elbow and knee together); lower the free leg after each movement; only hold the starting position.
Harden:
Additional weight (for the free leg).
Variation:
Lower foot placed on the floor with the outside instep and the upper leg brought to the elbow (free leg).
1 weight cuff/weight waistcoat ► Make the exercise more difficult (additional weight)
Back turning
Fighting and roughhousing games
Partner work

Two participants kneel down in the centre of a mat/grass field and grab each other by the shoulders. Both participants try to push and pull their opponent onto the mat/ground with their backs. The participant who first touches the mat/turf with both shoulders at the same time loses.
4-6 soft mats (small) ► indoor version
4 cones ► outdoor version
Indoor post set-up:
Using soft mats to form a rectangular field of mats.
Outdoor post set-up:
Using cones to define a rectangular field.
Back thrust
Fighting and roughhousing games
Partner work
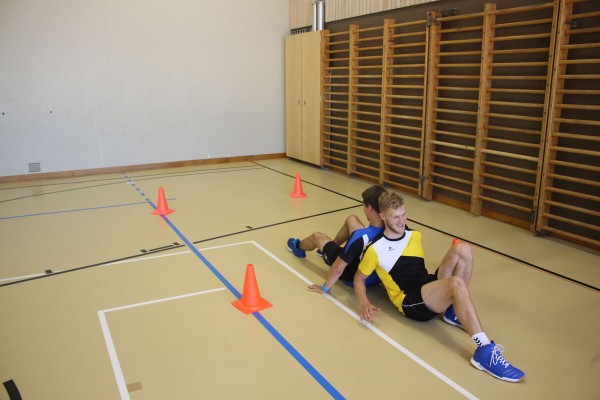
Two participants sit back to back on a centre line marked with cones. On command, both participants try to push their opponent over their baseline (marked with cones). The first person to cross their own line with their whole body loses.
6 marking cones/caps (optional) ►Playing field markings
Post setup:
Place the caps in a rectangle so that they define the centre line and two baselines of the playing field.
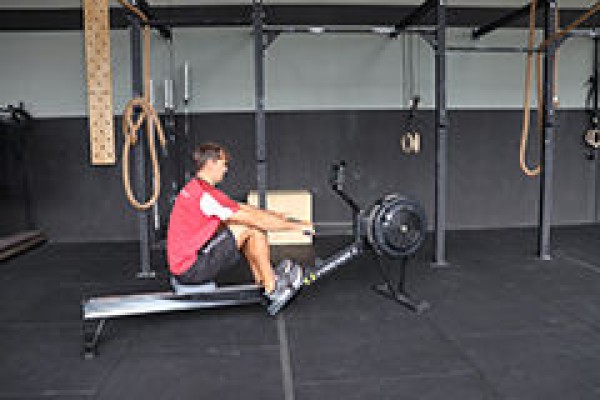
Rowing (m: 1000m/1km - 80cal; w: 800m - 60cal) ► row
Power
Individual work


Sitting with your legs bent and arms stretched forwards, first push off and stretch your legs, then pull your arms towards your head with your upper body leaning slightly backwards. Return to the starting position in exactly the opposite way: first stretch your arms, then move your upper body forwards and finally pull your legs forwards. In theory, the rowing movement sequence sounds complicated, but many of the individual movement sequences are already performed correctly unconsciously:
Starting position:
Upper body bent forwards towards the thighs.
Back muscles relaxed.
Lower back straight, upper back (trapezius muscle) may make a slight hump.
Arms stretched (triceps remain relaxed).
Tummy muscles slightly tensed.
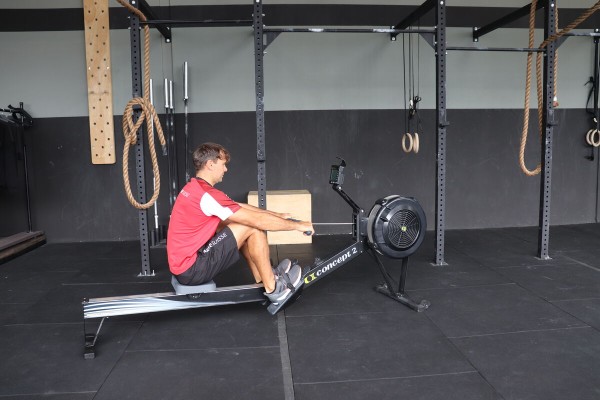
Starting the pull-through:
Legs lead the movement by stretching them.
At the same time as stretching your legs, slightly tense your lower back and bring it into a straight position.
The phase ends when your legs are almost fully extended.
Middle phase of the pull-through:
From this phase, the upper body also comes into play.
The arms and back now dictate the movement, with both parts of the body being pulled backwards almost simultaneously (between the chest and belly button). The strength comes from the back and not the arms.
The abdominal muscles and thigh muscles remain tensed the whole time.
The phase ends with the upper body leaning slightly backwards and the arms slightly raised. The back shoulder is already working slightly.
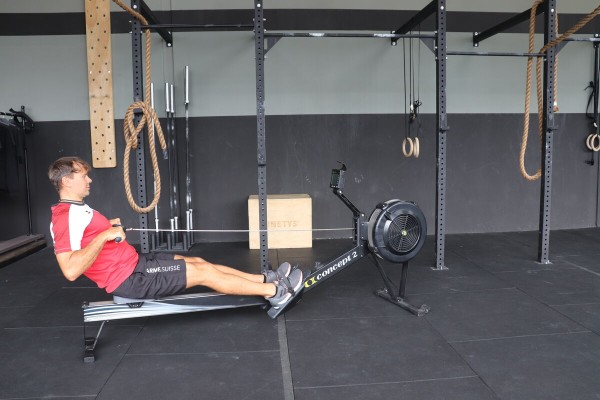
Final move:
Pull your arms completely towards your body.
The upper body leans back a little further in the same move. The back shoulder is now even more involved.
Tighten all the muscles involved (buttocks, thighs, abdomen, arms and shoulders).
Rolling:
Arms lead the way.
Stretch your arms forwards again. The upper body and legs follow the arms.
The buttocks pull the seat forwards.
The phase ends in the starting position.
1 rowing machine
Rudern (m: 1250m/1.25km - 100kal; w: 1000m/1km - 75kal) ► row
Power
Individual work


Sitting with your legs bent and arms stretched forwards, first push off and stretch your legs, then pull your arms towards your head with your upper body leaning slightly backwards. Return to the starting position in exactly the opposite way: first stretch your arms, then move your upper body forwards and finally pull your legs forwards. In theory, the rowing movement sequence sounds complicated, but many of the individual movement sequences are already performed correctly unconsciously:
Starting position:
Upper body bent forwards towards the thighs.
Back muscles relaxed.
Lower back straight, upper back (trapezius muscle) may make a slight hump.
Arms stretched (triceps remain relaxed).
Tummy muscles slightly tensed.
Starting the pull-through:
Legs lead the movement by stretching them.
At the same time as stretching your legs, slightly tense your lower back and bring it into a straight position.
The phase ends when your legs are almost fully extended.
Middle phase of the pull-through:
From this phase, the upper body also comes into play.
The arms and back now dictate the movement, with both parts of the body being pulled backwards almost simultaneously (between the chest and belly button). The strength comes from the back and not the arms.
The abdominal muscles and thigh muscles remain tensed the whole time.
The phase ends with the upper body leaning slightly backwards and the arms slightly raised. The back shoulder is already working slightly.
Final move:
Pull your arms completely towards your body.
The upper body leans back a little further in the same move. The back shoulder is now even more involved.
Tighten all the muscles involved (buttocks, thighs, abdomen, arms and shoulders).
Rolling:
Arms lead the way.
Stretch your arms forwards again. The upper body and legs follow the arms.
The buttocks pull the seat forwards.
The phase ends in the starting position.
1 rowing machine
Rowing (m: 125m - 10cal; w: 100m - 7cal) ► row
Power
Individual work


Sitting with your legs bent and arms stretched forwards, first push off and stretch your legs, then pull your arms towards your head with your upper body leaning slightly backwards. Return to the starting position in exactly the opposite way: first stretch your arms, then move your upper body forwards and finally pull your legs forwards. In theory, the rowing movement sequence sounds complicated, but many of the individual movement sequences are already performed correctly unconsciously:
Starting position:
Upper body bent forwards towards the thighs.
Back muscles relaxed.
Lower back straight, upper back (trapezius muscle) may make a slight hump.
Arms stretched (triceps remain relaxed).
Tummy muscles slightly tensed.
Starting the pull-through:
Legs lead the movement by stretching them.
At the same time as stretching your legs, slightly tense your lower back and bring it into a straight position.
The phase ends when your legs are almost fully extended.
Middle phase of the pull-through:
From this phase, the upper body also comes into play.
The arms and back now dictate the movement, with both parts of the body being pulled backwards almost simultaneously (between the chest and belly button). The strength comes from the back and not the arms.
The abdominal muscles and thigh muscles remain tensed the whole time.
The phase ends with the upper body leaning slightly backwards and the arms slightly raised. The back shoulder is already working slightly.
Final move:
Pull your arms completely towards your body.
The upper body leans back a little further in the same move. The back shoulder is now even more involved.
Tighten all the muscles involved (buttocks, thighs, abdomen, arms and shoulders).
Rolling:
Arms lead the way.
Stretch your arms forwards again. The upper body and legs follow the arms.
The buttocks pull the seat forwards.
The phase ends in the starting position.
1 rowing machine
Rowing (m: 2000m/2km - 160cal; w: 1600m/1.6km - 128cal) ► row
Power
Individual work


Sitting with your legs bent and arms stretched forwards, first push off and stretch your legs, then pull your arms towards your head with your upper body leaning slightly backwards. Return to the starting position in exactly the opposite way: first stretch your arms, then move your upper body forwards and finally pull your legs forwards. In theory, the rowing movement sequence sounds complicated, but many of the individual movement sequences are already performed correctly unconsciously:
Starting position:
Upper body bent forwards towards the thighs.
Back muscles relaxed.
Lower back straight, upper back (trapezius muscle) may make a slight hump.
Arms stretched (triceps remain relaxed).
Tummy muscles slightly tensed.
Starting the pull-through:
Legs lead the movement by stretching them.
At the same time as stretching your legs, slightly tense your lower back and bring it into a straight position.
The phase ends when your legs are almost fully extended.
Middle phase of the pull-through:
From this phase, the upper body also comes into play.
The arms and back now dictate the movement, with both parts of the body being pulled backwards almost simultaneously (between the chest and belly button). The strength comes from the back and not the arms.
The abdominal muscles and thigh muscles remain tensed the whole time.
The phase ends with the upper body leaning slightly backwards and the arms slightly raised. The back shoulder is already working slightly.
Final move:
Pull your arms completely towards your body.
The upper body leans back a little further in the same move. The back shoulder is now even more involved.
Tighten all the muscles involved (buttocks, thighs, abdomen, arms and shoulders).
Rolling:
Arms lead the way.
Stretch your arms forwards again. The upper body and legs follow the arms.
The buttocks pull the seat forwards.
The phase ends in the starting position.
1 rowing machine
Rowing (m: 200m - 15cal; w: 150m - 12cal) ► row
Power
Individual work

Sitting with your legs bent and arms stretched forwards, first push off and stretch your legs, then pull your arms towards your head with your upper body leaning slightly backwards. Return to the starting position in exactly the opposite way: first stretch your arms, then move your upper body forwards and finally pull your legs forwards. In theory, the rowing movement sequence sounds complicated, but many of the individual movement sequences are already performed correctly unconsciously:
Starting position:
Upper body bent forwards towards the thighs.
Back muscles relaxed.
Lower back straight, upper back (trapezius muscle) may make a slight hump.
Arms stretched (triceps remain relaxed).
Tummy muscles slightly tensed.
Starting the pull-through:
Legs lead the movement by stretching them.
At the same time as stretching your legs, slightly tense your lower back and bring it into a straight position.
The phase ends when your legs are almost fully extended.
Middle phase of the pull-through:
From this phase, the upper body also comes into play.
The arms and back now dictate the movement, with both parts of the body being pulled backwards almost simultaneously (between the chest and belly button). The strength comes from the back and not the arms.
The abdominal muscles and thigh muscles remain tensed the whole time.
The phase ends with the upper body leaning slightly backwards and the arms slightly raised. The back shoulder is already working slightly.
Final move:
Pull your arms completely towards your body.
The upper body leans back a little further in the same move. The back shoulder is now even more involved.
Tighten all the muscles involved (buttocks, thighs, abdomen, arms and shoulders).
Rolling:
Arms lead the way.
Stretch your arms forwards again. The upper body and legs follow the arms.
The buttocks pull the seat forwards.
The phase ends in the starting position.
1 rowing machine
Rowing (m: 250m - 20cal; w: 200m - 15cal) ► row
Power
Individual work


Sitting with your legs bent and arms stretched forwards, first push off and stretch your legs, then pull your arms towards your head with your upper body leaning slightly backwards. Return to the starting position in exactly the opposite way: first stretch your arms, then move your upper body forwards and finally pull your legs forwards. In theory, the rowing movement sequence sounds complicated, but many of the individual movement sequences are already performed correctly unconsciously:
Starting position:
Upper body bent forwards towards the thighs.
Back muscles relaxed.
Lower back straight, upper back (trapezius muscle) may make a slight hump.
Arms stretched (triceps remain relaxed).
Tummy muscles slightly tensed.
Starting the pull-through:
Legs lead the movement by stretching them.
At the same time as stretching your legs, slightly tense your lower back and bring it into a straight position.
The phase ends when your legs are almost fully extended.
Middle phase of the pull-through:
From this phase, the upper body also comes into play.
The arms and back now dictate the movement, with both parts of the body being pulled backwards almost simultaneously (between the chest and belly button). The strength comes from the back and not the arms.
The abdominal muscles and thigh muscles remain tensed the whole time.
The phase ends with the upper body leaning slightly backwards and the arms slightly raised. The back shoulder is already working slightly.
Final move:
Pull your arms completely towards your body.
The upper body leans back a little further in the same move. The back shoulder is now even more involved.
Tighten all the muscles involved (buttocks, thighs, abdomen, arms and shoulders).
Rolling:
Arms lead the way.
Stretch your arms forwards again. The upper body and legs follow the arms.
The buttocks pull the seat forwards.
The phase ends in the starting position.
1 rowing machine