Exercises (1874)
Rotation of the upper body while seated ► oblique crunch / rotational crunch
Power
Individual work
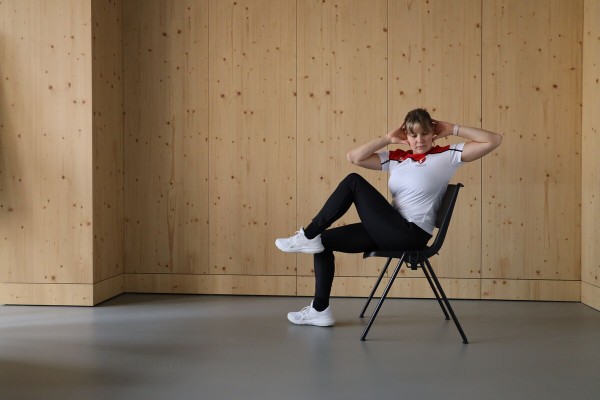
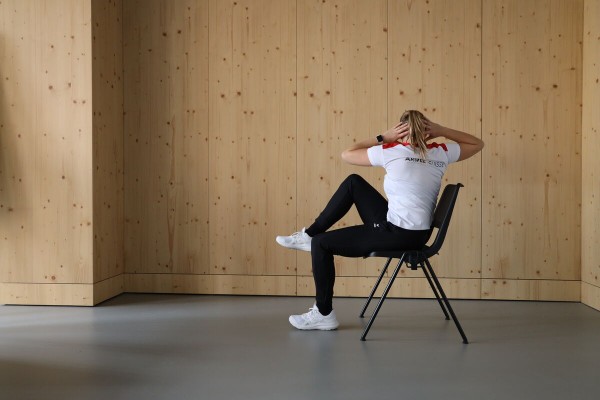
Sitting upright on a chair, cross your arms behind your head or place your hands on either side of your ear (elbows pointing to the side). Alternately lift one leg off the floor and move the elbow crosswise to the knee (bring it together approximately at the level of the navel). Raise the upper body to the starting position and lower the leg again. Switch sides after each exercise.
1 (office) chair
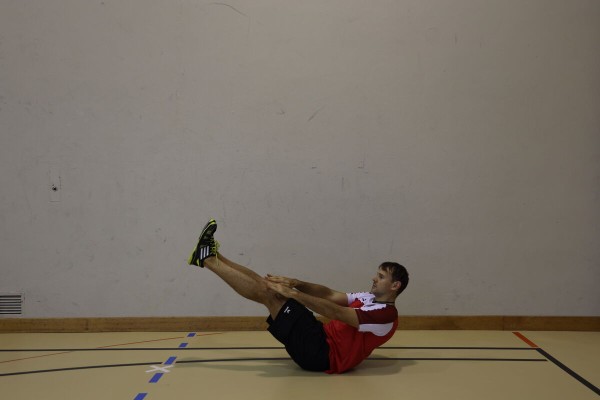
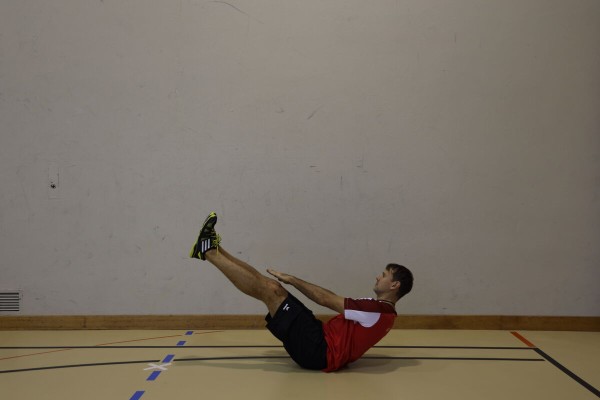
Rotation of the upper body in the seat ► russian twist / sitting twist / oblique twist
Power
Individual work


Sit on the floor, upper body leaning slightly backwards, legs bent and slightly raised, arms outstretched horizontally with the pistol in your hands and alternately bring the weapon sideways to the floor by rotating your upper body.
Caution:
Keep only the buttocks in contact with the floor, keep the upper body straight.
Lighten the load:
Lower the legs to the floor; hold the position only (without moving the upper body).
1 pistol (neutralised)
Rotation of the upper body in the seat ► russian twist / sitting twist / oblique twist
Power
Individual work


Sit on the floor, upper body leaning slightly back, legs bent (heels on the floor or slightly raised), arms bent and hands clasped in front of the chest; rotate the upper body in a controlled manner to the left and right (optionally, touch the floor with your hands at hip height). Aim: controlled trunk rotation whilst maintaining a stable core. Important: The rotation comes from the core, not from the arms.
Attention:
Hunching instead of a stable core posture, momentum instead of controlled rotation, excessive range of motion without control, hips not moving with the body (no isolated rotation), feet hanging loosely without tension (in the advanced version), breath not held.
Lighten:
Keep your feet on the ground; keep your upper body more upright (less forward lean); slower, smaller rotation; keep your heels in place (e.g. by tucking them under something).
Harden:
Add weight to your hands; perform the eccentric phase slowly (deliberately rotating back); hold the position at the end of the rotation (isometric hold); use a longer lever arm (arms straight rather than bent); use an unstable surface under your bottom (e.g. a balance pad).
2 weight cuffs/weight balls/1 (medicine) ball/weight plate/dumbbell ► Increase the difficulty of the exercise (additional weight)
1 balance pad/balance board ► Increase the difficulty of the exercise (unstable surface)
Rotation of the upper body in the seat ► russian twist / sitting twist / oblique twist
Power
Individual work


Sit on the floor, upper body leaning slightly backwards, legs bent and slightly raised, holding an object (e.g. helmet or ball) in your hands and moving from one side to the other (optionally touching the floor with the object at buttock height), the upper body accompanies the movement.
Caution:
Only touch the floor with your buttocks, keep your upper body straight.
Lighten:
Do not hold any additional weight in your hands; put your legs on the floor; only hold the position (without moving your arms).
Lighten:
Additional weight (e.g. place stones in your helmet or hold a rucksack).
1 helmet/(basket, medicine) ball
1 combat rucksack/tyre (PUCH)/3-4 stones ►Make the exercise more difficult (additional weight)
Rotation of the upper body in the seat ► russian twist / sitting twist / oblique twist
Power
Individual work


Sit on the floor, upper body leaning slightly backwards, legs bent and slightly raised, arms holding the (gym/medicine) ball in front of the body, arms (ball) moving from side to side, upper body accompanying the movement.
Attention:
Only keep your buttocks in contact with the floor, keep your upper body straight.
Lighten:
Place your legs on the floor; only hold the position (without moving your arms).
Lighten:
Additional weight on the arms/legs.
1 exercise ball, medicine ball, ball
2-4 weight cuffs ►to make the exercise more difficult (additional weight)
Rotation of the upper body in the seat ► russian twist / sitting twist / oblique twist
Power
Individual work


Sit on the floor, upper body leaning slightly backwards, legs bent and slightly raised, arms with assault rifle in hands stretched out horizontally (barrel pointing to the side or upwards) and by rotating the upper body bring the rifle alternately sideways to the floor.
Caution:
Contact the floor only with the buttocks, keep the upper body straight.
Easier:
Place your legs on the ground; only hold the position (without moving your upper body).
Variant:
Place your feet on the ground; hold the assault rifle with both hands on the hand guard so that the barrel is pointing upwards.
1 assault rifle (neutralised)
Rotation of the upper body in the seat ► russian twist / sitting twist / oblique twist
Power
Individual work


Sit on the floor, upper body leaning slightly backwards, legs bent and slightly raised, holding a medicine ball in your hands, which is alternately thrown to the floor on the left or right side at buttock height. The medicine ball is thrown in a large arc to the other side of the body.
Caution:
Only keep the buttocks in contact with the floor, keep the upper body straight.
Lighten:
Place your legs on the floor; do not hold any additional weight in your hands and only move your arms from side to side.
Heavier:
Add weight.
1 medicine ball
Rotation of the upper body in the seat ► russian twist / sitting twist / oblique twist
Power
Individual work


Sit on the floor, upper body leaning slightly backwards, legs bent and slightly raised, hold the medicine ball at the side of your body, throw the ball with both hands against the inclined mini-trampoline, catch the ball in front of your body and bring it to the other side. Then perform the exercise on the opposite side. The upper body always accompanies the movement (looking towards the ball).
Caution:
Only keep your buttocks in contact with the floor, keep your upper body straight.
Lighten the load:
Place your legs on the floor.
Lighten the load:
Add weight.
1 mini trampoline
1 medicine ball
Rotation of the upper body in the seat ► russian twist / sitting twist / oblique twist
Power
Individual work


Sit on the floor, upper body leaning slightly backwards, legs bent and slightly raised, 2-3 small weight discs (possibly of different weights) are placed next to the buttocks. Rotate the upper body to grasp a weight disc and place it on the other side of the buttocks (the head/gaze accompanies the movement). Then grab the next disc and move it to the other side. As soon as all the weight discs are stacked on top of each other again, the weights are transported back to the starting position.
Caution:
Only keep your buttocks in contact with the floor, keep your upper body straight.
Lighten:
Place your legs on the floor; only rotate your upper body from one side to the other without grabbing weights.
Lighten:
Heavier weight discs.
2-3 weight discs
Rotation of the upper body in the seat ► russian twist / sitting twist / oblique twist
Power
Individual work


Sit on the floor, upper body leaning slightly backwards, legs bent and slightly raised, grasp the weight (dumbbell, kettlebell or weight disc) with bent arms at stomach height, rotate the upper body to move the weight from one side of the body to the other (arm position - approx. 90 degree angle at the elbow joint - remains stable during the exercise).
Attention:
Keep your buttocks in contact with the floor, keep your back straight; always keep your head/gaze straight ahead.
Lighten:
Place your legs on the floor; less or no weight.
Heavier:
More weight.
1 weight disc/dumbbell/kettlebell
Rotation of the upper body in the seat ► seated upper body rotation
Power
Individual work


Sit on the floor, upper body tilted slightly backwards, legs slightly tucked in and heels up, feet in the loops, hold the gymnastics stick on your shoulders behind your head (back of hands pointing backwards), alternately move/rotate your upper body from one side to the other (head follows the movement).
Caution:
Keep your back straight (do not bend forwards).
Easier:
Choose less strong elastic bands; roll up the elastic bands less.
Harder:
Choose stronger elastic bands; roll up the elastic bands more.
1 gymnastic bar with elasticated straps
Rotation of the upper body in the seat ► V with rotation
Power
Individual work
Sit on the floor, legs stretched out and pointing forwards diagonally upwards (V-position), upper body leaning slightly backwards, arms in front (pointing towards the knees). Rotate your upper body to move your arms from one side to the other (upper body accompanies the movement).
Caution:
Only keep your buttocks in contact with the floor, keep your upper body straight.
Lighten:
Place your legs on the floor; only hold the position (without moving your arms).
Lighten:
Hold additional weight in your hands.
Variant:
Legs bent on the floor or held high.
2 weight cuffs/weight balls/1 (medicine) ball/weight disc/dumbbell ► Make the exercise more difficult (additional weight)
Rotation of the upper body while standing
Power
Individual work


A distinction is made between the left-handed and right-handed stance. Right-handers take the left stance (left foot in front), while left-handers take the right stance (right foot in front). The left-hand stance: The left foot is placed one step forwards from a parallel stance approximately shoulder-width apart so that the right hand is behind. The right hand corresponds to the striking hand, the left hand to the leading hand. The distance between the two feet is approximately one shoulder width, with the feet on a diagonal to each other. The front foot stands on the whole sole, the heel of the back foot is raised. Both feet point forwards and the weight is evenly distributed over both legs. The front shoulder is turned slightly inwards. The whole body is slightly crouched, the knees are slightly bent and soft. The striking hand is placed in front of the chin and rests against the body. The lead hand is in front at eye level. The fists point outwards with the back. The arms are in front of the body and the elbows point downwards so that the arms cover the body. Alternately or in a free rhythm, the punching or leading hand is moved forwards in an arc (semi-circle). At the end of the movement (of the punch), the elbow is at shoulder height and the thumb of the fist points at eye level to the face, the forearm is parallel to the floor (sideways hook). The upper body accompanies the (punching) movement.
Attention:
Always keep your arms up (chin or eye level).
Easier:
Smaller movements/lower intensity of the punching movement (less rotation).
Make it harder:
Hold additional weight on the arms or in the hands.
Variation:
Vary the hook punches by also hitting at liver level (instead of just at shoulder level).
2 weight cuffs/weight balls/dumbbells ►Make the exercise more difficult (additional weight)
Rotation of the upper body while standing
Power
Individual work


Stand shoulder-width apart, hold the pole on your shoulders behind your head, your feet are in the loops, your knees are slightly bent and your upper body is tilted forwards with a straight back, alternately move/rotate your upper body from one side to the other (head follows the movement).
Caution:
Keep your back straight (do not bend forwards).
Lighten:
Select less strong elasticated straps; roll up the elasticated straps less.
Heavier:
Select stronger elasticated straps; roll up the elasticated straps more.
1 gymnastic bar with elasticated straps
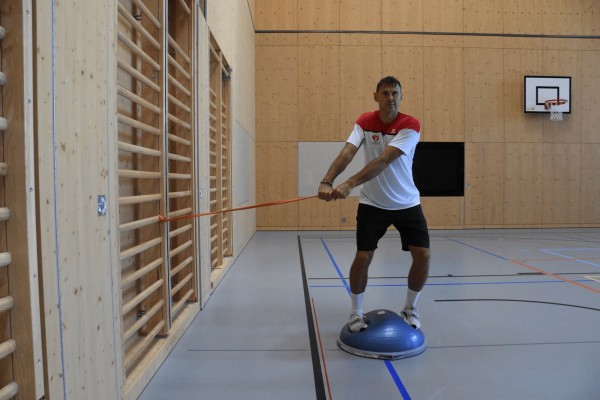
Rotation of the upper body while standing (left) ► standing upper body rotation
Power
Individual work


Attach the elastic band to the wall bars (or a parallel bar/tree, for example) at stomach height, stand shoulder-width apart (90 degree angle) to the side of the wall bars (parallel bar/tree), arms stretched out towards the wall bars (parallel bar/tree), grasp the elastic band with both hands, move the stretched arms at shoulder height to the other (right) side of the body and back to the starting position, keeping the hands closed and the movement taking place exclusively in the upper body.
Attention:
The arms are guided to the other side by the torso rotation (the arms remain stable).
Lighten:
Select an elastic band with less resistance.
Heavier:
Select an elastic band with greater resistance.
1 elasticated rubber band
1 wall bars/bars/tree
Rotation of the upper body while standing (left) ► standing upper body rotation
Power
Individual work
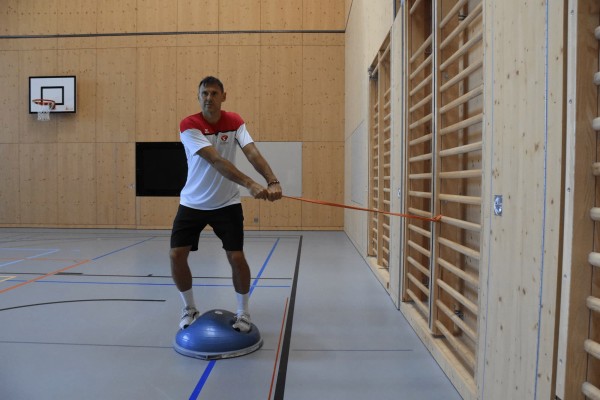

Rubber band at stomach/hip or shin height attached to the wall bars/ parallel bars (or e.g. to a tree) attached to the wall bars/bars (or a tree, for example), stand hip-width apart on a balance cushion at the side (90 degree angle) to the wall bars/tree, arms stretched out towards the wall bars/tree, grasp the elastic band with both hands, move the stretched arms diagonally upwards to shoulder height to the other (right) side of the body and back to the starting position, keeping the hands closed and the movement taking place exclusively in the upper body.
Attention:
The arms are guided to the other side by the torso rotation (the arms remain stable).
Easier:
Select a rubber band with less resistance; stand on the floor instead of on the balance cushions.
Harder:
Select a rubber band with greater resistance.
1 elasticated rubber band
1 wall bars/bars/tree
1-2 balance cushions
Rotation des Oberkörpers im Stand (left) ► standing upper body rotation / cable chop
Power
Individual work


Set the cable pulley at shoulder height, stand slightly more than shoulder-width apart to the side (90 degree angle) of the cable pulley (left leg closer to the device), grasp the cable pulley with both hands approximately shoulder-width apart at chest height with arms almost stretched out or hold a handle with both hands, rotate the upper body to the side (look to the side - away from the cable pulley), keeping the position of the upper body/arms stable. Then return the upper body to the starting position in a controlled manner.
Starting position:
- Stand upright at the side of the machine, legs slightly wider than shoulder width.
- Grasp the cable pulley with both hands at chest height in front of the body (arms shoulder width, almost stretched) or hold a handle with both hands.
Final position:
- Upper body rotated to the side (looking away from the cable pulley).
- Basic position of the arms/legs unchanged.
Caution:
The arms are guided to the other side by the torso rotation (the arms remain stable).
1 weight tower/machine ►cable pulley (centre)
Rotation of the upper body while standing (right) ► standing upper body rotation
Power
Individual work


Attach the elastic band to the wall bars (or a parallel bar/tree, for example) at stomach height, stand shoulder-width apart (90 degree angle) to the side of the wall bars (to the parallel bar/tree), arms stretched out towards the wall bars (parallel bar/tree), grasp the elastic band with both hands, move the stretched arms to shoulder height to the other (left) side of the body and back to the starting position, keeping the hands closed and the movement taking place exclusively in the upper body.
Attention:
The arms are guided to the other side by the torso rotation (the arms remain stable).
Lighten:
Select an elastic band with less resistance.
Harden:
Select an elastic band with greater resistance.
1 elasticated rubber band
1 wall bars/bars/tree
Rotation of the upper body while standing (right) ► standing upper body rotation
Power
Individual work

Rubber band at stomach/hip or shin height attached to the wall bars/ parallel bars (or e.g. to a tree) attached to the wall bars/bars (or a tree, for example), stand hip-width apart on a balance cushion at the side (90 degree angle) to the wall bars/tree, arms stretched out towards the wall bars/tree, grasp the elastic band with both hands, move the stretched arms diagonally upwards to shoulder height to the other (left) side of the body and back to the starting position, keeping the hands closed and the movement taking place exclusively in the upper body.
Attention:
The arms are guided to the other side by the torso rotation (the arms remain stable).
Lighten:
Select a rubber band with less resistance; stand on the floor instead of on the balance cushions.
Harden:
Select a rubber band with greater resistance.
1 elasticated rubber band
1 wall bars/bars/tree
1-2 balance cushions
Rotation des Oberkörpers im Stand (right) ► standing upper body rotation / cable chop
Power
Individual work


Set the cable pulley at shoulder height, stand slightly wider than shoulder width to the side (90 degree angle) of the cable pulley (left leg closer to the device), grasp the cable pulley with both hands approximately shoulder-width apart at chest height with arms almost straight, rotate the upper body to the side (look to the side - away from the cable pulley), keeping the position of the upper body/arms stable. Then return the upper body to the starting position in a controlled manner.
Starting position:
- Stand upright at the side of the machine, legs slightly wider than shoulder width.
- Grasp the cable pulley with both hands at chest height in front of the body (arms shoulder width, almost stretched).
Final position:
- Upper body rotated to the side (facing away from the cable pulley).
- Basic position of the arms/legs unchanged.
Attention:
The arms are guided to the other side by the torso rotation (the arms remain stable).
1 weight tower/machine ► cable pulley (centre)
Rotation of the upper body while standing ► anti-rotation
Power
Partner work


Trainee: Standing upright with hips wide apart, arms extended straight out in front at chest height and palms pressed firmly against each other, intercept the rotational movement triggered by the partner and guide the arms back to the starting position.
Partner: Pushes the arms of the active participant to the side alternately or in random order (intensity can be varied).
No material required
Rotation of the upper body while standing ► anti-rotation
Power
Partner work


Trainee: Standing upright with hips wide apart, holding the exercise ball at chest height with arms outstretched, intercept the rotational movement triggered by the partner and return the arms to the starting position.
Partner: Pushes the arms of the active participant (the ball) to the side alternately or in random order (intensity can be varied).
Variant:
The exerciser is in a squatting position (additional strain on the thigh muscles).
1 exercise ball
Rotation of the upper body while standing ► standing hand over
Power
Partner work


With some distance between them, the partners stand back to back, the two exercisers alternately pass a weight ball/weight disc to the left and right of their bodies at about chest height (turn their upper bodies out). The direction of rotation is changed from time to time.
Lighten:
Lighter ball; without ball (hands touching).
Harden:
Transfer heavier object.
1 weight ball/weight disc
1 ball (e.g. volleyball/football/basketball) ► Make the exercise easier
1 weight ball/weight disc/sandbag/medicine ball ► Make the exercise more difficult (additional weight)
Rotation of the upper body while standing ► standing upper body rotation
Power
Individual work


Stand upright, hold your weight in front of your body at chest height with your arms almost outstretched, move your arms from side to side (rotate your upper body left/right).
Attention:
Tighten your stomach, keep your back straight, keep your pelvis in place and only move your upper body.
Lighten:
Less weight.
Harden:
More weight.
1 weight disc/dumbbell/kettlebell/sandbag/medicine ball
Rotation of the upper body while standing ► standing upper body rotation
Power
Partner work

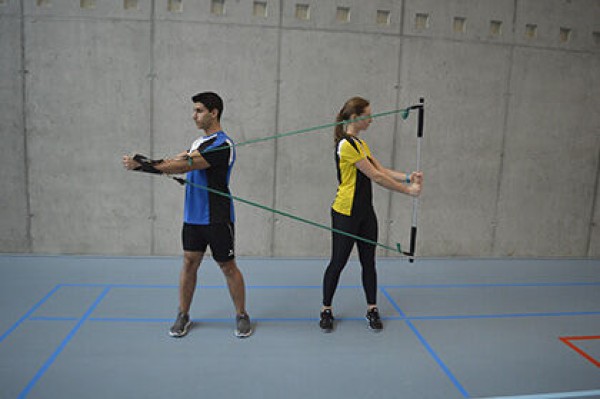
The two participants stand approx. 1 metre apart (facing in the same direction), one participant holds the gymnastics pole in the middle (pole vertical), the other participant holds the elastic loops in front of their own body at stomach height, their elbows are bent and remain fixed to their body. Both exercisers turn outwards (away from each other) simultaneously against the resistance of the elastic bands.
Attention:
Keep the hips straight; only the upper body turns; movement comes from the torso (not the arms).
Lighten:
Select less strong elastic bands, roll up the elastic bands less or keep a shorter distance from your partner.
Harden:
Select stronger elastic bands, roll up the elastic bands more or keep a greater distance from your partner.
1 gymnastic stick with elasticated strap