Exercises (2330)
Mini-Tennis
Games / Tournament
Game idea:
Two parties face each other on the court and try to score points by playing the ball into the opponent's court so that the opponent can no longer return the ball according to the rules. The game is analogous to tennis.
Scoring points:
A point is scored when the cue ball touches the ground twice in succession in the opponent's half of the court, with the first touch occurring within the marked area or when the opponent is unable to return the ball in accordance with the rules.
Court:
A net (can also be improvised) is stretched to a height of approx. 1.1m (top edge). The court is defined with lines or cones (e.g. badminton court; half a tennis court).
Number of participants:
1 against 1 (singles) or 2 against 2 (doubles)
Rules of the game:
The serve is made from below behind the baseline. At the time of the serve, the opponent is also on the baseline. The serve may not be taken directly from the air. The serve must be hit over the net into the opponent's court. There are no rules regarding cross serves. The serve is awarded to the player who has scored the point.
The game is played to a defined number of points (e.g. 15 points) or to a specific time. Each error (ball not returned in accordance with the rules, i.e. the ball is played out of bounds or into the net or does not reach the net at all) results in a point for the opponent. The ball is considered "out" if it has landed completely outside the line. Rolling the ball over the net is permitted, but touching the net by the player is prohibited. The racket may not protrude over the net into the opponent's court.
Mini tennis: Collect hits
Forms of play / exercises
Partner work
Two players stand opposite each other on either side of the net and try to fulfil various tasks in which hitting a newspaper plays a central role (note: if the game is played in the field and the weather is windy, this type of exercise is less suitable):
- Exercise to improve technique: try to hit a newspaper placed in the middle of the court (forehand/backhand). Both players are predominantly on the baseline.
- Exercise form to improve technique: newspaper placed in the centre of the court, try to hit it by playing at the net (volley). One player at the net (volley), the other plays the balls to (forehand/backhand).
- Technique training combined with competition form: newspaper placed in the centre of the court, try to hit (forehand/backhand). With each hit, the newspaper is cut in half. Which participant has the most folded newspaper after a certain time?
- Technical training combined with competition form: try to hit a newspaper placed on a certain line (forehand/backhand). With each hit, the newspaper is moved back one line. Which participant on each side of the court has moved their newspaper furthest away from the net after a certain time?
Pro Tn:
1 Smolball bat
1 newspaper
Minigolf: little bridge
Forms of play / exercises

Play the ball over the little bridge (felt carpet) and place it in the hoop.
Caution:
If the ball leaves the lane (mats), it is moved back to the starting point or, if the little bridge has already been passed, behind it. If the ball comes to a stop on the mats, play may continue from there.
Per participant:
1 stick & ball (floorball)
2 soft mats (small)
1 felt carpet
2 hoops
Minigolf: little bridge
Forms of play / exercises

Play the ball over the 2 little bridges (felt carpets) and place it in the hoop.
Caution:
If the ball leaves the lane (mats), it is moved back to the starting point or, if the little bridge has already been passed, behind it. If the ball comes to a stop on the mats, play may continue from there.
Per participant:
1 stick & ball (floorball)
3 soft mats (small)
3 felt carpet
2 hoops
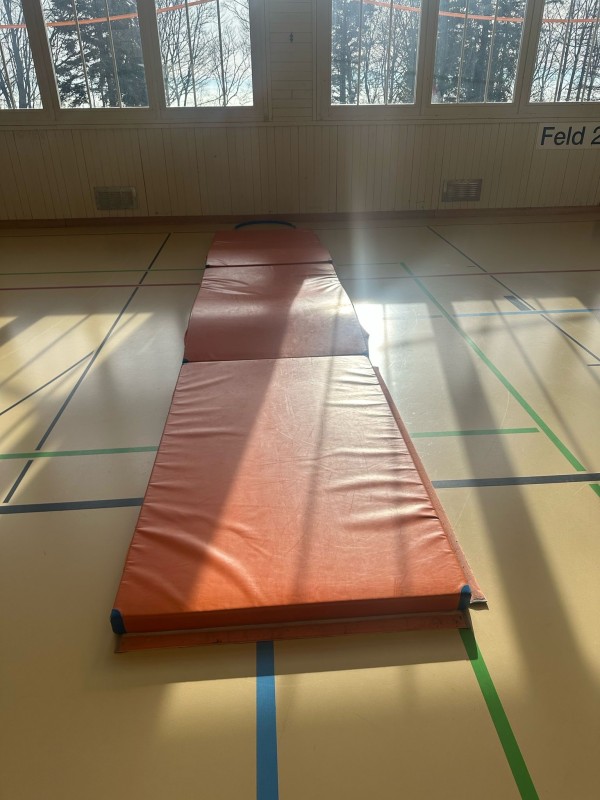
Minigolf: double jump
Forms of play / exercises

Move the ball over the first box section and place it in the second box section.
Attention:
If the ball leaves the lane (mats), it is moved back to the starting point or, if the first box section has already been overcome, behind this box section. If the ball comes to a stop on the mats, play may continue from there.
Per participant:
1 stick & ball (floorball)
4 soft mats (small)
2 centre sections of Swedish box
Minigolf: through the valley
Forms of play / exercises

Pass the ball between the mats so that it touches the goalpost/stake at the end.
Caution:
The course must be completed with a single, targeted shot. If the ball misses the passage between the mats, it is moved back to the starting point. If the ball comes to a stop between the mats, it is also moved back to the starting point. If no goal is available, a cone can be used as an alternative target.
Per participant:
1 stick & ball (floorball)
2 soft mats (medium)
1 goalpost/stake
Minigolf: corner ball
Forms of play / exercises

Place the ball through the box section, over the mat in the triangular area behind the mat.
Caution:
If the ball misses the box section, it is moved back to the starting point. If the ball leaves the lane (mat) after passing the box, the ball can be placed behind the box. If the ball comes to a stop on the mat, play may continue from there. If no indoor corner is available, two hoops can be used as an alternative target.
Per participant:
1 stick & ball (floorball)
1 soft mat (small)
1 centre section of Swedish box
Minigolf: straight line
Forms of play / exercises

Place the ball in the hole.
Caution:
If the ball leaves the lane (rope), it is moved back to the starting point. If the ball comes to a stop within the lane, play may continue from there. If no hole in the ground is available, a club can be used as an alternative target.
Per participant:
1 stick & ball (floorball)
1 ground socket for post/club
1 rope
3-4 stakes
Minigolf: hilly landscape
Forms of play / exercises
Place the ball over the mats in the hoop.
Attention:
If the ball leaves the lane (mats), it is moved back to the starting point. If the ball comes to a stop on the mats, play may continue from there.
Per participant:
1 stick & ball (floorball)
3 soft mats (small)
1 upper part of Swedish box
2 hoops
Minigolf: carousel
Forms of play / exercises

Move the ball along the carousel (rope) so that it touches the cone in the centre.
Caution:
If the ball leaves the lane (jumps over the rope), it is moved back to the starting point. If the ball comes to a stop inside the rope, play may continue from there.
Per participant:
1 stick & ball (floorball)
1 rope
1 marking cone
1 club
Minigolf: lob
Forms of play / exercises

Lift the ball and play it into the top opening of the box.
Caution:
If the ball misses the opening, it is moved back to the starting point.
Per participant:
1 stick & ball (floorball)
1 Swedish box
Minigolf: mini jump
Forms of play / exercises

Place the ball in the box section behind the springboard.
Caution:
If the ball leaves the track (springboard), it is moved back to the starting point.
Per participant:
1 stick & ball (floorball)
1 Reuter board
1 felt carpet
2 centre sections of Swedish box
Minigolf: alley of hoops
Forms of play / exercises

Place the ball over the carpets in the last hoop.
Caution:
If the ball leaves the lane (hoop), it is moved back to the last correctly passed hoop. If the ball comes to a stop inside the hoops, play may continue from there.
Per participant:
1 stick & ball (floorball)
5 hoops
5 felt carpets
Minigolf: alley of hoops
Forms of play / exercises
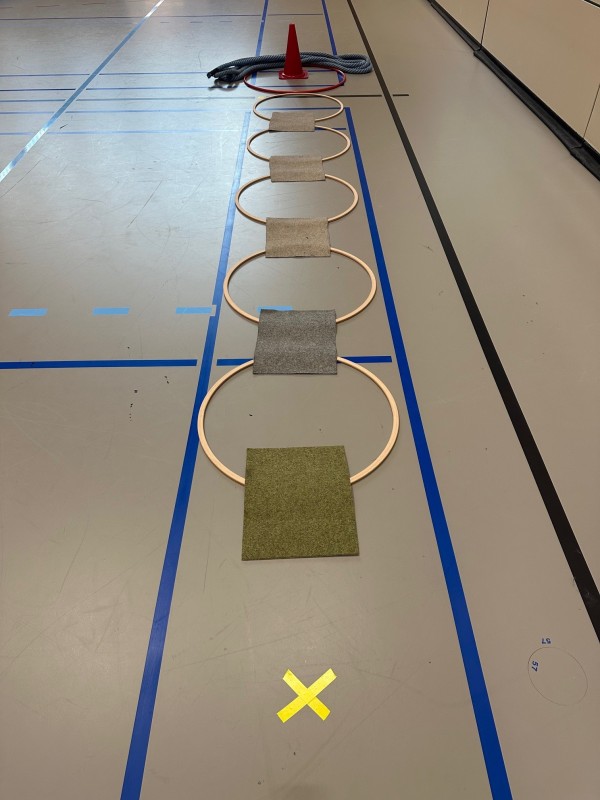
Place the ball over the carpets in the last hoop and touch the cone there.
Caution:
If the ball leaves the lane (hoop), it is moved back to the last correctly passed hoop (plus penalty stroke if applicable). If the ball comes to a stop inside the hoops, play may continue from there.
Per participant:
1 stick & ball (floorball)
6 hoops
5 felt carpets
1 cone
1 rope (optional)
Minigolf: slinky
Forms of play / exercises

Place the ball in the tyre at the end of the box staircase.
Attention:
The ball starts on the top part of the box. If the ball leaves the lane (box sections), it is moved back to the starting point. If the ball comes to a stop on the box sections, play may continue from there.
Per participant:
1 stick & ball (floorball)
4 Swedish box
2 hoops
Minigolf: jump
Forms of play / exercises

Place the ball in the box section behind the mat.
Caution:
If the ball leaves the lane (mats), it is moved back to the starting point. If the ball comes to a stop on the mats, play may continue from there.
Per participant:
1 stick & ball (floorball)
2 soft mats (small)
1 centre section of Swedish box
Minigolf: Stonehenge
Forms of play / exercises

Place the ball between the blocks on the jerseys.
Caution:
If the ball leaves the lane (outside the benches), it is moved back to the starting point. If the ball comes to a stop inside the two benches, play may continue from there. The ball must remain on the jerseys for the attempt to be scored.
Per participant:
1 stick & ball (floorball)
2 long benches
3 jerseys
4 blocks
Minigolf: stuntman
Forms of play / exercises

Get the ball over the jump and through the hoop.
Caution:
If the ball leaves the lane (mats), it is moved back to the starting point. If the ball comes to a stop on the mats, play may continue from there.
Per participant:
1 stick & ball (floorball)
2 soft mats (small)
1 soft mat (medium)
1 centre section of Swedish box
2 stakes
1 hoop
2 ropes
Minigolf: goal shot
Forms of play / exercises

Place the ball on the springboard and from there pass it through the hoop in the goal.
Caution:
If the hoop is missed, the ball is moved back to the starting point (on the springboard).
Per participant:
1 stick & ball (floorball)
1 Reuter board
1 goal (floorball)
1 hoop
1 rope
Minigolf: funnel
Forms of play / exercises

Place the ball over the felt carpet and the mat in the funnel (inverted cone).
Caution:
If the ball leaves the lane (mats), it is moved back to the starting point. If the ball comes to a stop on the mats, play may continue from there.
Per participant:
1 stick & ball (floorball)
2 soft mats (small)
1 felt carpet
1 marking cap
1 adhesive tape (indoor)
2 blocks (optional)
Minigolf: funnel
Forms of play / exercises

Place the ball over the felt carpet and the mat in the funnel (inverted cone).
Caution:
If the ball falls between the mats, it is returned to the starting point. If the ball comes to a stop on the mats, play may continue from there.
Per participant:
1 stick & ball (floorball)
2 soft mats (small)
1 felt carpet
1 marking cap
1 adhesive tape (indoor)
2 blocks
2 pieces of floorball rink
Minigolf: u-turn
Forms of play / exercises

Pass the ball around the boxes and place it in the hoop.
Attention:
If the ball leaves the lane (outside the benches), it is moved back to the starting point. If the ball comes to a stop within the lane, play may continue from there.
Per participant:
1 stick & ball (floorball)
4 long benches or 2 benches plus wall corner
2 Swedish boxes
1 hoop
Minigolf: u-turn
Forms of play / exercises


Pass the ball around the boxes and place it in the hole.
Attention:
If the ball leaves the lane (outside the benches), it is moved back to the starting point. If the ball comes to a stop within the lane, play may continue from there.
Per participant:
1 stick & ball (floorball)
2 benches plus wall corner
2 Swedish boxes
3 stakes
1 ground socket for post
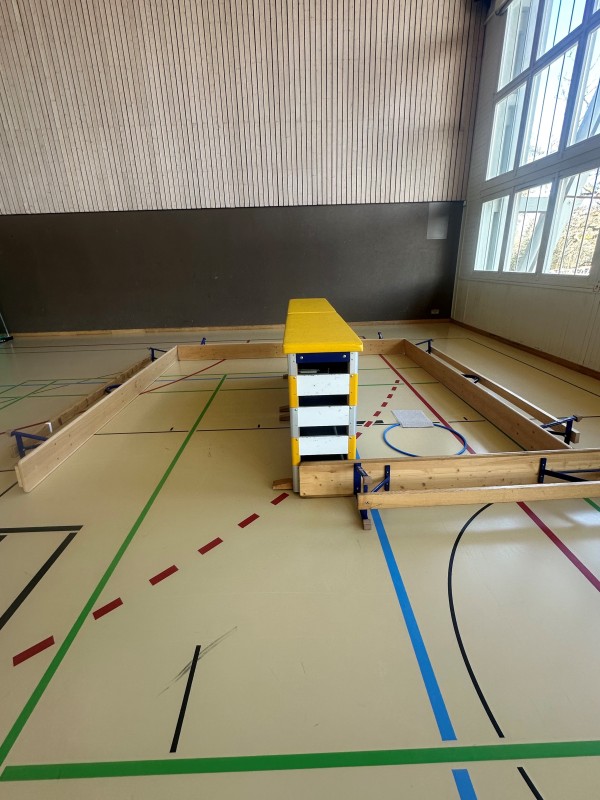
Minigolf: overpass
Forms of play / exercises

Move the ball over the bench and place it in the box.
Attention:
If the ball leaves the lane (bench), it is moved back to the starting point.
Per participant:
1 stick & ball (floorball)
1 long bench
1 Swedish box
Minigolf: underpass
Forms of play / exercises

Place the ball in the hole through the underpass (box section).
Caution:
If the ball misses the underpass or stops in the underpass, it is moved back to the starting point. If the ball stops behind the underpass, play may continue from there. If the ball leaves the lane (rope) behind the underpass, it is placed directly behind the underpass. If no hole in the ground is available, a club can be used as an alternative target.
Per participant:
1 stick & ball (floorball)
1 Swedish box
1 rope
4 balance cushions
1 ground socket for post/club