
Exercises (1641)
Cross-country ski ergometer (m: 500m - 40k; w: 400m - 30k)
Power
Individual work

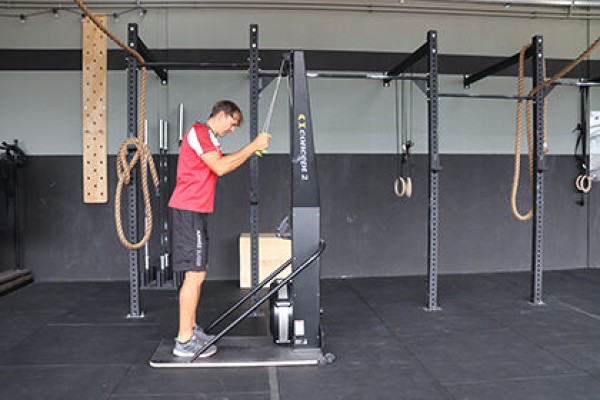


Working with the cross-country ski ergometer does not require any prior knowledge of winter sports, the technique is beginner-friendly and quick to learn. However, there are a few points to bear in mind: Firstly, stand with your feet slightly more than shoulder-width apart (how close you stand to the device is a matter of taste, although taller people usually prefer a greater distance in order to achieve a full arm extension at the starting point and therefore ultimately a longer stroke). The hands should also be just outside the shoulders when gripping the handles. As the handles of the device are attached to freely movable hinges, you can easily rotate them to your optimum position. The edges of the hand, including the little finger, should be placed on the thickened end of the handle, allowing more pressure to be applied. At the beginning of the pull, the entire body is stretched, only the arms remain slightly bent, the handles are now pulled downwards at an angle until the hands are just below the knees (a V-shaped curve, where the hands move sideways away from the body, is avoided). At the lowest point, the elbows are fully extended while the knees are minimally bent (comparable to the starting position of a jump). In the return phase, the body straightens up again completely, synchronised with the backswing of the arms. Lifting your heels off the ground is perfectly fine, especially at higher speeds.
Attention:
Do not turn every repetition into a squat, as this will tire your legs too quickly. Take a deep breath before each pull on the machine and keep the abdominal muscles under constant tension.
Lighten/Harden:
The intensity is controlled by adjusting the air valve. The higher the lever is moved on the scale (1-10), the wider the flap opens and the more air can flow into the bike. More air means more resistance in the initial phase of the pull (comparable to a higher pedalling resistance in the higher gears on a bicycle). It is important to find a setting at which a continuous and controlled pressure can be maintained. If the setting is too high, the air resistance initially has to be overcome with an excessively strong pull and the remaining range of motion "runs into nothing", which is a waste of energy. If you pay attention to the background noise, you will get a suitable indicator: the aim should be to achieve the smoothest possible whirring with only slight peaks in the initial phase of the pull. Most exercisers tend to over-optimise the resistance setting. As is so often the case, less is more; levels 6-7 work well for men and 4-6 for women, with exceptions for particularly heavy and strong athletes.
Variant:
The double pole technique is usually used for training, which means that both arms work in synchronisation with each other. The diagonal technique, in which the arms are used alternately, is less common but can be used as a variation. It achieves lower speeds than the simultaneous use of the arms, but is certainly suitable as an occasional training stimulus, which above all creates a healthy rotation of the spine and a strain on the lateral trunk muscles. The diagonal technique can also correct imbalances in unevenly developed back and arm muscles (e.g. after injuries).
1 cross-country ski ergometer
Cross-country ski ergometer (m: 750m - 60k; w: 600m - 45k)
Power
Individual work


Working with the cross-country ski ergometer does not require any prior knowledge of winter sports, the technique is beginner-friendly and quick to learn. However, there are a few points to bear in mind: Firstly, stand with your feet slightly more than shoulder-width apart (how close you stand to the device is a matter of taste, although taller people usually prefer a greater distance in order to achieve a full arm extension at the starting point and therefore ultimately a longer stroke). The hands should also be just outside the shoulders when gripping the handles. As the handles of the device are attached to freely movable hinges, you can easily rotate them to your optimum position. The edges of the hand, including the little finger, should be placed on the thickened end of the handle, allowing more pressure to be applied. At the beginning of the pull, the entire body is stretched, only the arms remain slightly bent, the handles are now pulled downwards at an angle until the hands are just below the knees (a V-shaped curve, where the hands move sideways away from the body, is avoided). At the lowest point, the elbows are fully extended while the knees are minimally bent (comparable to the starting position of a jump). In the return phase, the body straightens up again completely, synchronised with the backswing of the arms. Lifting your heels off the ground is perfectly fine, especially at higher speeds.
Attention:
Do not turn every repetition into a squat, as this will tire your legs too quickly. Take a deep breath before each pull on the machine and keep the abdominal muscles under constant tension.
Lighten/Harden:
The intensity is controlled by adjusting the air valve. The higher the lever is moved on the scale (1-10), the wider the flap opens and the more air can flow into the bike. More air means more resistance in the initial phase of the pull (comparable to a higher pedalling resistance in the higher gears on a bicycle). It is important to find a setting at which a continuous and controlled pressure can be maintained. If the setting is too high, the air resistance initially has to be overcome with an excessively strong pull and the remaining range of motion "runs into nothing", which is a waste of energy. If you pay attention to the background noise, you will get a suitable indicator: the aim should be to achieve the smoothest possible whirring with only slight peaks in the initial phase of the pull. Most exercisers tend to over-optimise the resistance setting. As is so often the case, less is more; levels 6-7 work well for men and 4-6 for women, with exceptions for particularly heavy and strong athletes.
Variant:
The double pole technique is usually used for training, which means that both arms work in synchronisation with each other. The diagonal technique, in which the arms are used alternately, is less common but can be used as a variation. It achieves lower speeds than the simultaneous use of the arms, but is certainly suitable as an occasional training stimulus, which above all creates a healthy rotation of the spine and a strain on the lateral trunk muscles. The diagonal technique can also correct imbalances in unevenly developed back and arm muscles (e.g. after injuries).
1 cross-country ski ergometer
Sprinting/throwing an object
Power
Individual work

Purpose
Training and testing of the throwing technique
Additional equipment
5 HG 85 throwing gun
Starting position
lying down, Stgw with empty magazine
Procedure
Sprint 50 m into a throwing position (target time 15 s)
5 throws from different throwing distances
Conditions
4 hits and 3 different freely selectable throwing distances
Notes
If no realistic HG targets are available, marked target areas can also be used (e.g.
for reasons of efficiency, several throwers should be able to practise at the same time.
with an increased routine, the requirements in terms of throwing distance should be increased.
Material per participant: Tenue CNM
Additional material: 6 G-discs with posts, 3 fanjons, 2 red/white marking tapes, 2 boxes with 16 HG 85 clay pellets
Sprinting
Power
Individual work

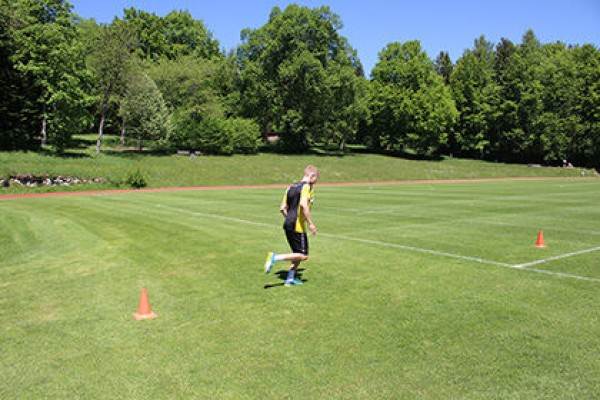
Cover a given distance (between 10-20 metres) as quickly as possible/at a sprint (if necessary, shuttle back and forth between the markers several times).
Lighten:
Lower speed.
Harden:
Higher speed.
Variant:
Do not sprint but change your gait between the markers (e.g. backwards, on all fours, crawling, etc.).
2 marinating cones/caps/colouring sticks
Jump in place
Power
Individual work


Stand upright with your feet shoulder-width apart, arms supported on your hips or bent in front of your body. Powerful jump vertically into the air.
Attention:
Keep your upper body upright (keep your core tensed).
Lighten:
Smaller/less intense jumps.
Harden:
Larger/intensive jumps; additional weight (on the chest/shoulders, hold in the hands, hold in front).
Variation:
With each jump, pull the tips of your feet towards your knees (bend your feet).
2 weight cuffs/short dumbbells/1 weight vest/weight disc/(medicine) ball/sandbag/fighting backpack ► Make the exercise more difficult (additional weight)
Jump in place one-legged (left)
Power
Individual work


One-legged stand (left), arms supported on the hips or bent in front of the body. Powerful jump vertically into the air.
Attention:
Keep your upper body upright (tense your core).
Lighten:
Smaller/less intense jumps.
Harden:
Bigger/more intense jumps; additional weight (on your chest/shoulders, hold in your hands, in front of you).
Variation:
With each jump, pull the tips of your feet towards your knees (bend your feet).
1 weight cuff/weight vest/weight disc/(medicine) ball/sandbag/fighting backpack/2 dumbbells ► Make the exercise more difficult (additional weight)
Jump on the spot one-legged (left) (one-legged jump) ► pogo tuck jump
Power
Individual work
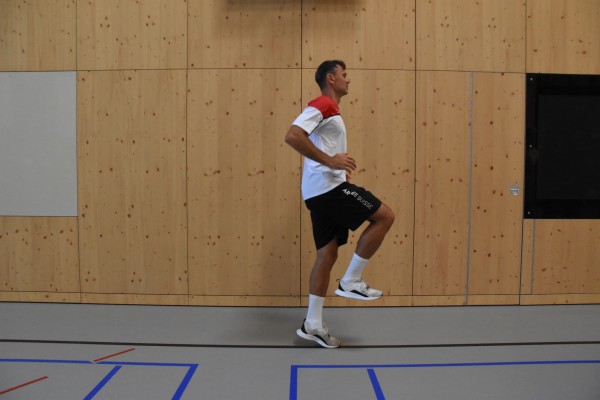
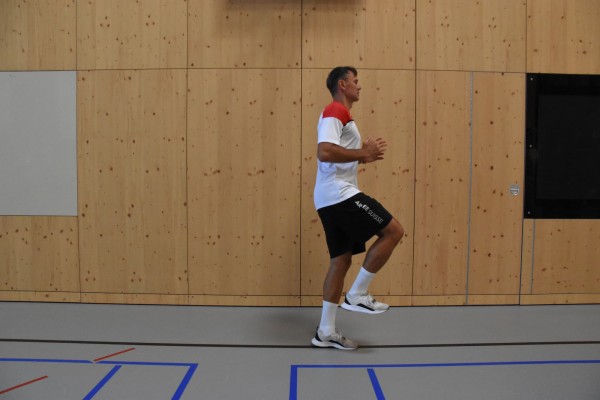
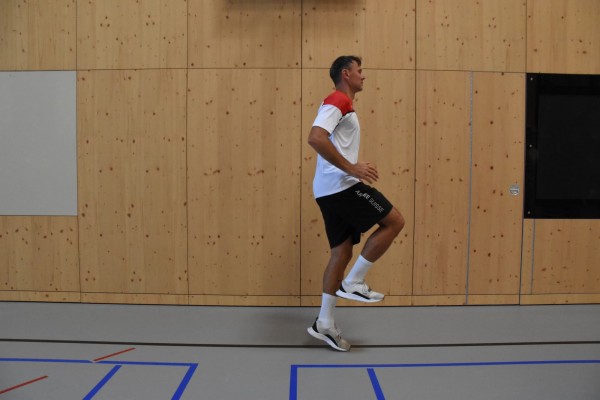
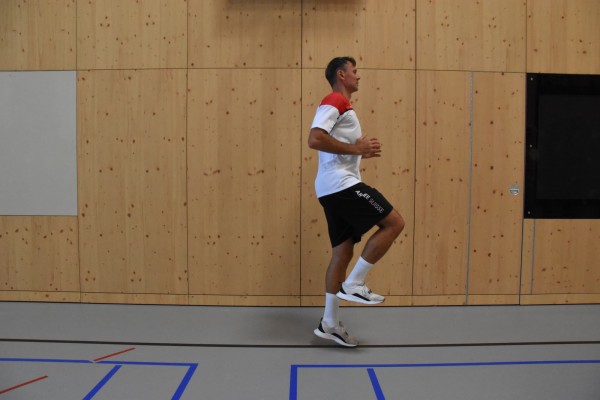
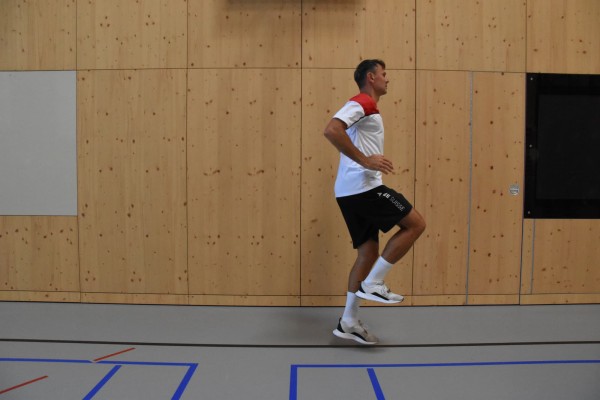
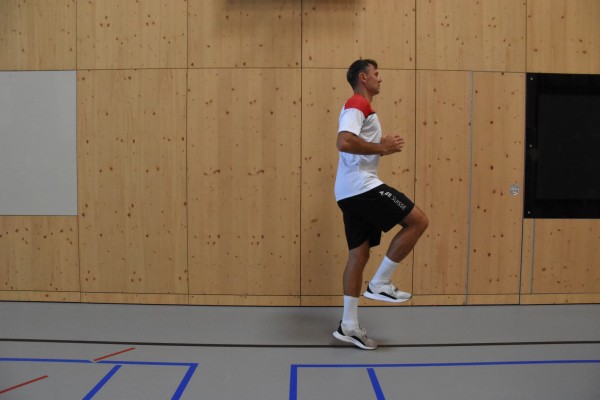
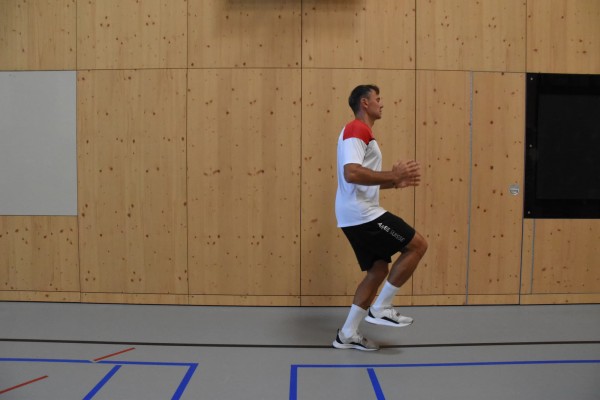
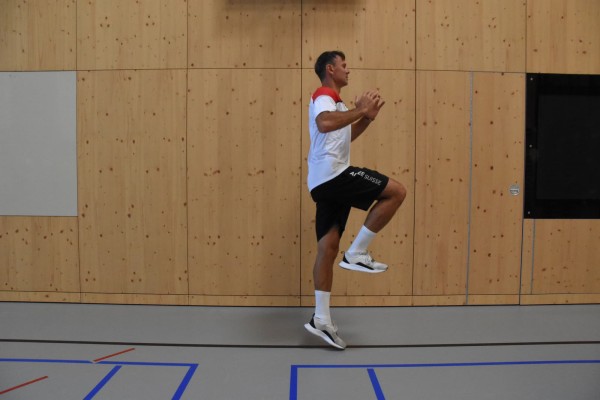
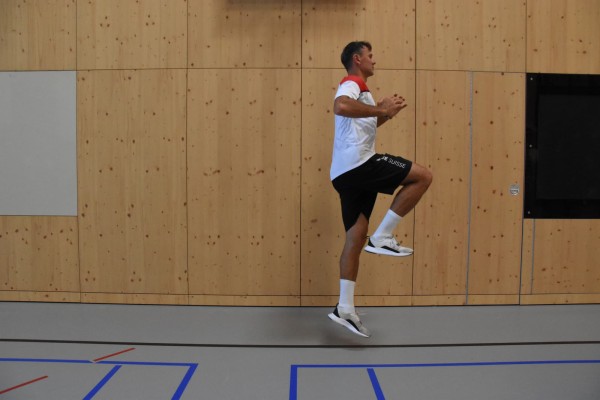
Steady hopping in place on one leg (left) without putting your heel down completely. Every few repetitions (e.g. always after 5 small hops) perform a jump upwards (one-legged jump). The arms can support the jump by pulling them up and overhead when jumping from hip height.
Attention:
Keep your upper body upright (tense your core).
Lighten:
Smaller/less intense jumps into the air.
Harden:
Higher/intensive jumps; additional weight (on your chest/shoulders, hold in your hands, hold in front of you).
Variation:
Pull the tip of your foot towards your knee (bend your foot) with each jump.
1 weight cuff/weight vest/weight disc/(medicine) ball/sandbag/fighting backpack/2 dumbbells ► Make the exercise more difficult (additional weight)
Jump on the spot one-legged (left) (one-legged jump) ► rudiment hop
Power
Individual work
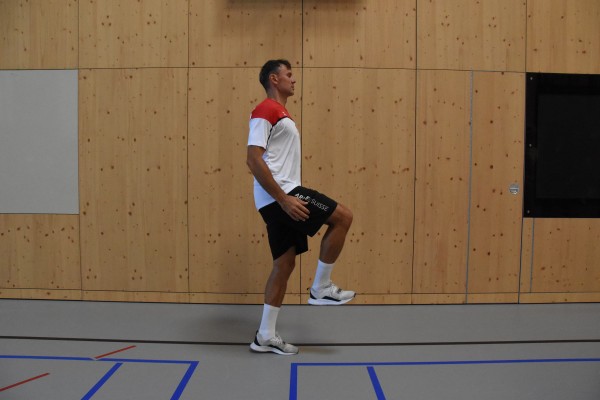
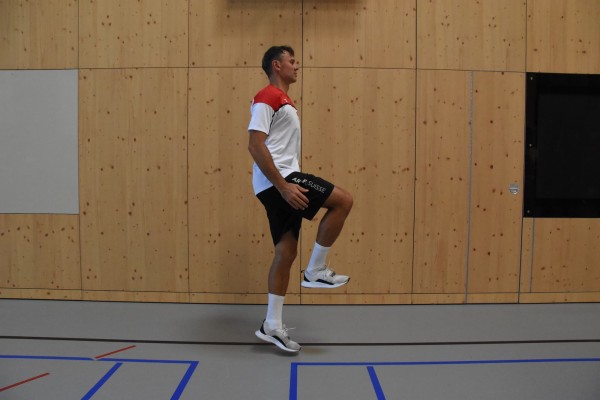
Stand on one leg (left), with the free (right) leg raised (approximately right angle in the knee joint so that the knee is at about hip height in front of the body). Jump steadily in place, putting your heel down completely with each repetition.
Attention:
Keep your upper body upright (keep your core tensed).
Lighten:
Smaller/less intense jumps.
1 weight cuff/weight vest/weight disc/(medicine) ball/sandbag/fighting backpack/2 dumbbells ► Make the exercise more difficult (additional weight)
Jump in place one-legged (right)
Power
Individual work


One-legged stand (right), arms supported on the hips or bent in front of the body. Powerful jump vertically into the air.
Attention:
Keep your upper body upright (keep your core tensed).
Lighten:
Smaller/less intense jumps.
Harden:
Bigger/more intense jumps; additional weight (on your chest/shoulders, hold in your hands, in front of you).
Variation:
With each jump, pull the tips of your feet towards your knees (bend your feet).
1 weight cuff/weight vest/weight disc/(medicine) ball/sandbag/fighting backpack/2 dumbbells ► Make the exercise more difficult (additional weight)
Jump on the spot one-legged (right) (one-legged jump) ► pogo tuck jump
Power
Individual work
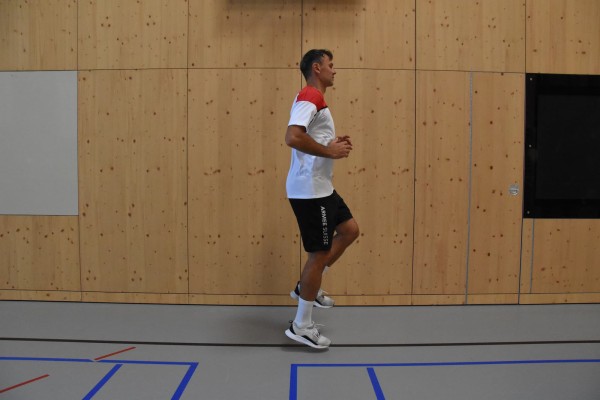
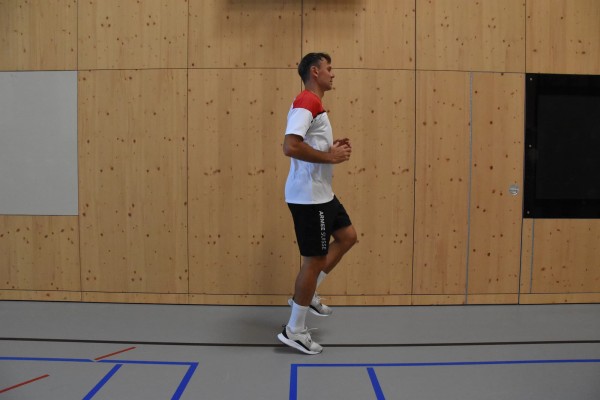
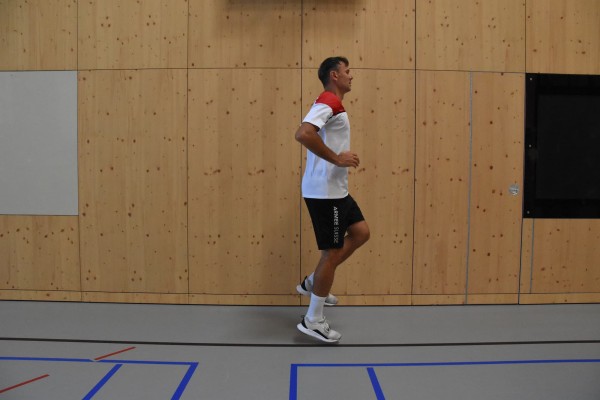
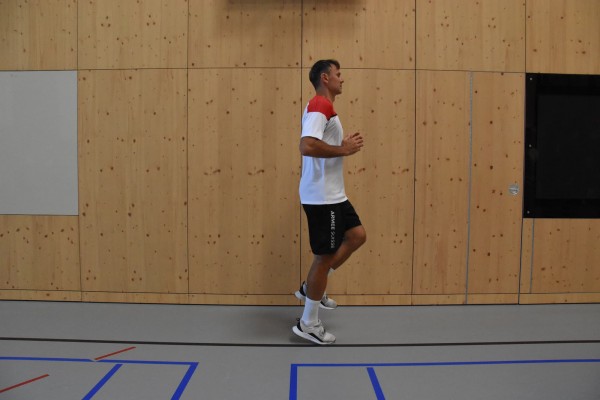
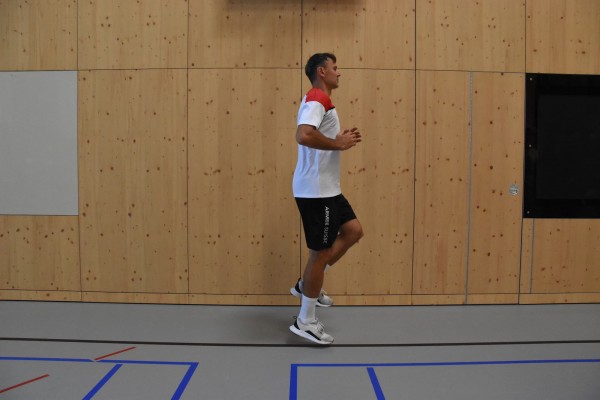
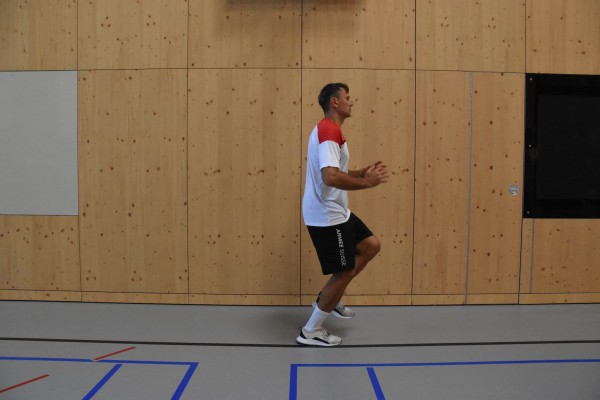
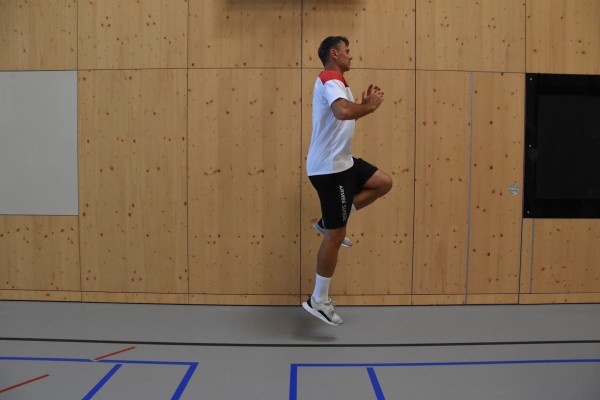
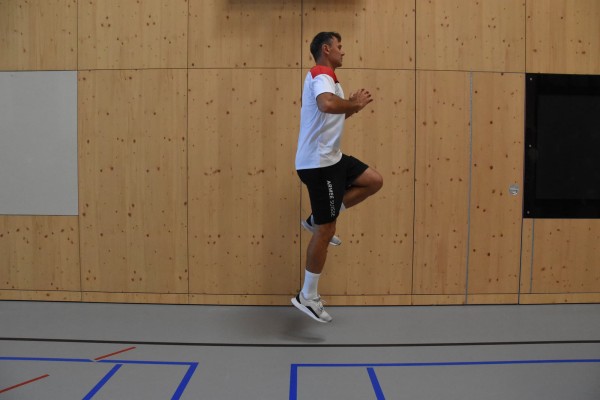
Steady hopping in place on one leg (right) without putting your heel down completely. Every few repetitions (e.g. always after 5 small hops) perform a jump upwards (one-legged jump). The arms can support the jump by pulling them up and overhead when jumping from hip height.
Attention:
Keep your upper body upright (tense your core).
Lighten:
Smaller/less intense jumps into the air.
Harden:
Higher/intensive jumps; additional weight (on your chest/shoulders, hold in your hands, hold in front of you).
Variation:
Pull the tip of your foot towards your knee (bend your foot) with each jump.
1 weight cuff/weight vest/weight disc/(medicine) ball/sandbag/fighting backpack/2 dumbbells ► Make the exercise more difficult (additional weight)
Jump on the spot one-legged (right) (one-legged jump) ► rudiment hop
Power
Individual work
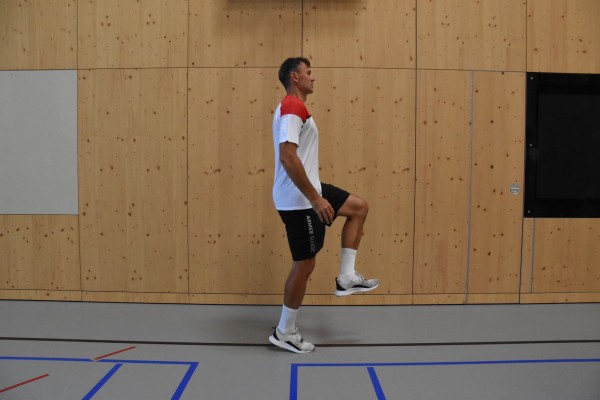
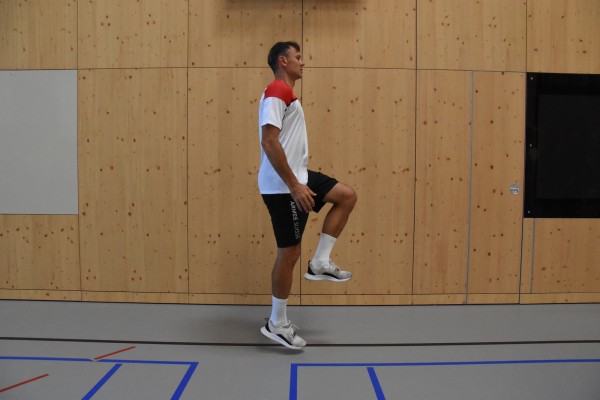
Stand on one leg (right), with the free (left) leg raised (approximately right angle in the knee joint so that the knee is at hip height in front of the body). Jump steadily in place, putting your heel down completely with each repetition.
Attention:
Keep your upper body upright (keep your core tensed).
Lighten:
Smaller/less intense jumps.
1 weight cuff/weight vest/weight disc/(medicine) ball/sandbag/fighting backpack/2 dumbbells ► Make the exercise more difficult (additional weight)
Jump in place with extension and flexion of one leg alternating ► runner hop
Power
Individual work
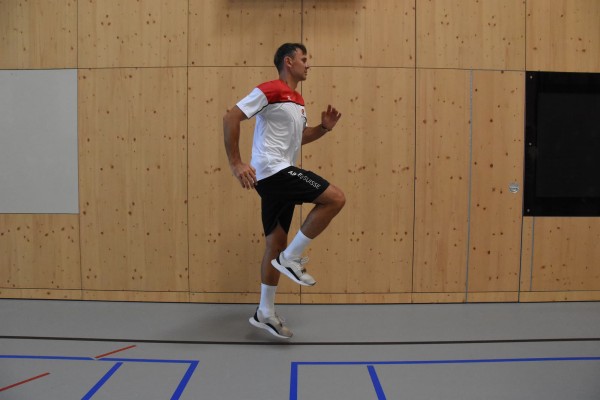
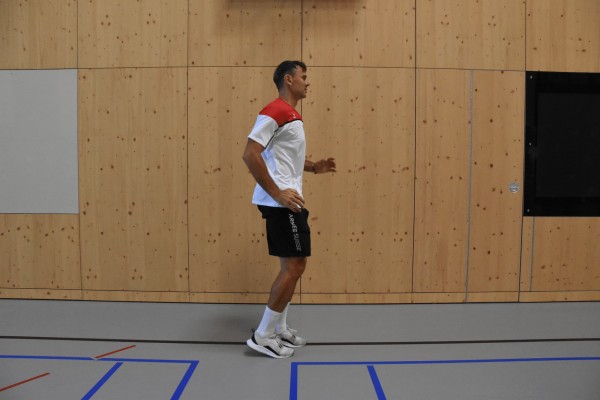
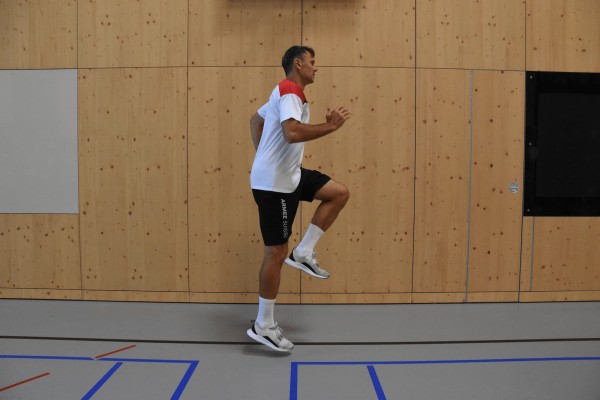
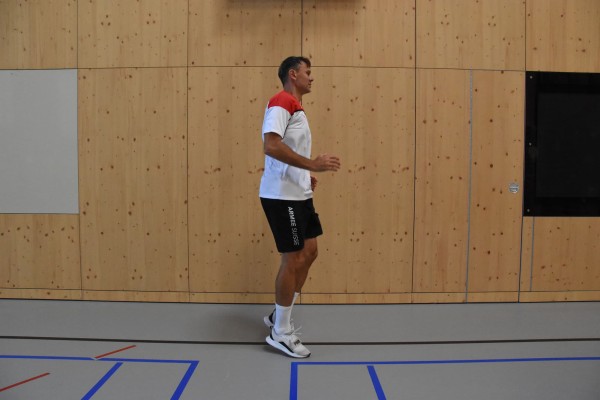
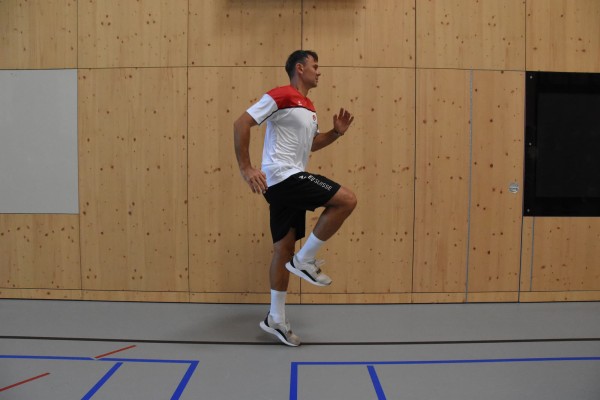
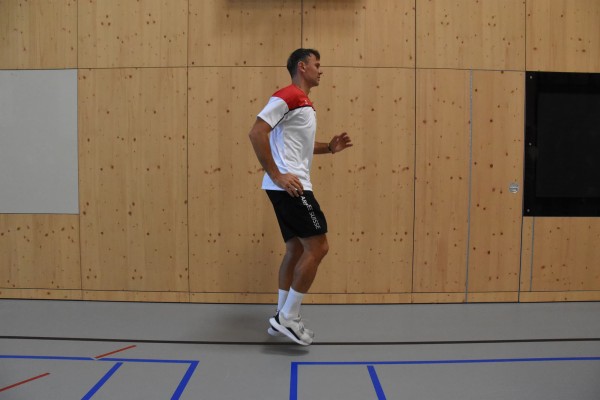
Stand upright with your feet shoulder-width apart, hopping steadily in place. Alternately bend one leg during the two-legged small jump (raise the knee in front of the body to approximately hip height). Land on both legs (heels completely off the ground), keeping the ground contact time as short as possible before the next repetition. Support your arms on your hips or support the movement with your arms (arms bent and stretched - arm bent on the opposite side where the knee is raised - sprinter position).
Caution:
Keep your upper body upright (tense your core).
Lighten:
Smaller/less intense jumps (lift your knees less).
Harden:
Higher/more intense jumps; additional weight (on your chest/shoulders, hold in your hands, in front of you).
2 weight cuffs/short dumbbells/1 weight vest/weight disc/(medicine) ball/sandbag/fighting rucksack ► Make the exercise more difficult (additional weight)
Jump in place and flexion and extension of the legs
Power
Individual work

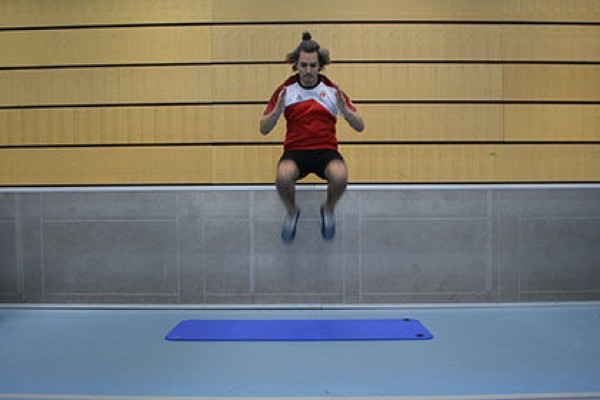


Stand upright on the balls of your feet with your knees slightly bent and your arms bent in front of your body (or supported on your hips). Jump up into the air and bend your legs (raise your knees approximately to navel height). Bounce steadily in place (fast frequency) without putting your heels down (jump on your toes).
Attention:
Keep your upper body upright (keep your core tensed).
Lighten:
Lift your knees less, smaller/less intense jumps.
Harden:
Lift your knees further; bigger/more intense jumps; additional weight (on your chest/shoulders, hold in your hands, hold in front of you).
2 weight cuffs/short dumbbells/1 weight vest/weight disc/(medicine) ball/sandbag/fighting backpack ► Make the exercise more difficult (additional weight)
Jump in place and hip rotation ► jump + hip rotation
Power
Individual work
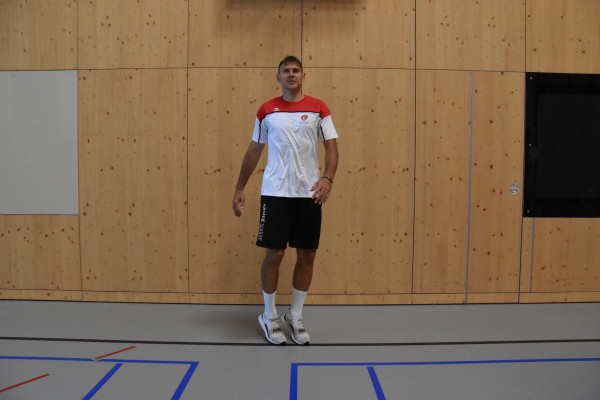
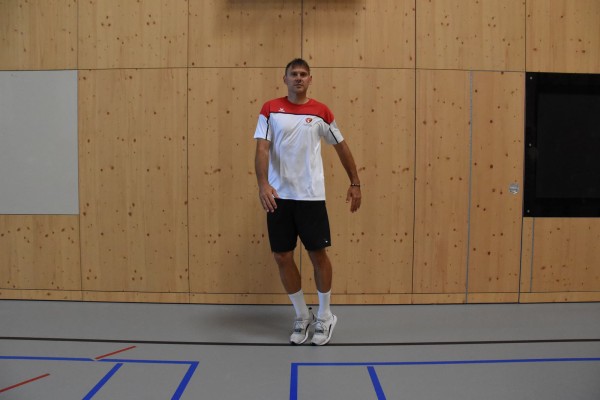
Continuous jumping with both legs in place (feet closer than shoulder width), with the hips alternately turned out to one side (feet pointing to the respective side). The upper body and gaze always remain directed forwards, the heels are never fully lowered.
Attention:
The upper body remains upright (tense the torso).
Harden:
Additional weight (on the chest/shoulders, hold in the hands, hold in front).
2 weight cuffs/short dumbbells/1 weight vest/weight disc/(medicine) ball/sandbag/fighting backpack ► Make the exercise more difficult (additional weight)
Jump onto an object
Power
Individual work


Jump onto the long bench on both legs and back down again.
Attention:
Keep your upper body upright, cushion your landing.
Lighten:
Jump over a line (omit the long bench); choose a lower element (e.g. vaulting box top); lower cadence.
Harden:
After standing on the long bench, jump upwards; choose a higher element; keep additional weight on your feet/shoulder; higher cadence.
1 long bench
1 vaulting box top section ► Make the exercise easier (position)
2 vaulting box elements (incl. top section) ► Make the exercise more difficult (position)
2 weight cuffs/1 weight vest/sandbag ► Make the exercise more difficult (additional weight)
Jump onto an object ► box jump
Power
Individual work


From a standing position, tilt your upper body slightly forwards, stretch your arms backwards at an angle to your body (like a ski jumper on a ski jump), push off the ground powerfully to jump onto a raised object (plyo box or swinging box element incl. top) (use the momentum of your arms), straighten your upper body (stand on the object) and jump back to the starting position (possibly the other side of the object).
Attention:
Land as softly as possible (cushion the jump with your knees).
Lighten:
Lower the intensity between each execution; lower the height of the object.
Harden:
Additional weight; higher object.
Variation:
Bouncing from one side of the object to the other by jumping sideways.
1 flat bench/plyo box/swivel box
2-4 weight cuffs/1 weight waistcoat ► Make the exercise more difficult (additional weight)
Jump from a kneeling position onto an object ► kneeling position to box jump
Power
Individual work
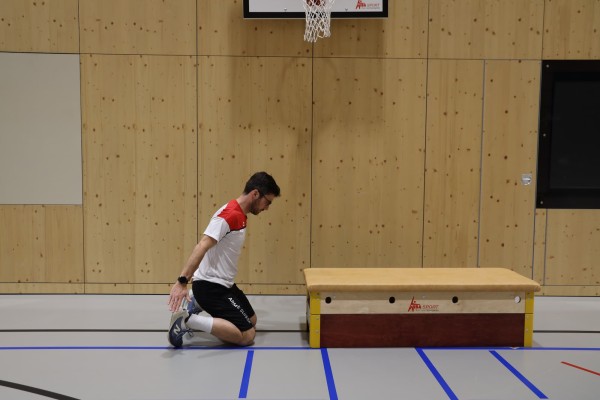
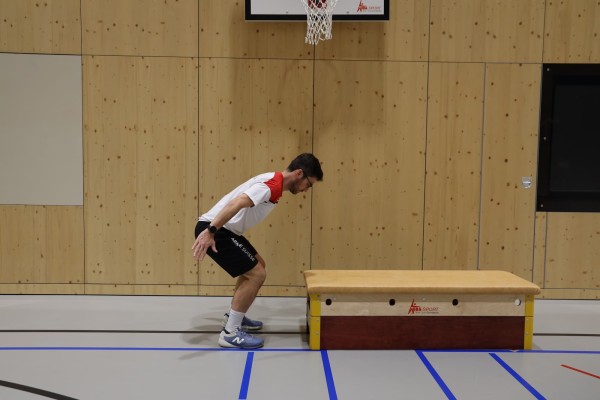
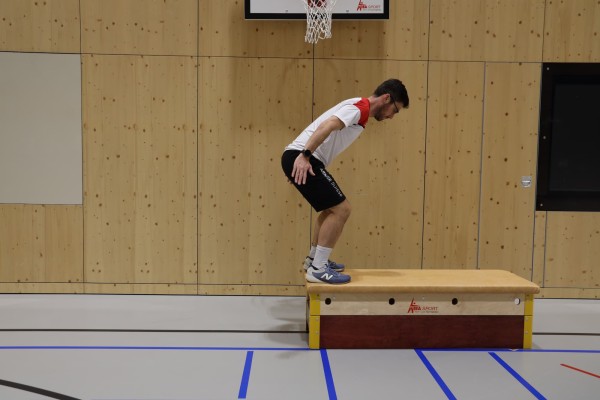
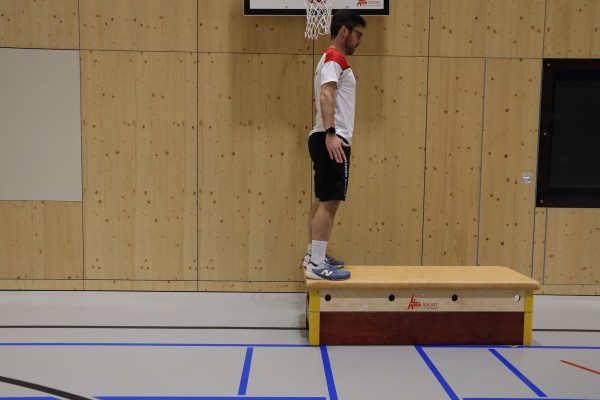
Position yourself on your knees in front of a stable raised surface (e.g. a plyo box or a Swedish box, including the top section). Move your hips backwards and lean your upper body slightly forwards, stretching your arms diagonally backwards alongside your body (like a ski jumper on the ski jump). From this position, jump forwards or upwards powerfully and explosively (using the momentum of your arms) through your hips and legs, landing on the platform with both feet simultaneously. Cushion the landing in a controlled manner with your knees slightly bent. Then stand upright on the box and return to a squatting position in a controlled manner.
Attention:
Only use a box that is sufficiently stable and non-slip; adjust the height of the box to suit your performance level; jump explosively from a hip extension (not just from the knees); place both feet firmly on the box upon landing; do not let your knees cave inwards upon landing; cushion the landing softly and in a controlled manner; keep your core stable throughout the jump.
Lighten:
Use a smaller step; start by standing up from a raised kneeling position without jumping.
Harden:
Use a taller object; perform the jump with as little ground contact time as possible; add extra weight.
1 flat bench/plyo box/swivel box
2-4 weight cuffs/1 weight waistcoat ► make the exercise more difficult (additional weight)
Jump from a kneeling position to a squat position (kneeling jumps) ► kneeling jump
Power
Individual work


Stand on your knees (possibly with your buttocks sitting on your feet), your arms hanging down at the side of your body and your upper body upright. The buttocks and leg muscles are tensed and the arms are brought back to gain momentum. Then, with an explosive movement, hop onto both feet simultaneously (landing in a squat position), bringing your arms up quickly and pushing your hips forwards.
Attention:
The exercise requires a certain amount of explosiveness in the legs and is therefore rather demanding.
Lighten:
Significantly greater support from the arms (momentum).
Harden:
Additional weight; soft surface.
2 weight cuffs/1 weight vest/fighting backpack ► making the exercise more difficult (additional weight)
1 small soft mat ► making the exercise more difficult (base)
Jump from kneeling to standing (kneeling jumps) and jump into the air ► kneeling jump / kneeing jump
Power
Individual work
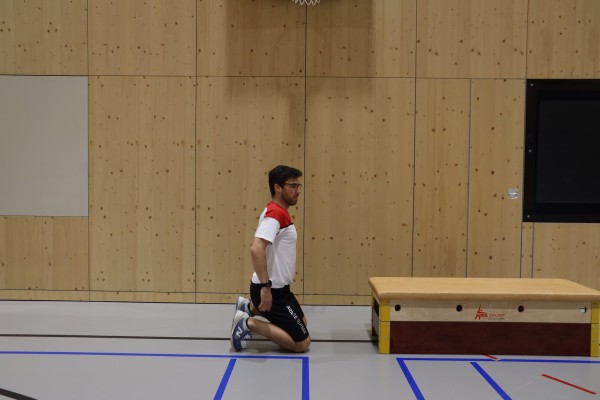
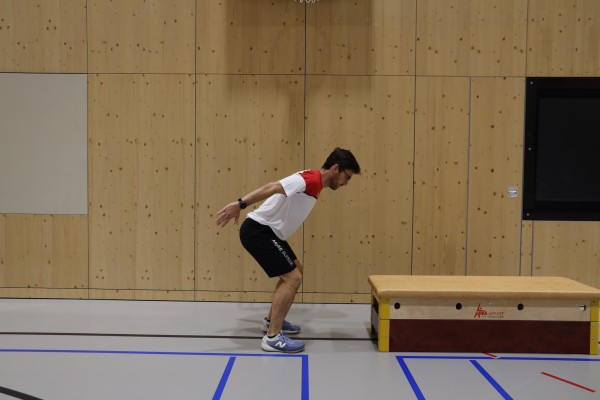
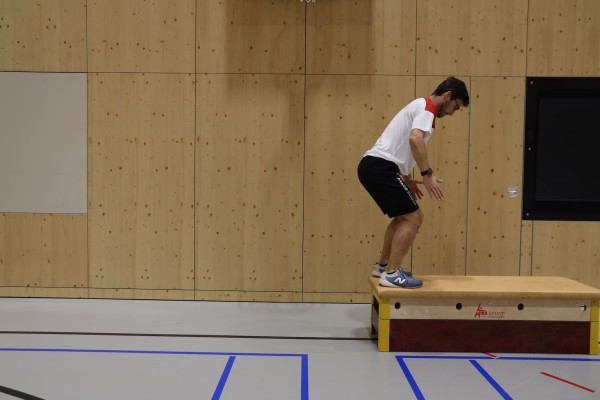
Stand on your knees (possibly with your buttocks sitting on your feet), your arms hanging down at the side of your body and your upper body upright. The buttocks and leg muscles are tensed and the arms are brought back to gain momentum. Then, with an explosive movement, hop onto both feet simultaneously (landing in a squat position), bringing your arms up quickly and pushing your hips forwards. After landing, you immediately jump up with both legs (with as little contact time with the ground as possible).
Attention:
The exercise requires a certain amount of explosiveness in the legs and is therefore rather demanding.
Lighten:
Significantly greater support from the arms (momentum).
Harden:
Additional weight; soft surface.
2 weight cuffs/1 weight vest/fighting backpack ► making the exercise more difficult (additional weight)
1 small soft mat ► making the exercise more difficult (base)
Jump from kneeling to standing (kneeling jumps) and jump into the air including rotation (left) ► kneeling jump / kneeing jump
Power
Individual work
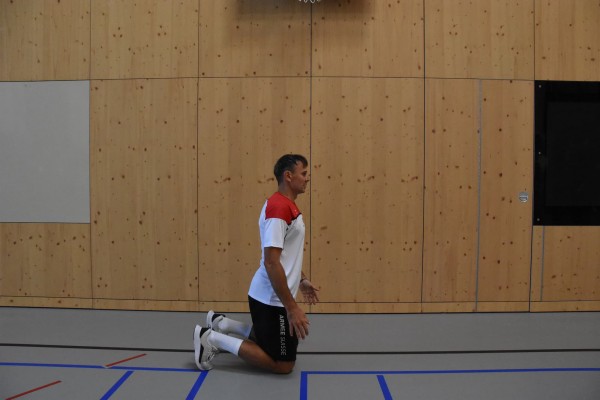
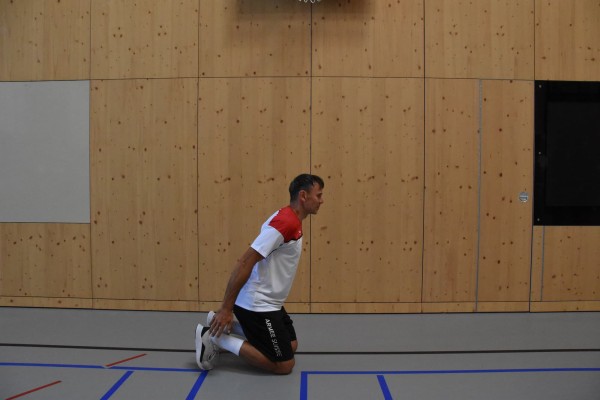
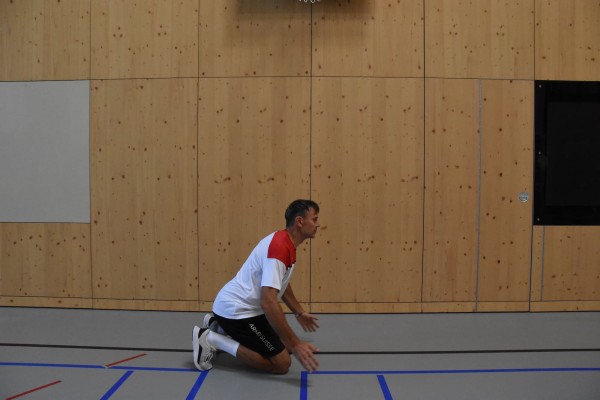
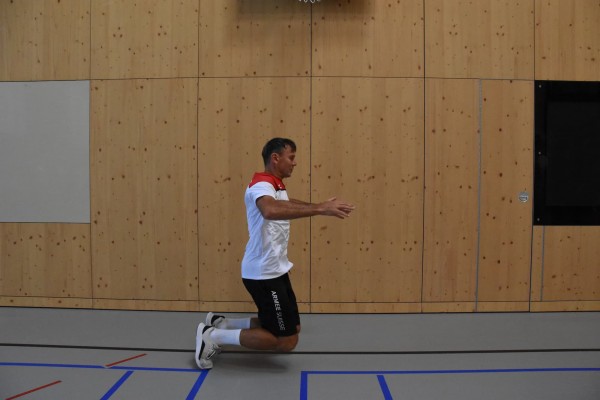
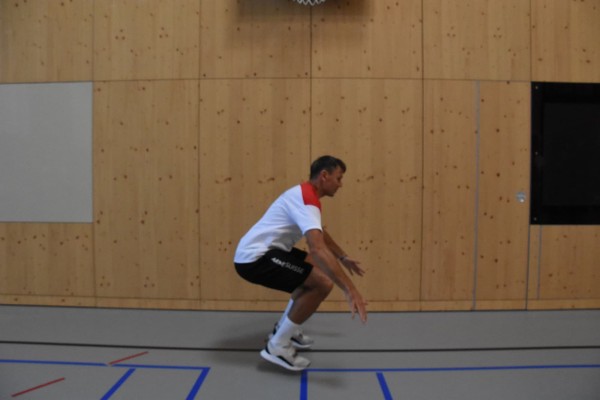
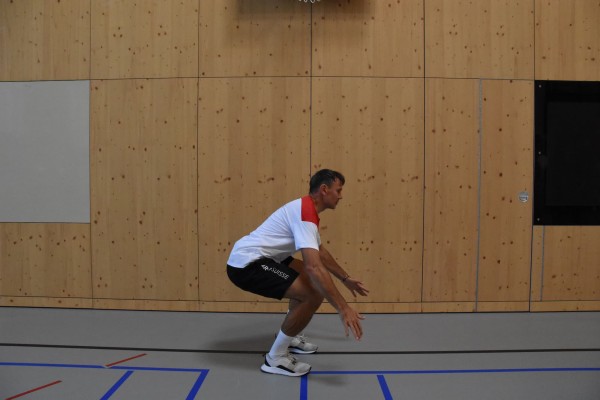
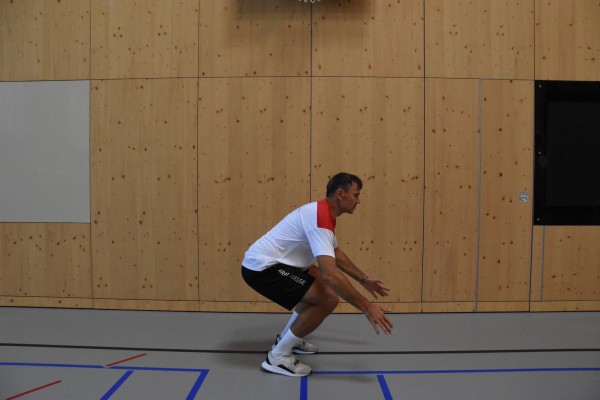
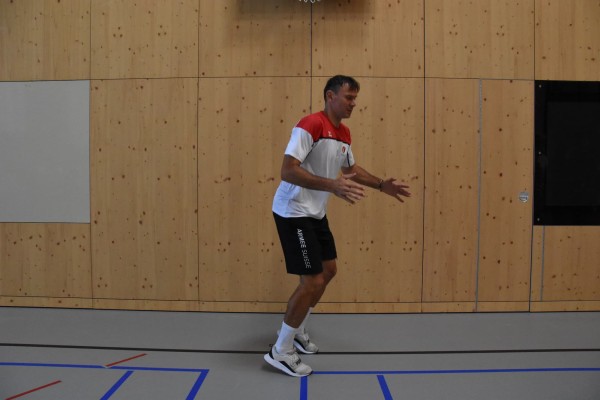
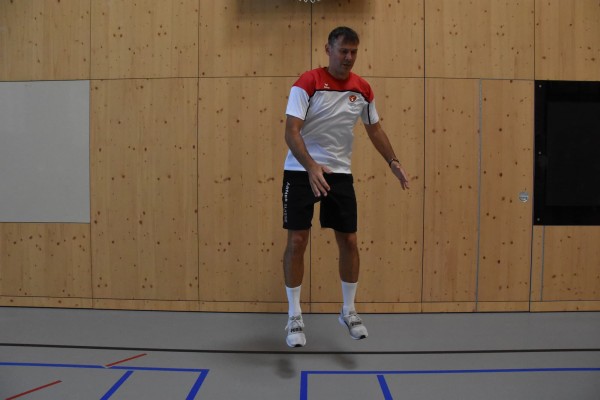
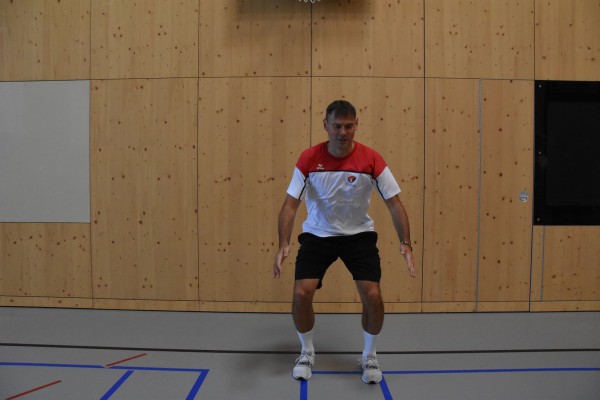
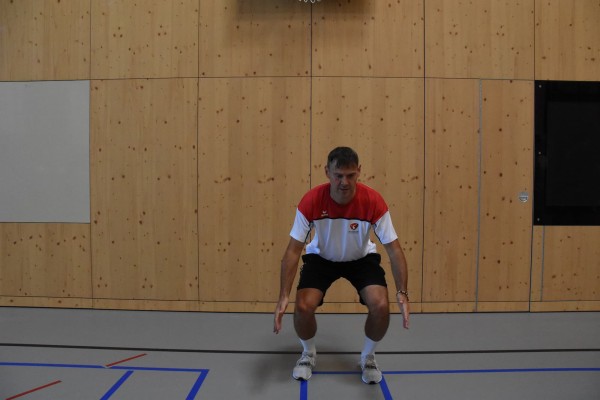
Stand on your knees (possibly with your buttocks sitting on your feet), your arms hanging down at the side of your body and your upper body upright. The buttocks and leg muscles are tensed and the arms are brought back to gain momentum. Then, with an explosive movement, hop onto both feet simultaneously (landing in a squat position), bringing your arms up quickly and pushing your hips forwards. After landing, you immediately jump up with both legs (keeping your contact time with the ground as short as possible), rotating your body 90 degrees to the left side in the air (landing facing the left side, in the starting position you are facing forwards).
Attention:
The exercise requires a certain amount of explosiveness in the legs and is therefore rather demanding.
Ligthen:
Significantly greater support from the arms (momentum).
Harden:
Additional weight; soft surface.
2 weight cuffs/1 weight vest/fighting backpack ► making the exercise more difficult (additional weight)
1 small soft mat ► making the exercise more difficult (base)
Jump from kneeling to standing (kneeling jumps) and jump into the air including rotation (right) ► kneeling jump / kneeing jump
Power
Individual work
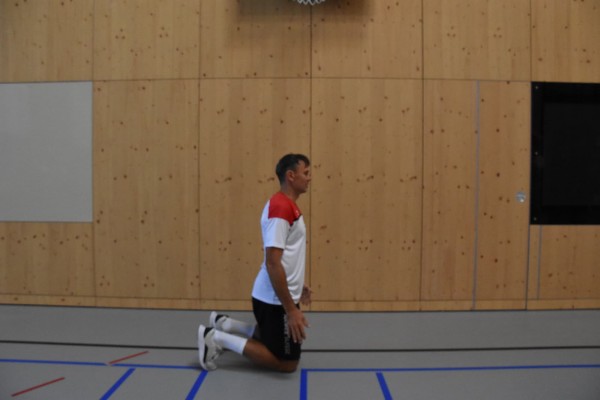
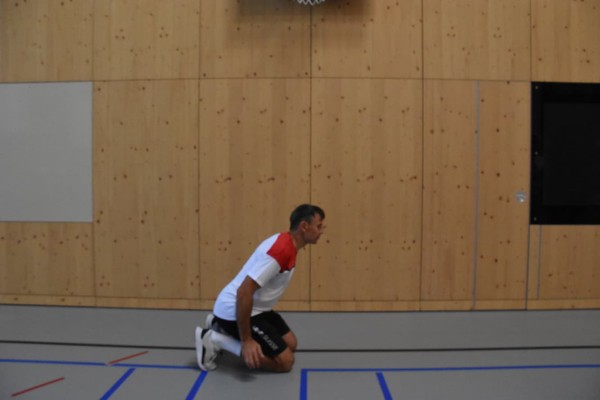
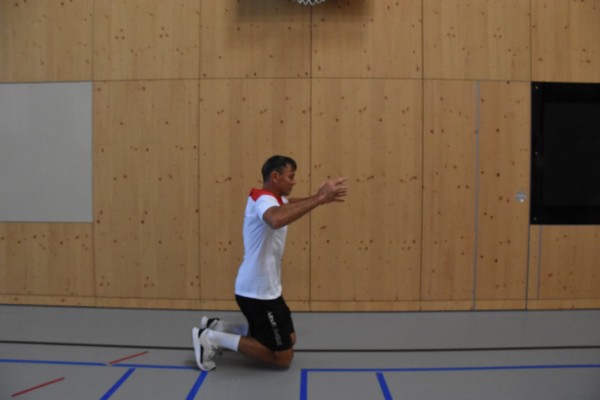
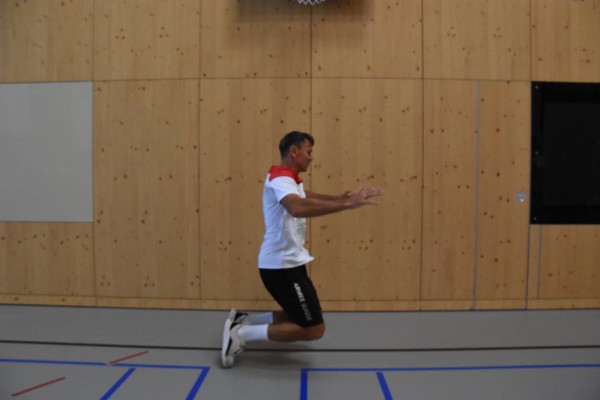
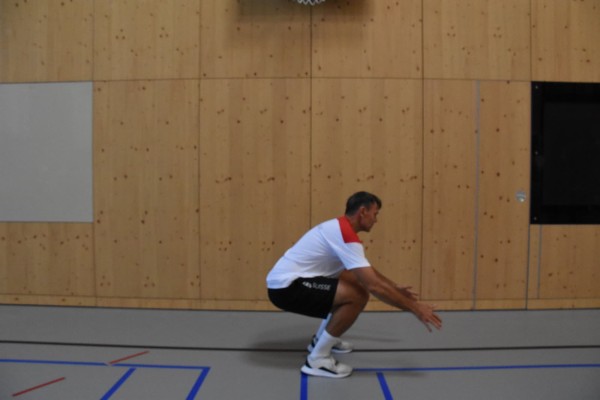
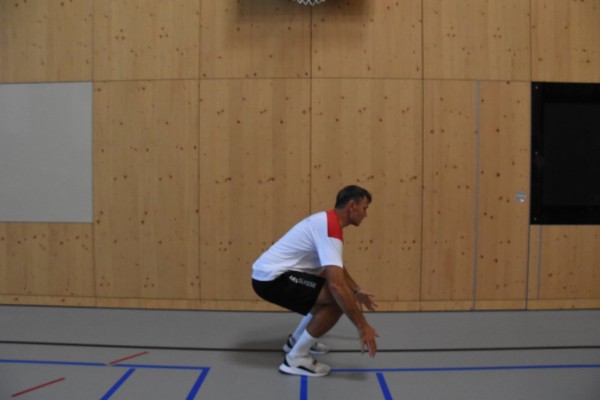
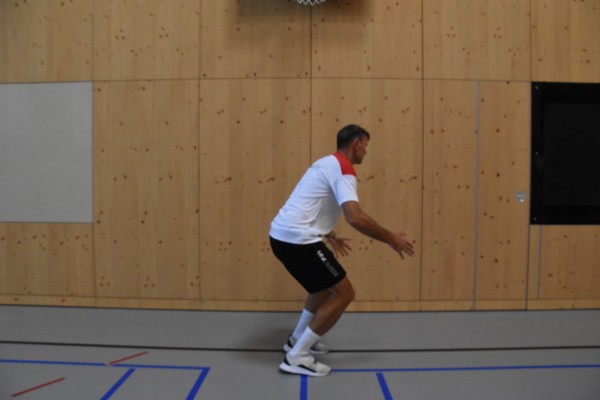
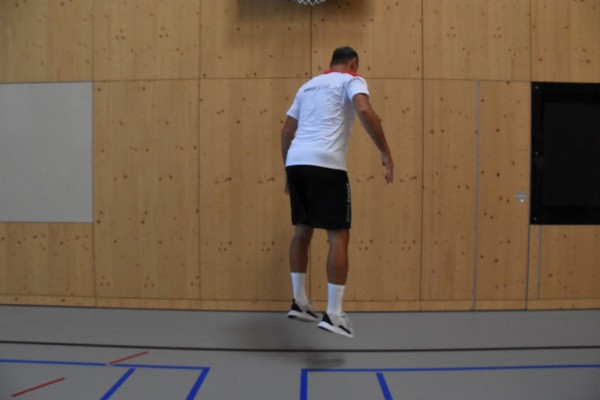
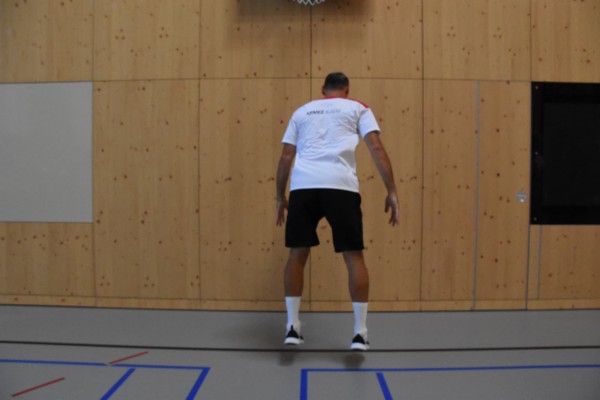
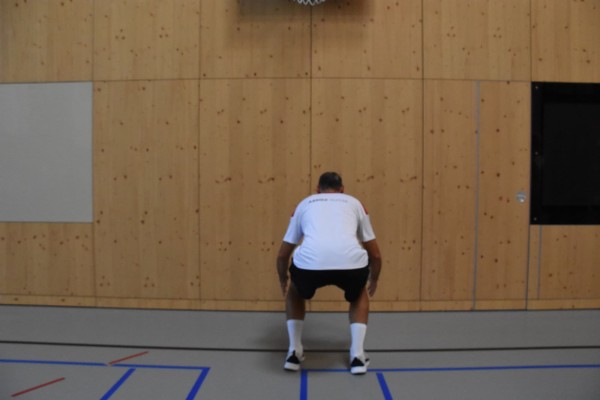
Stand on your knees (possibly with your buttocks sitting on your feet), your arms hanging down at the side of your body and your upper body upright. The buttocks and leg muscles are tensed and the arms are brought back to gain momentum. Then, with an explosive movement, hop onto both feet simultaneously (landing in a squat position), bringing your arms up quickly and pushing your hips forwards. After landing, you immediately jump up with both legs (keeping your contact time with the ground as short as possible), rotating your body 90 degrees to the right side in the air (landing facing the right side, in the starting position you are facing forwards).
Attention:
The exercise requires a certain amount of explosiveness in the legs and is therefore rather demanding.
Lighten:
Significantly greater support from the arms (momentum).
Harden:
Additional weight; soft surface.
2 weight cuffs/1 weight vest/fighting backpack ► making the exercise more difficult (additional weight)
1 small soft mat ► making the exercise more difficult (base)
Jump from kneeling to standing (kneeling jumps) and jump into the air including rotation ► kneeling jump / kneeing jump
Power
Individual work
Stand on your knees (possibly with your buttocks sitting on your feet), your arms hanging down at the side of your body and your upper body upright. The buttocks and leg muscles are tensed and the arms are brought back to gain momentum. Then, with an explosive movement, hop onto both feet simultaneously (landing in a squat position), bringing your arms up quickly and pushing your hips forwards. After landing, immediately jump up with both legs (keeping contact with the floor as short as possible), rotating the body 90 degrees in the air. Switch sides after each repetition so that you land facing the left or right side (starting position facing forwards).
Attention:
The exercise requires a certain amount of explosiveness in the legs and is therefore rather demanding.
Lighten:
Significantly greater support from the arms (momentum).
Harden:
Additional weight; soft surface.
2 weight cuffs/1 weight vest/fighting backpack ► making the exercise more difficult (additional weight)
1 small soft mat ► making the exercise more difficult (base)
Jump in all directions
Power
Individual work


Both-legged jumps into and out of the object lying on the floor (e.g. tyre) or jump over an object (e.g. combat backpack), integrating both forward, backward and sideways jumps into the exercise.
Attention:
Danger of tripping.
Keep your knees stable and behind the tips of your feet.
Lighten:
Jump without an object or just jump from a standing position behind the object forwards and back to the starting position; jump over a smaller object (e.g. combat rucksack instead of a tyre).(e.g. combat rucksack instead of tyre or helmet instead of combat rucksack); lower cadence.
Harden:
Higher cadence; additional weight (on the feet).
1 tyre (10DM)/fighting rucksack
1 helmet ► Make the exercise easier
2 weight cuffs/1 weight vest/sandbag ► Make the exercise more difficult (additional weight)
Leap into the air
Power
Individual work


Stand upright with your feet shoulder-width apart and your arms supported on your hips. Jump straight up with both legs (feet extended during the flight phase).
Attention:
Maintain an upright position (body tension).
Ligthen:
Smaller/less intense jumps.
Harden:
Hold additional weight (on the legs, on the shoulders, in the hands); jump on a soft surface.
Variant I:
Never put your heels down completely.
Variant II:
Pause between jumps (complete stance) or jump continuously.
Variant III:
Touch the floor with your hands after each jump (knee bend), stretch your arms upwards during the jump (stretch jump).
Variant IV:
Pull your knees up to the height of your navel at the same time as you jump, arms bent in front of you.
2 weight cuffs/short dumbbells/1 weight vest/sandbag/fighting backpack ► making the exercise more difficult (additional weight)
1 small/large soft mat ► making the exercise more difficult (base)
Leap into the air
Power
Individual work


Round course over box elements of different heights. Place a soft mat (small) between the elements and at the end of the course (crosswise - wide side of the mat facing the long side of the box). Jump onto the vaulting box element with both legs and back down again.
Attention:
Pause briefly on the vaulting box, cushion the landing with your legs (lower your buttocks), do not let your knees swing outwards/inside.
Lighten:
Less high elements.
Harden:
Higher elements.
Variant:
When jumping down, jump up again immediately after landing (explosive power) or take a roughly right angle with your knees when landing and hold this position briefly before jumping off again.
3 Swedish box
3 soft mats (small)