Exercises (1874)
Stroke combinations
Light-Contact
Partner work
Two elasticated bands are attached at approximately chest height (to a wall bar, boxing ring or similar). The participant stands with their back facing the attachment in a stepping position (staggered stance) and grasps one end of each band with their hands. The distance should be chosen so that the straps are slightly taut. From this position, the participant takes a step forwards and strikes any combination of 2-5 strokes. Then take a step back to the starting position to begin the exercise again.
Caution:
Grab the bands correctly.
4 elasticated rubber bands (2 per participant)
Stroke combinations
Light-Contact
Partner work


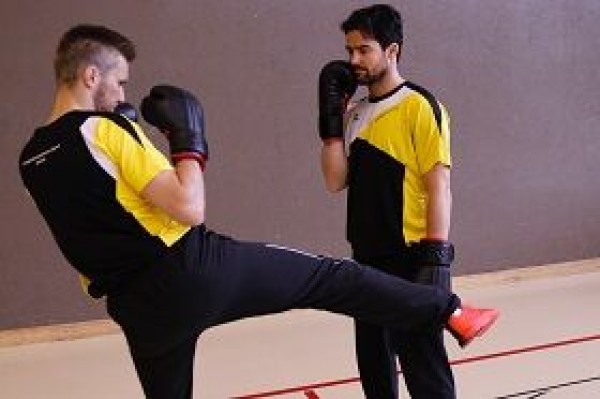


► Uppercut (crosswise, i.e. left fist to the opponent's left hand)
The passive participant can occasionally execute punching movements to which the active participant must react appropriately (e.g. evasive movements). This ensures that the defence is not neglected.
Variant:
Integrate footwork as well:
- Place the hand on the side of the body - back of the hand facing outwards (vary the height)
► Kick sideways onto the back of the hand - Cross the arms in front of the body - palms facing downwards
► Knee kick between the hands - Place both hands on the stomach - back of the hand facing the opponent
► Push off (leg pushed out forwards)
Participant:
1 pair of boxing gloves
Wheelbarrow defect
Fighting and roughhousing games
Group work
Groups of 2
Two participants form a team, with one of the participants representing the wheelbarrow (leaning on their hands and being held by their partner's thighs). The different groups try to make the other "wheelbarrows" collapse. Which group remains at the end?
An additional exercise (e.g. wall sits, press-ups, forearm support, etc.) can be determined for the "broken" wheelbarrows.
No material required
Shoulder thrust
Fighting and roughhousing games
Partner work
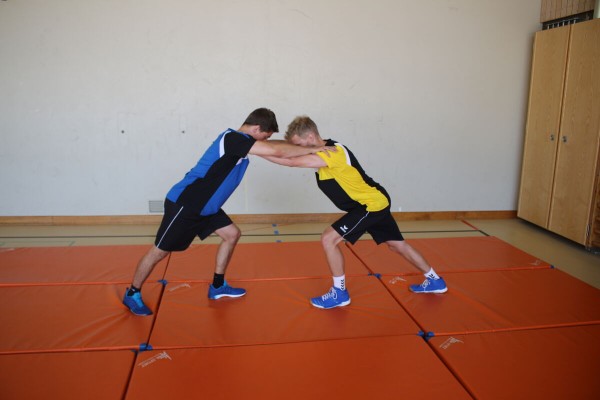
Two participants line up in the centre of a mat/grass field (or without a field boundary) and grab each other by the shoulders. Both participants try to push/pull their opponent out of the field. The first person to put a foot next to the field loses.
Variant:
Playing field size varies; exercise is also possible on a small field (1-4 mats).
9-12 soft mats (small) ► indoor version
4 marking cones/caps ► indoor and outdoor version
Indoor post set-up:
form a rectangular field of mats using soft mats.
Indoor/outdoor post set-up:
define a rectangular field using caps.
Shoulder thrust with restriction
Fighting and roughhousing games
Partner work
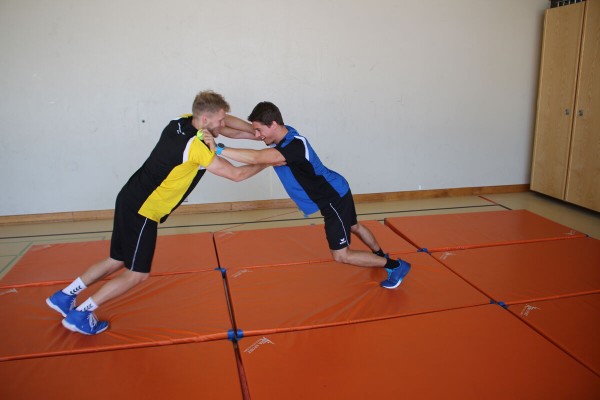
Two participants line up in the centre of a mat/lawn area and try to push each other off a mat/lawn area. The participants each hold a tennis ball in their hands. The tennis balls restrict the participants in their fighting behaviour, which should prevent scratches and/or abrasions. The first person to put a foot next to the court loses.
9 soft mats (small) ► indoor version
4 tennis balls
4 marking cones/caps ► indoor and outdoor version
Indoor post set-up:
form a rectangular mat field using soft mats.
Indoor/outdoor post set-up:
define a rectangular field using caps.
Suspended push-off
Fighting and roughhousing games
Partner work

Two participants sit opposite each other in a suspended position (legs and upper body raised off the floor, only the buttocks touch the floor, arms possibly crossed in front of the body). With the support of their legs, the participants try to unbalance their opponent. As soon as a participant touches the floor with their back, hands or feet, they lose. The competition can be performed with or without permanent contact between the legs/feet.
Caution:
Despite any fatigue, a hollow back position must be avoided (actively tense the torso).
No material required
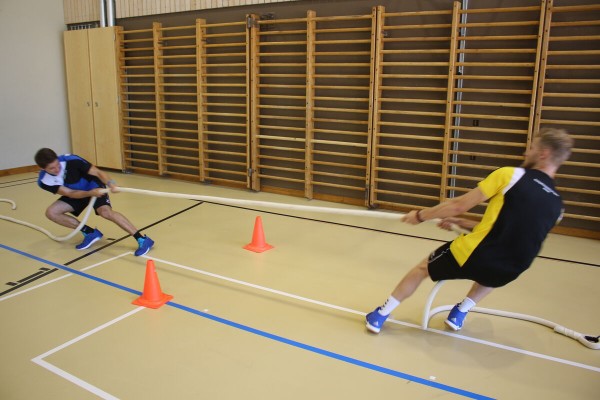
Rope/rope pulling ► rope pulling
Power
Partner work
1 trainee & 1 helper ► Note change of position
(= double the time required; for lesson planner see Organisation Kraft: Info button Execution)


► Exercise only suitable in the gym!
Trainee: Pulls their partner towards them by pulling on the rope/rope. As soon as both participants are in the same position, the trainee distances themselves until the rope/rope is stretched to its full length so that they can pull their partner towards them again.
Partner: Stands in a squatting position (stable torso; stomach tensed) on the carpet remnants and holds on to the end of the rope/rope.
Attention:
Both participants ensure a straight back.
Lighten:
Lighter partner.
Harden:
Heavier partner (partner with additional weight).
1 rope/rope
2 carpet remnants
1 weight waistcoat ► to make the exercise more difficult (additional weight)
Skipping rope
Light-Contact
Partner work
Skipping in place, alternating between bringing one leg to the ground and lifting the other leg up to navel height with the knee (skipping).
2 skipping ropes (one rope per participant)
Rope skipping / ball kicking
Light-Contact
Partner work
The two positions are changed at each round.
Position 1:
Skipping rope by jumping on the spot with both legs.
Position 2:
Holding a medicine ball with both hands in front of the chest in a stepping position (staggered stance). Push the ball to the ground with one arm (side can be varied) and catch it again with both hands. After each kick, shift position slightly without crossing your legs and then kick the ball towards the floor again.
1 skipping rope
1 medicine ball
Rope pulling
Fighting and roughhousing games
Partner work
Two participants stretch a rope between them (holding the rope in their hands) and stand facing each other at a distance of approx. 3-4 metres. The participants try to pull their opponent over the centre line (or the opponent/the centre of the rope over a certain line). Whoever is pulled over the line first loses.
1 rope
2 marking cones/caps (optional) ►Field marking
Post set-up:
Mark the defined baseline (for the centre of the rope) using cones.
Lateral forearm support (left) ► forearm side plank / lateral pillar bridge / side bridge
Power
Individual work
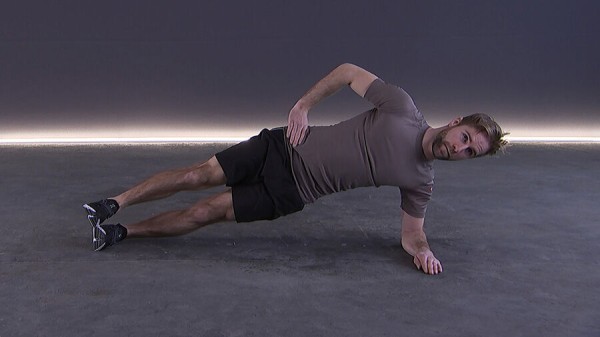
Side plank on the (left) forearm, with the elbow directly beneath the shoulder, the forearm on the floor, and the legs stretched out, either one on top of the other or staggered for greater stability; lift the pelvis until the body forms a straight line from head to toe. The oblique abdominal muscles, glutes and legs should be actively engaged. Hold the position isometrically and continue to breathe calmly.
Attention:
The pelvis does not sag (insufficient tension in the lateral core muscles), the hips do not rotate forwards or backwards, the shoulders do not collapse (sinking in the joint), the head does not droop or tilt (straining the neck), and there is not too much pressure in the lower back instead of the core (incorrect distribution of tension).
Lighten:
Knees on the floor (knee-side-plank); place the top leg slightly in front of the bottom leg, or position the feet staggered rather than stacked.
Harden:
Feet close together (stacked position); upper leg raised (side plank leg raise); additional load on the hips (e.g. weight on the pelvis); free upper hand above the head or holding a weight; unstable surface (possible for both the arm and the legs).
1 soft mat (small)
1 weighted vest/weight plate/dumbbell/sandbag ► Increases the difficulty of the exercise (additional weight)
1 ball/1–2 balance cushions/1 balance board ► Increases the difficulty of the exercise (unstable surface)
Lateral forearm support (left) ► lateral pillar bridge / side plank / side bridge
Power
Individual work

Side support with the left forearm on the balance board. Raise your upper leg slightly off the floor (in extension of your body) and bend your lower leg on the floor (kneeling, foot pointing backwards). Hold the position you have assumed.
Attention:
Head, torso, hips and knees practically form a line (pelvis does not tilt backwards or forwards), keep shoulder above elbow.
Lighten:
Lateral forearm support without balance board; support upper leg extended on the floor as an extension of the body.
Harden:
Both legs stretched out in extension of the body (outer instep of the lower foot supports the overlapping legs).
Variant:
Lift and lower the pelvis.
1 balance board incl. roller
Lateral forearm support (right) ► forearm side plank / lateral pillar bridge / side bridge
Power
Individual work

Side plank on the (left) forearm, with the elbow directly beneath the shoulder, the forearm on the floor, and the legs stretched out, either one on top of the other or staggered for greater stability; lift the pelvis until the body forms a straight line from head to toe. The oblique abdominal muscles, glutes and legs should be actively engaged. Hold the position isometrically and continue to breathe calmly.
Attention:
The pelvis does not sag (insufficient tension in the lateral core muscles), the hips do not rotate forwards or backwards, the shoulders do not collapse (sinking in the joint), the head does not droop or tilt (straining the neck), and there is not too much pressure in the lower back instead of the core (incorrect distribution of tension).
Lighten:
Knees on the floor (knee-side-plank); place the top leg slightly in front of the bottom leg, or position the feet staggered rather than stacked.
Harden:
Feet close together (stacked position); upper leg raised (side plank leg raise); additional load on the hips (e.g. weight on the pelvis); free upper hand above the head or holding a weight; unstable surface (possible for both the arm and the legs).
1 soft mat (small)
1 weighted vest/weight plate/dumbbell/sandbag ► Increases the difficulty of the exercise (additional weight)
1 ball/1–2 balance cushions/1 balance board ► Increases the difficulty of the exercise (unstable surface)
Lateral forearm support (right) ► lateral pillar bridge / side plank / side bridge
Power
Individual work

Side support with the right forearm on the balance board. Lift the top leg slightly off the floor (in extension of the body) and bend the bottom leg on the floor (kneeling, foot pointing backwards). Hold the position you have assumed.
Attention:
Head, torso, hips and knees practically form a line (pelvis does not tilt backwards or forwards), keep shoulder above elbow.
Lighten:
Lateral forearm support without balance board; support upper leg extended on the floor as an extension of the body.
Harden:
Both legs stretched out in extension of the body (outer instep of the lower foot supports the overlapping legs).
Variant:
Lift and lower the pelvis.
1 balance board incl. roller
Lateral forearm support / lateral support (left) ► side plank / lateral pillar bridge / side bridge
Power
Individual work


Progression I:
Side support on the left forearm with the legs in the foot supports (crossed over, top leg in front). Support the upper right arm on the floor in front of the body, lift the pelvis off the floor and hold the position. To increase the intensity, support the free arm on the hip or extend it vertically upwards.
Progression II:
Analogue to Progression I, but only supported on one hand. Increase the intensity according to progression I.
Attention:
Keep body tension, do not let hips sag, back straight, forearm under shoulder (for both progressions).
Harden:
The further away the head is from the attachment point, the more challenging the exercise becomes.
Variant I:
Lift and lower the pelvis.
Variant II:
Alternately bring the upper arm under the body and extend it upwards, accompanying the movement with the head.
1 sling trainer
Lateral forearm support / lateral support (right) ► side plank / lateral pillar bridge / side bridge
Power
Individual work


Progression I:
Side support on the right forearm with the legs in the foot supports (crossed over, top leg in front). Support the upper left arm on the floor in front of the body, lift the pelvis off the floor and hold the position. To increase the intensity, support the free arm on the hip or extend it vertically upwards.
Progression II:
Analogue to Progression I, but only supported on one hand. Increase the intensity according to progression I.
Attention:
Keep body tension, do not let hips sag, back straight, forearm under shoulder (for both progressions).
Harden:
The further away the head is from the attachment point, the more challenging the exercise becomes.
Variant I:
Lift and lower the pelvis.
Variant II:
Alternately bring the upper arm under the body and extend it upwards, accompanying the movement with the head.
1 sling trainer
Lateral forearm support with raised leg (left) ► lateral pillar bridge / side plank / side bridge
Power
Individual work

Side support on the left forearm (possibly on a wall for the correct straight position). Raise the top leg, extend the free arm in a high position (starfish) or support it on the hip and hold the position.
Attention:
Head, torso, hips and knees form a line (pelvis does not tilt backwards or forwards), keep the shoulder above the elbow.
Lighten:
Knee on the floor; spread the upper leg less.
Harden:
Additional weight (on the hip, on the upper leg for additional training of the leg muscles); unstable base (possible for both supporting arm and supporting leg).
1 weight cuff/weight vest/weight disc/dumbbell/sandbag ► make the exercise more difficult (additional weight)
1 ball/1-2 balance cushions/1 balance board ► make the exercise more difficult (unstable surface)
Lateral forearm support with raised leg (right) ► lateral pillar bridge / side plank / side bridge
Power
Individual work

Side support on the right forearm (possibly on a wall for the correct straight position). Raise the top leg and stretch the free arm upwards (starfish) or support it on the hip and hold the position.
Attention:
Head, torso, hips and knees form a line (pelvis does not tilt backwards or forwards), keep the shoulder above the elbow.
Lighten:
Knee on the floor; spread the upper leg less.
Harden:
Additional weight (on the hip, on the upper leg for additional training of the leg muscles); unstable base (possible for both supporting arm and supporting leg).
1 weight cuff/weight vest/weight disc/dumbbell/sandbag ► make the exercise more difficult (additional weight)
1 ball/1-2 balance cushions/1 balance board ► make the exercise more difficult (unstable surface)
Lateral forearm support with arm pull (left) ► lateral pillar bridge / side plank / side bridge + pull mit Band
Power
Individual work
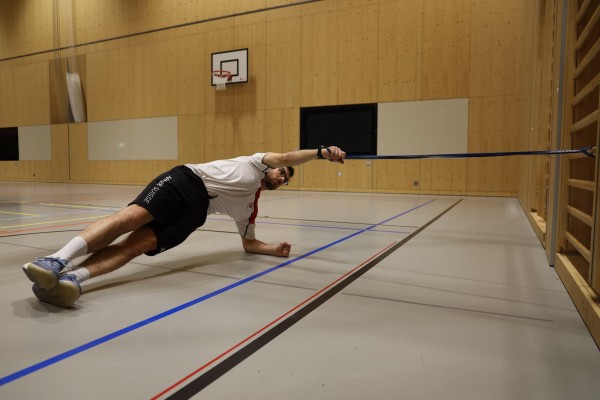
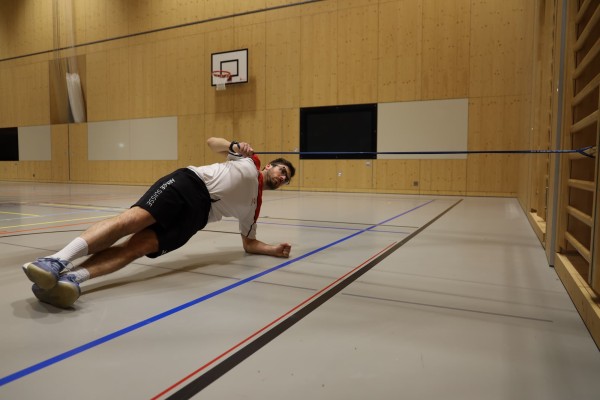
Side plank on the left forearm, legs extended and stacked. Hold the anchored resistance band with the right arm. From a stable core position, pull the band toward the body in a controlled manner while maintaining the side plank.
Attention:
Head, torso, hips and legs form a straight line (pelvis stays level); left shoulder remains above the left elbow; during the pull, avoid any trunk rotation or hip drop; movement of the right arm should be slow and controlled.
Lighten:
Bend the lower (left) leg and support on the knee; reduce band tension or move closer to the anchor point; side plank without pulling (hold only).
Harden:
Lift the top leg while keeping it extended; use a stronger resistance band.
1 resistance band
1 wall bars
Lateral forearm support with arm pull (right) ► lateral pillar bridge / side plank / side bridge + pull mit Band
Power
Individual work
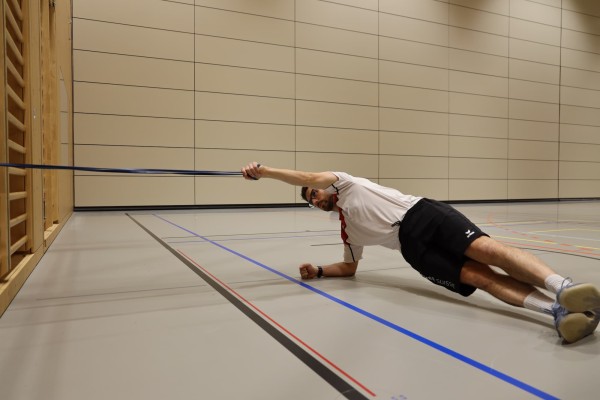

Side plank on the right forearm, legs extended and stacked. Hold the anchored resistance band with the left arm. From a stable core position, pull the band toward the body in a controlled manner while maintaining the side plank.
Attention:
Head, torso, hips and legs form a straight line (pelvis stays level). Right shoulder remains above the right elbow.
During the pull, avoid trunk rotation or hip drop. Movement of the left arm should be slow and controlled.
Lighten:
Bend the lower (right) leg and support on the knee; reduce band tension or move closer to the anchor point; side plank without pulling (hold only).
Harden:
Lift the top leg while keeping it extended; use a stronger resistance band.
1 resistance band
1 wall bars
Alternating lateral tilting of the upper body while standing
Power
Individual work

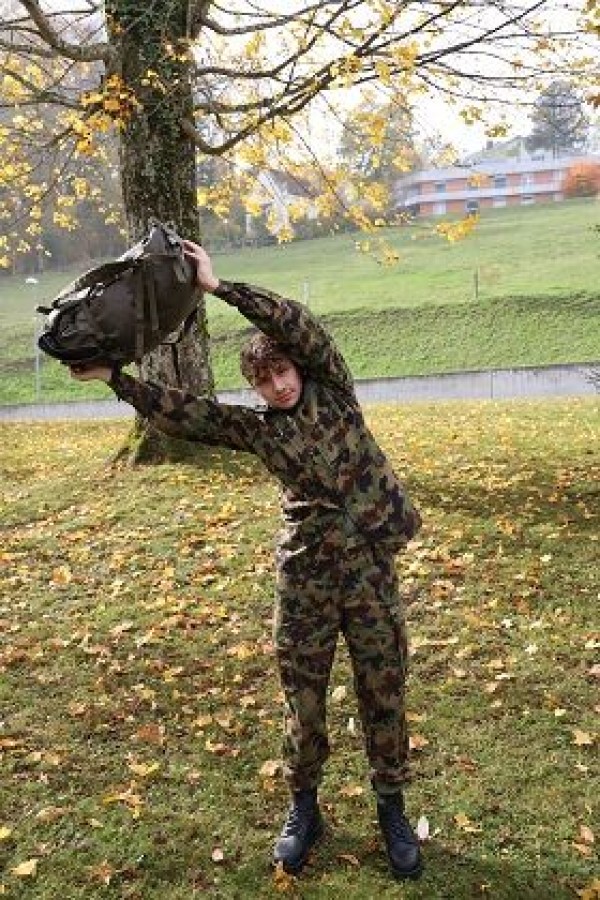
Stand upright with your hips wide apart, hold the object high above your head and then tilt your upper body alternately to the left and right side.
Attention:
Do not lean your upper body forwards or backwards, no hollow back (tense your torso).
Lighten:
No additional weight; lean your upper body less to the side.
Harden:
Additional weight (e.g. place stones in the helmet or a combat backpack)
1 helmet/(medicine) ball
1 combat rucksack/tyre (PUCH)/3-4 stones ► Make the exercise more difficult (additional weight)
Alternating lateral tilting of the upper body while standing ► side bend
Power
Individual work


Stand upright, shoulder-width apart with your feet in the loops. The gymnastics pole is held on the shoulders behind the head and the upper body is tilted alternately to the left and right side.
Attention:
Do not lean your upper body forwards or backwards, no hollow back (tense torso).
Lighten:
Select less strong elastic bands; roll up the elastic bands less.
Harden:
Select stronger elastic bands; roll up the elastic bands more.
1 gymnastic bar with elasticated straps
Lateral tilting of the upper body in forearm support ► pillar bridge / plank rolls
Power
Individual work
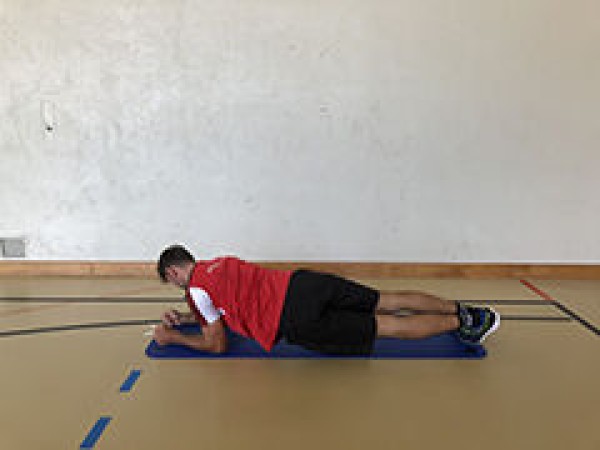
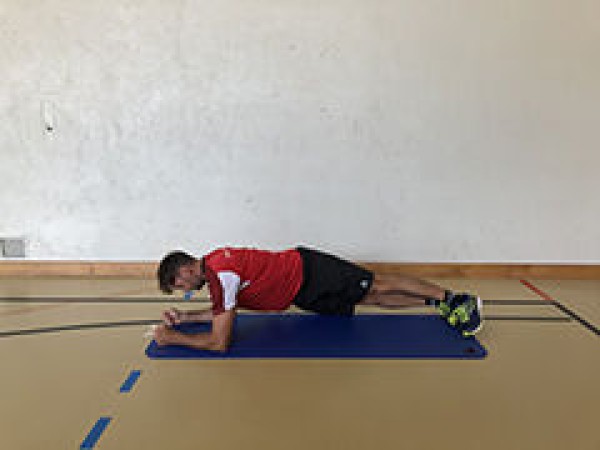

In the forearm support (the stretched legs and upper body practically form a line, the legs are supported on the tips of the toes and the upper body on the forearms, the forearms lie flat on the floor parallel to each other, the upper arms are vertical) tilt the upper body to the left or right side and return to the starting position.
Attention:
Head, torso, hips and knees practically form a line (do not stretch your buttocks upwards or allow them to sag, tense your stomach).
Lighten:
Knees on the floor.
Harden:
A stable base for the legs and/or arms is possible.
1-2 balls/balance cushions/balance boards ► Make the exercise more difficult (unstable surface)
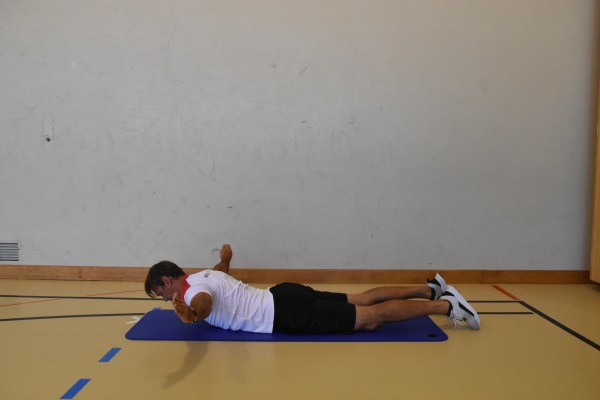
Lateral raising of the arms in prone position ► prone T hold
Power
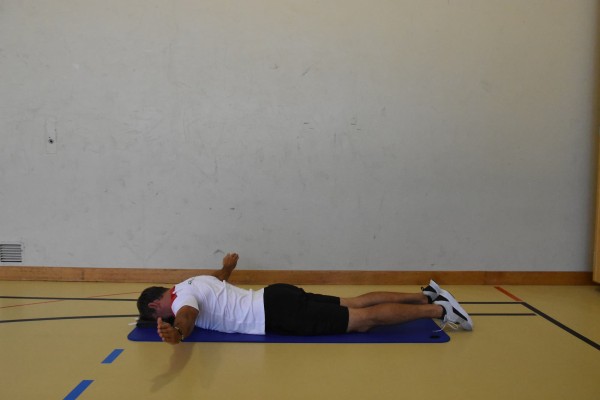
Lie on your stomach with your forehead resting on a folded sheet, feet shoulder-width apart, arms pointing to either side (T-position). From this position, pull the shoulder blades together and raise the arms until the elbows are at shoulder height and the arms are parallel to the floor (palms facing forward or downward). Keep your arms straight and hold the position.
Attention:
Only the arms should be raised, nothing else - aim to isolate the upper back.
Harden:
Hold additional weight in your hands or on your arms.
2 weight cuffs/2 weight balls/dumbbells ► Make the exercise more difficult (additional weight)
Lateral raising of the arms in prone position ► prone T raise hold / prone lateral raise hold
Power
Lie on your stomach with your upper body slightly raised, feet shoulder-width apart, arms pointing to either side (T-position). From this position, pull your shoulder blades together and raise your arms until your elbows are at shoulder height and your arms are parallel to the floor (palms facing forward or downward). Keep your arms straight and hold the position.
Attention:
Only the arms should be raised, nothing else - aim to isolate the upper back.
Harden:
Hold additional weight in your hands or on your arms.
2 weight cuffs/2 weight balls/dumbbells ► Make the exercise more difficult (additional weight)