
Exercises (1641)
Lunge sideways alternating ► lateral lunge
Power
Individual work


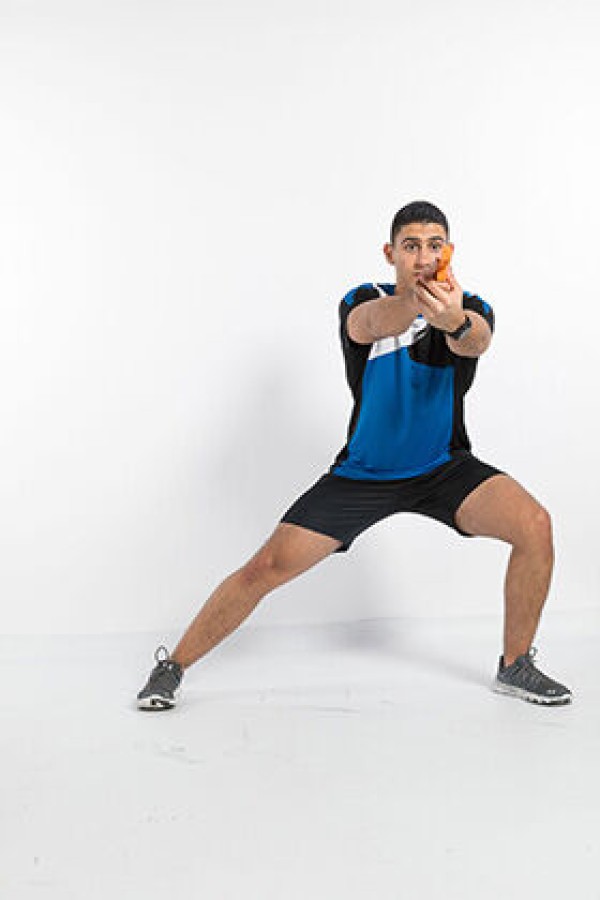
Standing lunge, lunge to the side in contact position with simultaneous bending of the legs and lowering of the upper body to move sideways and return to the standing position (movement as if you were ducking under a height limit). The next exercise is performed in the opposite direction so that you are back at the starting position.
Lighten:
Bend your knees less/barely lower your body.
Harden:
Bend your knees more/Centre of gravity very low.
1 Pistol
Lunge sideways alternating ► lateral lunge
Power
Individual work


Standing lunge, lunge to the side in contact position with simultaneous bending of the legs and lowering of the upper body to move sideways and return to the standing position (movement as if you were ducking under a height limit). The next exercise is performed in the opposite direction so that you are back at the starting position.
Lighten:
Bend your knees less/barely lower your body.
Harden:
Bend your knees more/Centre of gravity very low.
1 assault rifle (neutralised)
Lunge sideways alternating ► lateral lunge
Power
Individual work


Stand upright shoulder-width apart, feet in the loops, hold the gymnastics pole in front of the body with bent, parallel forearms (baby position), lunge to the side (leg stretched out, supporting leg bent), push off the bent leg to return to the starting position. Switch sides after each exercise.
Attention:
Keep your upper body upright, keep the knee of the supporting leg centred over the foot, put weight on the whole foot.
Lighten:
Choose less strong elastic bands; roll up the elastic bands less; bend the training leg less (lower the upper body less).
Harden:
Choose stronger elastic bands; roll up the elastic bands more.
1 gymnastic bar with elasticated straps
Lunge sideways alternating ► lateral lunge
Power
Individual work


From an upright shoulder-width stance with the dumbbells held in the hanging arms, perform a lunge to the side (leg outstretched, supporting leg bent). Then push off the bent leg to return to the starting position in the standing position. Switch sides after each exercise.
Starting position:
- Stand shoulder-width apart
- Your back is straight
- Let your arms hang loosely, grasp the dumbbells in a neutral grip
Finishing position:
- Back remains straight
- Look straight ahead
- Leg to be trained is bent, the other leg is stretched out to the side
- Buttocks point backwards, do not bring the knee of the training leg forwards (does not protrude beyond toes)
- Keep the knee of the supporting leg centred over the foot, put weight on the whole foot
- Thigh of the bent leg is parallel to the floor
- Dumbbells (almost) touch the floor
2 dumbbells
Lunge forwards alternating ► farmer walk
Power
Individual work

Grab an object with both hands (approx. 10kg), arms hanging at your sides. Carry objects back and forth between two fanjons, moving with lunges (back knee just touching the floor).
Attention:
Keep your back straight, your pelvis stable with every step, keep your shoulders fixed (lower towards your hips).
Lighten:
Equipment approx. 5kg
Harden:
Equipment approx. 15kg
2 fanjons
Weight 10kg
Weight 5kg ► make the exercise easier
Weight 15kg ► make the exercise more difficult
Lunge forwards alternating ► forward lunge
Power
Individual work


Stand upright, arms supported on the hips, folded across the chest or in front, lunge forwards, bend the front (and back) leg to a right angle (back knee briefly touches the floor), push off the front leg to return to the starting position. Switch sides for the next exercise.
Attention:
Always keep the front knee behind the tip of the foot and centred over the foot. Distribute your weight over the entire front foot. Keep an upright posture (tense torso), push your front knee outwards (do not tilt it inwards).
Lighten:
Lower your upper body less (greater angle at the knees).
Harden:
Additional weight (on the shoulders, with hanging arms or in a forward or upright position).
Variant I:
Push off the back leg to return to the standing position. The lunge creates locomotion.
Variant II:
Instead of bringing the front leg to a standing position, the back leg is brought directly forwards and the knee is bent (new lunge), creating continuous locomotion.
1 weight vest/weight disc/(medicine) ball/barbell/sandbag/fighting backpack/2 dumbbells ► make the exercise more difficult (additional weight)
Lunge forwards alternating ► forward lunge
Power
Individual work
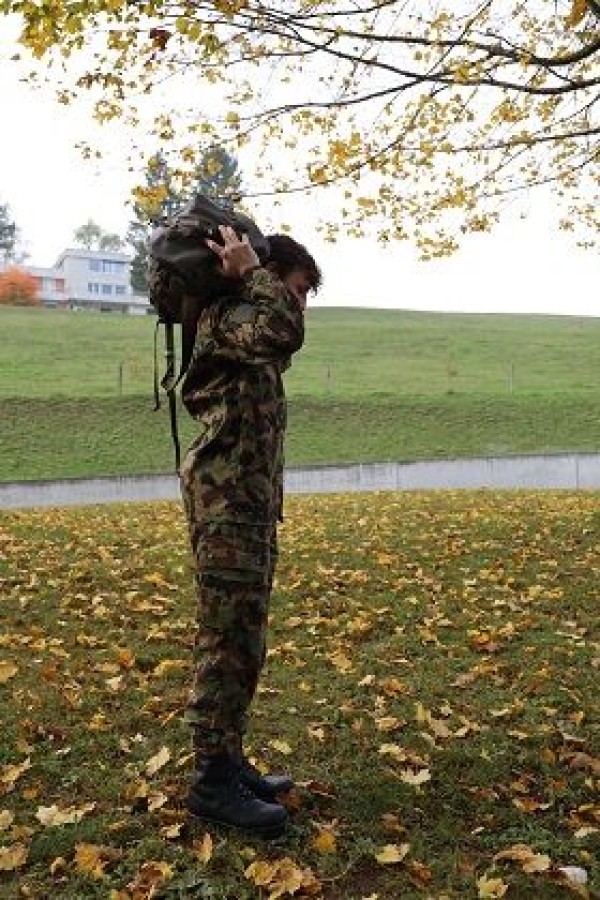
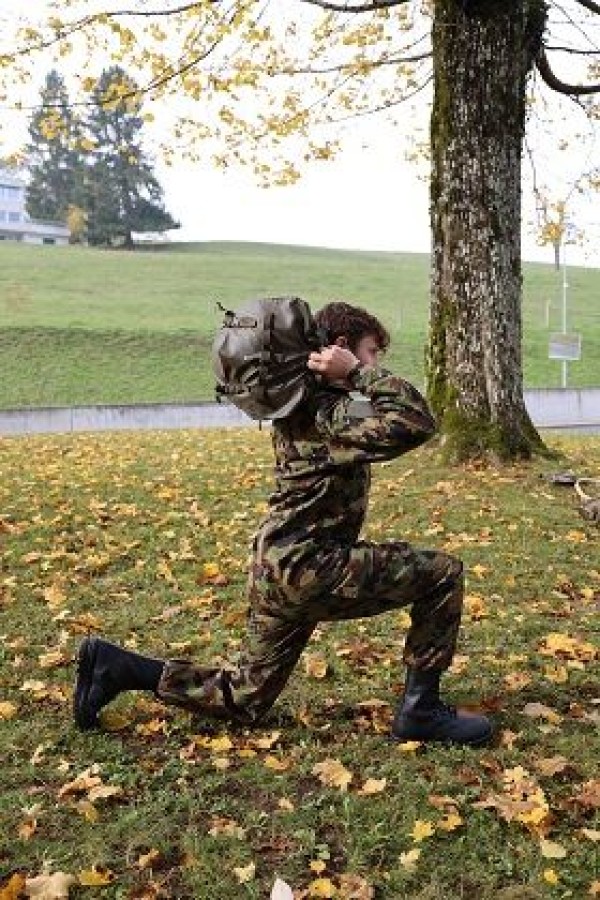
Stand upright, hold an object placed on your shoulder or neck (e.g. sandbag or rucksack) with your hands, lunge forwards, bend your front (and back) leg to a right angle (back knee briefly touches the floor), push off your front leg to return to the starting position. Switch sides for the next exercise.
Attention:
Always keep the front knee behind the tip of the foot and centred over the foot. Distribute your weight over the entire front foot. Keep an upright posture (tense torso), push the front knee outwards (do not tilt inwards).
Lighten:
Less weight/load; lower the upper body less (greater angle in the knees).
Harden:
More weight/increased load.
Variant I:
Push off the back leg to return to the standing position. The lunge creates locomotion.
Variant II:
Instead of bringing the front leg to the standing position, the back leg is brought directly forwards and the knee is bent (new lunge), creating continuous locomotion.
1 combat rucksack/sandbag (medium weight)
1 sandbag (light) ► make the exercise easier
1 weight vest/sandbag (heavy) ► make the exercise more difficult (additional weight)
Lunge forwards alternating with extension and flexion of the arms ► lunge & overhead press
Power
Individual work


Stand upright, place the barbell on your shoulder/neck or hold it in front of your chest and hold it with your hands more than shoulder-width apart. Lunge forwards, bend your front (and back) leg to a right angle (back knee practically on the floor), simultaneously straighten your arms and push the barbell upwards. Then bring the back leg forwards to perform another lunge (forwards movement). With each lunge, the weight is pushed upwards once (in the low lunge position, the arms are extended; in the upright single-leg position, the barbell is in the starting position).
Attention:
Always keep your front knee behind the tip of your foot and centred over your foot. Distribute your weight over the entire front foot. Keep an upright posture (no hollow back, tense torso), push your front knee outwards (do not tilt inwards).
Lighten:
Less weight/load; lower your upper body less (greater angle in the knees).
Harden:
More weight/greater load.
Variant I:
Attach a weight disc to both ends of the barbell with an elastic band. Due to the instability created by the swinging weight, the variation of the exercise also promotes sensorimotor skills and the exercise is significantly more challenging.
Variant II:
Push off the front leg to return to the standing position (no movement).
1 barbell
2 elastic bands and (small) weight discs ► variation of the exercise
Lunge forwards alternating with extension and flexion of the arms ► lunge & overhead press
Power
Individual work


Stand with your hips wide apart, hold the weight in front of your body, lunge forwards (approx. 60-90 cm), lower your hips to the floor until the back of your leg is parallel to the floor, bend your front leg to a right angle. From this position, the front lift is performed by raising the arms so that the weight is finally overhead. After a short pause in the lunge position with the arms held high, the front leg is pushed down to return to the standing position. Switch sides for the next exercise.
Attention:
Always keep the front knee behind the tip of the foot and centred over the foot. Distribute your weight over the entire front foot. Stand upright (tense torso), push the front knee outwards (do not tilt inwards).
Lighten:
Less or no additional weight; lower the upper body less (greater angle in the knees).
Harden:
More weight.
Variant I:
Push off the back leg to return to the standing position. The lunge creates locomotion.
Variant II:
Instead of bringing the front leg to the standing position, the back leg is brought directly forwards and the knee is bent (new lunge), creating continuous locomotion.
1 medicine ball/weight disc/dumbbell
1 weight waistcoat ► to make the exercise more difficult (additional weight)
Lunge forwards alternating with rotation of the upper body
Power
Individual work
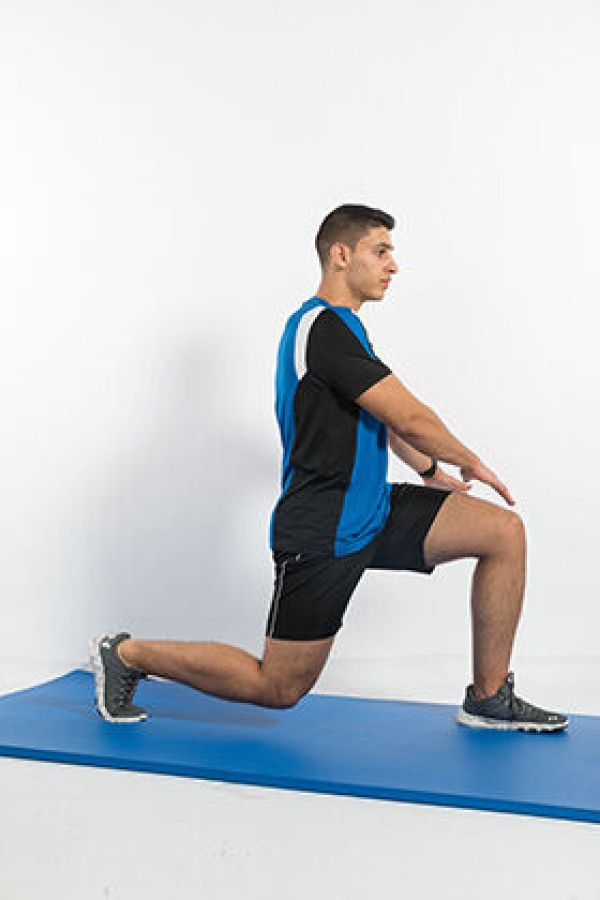
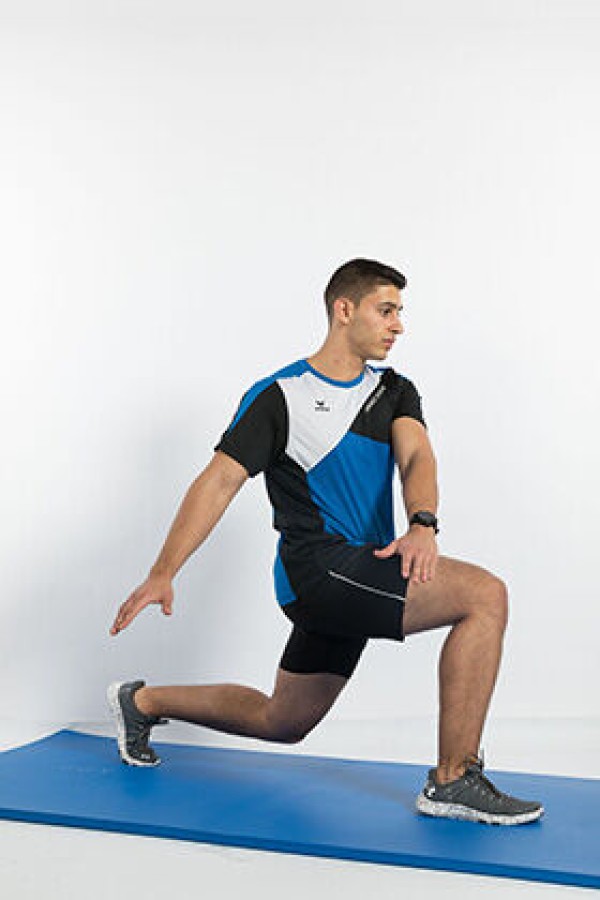
Stand upright, arms stretched as far as possible in front, lunge forwards, bend the front (and back) leg to a right angle, rotate the upper body to the side of the front leg and back in the lunge position (look at the movement), push off the front leg to return to the starting position. Switch sides for the next exercise.
Attention:
Always keep the front knee behind the tip of the foot and centred over the foot. Distribute weight over the entire foot. Stand upright (tense torso), push the front knee outwards (do not tilt inwards).
Lighten:
Lower the upper body less (greater angle in the knees).
Harden:
Additional weight (hold in hands).
Variant I:
Push off the back leg to return to the standing position. The lunge creates locomotion.
Variant II:
Instead of bringing the front leg back to the standing position, the back leg is brought forwards and the knee is bent (new lunge), creating continuous locomotion.
1 weight vest/weight disc/(medicine) ball/1-2 dumbbells ► make the exercise more difficult (additional weight)
Lunge forwards alternating with rotation of the upper body
Power
Individual work


When standing upright, hold an object (e.g. helmet or rucksack) at chest height with arms almost outstretched, lunge forwards, bend the front (and back) leg to a right angle (back knee briefly touches the floor), rotate the upper body/object to the side of the front leg and back in the lunge position (gaze accompanies the movement), push off the front leg to return to the standing position in the starting position. Switch sides for the next exercise.
Attention:
Always keep the front knee behind the tip of the foot and centred over the foot. Distribute your weight over the entire front foot. Keep an upright posture (tense torso), push the front knee outwards (do not tilt inwards).
Lighten:
Less weight/load; lower the upper body less (greater angle in the knees).
Harden:
More weight/increased load.
Variant I:
Push off the back leg to return to the standing position. The lunge creates locomotion.
Variant II:
Instead of bringing the front leg to the standing position, the back leg is brought directly forwards and the knee is bent (new lunge), creating continuous locomotion.
1 combat rucksack/weight plate/dumbbell
1-2 PET bottles (1.5 litres)/helmet ► make the exercise easier
1 tyre (PUCH)weight vest/sandbag ► make the exercise more difficult (additional weight)
Lunge forwards alternating with rotation of the upper body
Power
Individual work


Stand upright with your feet in the loops, hold the gymnastics pole with your hands on your shoulders behind your head, perform a lunge forwards, front leg bent (approximately right angle in the knee joint), back leg almost fully extended on tiptoe, move/rotate your upper body from one side to the other (head accompanies the movement), push off the front leg to return to the starting position. Switch sides after each lunge.
Attention:
The hips and knees point forwards during the entire movement. The front knee always remains behind the toe and centred over the foot. Lower your body in the centre (like a plumb line following the back knee, upper body remains upright, tighten your stomach).
Lighten:
Select less strong elastic bands; roll up the elastic bands less.
Harden:
Choose stronger elastic bands, roll up the elastic bands more.
Variant:
To relieve pressure on the neck, the gymnastic stick can also be held in front of the body at sternum level (baby position).
1 gymnastic bar with elasticated straps
Step-up to balance ► step-up to balance
Power
Individual work
Stand upright, facing the Swedish bench with your feet hip-width apart, engage your core and hold a dumbbell in the hand on the side of your supporting leg. Place your foot completely and firmly in the centre of the bench, ensuring that the ball of your foot and your heel are in full contact with it. Shift your body weight onto your front leg and push yourself up powerfully. Once at the top, bring your free leg straight up in a controlled knee lift (at least 90° at the hip and knee), whilst the opposite arm moves forwards and upwards in a runner’s arm swing. "Freeze" in this end position on one leg for 1–2 seconds, keeping your pelvis level and your shoulders relaxed. Then, in a controlled and decelerated manner, bring the free leg back and down towards the floor, reset the supporting leg and repeat the movement fluidly, or switch sides.
Attention:
The lower leg pushes off the floor with momentum (a jump rather than relying on the supporting leg for power); the knee of the rising leg buckles inwards as it is pushed upwards; the final position at the top is not stabilised, but is immediately released; the pelvis sags downwards on the side of the free leg whilst standing on one leg (Trendelenburg sign); only the forefoot rests on the edge of the bench, whilst the heel hangs in the air; the descent is uncontrolled and unchecked (‘plopping down’).
Lighten:
Choose a lower box height or bench; in the top position, let the free leg tap lightly onto the bench with the tips of the toes, rather than holding it freely in the air; Slow down the pace of the movement; use your fingertips to hold onto a wall or bar for lateral support; choose lighter dumbbells.
Harden:
Wear a weighted vest or increase the weight of the dumbbells; deliberately slow down the downward movement (eccentric phase) significantly to 3–4 seconds before your foot touches the floor; place the foot of your supporting leg on a balance pad on the bench; seamlessly incorporate a light calf raise on your supporting leg from the top of the knee lift.
1 plyo box/vaulting box
1 dumbbell ► makes the exercise more challenging (additional weight)
1 weighted vest ► makes the exercise more challenging (additional weight)
1 unstable surface ► makes the exercise more difficult (balance component)
Prone position (push-up) and upright position alternating ► db burpee deadlift
Power
Individual work
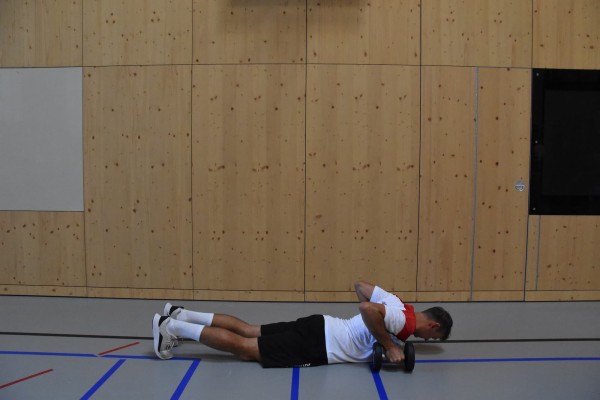
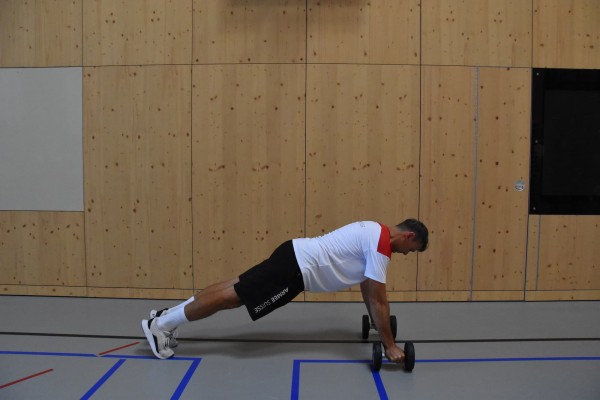
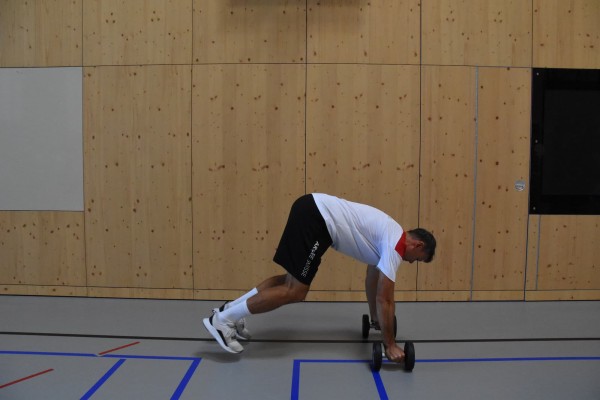
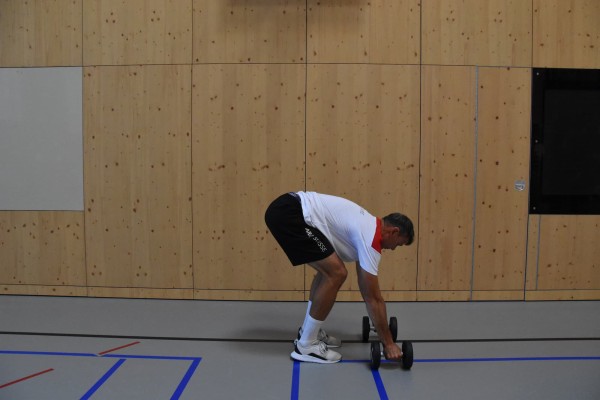
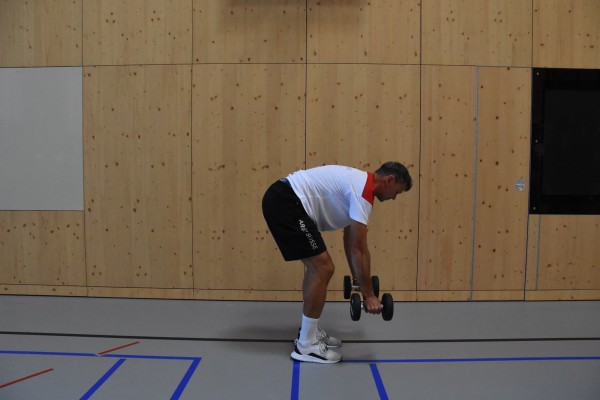
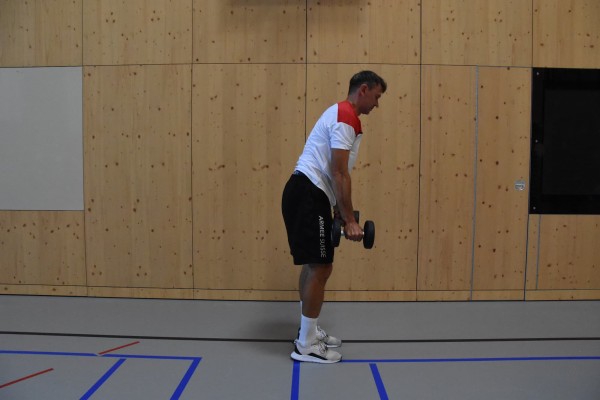
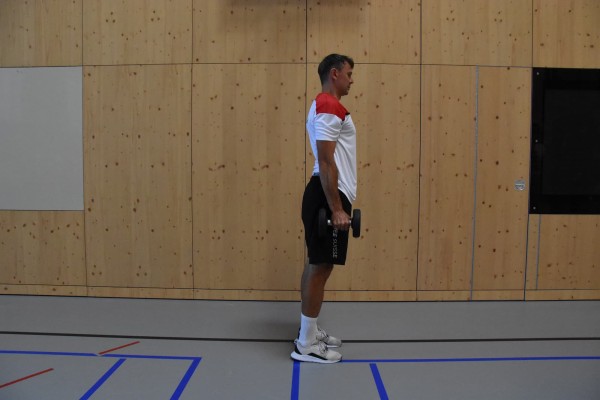
Stomach position, grasp a dumbbell with both hands (back of each hand pointing to the respective side), these are placed on the floor at chest height, the arms are bent accordingly. From this position, stretch your arms to push your upper body away from the floor, your knees are also no longer in contact with the floor and your slightly bent legs are only supported on the tips of your feet. With a small jump forwards, bring your legs approximately shoulder-width apart towards the dumbbells (place your feet slightly inwards behind the dumbbells on each side). The upper body is tilted forwards as the outstretched arms are still holding the weights on the floor (back as straight as possible). Now straighten your legs, push your hips forwards and raise your upper body to a standing position. The arms remain stretched and point sideways along the body towards the floor in the end position so that the weights are approximately at hip height. Then lower your upper body back down to place the weights on the floor again with your arms straight (with the tips of your feet slightly offset outwards). Support your upper body with your arms (hands gripping the dumbbells) to perform a two-legged jump backwards so that you reach the push-up position. Lower your upper body back to the starting position in the prone position (bend your arms, hold the weights next to your chest, knees on the floor, straight legs resting on the tips of your feet).
Lighten:
Less/no weight.
Harden:
Execute a push-up instead of lowering your body to the prone position; more weight.
2 dumbbells
Prone position (push-up) and upright standing alternating with extension and flexion of the arms ► burpee & snatch / devil press
Power
Individual work
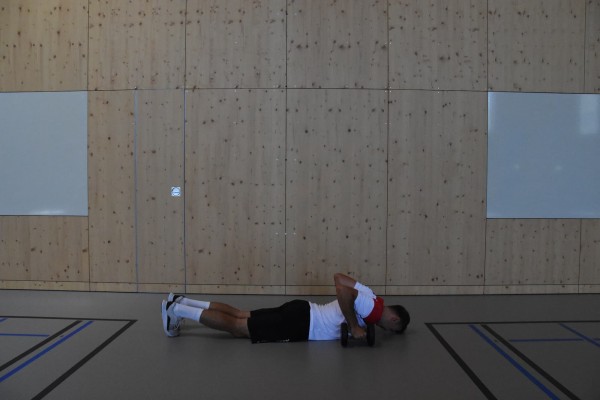
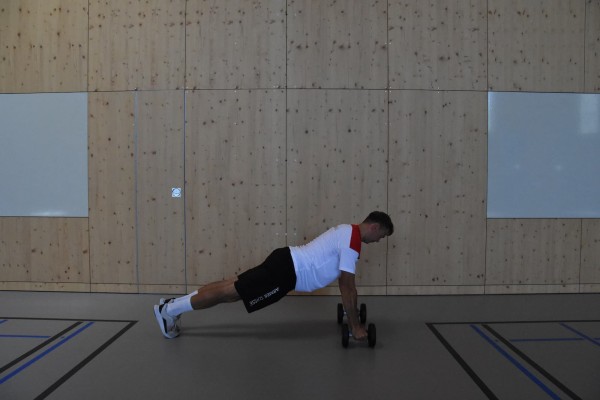
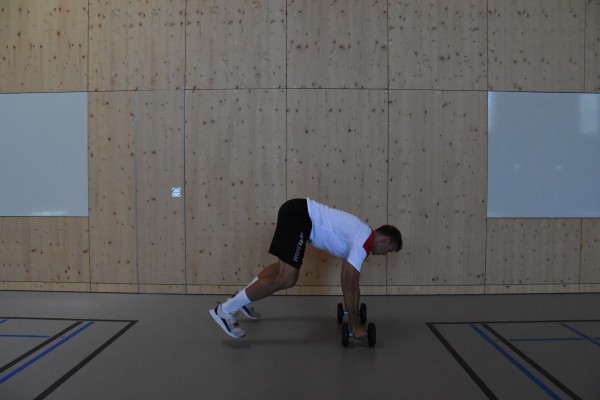
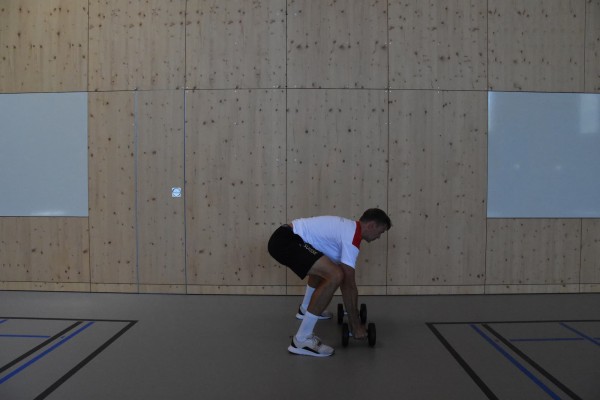
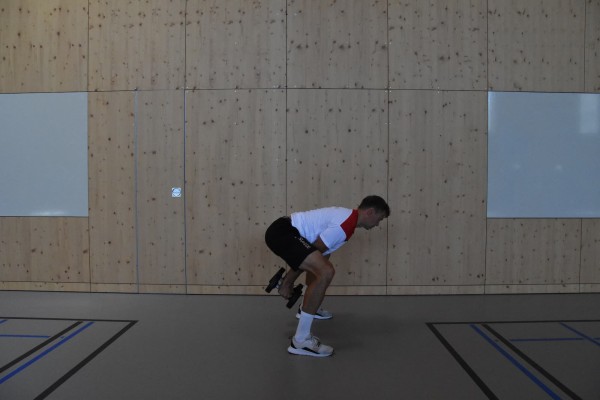
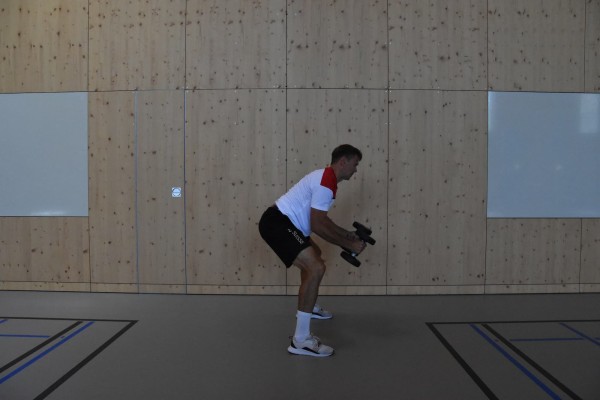
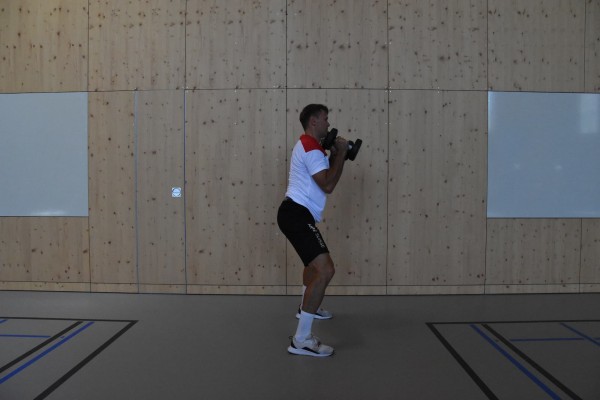
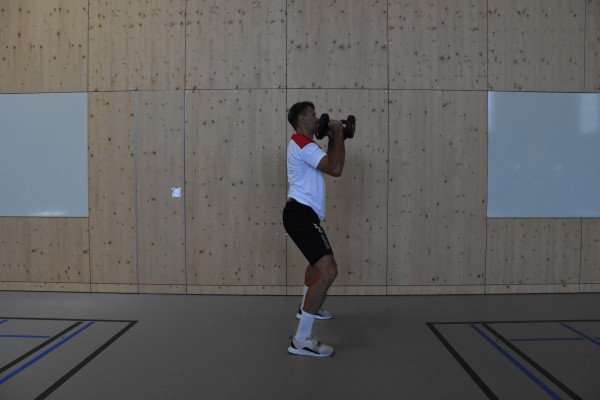
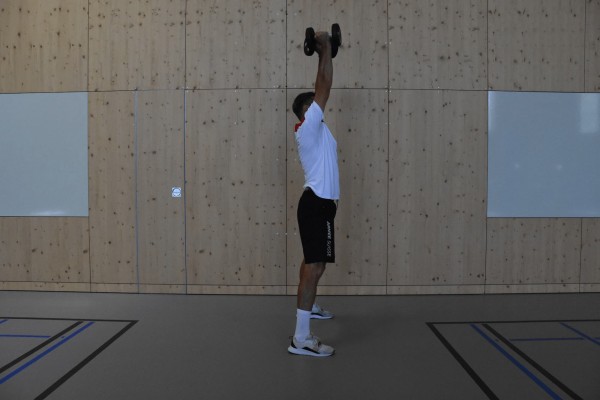
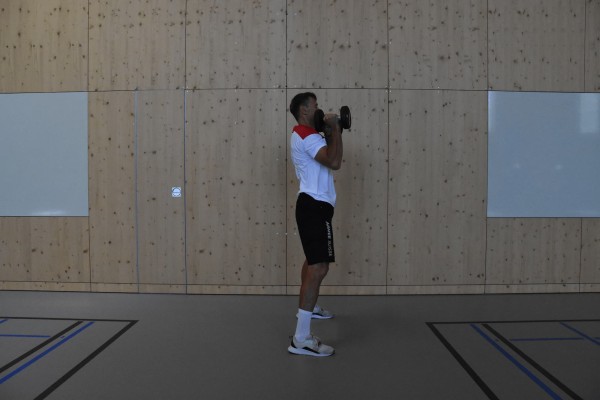
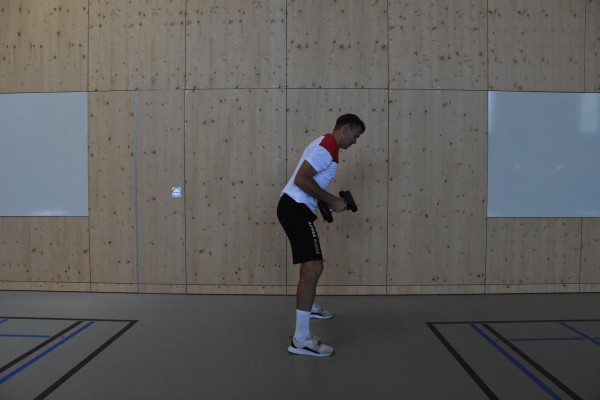
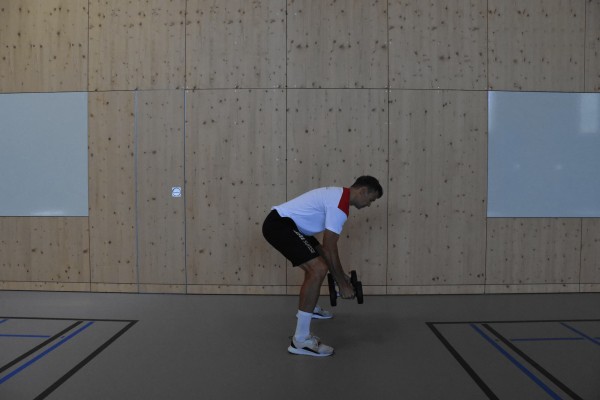
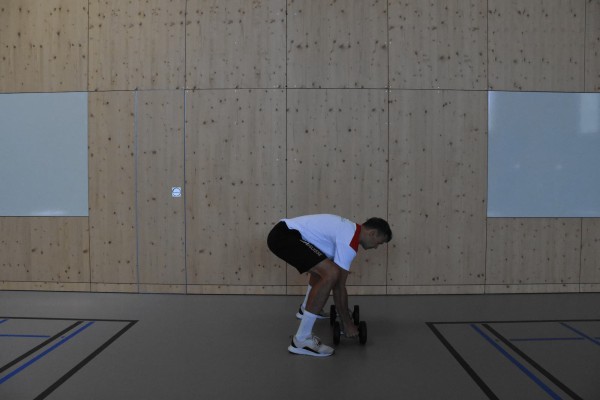
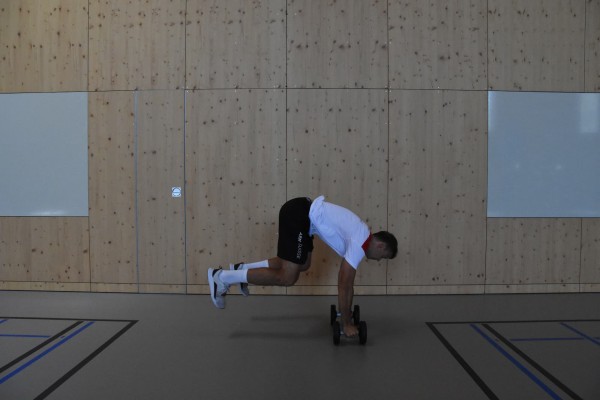
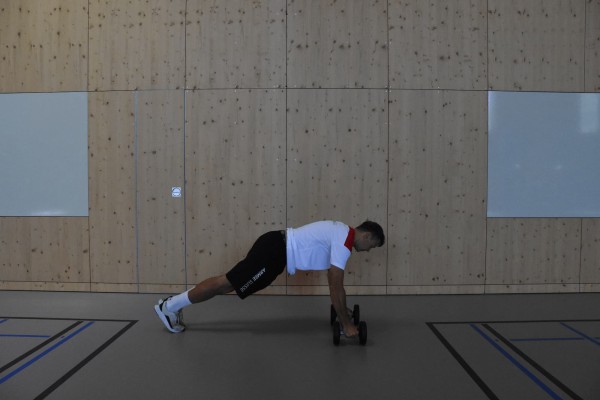
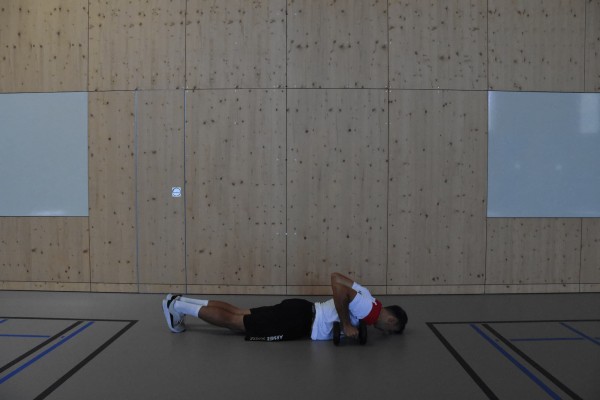
Stomach position, grasp a dumbbell with both hands (back of each hand pointing to the respective side), these are placed on the floor at chest height, the arms are bent accordingly. From this position, stretch your arms to push your upper body away from the floor, your knees are also no longer in contact with the floor and your slightly bent legs are only supported on the tips of your feet (push-up position). With a small jump forwards, bring your legs more than shoulder-width apart towards the dumbbells (place your feet slightly outwards behind the dumbbells on each side). The upper body is tilted forwards as the outstretched arms are still holding the weights on the floor (back as straight as possible). Now lift the weights off the floor and move them backwards between your legs to the height of your buttocks with your arms stretched out. Now swing the weights overhead by first holding the dumbbells in front of your chest with your arms bent, and from there push your arms out vertically upwards. The upright stance with arms stretched upwards and legs slightly bent corresponds to the end position. Then bend your arms while standing upright to bring the weights to your shoulders. Tilt your upper body forwards, stretch your arms and place the dumbbells on the floor between your legs (slightly in front of your feet) (legs slightly bent). Support your upper body with your arms (hands gripping the dumbbells), jump backwards with both legs so that you can assume the starting position in the prone position in one smooth movement (bend your arms, lower your upper body, hold the weights next to your chest, knees on the floor, straight legs resting on the tips of your feet).
Lighten:
Less/no weight.
Harden:
Execute a push-up instead of lowering the body to the prone position; more weight.
2 dumbbells
Prone position (push-up) and upright standing alternating with extension and flexion of one arm ► single dumbbell devil press
Power
Individual work
This exercise combines a one-armed burpee with a dumbbell and an overhead press. To do this, place a dumbbell between your feet, squat down and grasp the dumbbell with one hand. Jump or step backwards into a push-up position (optional: your chest briefly touches the floor). Bring your feet back to the front, explosively drive the dumbbell upwards from the hips, fully extend your arm overhead (snatch/press movement), and lower the weight in a controlled manner. Either switch sides after the desired number of repetitions or transfer the weight to the other hand as you lower it.
Attention:
Keep your back neutral during the lift; maintain core tension; generate power from your hips and legs (do not just push with your arms); keep the barbell close to your body; stabilise the overhead position (arm extended, shoulder engaged, do not push your ribs forward); lower the barbell calmly and in a controlled manner.
Common mistakes: Hunching the back when lifting the barbell; pulling with the arms too early instead of extending the hips; unstable shoulders overhead; landing with feet too close together or asymmetrically; loss of core tension during the burpee; weight too heavy (technique breaks down); rotation in the upper body due to uneven load.
Lighten:
Do the exercise without the push-up; step your feet back into the push-up position instead of jumping; use a lighter dumbbell; split the movement (do the burpee first, then the dumbbell snatch separately); instead of lifting the weight overhead, lift it only to shoulder height.
Harden:
Heavier dumbbell; incorporate push-ups; switch hands with every repetition; double devil press with two dumbbells, deficit version (dumbbell on a raised platform); combine with an additional squat or thruster.
1 dumbbell
Prone position and alternating handstand ► wall walk
Power
Individual work
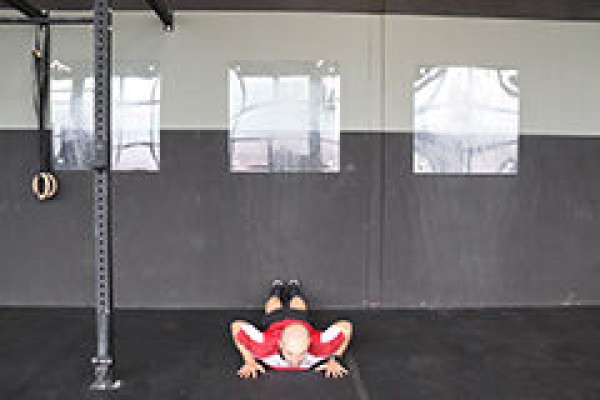

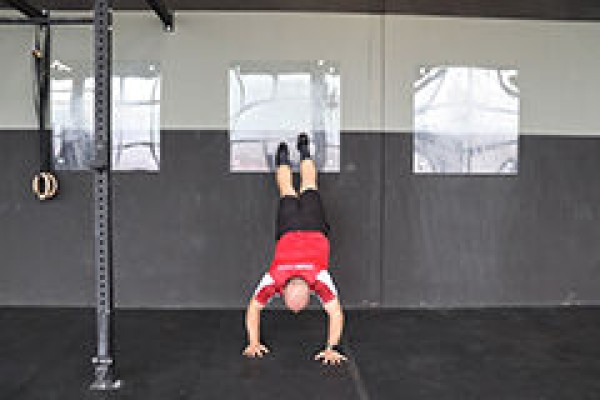
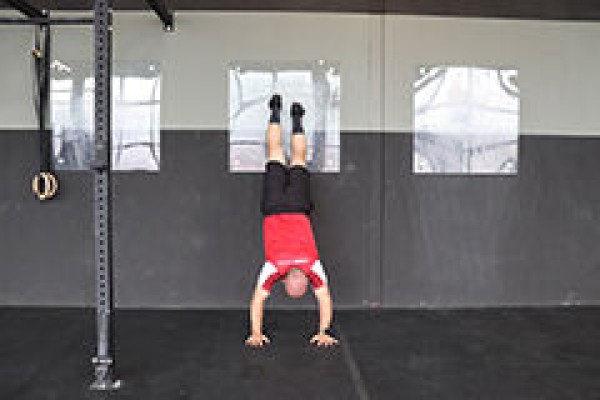


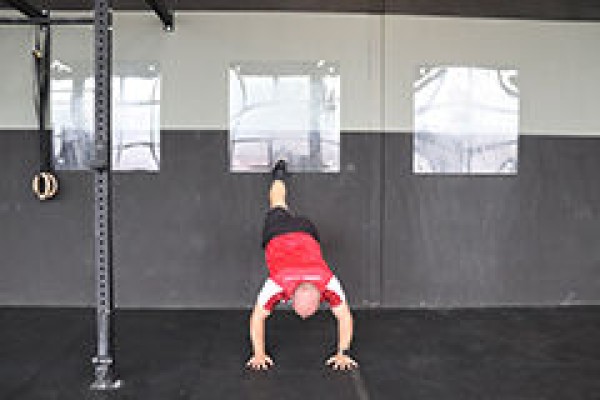


Lie on your stomach in front of a wall with the tips of your feet exactly in the corner between the floor and the wall and your arms bent next to your shoulders (palms on the floor, elbows pointing towards the wall). Extend your arms to push your upper body away from the floor, then walk your feet upwards along the wall (alternately moving one leg upwards), at the same time as moving your legs upwards, alternately move your arms towards the wall (walking with your arms). The legs and arms are moved until the handstand position can be assumed (full body stretch, arms stretched out in a high position). Then perform the movement sequence in reverse order to return from the handstand to the prone position.
Attention:
Move your legs and arms in a controlled manner.
Lighten:
Break off the exercise before the handstand position and return to the prone position (move your legs less far upwards).
Harden:
Additional weight (on your feet).
1 wall
2 weight cuffs/1 weight waistcoat ► make the exercise more difficult (additional weight)
Prone position and handstand with sideways shift alternating ► lateral wall walk
Power
Individual work
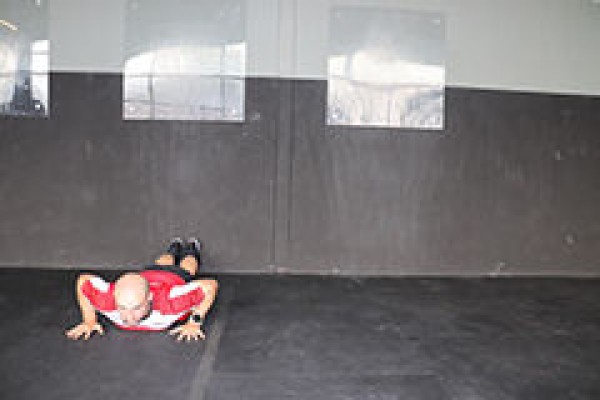
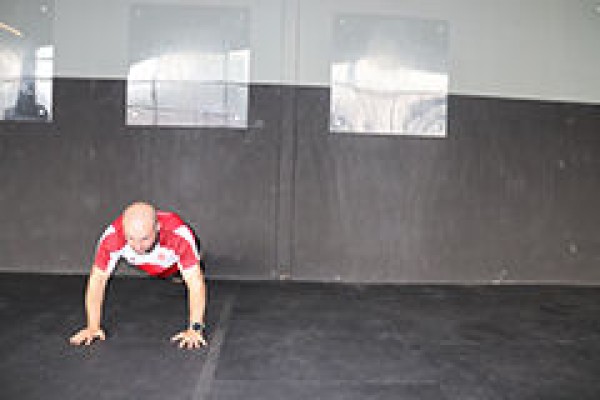
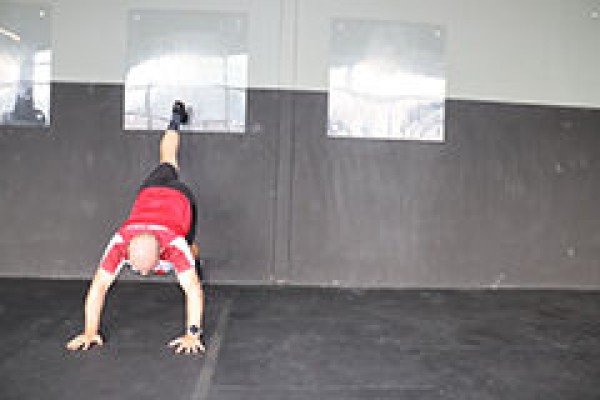
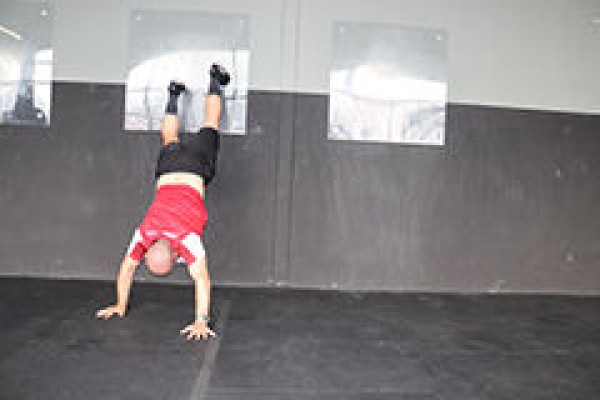

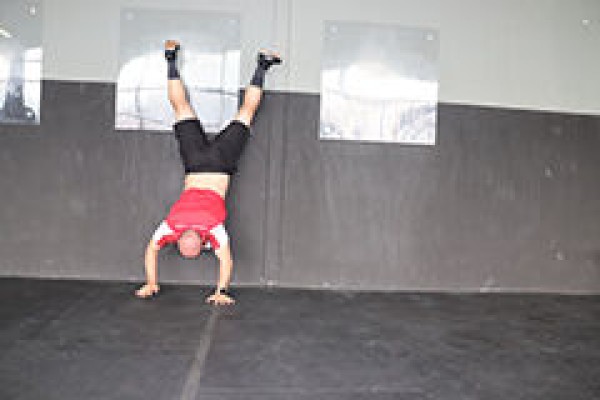
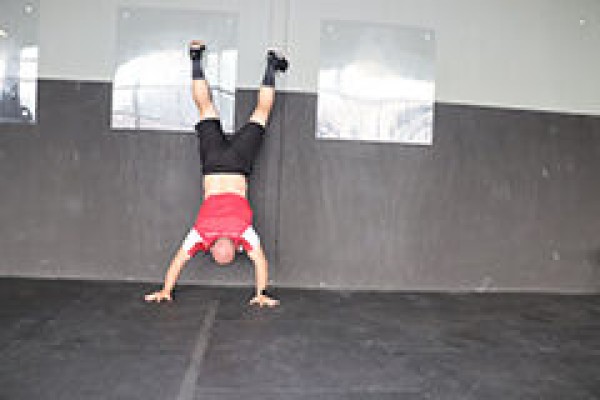
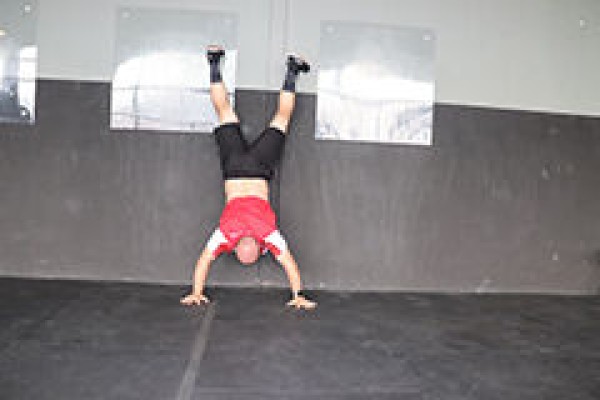

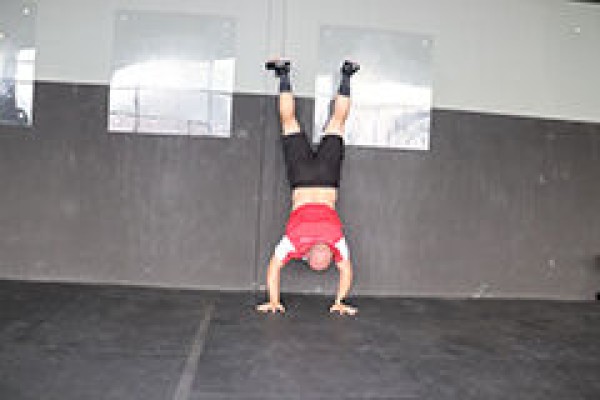
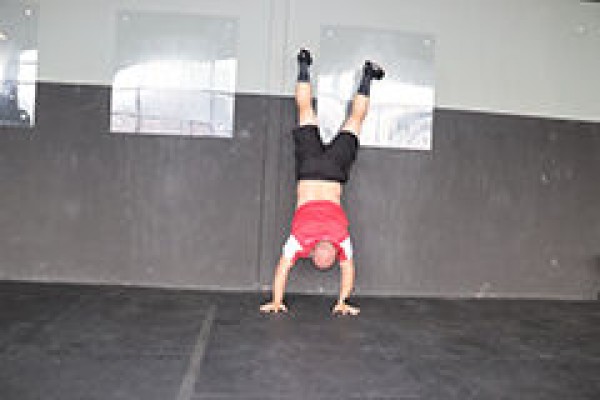
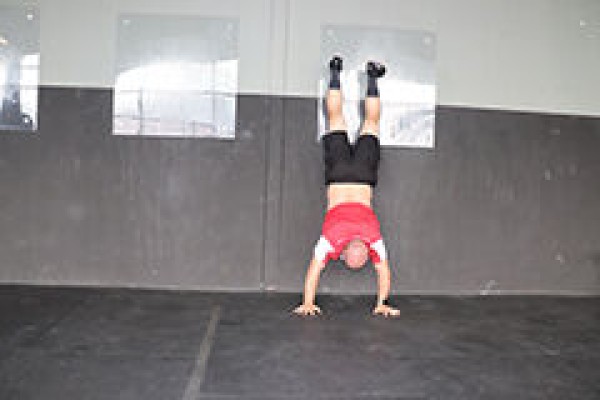
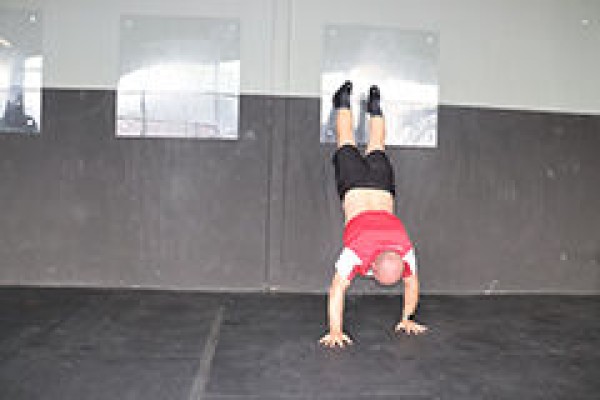
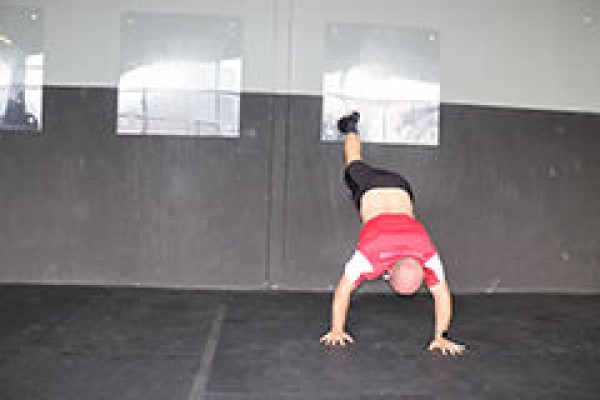

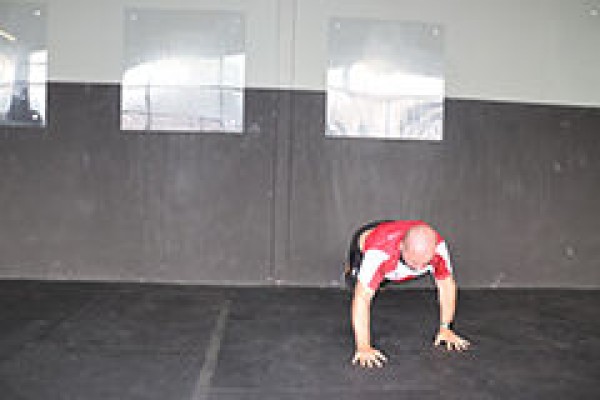
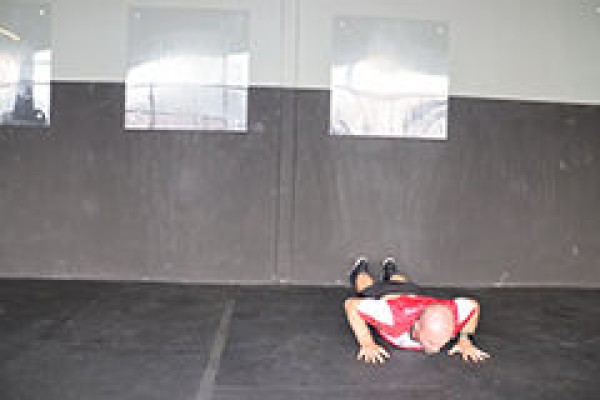
Lie on your stomach in front of a wall with the tips of your feet exactly in the corner between the floor and the wall and your arms bent next to your shoulders (palms on the floor, elbows pointing towards the wall). Stretch your arms to push your upper body away from the floor, then walk your feet upwards along the wall (alternately moving one leg upwards), at the same time as lifting your legs, alternately move your arms towards the wall (walking with your arms). The legs and arms are moved until the handstand position can be assumed (full body stretch, arms stretched in a high position). Once in the handstand position, the hands are moved to the side a few times (running sideways with the hands) before the sequence of movements is repeated in reverse order to return from the handstand to the prone position. For the next repetition, move your arms to the other side to return to the starting point of the exercise.
Attention:
Move your legs and arms in a controlled manner.
Lighten:
Stop the exercise before the handstand position and return to the prone position (move your legs less far upwards); perform the exercise without moving your arms.
Harden:
Additional weight (on your feet).
1 wall
2 weight cuffs/1 weight waistcoat ► make the exercise more difficult (additional weight)
Pelvic lifts in a push-up position on a gym ball ► swiss ball pike
Power
Individual work
Lie face down across the exercise ball and move your hands forwards until only your shins or the tops of your feet are resting on the ball. Your hands should be placed shoulder-width apart, directly beneath your shoulder joints, with your arms firmly on the floor. Your body is in a stable plank position, parallel to the floor. Actively press your shoulders away from the floor (no sagging between the shoulder blades). Your abdominal and gluteal muscles are firmly engaged, and your head remains in line with your spine. The knees remain fully extended throughout the entire movement. Using a powerful hip flexion and core engagement, pull the pelvis vertically upwards towards the ceiling so that the body forms an inverted ‘V’ (roof position). As you do this, the ball rolls forwards to your toes, whilst your head moves between your upper arms. Briefly stabilise your position at the highest point, then roll back to the starting position in a controlled manner with your legs straight.
Attention:
When rolling back into extension, the torso sags and falls into an uncontrolled hollow back; the shoulders drift backwards instead of remaining stable and centred over the wrists; the movement is forced out of the legs with momentum, rather than being guided by the trunk and hip flexor muscles; the arms buckle or the shoulder blades flare upwards (instability in the shoulder girdle); the roll-out should only be performed as far back as the abdominal muscles can keep the pelvis stable in a horizontal position. Stop the movement as soon as the lumbar spine sags.
Lighten:
Hold a static plank with your shins on the ball (without rolling); place the ball further under your thighs/hips (the shorter lever makes it considerably easier to pull yourself up); Perform the movement over a range of just a few centimetres; carry out the movement on the floor with sliding pads or towels under your feet (this reduces the risk of the ball tipping over).
Harden:
Hold the pike or tuck position at the top for 2–3 seconds; perform on one leg; one foot rests on the ball, whilst the free leg remains extended in the air in line with the body; at the end of the roll-back into the extended position, incorporate a clean push-up on the floor.
1 exercise ball
2 sliding pads ► make the exercise easier (provide a more stable surface)
Move leg backwards and back in standing position (left) ► kick-back
Power
Individual work
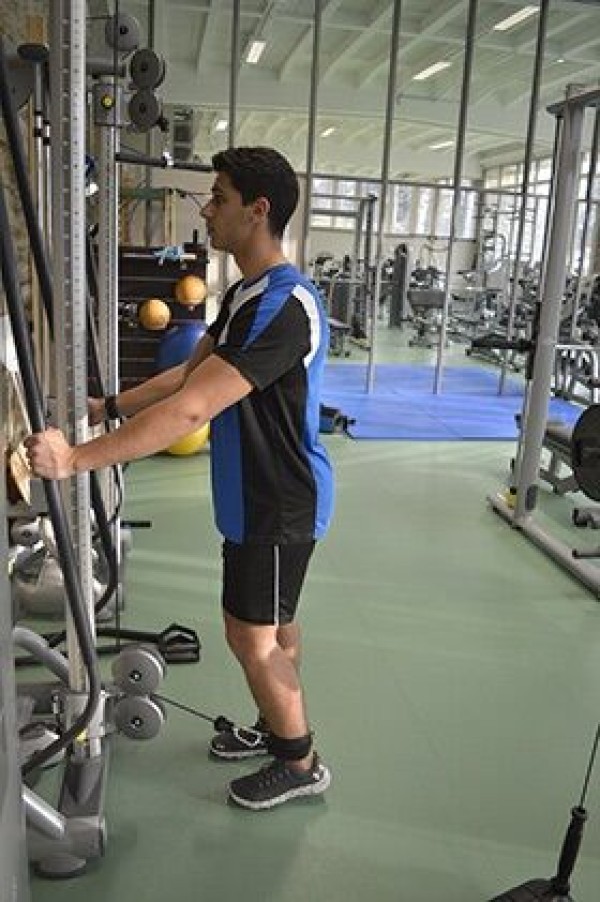
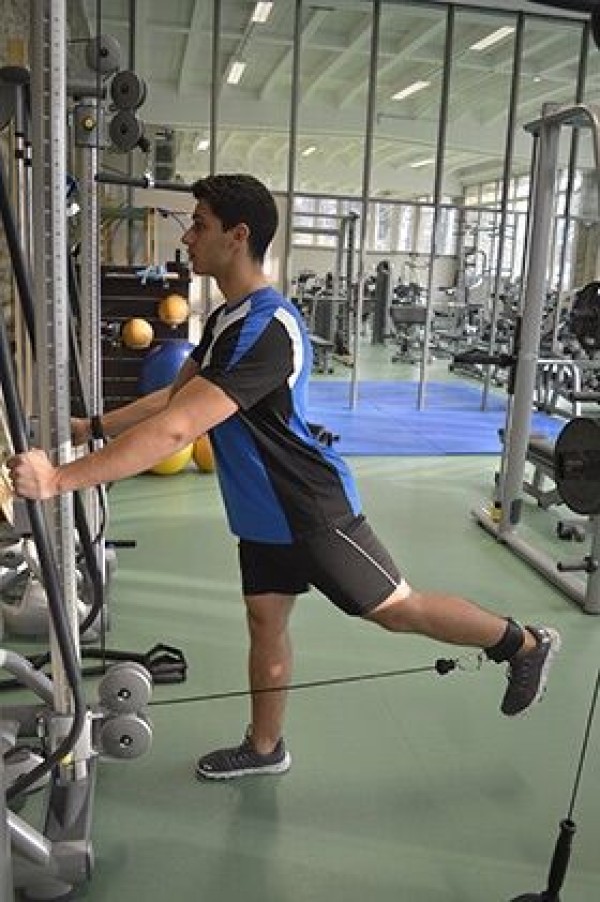
The foot loop of the cable pulley is placed around the training leg (left). In a standing position, facing the cable pulley, the leg is slowly pulled backwards against the weight and returned to the starting position in a controlled manner.
Starting position:
- Stand upright in front of the machine
- Hands on the machine to maintain balance
- Foot loop fixed to the ankle
Finishing position:
- Leg pushed backwards
- Movement from the hip, angle in the knee remains the same
Attention:
Training leg not fully extended.
1 weight tower/machine ► cable pulley (deep)
Move leg backwards and back while standing (right) ► kick-back
Power
Individual work


The foot loop of the cable pulley is placed around the training leg (right). In a standing position, facing the cable pulley, the leg is slowly pulled backwards against the weight and returned to the starting position in a controlled manner.
Starting position:
- Stand upright in front of the machine
- Hands on the machine to maintain balance
- Foot loop fixed to the ankle
Finishing position:
- Leg pushed backwards
- Movement from the hips, angle in the knee remains the same
Attention:
Training leg not fully extended.
1 weight tower/machine ► cable pulley (deep)
Push your leg out forwards while standing ► front kick
Power
Individual work


Stand shoulder-width apart, one leg slightly backwards (weaker hand/weaker leg in front), gaze/face forward, upper body slightly rotated (to the side of the stronger leg), arms bent in front of the body, lift one leg alternately or in free rhythm and push off in the direction of gaze (push off/kick movement forwards).
Attention:
Do not fall backwards with your upper body when kicking your leg out.
Lighten:
Kick your leg out less high.
Harden:
Push your leg out higher; add weight to your leg.
Variant:
Load one leg for longer by not putting it down completely (or only supporting it slightly on your toes).
2 weight cuffs ► make the exercise more difficult (additional weight)
Push your leg out forwards in a standing position and lunge backwards alternately (left) ► front kick & reverse lunge
Power
Individual work

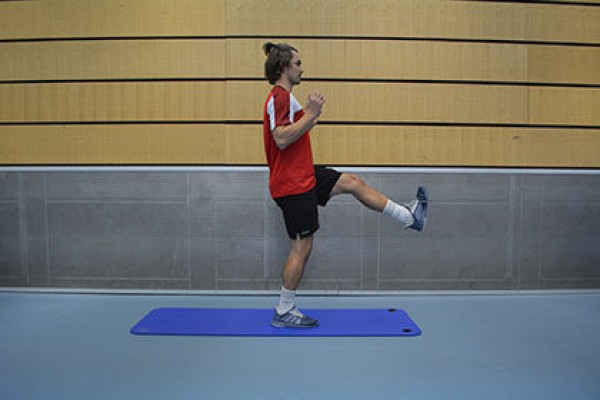

Stand shoulder-width apart, one leg (left) slightly backwards, gaze/face and upper body facing forwards, arms hanging beside the body. Raise one leg (left) and kick it out in the direction of your gaze (kick movement forwards), bend your arms at the same time and move your hands to head height. Lower your upper body as you bring your free leg back, bend your supporting leg and bring your free leg backwards, both hands touching the floor (lunge position - similar to starting a sprint). Alternate between the two positions (kick forwards and lunge backwards) with a high cadence.
Attention:
Do not fall backwards with your upper body when kicking your leg away. Keep your posture upright when lunging.
Lighten:
Push your leg out less high or far back.
Harden:
Push your leg out higher; add weight to your leg.
1 weight cuff ► make the exercise more difficult (additional weight)
Push your leg out forwards in a standing position and lunge backwards alternately (right) ► front kick & reverse lunge
Power
Individual work
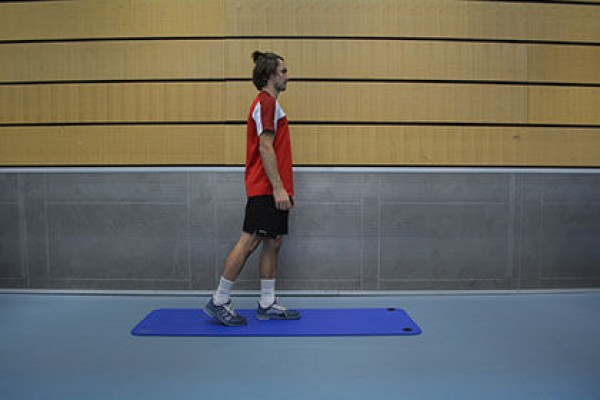

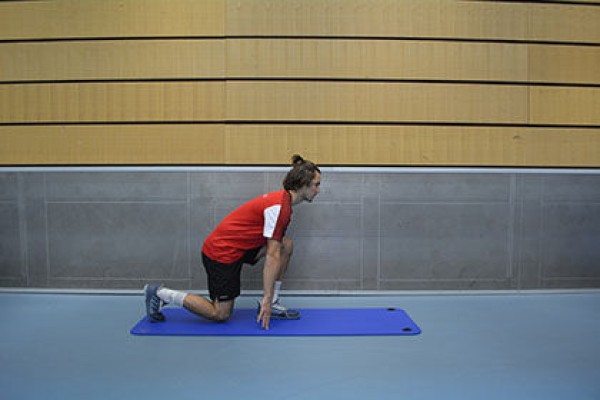
Stand shoulder-width apart, one leg (right) slightly backwards, gaze/face and upper body facing forwards, arms hanging beside the body. Raise one leg (right) and kick it out in the direction of your gaze (kick movement forwards), bend your arms at the same time and move your hands to head height. Lower your upper body as you bring your free leg back, bend your supporting leg and bring your free leg backwards, both hands touching the floor (lunge position - similar to starting a sprint). Alternate between the two positions (kick forwards and lunge backwards) with a high cadence.
Attention:
Do not fall backwards with your upper body when kicking your leg away. Keep your posture upright when lunging.
Lighten:
Push your leg out less high or far back.
Harden:
Push your leg out higher; add weight to your leg.
1 weight cuff ► make the exercise more difficult (additional weight)
Move leg forwards and backwards in shoulder position (left)
Power
Individual work

Shoulder position, one leg (left) bent, the other stretched out or also bent but held high, arms flat on the floor at the side of the body, pelvis raised, bounce forwards and back to the starting position with the supporting leg (left) (touch down with the heel).
Attention:
Pelvis always remains raised, upper body only rests on the shoulders.
Lighten:
Just hold the position with your pelvis raised; move your standing leg less.
Harden:
Additional weight (on the hips).
Variation:
Remnant carpet/felt slipper/glider under the standing leg to glide forwards and backwards.
1 weight vest/weight disc/dumbbell/sandbag ► make the exercise more difficult (additional weight)
1 carpet remnant/felt slipper/glider ► variation of the exercise