
Exercises (1882)
Frontal and lateral raising and lowering of the arms in prone position ► front raise/lateral raise (side raise)
Power
Individual work


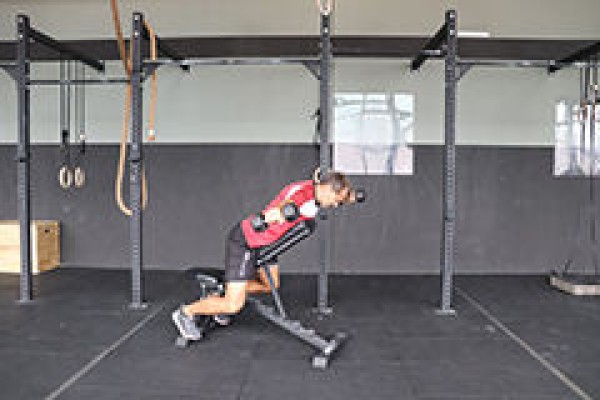


Stomach position on the inclined flat bench, arms almost stretched out towards the floor (hanging), grasp a dumbbell with each hand (overhand grip, palms facing forwards). In one movement, raise your arms frontally to approximately chin height (palms facing down), spread your arms out to the side (T-position, arms parallel to the floor), then bring your arms to the floor (palms facing your body). Now perform the movement in reverse order: Raise your arms sideways, bring them together in front of your head, then lower your arms to the floor back to the starting position.
Attention:
Despite the reduced possibility of falsification due to the upper body being fixed on the incline bench, ensure that the movement is performed slowly and evenly (jerking the weights upwards always leads to poorer training results and increases the risk of injury).
Lighten:
Less weight.
Harden:
More weight.
1 flat bench
2 dumbbells
Footsteps
Fighting and roughhousing games
Partner work

Two participants stand opposite each other and grab each other by the shoulders. The participants try to step on their opponent's feet. Who collects more kicks?
No material required
Pulling an object towards you while standing ► row battle rope
Power
Individual work
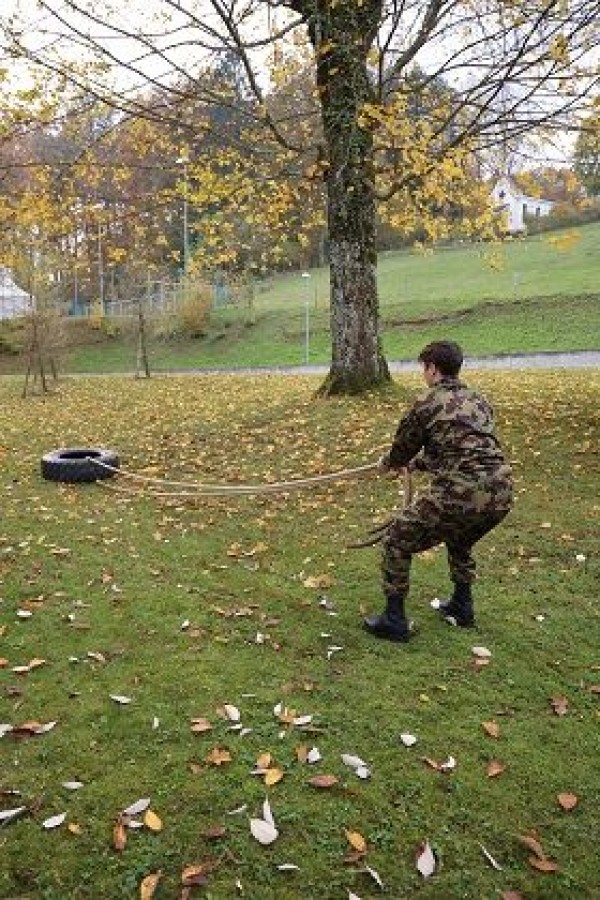
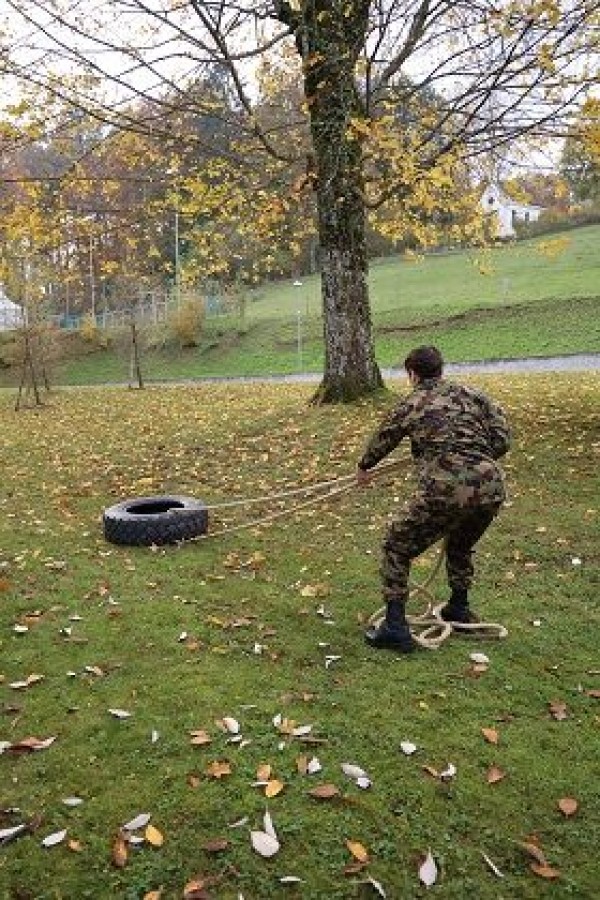
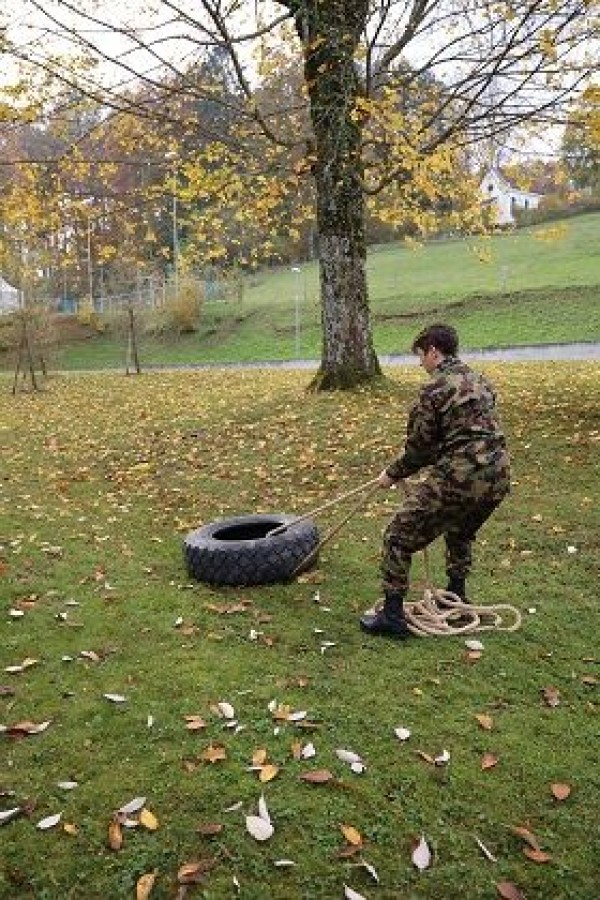
Stand shoulder-width apart at the ends of the rope (facing the tyre), bend your knees slightly, grasp both ends of the rope with your hands and pull the tyre attached to the rope towards you. Once you have pulled the tyre up to your feet, sprint to the other side until the rope is taut again to restart the exercise.
Attention:
Keep your back straight.
Lighten:
Less weight/load.
Harden:
More weight/greater load.
1 rope/rope
1 tyre (DURO)
1 tyre (PUCH) ► Make the exercise easier
1 tyre (10DM) ► Make the exercise more difficult (additional weight)
Gehen ► suitcase carry
Power
Individual work
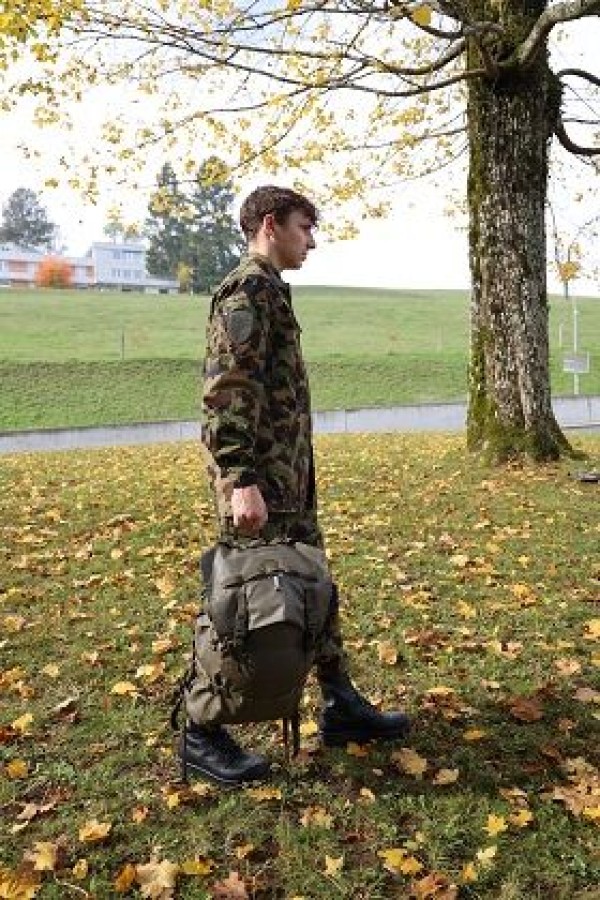
Bend your knees whilst keeping your back straight, lift a heavy dumbbell / kettlebell from the floor with one arm, and stand up in a controlled manner. The weight hangs at your side, next to your thigh, like a suitcase, whilst both shoulders remain at exactly the same height, without slumping towards the side bearing the weight or leaning back towards the opposite side. The upper body is upright, your gaze is directed straight ahead and the lateral core muscles are tensed to the maximum to compensate for the asymmetrical load. The free arm can be held out slightly for stabilisation. Now walk straight ahead at a steady, controlled pace. The torso remains absolutely vertical and stable, without swaying sideways or buckling, and the weight does not shift onto the leg. Halfway through the exercise, set the leg down in a controlled manner with a straight back and change sides. The aim is to achieve a completely composed, upright gait.
Attention:
The upper body tilts towards the side of the weight (lateral flexion); the exerciser leans extremely far to the free side in order to balance the weight purely through leverage; the shoulder on the side bearing the weight sags passively downwards and loses muscular control; the dumbbell swings back and forth like a pendulum; the gait is sloppy, hurried or shuffling; the head is thrust forward or held at an angle; the barbell is lifted and lowered with a rounded back.
Lighten:
Reduce the weight of the dumbbell / kettlebell; shorten the walking distance or take breaks to realign your posture; Slow down your walking pace; carry the weight with both arms (Farmer’s Walk) if stabilising your core on one side is still too challenging.
Harden:
Choose a significantly heavier weight (combat rucksack/sandbag); carry the weight overhead with your arm fully extended (Waiter Walk / Overhead Carry); balance on a line (e.g. walk along the narrow edge of an upturned Swedish bench); wear a weight vest as well.
1 dumbbell/kettlebell (medium weight)
2 dumbbells/kettlebells (light weights in both hands) ► make the exercise easier (less weight/better balance)
1 combat rucksack/sandbag (very heavy) ► make the exercise more difficult (additional weight)
1 place the Swedish box upside down ► to make the exercise more difficult (balance component)
Gehen ► suitcase carry
Power
Individual work

Take an object in one hand (e.g. military equipment or a combat rucksack), let your arms hang at the side of your body and carry the object over a certain distance.
Attention:
Keep your back straight, your pelvis stable with every step and your shoulders fixed (lower towards your hips).
Variant:
Hold an object in both hands.
Lighten:
Equipment approx. 5kg
Harden:
Heavier equipment (add 3 litres of water to the backpack)
Material per participant: Tenue CNK 420, 2 x material of approx. 5kg/10kg/15kg
Additional material: 2 fanjons, 2 PET bottles (1.5l)
Walking on an elevation
Power
Individual work
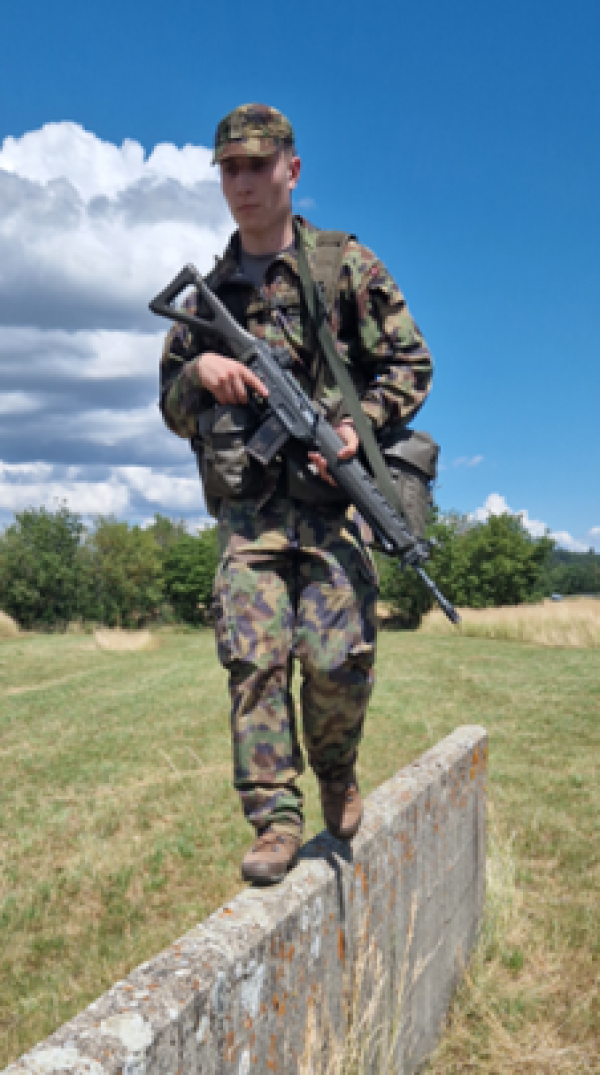
In the CNG 428 tenue, step onto a raised area (e.g. wall); start alternately with the left or right leg (support from a team mate is possible). Run back and forth without stepping off/losing your balance.
Lighten:
Without equipment;
Wider wall.
Harden:
With combat backpack;
Narrower wall.
Material per participant: Tenue CNG 428
Additional material: 1 wall/ruins (station 6 of the outdoor obstacle course)
Basic position (boxing position)
Light-Contact
Individual work
The participants practise adopting the basic stance:
The boxing stance is the starting and finishing position for all attack and defence techniques. From a shoulder-width stance, one foot is moved slightly forwards and the knees are bent slightly. The foot that is on the opposite side to the stronger hand is moved forwards (e.g. right-handers have the left leg in front). As an exercise, the participants can stand on a line to place one foot forwards from there. The correct distance between the feet is achieved when the heel of the front foot is just in front of the line (the back foot remains in place - toe on the line). At the same time as stepping forwards, the hanging arms are bent, the hands are clenched into fists and raised to head height. The strong hand (on the side of the back leg) is practically on the cheek, the weaker hand (on the side of the front leg) is held slightly in front of the head at approximately eye level. The weaker side corresponds to the lead hand (jab) and the stronger to the punching hand (straight).
Variant:
To assume the basic stance, you can also simply take two steps forwards from a shoulder-width stance and then stop and assume the basic stance. It is only important that the first step is taken on the side where the stronger hand is located.
Exercise:
From the shoulder-width stance with hanging arms, assume the basic position several times. Small shifts are incorporated in between.
No material required
Group Sumo
Fighting and roughhousing games
Group work
6-10 participants
In group sumo, everyone fights against everyone else. The participants try to stay on the field of mats as long as possible (the field can also be defined with marking cones/caps without mats). Anyone whose body part protrudes over the edge of the mat/field must leave the fighting area. The participant who is the last to remain on the mat area/(grass) field wins, whereby only pulling and pushing the opponent is permitted.
x soft mats (small) ► indoor version
4 marking cones/caps ► indoor and outdoor versions
Cockfighting
Fighting and roughhousing games
Partner work
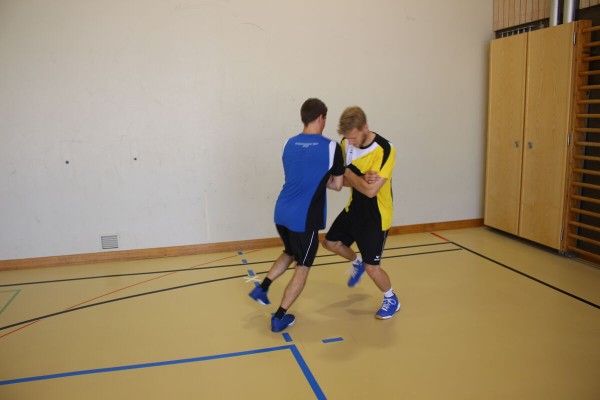
Two participants line up in a defined area (e.g. the centre circle of the basketball court or an area marked with cones). Both participants stand on one leg (one-legged stance) and have their arms crossed in front of their chest. The participants try to unbalance their opponent by jostling or dodging. The first person to put down their raised leg, fall over or leave the playing field loses. Change legs after each round.
4 marking cones (optional) ►Playing field marking
Post setup:
Define a square-shaped field using cones.
Cockfighting
Fighting and roughhousing games
Group work
The participants stand on one leg (one-legged stance) and have their arms crossed in front of their chest (the leg may be changed from time to time; if necessary, this is determined by the sports director). They try to unbalance their opponents by jostling or dodging them. Whoever touches the ground with both legs or falls over is eliminated. Which participant still hops on one leg at the end?
An additional exercise (e.g. wall sits, press-ups, forearm support) can be determined for the fallen "cocks".
4 marking cones (optional) ►Field markings
Cross your hand over your bent leg while standing
Power
Individual work


Bend your legs in a standing position, upper body tilted forwards, bend one leg alternately and touch the tip of each foot with your hand crosswise.
Attention:
Knees always remain behind the tips of the feet and point forwards.
Lighten:
Lower your upper body less (touch your knees instead of the top of your feet).
Harden:
Add weight to your arms and/or legs.
2-4 weight cuffs/2 weight balls to make the exercise more difficult (additional weight)
Bring your hand crosswise to your knee in push-up position ► knee touch / knee tap push up position
Power
Individual work


Push-up position (high support, face/gaze downwards), buttocks slightly raised, touch the opposite foot or knee with one hand, without lifting the legs. Switch sides after each exercise.
Attention:
Keep your upper body stable (tense your stomach).
Lighten:
Just hold the basic position (push-up position).
Harden:
Additional weight on the arms; unstable support.
2 weight cuffs ► making the exercise more difficult (additional weight)
2 balance cushions/1 balance board ► making the exercise more difficult (unstable base)
Bring your hand crosswise to your shoulder in push-up position ► Shoulder tap push up position
Power
Individual work


Push-up position (high support, face/look down), bring one hand crosswise to the shoulder. Switch sides after each exercise.
Attention:
Head, torso, hips and knees practically form a line (do not stretch your buttocks upwards or let them sag, tense your stomach).
Lighten:
Just hold the basic position (push-up position); place your knees on the floor.
Harden:
Additional weight (on your back or arms); unstable base.
2 weight cuffs/1 weight vest/weight disc/sandbag ► Make the exercise more difficult (additional weight)
1-2 balance cushions/1 balance board ► Make the exercise more difficult (unstable surface)
Bring hand and foot together crosswise while standing
Power
Individual work


Stand upright on the balls of your feet, shoulder-width apart, alternately lift one foot while hopping and touch it with your hand crosswise in front of your body at hip level.
Attention:
Do not put your heels down completely (keep jumping on your toes).
Lighten:
Lift your foot less (possibly without touching it with your hand).
Harden:
Lift your foot higher; additional weight (on your legs).
2 weight cuffs/1 weight waistcoat ► Make the exercise more difficult (additional weight)
Bring hand and foot together crosswise in four-footed stance backwards alternating ► toe tap / toe touch
Power
Individual work
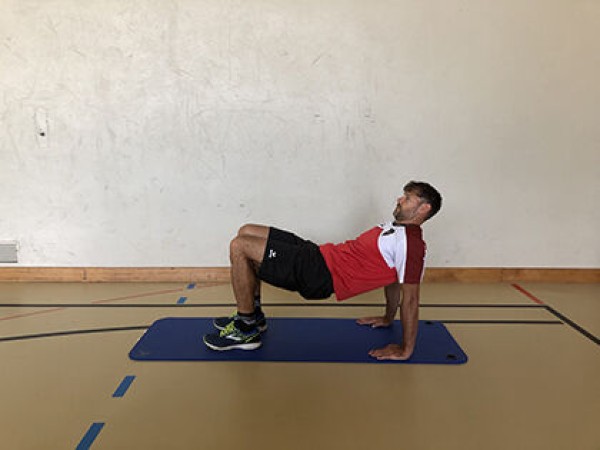

Inverted four-foot stance (chest pointing upwards, body supported on hands and feet, fingertips pointing forwards). Raise one arm and one leg crosswise and bring the hand and foot together. Switch sides after each exercise.
Lighten:
Just hold the position or raise your arm and leg only slightly (without bringing your hand and foot together).
Harden:
Additional weight.
2-4 weight cuffs/1 weight waistcoat ► Make the exercise more difficult (additional weight)
Bring hand and foot together crosswise in push-up position ► mountain climber toe touch / toe tap (climber tap)
Power
Individual work


Push-up position (high support, face/gaze downwards), bring one hand and one foot together crosswise, keeping the arm stretched and the leg bent (knee approximately at chest height). Switch sides after each exercise.
Attention:
Keep your upper body as stable as possible (tense your stomach).
Lighten:
Just hold the basic position (push-up position).
Harden:
Additional weight on arms and legs; unstable base.
Variant:
Cross your elbows to your knees.
2-4 weight cuffs ► Make the exercise more difficult (additional weight)
1-2 balance cushions ► Make the exercise more difficult (unstable base)
Bring hand and knee together in lateral forearm support (left) ► knee raise lateral pillar bridge / side bridge
Power
Individual work


Side support on the (right) forearm (possibly on a wall for the correct straight position), bring the upper hand (or elbow) and upper knee together (approximately at the level of the navel) and back to the starting position.
Attention:
Head, torso, hips and knees practically form a line (pelvis does not tilt backwards or forwards), keep the shoulder above the elbow.
Lighten:
Place the lower knee on the floor; bend the leg less; only hold the position.
Harden:
Additional weight for the arm and/or training leg; unstable base (possible for both the supporting arm and the supporting leg).
2 weight cuffs/1 weight ball/dumbbell ► Make the exercise more difficult (additional weight)
1 ball/1-2 balance cushions/1 balance board ► Make the exercise more difficult (unstable surface)
Bring hand and knee together in lateral forearm support (right) ► knee raise lateral pillar bridge / side bridge
Power
Individual work

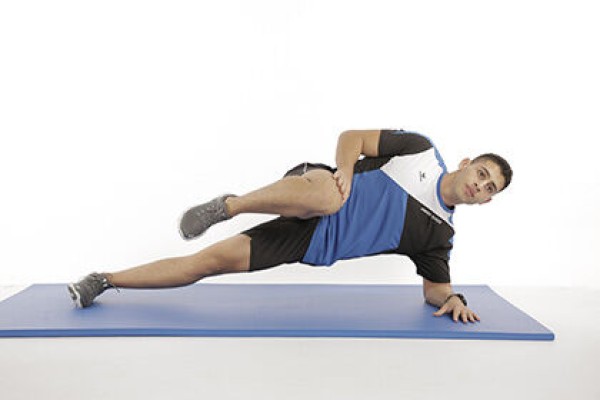
Side support on the (left) forearm (possibly on a wall for the correct straight position), bring the upper hand (or elbow) and upper knee together (approximately at the level of the navel) and back to the starting position.
Attention:
Head, torso, hips and knees practically form a line (pelvis does not tilt backwards or forwards), keep the shoulder above the elbow.
Lighten:
Place the lower knee on the floor; bend the leg less; only hold the position.
Harden:
Additional weight for the arm and/or training leg; unstable base (possible for both the supporting arm and the supporting leg).
2 weight cuffs/1 weight ball/dumbbell ► Make the exercise more difficult (additional weight)
1 ball/1-2 balance cushions/1 balance board ► Make the exercise more difficult (unstable surface)
Move hand to heel in supine position alternating ► heel touch / heel tap
Power
Individual work

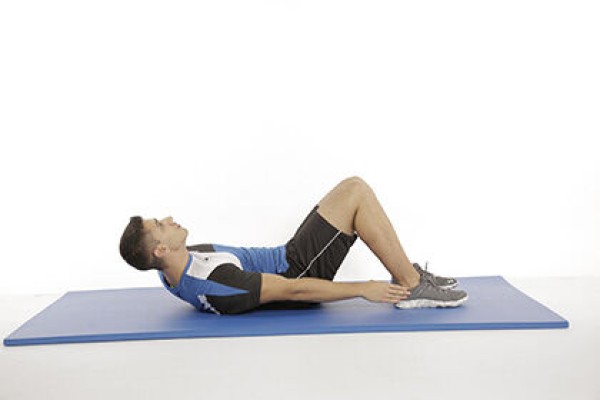
Lie on your back with your legs bent (feet also bent or flat on the floor), arms outstretched and slightly raised next to your body, hands alternately on your left and right heels (tilt your upper body sideways).
Attention:
Do not lower your shoulders completely (constant tension).
Lighten:
Lower your hands forward; only hold the centre position with your upper body raised.
Harden:
Hold additional weight on your arms/in your hands.
2 weight cuffs/weight balls/dumbbells ► Make the exercise more difficult (additional weight)
Bring hand to shoulder crosswise in push-up position alternating ► biceps curl push up position
Power
Individual work


In the push-up position, hold a dumbbell in each hand and alternately move one dumbbell to the opposite shoulder by bending one arm (return to the push-up position in between).
Caution:
Keep the torso stable and don't let it sag (actively tense the torso muscles).
Lighten:
Less weight.
Harden:
More weight; additional weight (on the back).
Variant:
Combine exercise with push-ups (i.e. bend and stretch left arm, push-up, bend and stretch right arm, push-up, etc.).
2 dumbbells
1 weight vest/weight disc/sandbag ► Make the exercise more difficult (additional weight)
Place your hands further forward than your shoulders in a push-up position ► extended plank hold
Power
Individual work
Push-up position, but with hands placed well in front of the shoulders (10–30 cm or more, depending on your level). Arms are straight, elbows ‘soft’, legs also straight, feet hip-width apart or closer together. Abdomen, buttocks and legs actively tensed. Push actively from the shoulders (protraction), maintain a straight body line as far as possible (head in a neutral position – gaze towards the floor) and continue to breathe calmly.
Attention:
Avoid arching your back too much, do not let your shoulders slump or sag, do not raise your hips too high (compensatory movement), do not lean forward too far without control, do not overextend your elbows, and do not lift your head or look straight ahead.
Lighten:
Place your hands further back or simply hold a push-up position (high plank); keep your knees on the floor (knee plank); place your hands on a raised surface (e.g. a bench or box); widen your stance.
Harden:
Move your hands further forward; bring your feet closer together; shift your weight onto your back: hold the position on one leg, one arm, or with an arm and leg crossed; move dynamically forwards and backwards; transition into a proper planche lean (hands remain under the shoulders, but actively lean your body forwards).
1 Weight vest/weight plate ► To make the exercise more challenging (additional weight)
Bring your hands to your feet from the push-up position ► hand walk
Power
Individual work


Push-up position (high support, face/look down), walk backwards with your hands and slowly straighten up until you can touch your feet, bring your hands forwards back to the starting position (possibly even further than head height).
Attention:
Do not let your upper body sag (actively tense your core), do not wiggle your hips back and forth.
Lighten:
Do not move your hands so far backwards/forwards.
Harden:
Stable surface (for your feet).
1 balance cushion/balance board ► Make the exercise more difficult (unstable surface)
Bring your hands to your shoulder while standing (horizontally) ► shoulder tap (lateral)
Power
Individual work
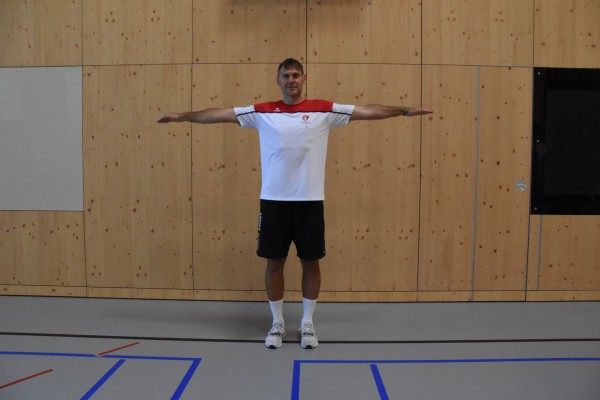
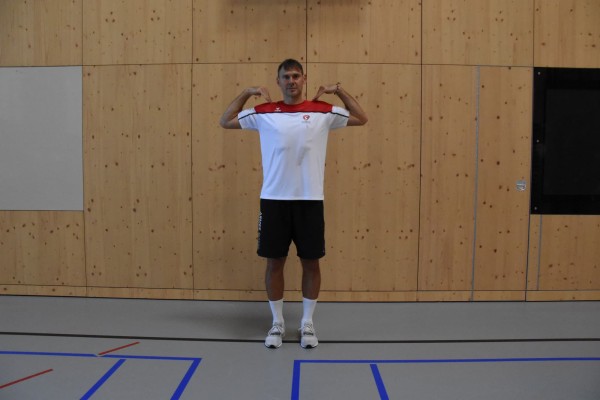
Stand upright with your feet shoulder-width apart, arms stretched out to the side (shoulder height - palms facing the floor), bend your arms and touch your shoulders with your hands, stretch your arms back to the starting position.
Harden:
Hold additional weight on your arms or in your hands.
Variant:
Arms held out in front instead of stretched out to the side. A combination of arm positions is also possible: after touching the shoulders, extend the arms alternately frontally or laterally.
2 weight cuffs/weight balls/dumbbells ► make the exercise more difficult (additional weight)
Bring your hands to your shoulder while standing (vertically) ► shoulder tap (vertical)
Power
Individual work


Stand upright with your feet shoulder-width apart, arms stretched out overhead (palms facing inwards), bend your arms and touch your shoulders with your hands, stretch your arms back to the starting position.
Harden:
Hold additional weight on your arms or in your hands.
Variant:
Arms held out in front or to the side. A combination of arm positions is also possible: after touching the shoulders, extend the arms alternately frontally, laterally or upwards.
2 weight cuffs/weight balls/dumbbells ► make the exercise more difficult (additional weight)
Butt slapping
Fighting and roughhousing games
Partner work

Two participants stand opposite each other and reach out their left/right hand (wrist grip). The participants try to hit their opponent on the buttocks with their free hand without being hit themselves. Who gets more hits? Switch sides after each or several rounds.
No material required