Exercises (2330)
Fistball: King's Ball
Forms of play / exercises
2 teams of 4-5 players each
Normal fistball game with 2 teams of 4-5 players each. Each team has a king (labelled with a ribbon). The king always has to defend the first ball (after the opponent's kick-off and return). Play then continues as normal.
Pitch:
1 fistball
1 fistball net
2 game ribbons
Fistball: Take your time
Forms of play / exercises
2 teams of 4-5 players each
Normal fistball game with 2 teams of 4-5 players each. However, the teams are allowed to touch the ball as many times as they need to make a return. However, the ball may not be played twice in succession by the same player.
Pitch:
1 fistball
1 fistball net
Fistball: Hit the goal
Forms of play / exercises
2 teams of 4-5 players each
Normal fistball game with 2 teams of 4-5 players each. A sector is marked on the net with flags or similar. If a team hits the "goal" during the kick-off or return, an extra point is scored. The game continues without interruption.
Pitch:
1 fistball
1 fistball net
2 flags
Fistball: Forwards - Backwards
Forms of play / exercises
2 teams of 4-5 players each
Normal fistball game with 2 teams of 4-5 players each. The first set is played to 11 points. The second set is played backwards. The points scored in the first set must be reduced again. The losing team in the first set must therefore score fewer points in the second set. Who wins the second set?
Pitch:
1 fistball
1 fistball net
Fistball: Pass
Forms of play / exercises
Partner work
Two participants stand opposite each other and pass the fistball to each other. They vary between the distances independently. The indirect pass is performed in the forward position. The high-low movement forwards alone guides the ball while the arm remains still.
Variant:
Also try passing with the weaker hand.
Per group of 2:
1 fistball
Field battle
Fighting and roughhousing games
Group work
6-10 participants
A mat/lawn area is divided into three to five fields. All participants start fighting in the first field. The participants try to push each other (each against each other) into the next field. Only pulling and pushing the opponent is permitted. The fight continues in the next square. Whoever is pushed out of the second square is relegated to the third square and so on. The winner is whoever is left alone in the first square at the end.
Variant:
Whoever wins a fight (pushes their opponent into another square) can move up one zone again.
x Soft mats (small) ► Indoor version
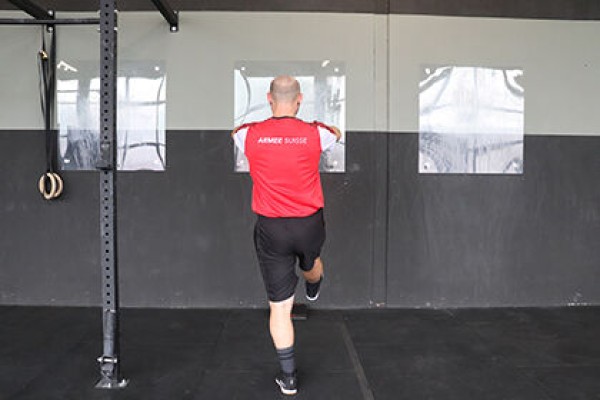
Bring heel to buttocks in jump ► bottom kick
Power
Individual work


Stand upright in a slight straddle position (starting position, then single-leg stance), alternately pull the heel up to the buttocks while jumping (bouncing slightly from one leg to the other), arms supported on the hips, crossed in front of the chest or in front of the body.
Attention:
Maintain upright position (body tension).
Lighten:
Exercise while standing (without jumping).
Harden:
Add weight (hold on the legs, shoulders or in the hands).
Variant:
Pause between jumps (stand completely, maintain balance) or jump continuously.
2 weight cuffs/1 weight vest/weight disc/sandbag/fighting backpack/1-2 dumbbells ► Make the exercise more difficult (additional weight)
Armed Forces Fitness Test (FTA) - short
Examinations
Time ratios (60 min.) correspond to a group size of approx. 30 participants.
Of course, each participant is tested individually.
The army fitness test (FTA) assesses the physical fitness of male and female conscripts/army personnel (gender-specific value tables). However, the athletic performance test can also be carried out for other athletes to determine their level of fitness.
Procedure of the test
Information:
First, the starting numbers are distributed and the participants are informed about the procedure of the FTA. The stations in the hall and the final endurance test in the hall or in the field take place after the run-in. Participants must wear their sports shoes and race number throughout the test (with the exception of the measurement of anthropometric parameters). Exercising is not permitted during the waiting times between the individual stations.
Warm-up:
A (guided) warm-up is carried out before the test. The warm-up lasts 10 to 15 minutes, of which approx. 10 minutes are set aside for stimulating the cardiovascular system and approx. 5 minutes for mobilising the joints/purpose gymnastics.
Station operation:
The participants all perform the medicine ball kick first. Once all participants have completed the medicine ball kick, half of the participants switch to the global trunk strength test and the other half to the anthropometric parameters survey. As soon as both subgroups have completed their measurements, the stations are swapped. The last station is the endurance test. The sports director and his assistants prepare the evaluation.
Sequence:
Station 1: Medicine ball kick
Station 2a: Global trunk strength test
Station 2b: Anthropometric parameters
Station 3: Progressive endurance run (indoor or outdoor)
Execution rules
Station 1: Medicine ball kick
Facility:
A long bench is placed against a wall. The height of the long bench at rest is 37 to 38 cm, the seat height in the centre of the loaded long bench is 35 to 36 cm. A measuring tape 10 metres long is attached to the floor perpendicular to the wall with adhesive tape. The zero point of the measuring tape is on the wall.
Execution:
The participant sits on the long bench so that their buttocks and back touch the wall. A foam/soft tennis ball is placed between the shoulder blades and pressed against the wall. The medicine ball (2 kg, Ø 28 cm) is held with both hands in front of the chest and kicked from there. The medicine ball kick is invalid if the buttocks leave the bench, the back leaves the wall (check whether the foam/soft tennis ball moves/falls down) or the ball is not kicked with both hands.
Tip: the participants should press themselves against the wall with the strength of their legs to keep their back against the wall when kicking the ball. The ball must be held firmly and kicked at an angle of approximately 45 degrees. Before the ball kick, the participant should build up tension in the upper body, with the final kick being performed as explosively as possible.
Attempts:
Three, the best attempt is scored, but at least one valid attempt must be achieved.
All three attempts are either performed immediately one after the other without interruption or all participants perform the first, then the second and finally the third attempt one after the other (pauses between the kicks can influence the results, but different scoring is not used as the difference is negligible).
Measurement:
The distance is measured to the nearest centimetre (round results mathematically), from the wall to the landing point of the ball (centre of the ball).
Control:
The test leader is located next to the expected landing area of the ball. He/she checks the correct execution of the ball kick, paying particular attention to ensuring that the buttocks do not leave the long bench, the back does not leave the wall (displacement of the foam/soft tennis ball) and that the ball is kicked with both arms simultaneously. The landing point of the ball (centre of the ball) is immediately marked with an indicator stick to record the distance of the shot. The result is recorded directly electronically or transferred to an evaluation form and later analysed electronically.
Station 2a: Global trunk strength test
Facility:
A fitness mat can optionally be placed on a flat floor for the participants. A trunk strength tester (RKT) is attached to the centre of a vaulting box to check the position in the forearm support. A music system including a CD with a count is required for the test procedure.
Execution:
Position in the forearm support: The outstretched legs and upper body form a line. The legs are supported on the tips of the toes and the upper body on the forearms. The forearms lie flat on the floor parallel to each other. The hands must not touch/be closed. The upper arms are vertical (90 degree angle at the elbow joint).
The feet are lifted alternately 2 to 5 cm off the floor in a one-second rhythm. If the rhythm cannot be maintained due to a lack of sense of rhythm, the test leader corrects the participant. As the rhythm only has a minor influence on the performance, the test can also be assessed if the leg movement is arrhythmic.
The time is stopped as soon as the position in the forearm support can no longer be maintained and the participant returns to the prone position; the knees are put down; the head is supported on the arms. The participant is admonished, but the time is not stopped as soon as the hands touch/close.
The participant is in the prone position (on the fitness mat) between the centre section of the vaulting box and assumes the position in the forearm support under the instruction of the test leader. The test leader checks the position of the RKT so that it is positioned on the small of the back (directly above the buttocks). If the switch on the RKT is pressed upwards, the diode lights up. If necessary, a small soft mat can be used for smaller participants so that they can also assume the correct position. As soon as the participant has positioned themselves correctly in relation to the RKT, they return to the prone position. At the start signal, the competitor assumes the forearm support position again, whereupon the timing starts. In the event of an abort, the competitor does not have to remain lying between the centre section of the vault box, but can return to the waiting area. If no cancellation criterion occurs, the participants can cancel the measurement after 300 seconds, as the maximum time is counted from this point onwards (CD runs up to a maximum of 400 seconds).
Attempts:
One. It is not permitted to continue the test after a cancellation criterion (a pause) has been reached.
Measurement:
The time is measured to the nearest second (result according to the count on the CD).
Control:
The test leader explicitly points out the cancellation criteria in advance. During the test, the test leader checks the execution regulations, paying particular attention to the fact that the hands do not touch, the head is not supported, the feet are lifted alternately and contact with the measuring device is maintained. If the participant is unable to maintain the rhythm when lifting their legs every second, the test leader will point this out to them. However, this is not a criterion for cancelling the test. The participant's contact with the measuring device can be checked using the light on the timer. If contact is lost, the test leader is responsible for ensuring that contact is re-established immediately. This applies until one of the cancellation criteria is met. The result is recorded directly electronically or transferred to an evaluation form and later analysed electronically.
A CD is used for the time measurement, on which a count can be heard every second. The test is carried out in small groups. The test leader checks the positions of the participants beforehand to ensure that they are correctly positioned under the RKT. Once all the settings have been made, the participants start the global trunk strength test at the same time. As soon as a participant no longer fulfils the execution requirements, the test leader records the time.
Station 2b: Anthropometric parameters
Facilities:
Height: A stadiometer is provided to measure height or a measuring tape is attached to a wall with adhesive tape.
Weight: Calibrated scales are required to determine weight (including spare batteries). It is important to ensure that the scales are placed on a firm surface (the hall floor can distort the result). Once the scale has been calibrated, it will not be moved again.
Waist circumference: The waist circumference is recorded with a measuring tape.
Design:
All measurements are taken without shoes and only in a T-shirt and gym shorts.
Size: The participant stands upright under the stadiometer/on the wall in front of the measuring tape. Feet touching, looking straight ahead (head upright).
Weight: The participant stands on the scales and remains still until the scales display shows a stable number.
Waist circumference: The participant stands upright and relaxed in front of the test leader, feet positioned hip-width apart, arms hanging loosely beside the body. The measurement is taken while exhaling (no abdominal contraction).
Measurement:
Height: The height is measured to the nearest centimetre (mathematically rounding the result), from the floor to the top of the head.
Weight: The weight is measured to the nearest 0.1 kg (mathematically rounding the result).
Waist circumference: The circumference is measured to the nearest centimetre (mathematically rounding the result). The waist circumference is measured in the centre between the lower edge of the ribs and the iliac crest (usually the thinnest part of the upper body, approx. 1-2 cm above the navel).
Calculations: WHtR (waist to height index) = waist circumference [cm] / height [cm] BMI (body mass index) = body weight [kg] / height2 [m2].
Control:
Height: The test leader ensures that the participant is in the correct position and positions the height slider of the stadiometer or places a flat surface on the participant's head at right angles to the wall in order to read the height on the measuring tape.
Weight: The test leader ensures that the participant stands on the scales until they have finally defined the weight.
Waist circumference: The waist circumference is measured with a measuring tape that is placed horizontally (parallel to the floor) on the participant's body without cutting into it. The test leader carries out the measurement while the participant exhales.
The anthropometric parameters are recorded directly electronically or transferred to an evaluation form and later analysed electronically.
Station 3a: Progressive endurance run (circuit)
Facility:
If conditions permit, the progressive endurance run is carried out on an outdoor facility (see section 1.2.3 Endurance test). A flat and clear circular track with a length of at least 200 metres is required for the run. The ground must be firm (a finned track is not suitable as the additional load caused by the soft ground distorts the evaluation). A marker (pig cone/cap) is placed on the inside of the track every 10 metres. If signalling lamps are available, these are placed on the markings (pig cones). If no optical signalling system is available, the progressive endurance run is conducted with an acoustic signal. This requires a music system including a CD on which a signal tone can be heard. The music system must be set up so that the signal tone can be heard clearly along the entire circuit.
Execution:
Each participant starts at a marker. In exceptional cases (lack of time), two competitors may line up at each marker. At the start signal, the participant starts running anti-clockwise. During the progressive endurance run, the competitors must reach the next marker at each visual/audible signal. If the participant is travelling too fast, they must wait at the next marker until the signal. The test ends as soon as the participant can no longer keep up with the set pace and passes the next marker too late without being able to catch up. If the participant drops out, he/she goes to the outside lane and ensures that his/her running time has been recorded (report to the test leader responsible for the respective sector).
Attempts:
One.
Measurement:
The running time is measured to the nearest second (round the result mathematically).
The progressive endurance run starts at 8.5 km/h. The running speed increases every 200 metres. The running speed increases by 0.5 km/h every 200 m.
Control:
If the participants are lined up in the order of the start numbers, the control is simplified, as a mistake in the form of running ahead/overtaking or falling behind the participants is better recognised if the participants do not adhere to the execution regulations. Before the test, the visual or acoustic signal is shown or played to the participants. At the start signal, all test leaders start their stopwatch. During the progressive endurance run, the test leaders check that the participants keep to the pace and always pass a marker at the signal. Participants running ahead/overtaking are instructed to reduce their running speed until the running rhythm matches the signal tone again or to wait briefly at the marker until the signal appears or sounds. The test leaders look towards the direction in which the participants are running and note the running time of the participants who stop the test between themselves and the previous test leader (sector allocation). If a participant does not stop the test independently, even though he/she is obviously no longer able to keep up the pace, the test leader takes him/her out of the run and records the time. The result is recorded directly electronically or transferred to an evaluation form and later analysed electronically.
Recommendation for sector allocation: the 4 test leaders are allocated to the "corners" of the circuit (start/end of the bends).
Station 3b: Progressive endurance run (20-metre penile run)
Facility:
If the conditions do not allow the progressive endurance run to take place on an outdoor facility, the progressive endurance run is moved indoors (see section 1.2.3 Endurance test). In the hall, 22 m in length (20 m from baseline to baseline plus one metre each for turning) and 1 m in width per participant must be available for the run. The two baselines and the centre line must be clearly marked (cones). The shuttle run is carried out with an acoustic signal. This requires a music system including a CD on which a signal tone can be heard. The music system is set up so that the signal tone can be heard clearly by all participants.
Performance:
The participants line up next to each other at a distance of one metre between two markers (cones). At the start signal, the participant runs to the opposite baseline. During the progressive endurance run, the participants must reach the next line (baseline or centre line) at each acoustic signal. At the baselines, the participant turns, crossing the line with at least one part of the foot. The participants therefore shuttle back and forth between the baselines. If the participant is travelling too fast, they must wait at the next line until the signal tone. The test ends as soon as the participant can no longer keep up with the set pace and passes the next line too late without being able to catch up. If the participant drops out, they leave the running area and make sure that their running time has been recorded (report to the test leader responsible for the respective sector).
Tries:
One.
Measurement:
The running time is measured to the nearest second (round the result mathematically).
The progressive endurance run starts at 8.5 km/h. The running speed increases every 200 metres. The running speed increases by 0.5 km/h every 200 metres.
Control:
Before the test, the acoustic signal is played to the participants. At the start signal, all test leaders start their stopwatch. During the progressive endurance run, the test leaders check that the participants keep to the pace and always pass the line (baseline or centre line) at the acoustic signal. Participants running ahead are instructed to reduce their running speed until their running rhythm matches the signal tone again or to wait briefly at the line until the signal sounds. The test leaders note the running time of the participants who stop the test between themselves and the next test leader (sector allocation). If a participant does not stop the test independently, even though he/she is obviously no longer able to keep up the pace, the test leader takes him/her out of the run and records the time. The result is recorded directly electronically or transferred to an evaluation form and later analysed electronically.
Recommendation for sector allocation: The test leaders distribute themselves evenly over the available area (for 30 participants, for example, 2 sectors of 8 and 7 participants respectively).
All items:
Evaluation form including writing materials or device for electronic data collection.
Medicine ball kick:
Long bench, measuring tape, adhesive tape, 2-3 medicine balls (2 kg, Ø 28 cm), foam/soft tennis ball, scoreboard stick.
Global core strength test:
1 fitness mat per participant (optional), 1 vaulting box centre section incl. RKT per participant, small soft mat for smaller participants, music system including CD with acoustic signal tone.
Anthropometric parameters:
Stadiometer or measuring tape including adhesive tape and flat base, scales including spare batteries, (tailor's) measuring tape.
Circuit run:
1 marker (pig cone for optical signalling system, cone for acoustic signal) per 10 m running distance, distance measuring wheel (if no distance markers are available), optical signalling system or music system including CD with acoustic signal, 1 stopwatch per measuring leader.
20 m shuttle run:
3 markers (cones) per participant, measuring tape, music system including CD with acoustic signal, 1 stopwatch per measuring leader.
- 0302_FTA3.pdf
- 0302_TFA3.pdf
- 0302_TFE3.pdf
- FTA3_BK_Jahrestest_A3.pdf
- FTA3_RS_Eintrittstest_A3.pdf
- FTA3_S_LG_Eintritts-_und_Schlusstest_A3.pdf
- TFA3_E_cours_test_d'admission_et_test_final_A3_.pdf
- TFA3_ER_test_d_admission_A3.pdf
- TFA3_militaires_de_carrière_test_annuel_A3.pdf
- TFE3_Militari_di_professione_test_annuale_A3.pdf
- TFE3_S_corso_test_d'entrata_e_finale_A3.pdf
- TFE3_SR_test_d'entrata_A3.pdf
Army fitness test (FTA) - long
Examinations
Time ratios (90 min.) correspond to a group size of approx. 30 participants.
Of course, each participant will be tested individually.
The army fitness test (FTA) assesses the physical fitness of male and female conscripts/army personnel (gender-specific value tables). However, the athletic performance test can also be carried out for other athletes to determine their level of fitness.
Procedure of the test
Information:
First, the starting numbers are distributed and the participants are informed about the procedure of the FTA. The stations in the hall and the final endurance test in the hall or in the field take place after the run-in. Participants must wear their sports shoes and race number throughout the test (with the exception of the measurement of anthropometric parameters). Exercising is not permitted during the waiting times between the individual stations.
Warm-up:
A (guided) warm-up is carried out before the test. The warm-up lasts 10 to 15 minutes, of which approx. 10 minutes are set aside for stimulating the cardiovascular system and approx. 5 minutes for mobilising the joints/purpose gymnastics.
Station operation:
The participants first complete stations 1-3 alternately. Afterwards, half of the participants switch to the global trunk strength test and the other half to the anthropometric parameters. As soon as both subgroups have taken their measurements, the stations are swapped. The last station is the endurance test. The sports director and his assistants prepare the evaluation.
Sequence:
Station 1: Medicine ball kick
Station 2: Standing long jump
Station 3: One-legged stand
Station 4a: Global trunk strength test
Station 4b: Anthropometric parameters
Station 5: Progressive endurance run (indoor or outdoor)
Execution rules
Station 1: Medicine ball kick
Facility:
A long bench is placed against a wall. The height of the long bench at rest is 37 to 38 cm, the seat height in the centre of the loaded long bench is 35 to 36 cm. A measuring tape 10 metres long is attached to the floor perpendicular to the wall with adhesive tape. The zero point of the measuring tape is on the wall.
Execution:
The participant sits on the long bench so that their buttocks and back touch the wall. A foam/soft tennis ball is placed between the shoulder blades and pressed against the wall. The medicine ball (2 kg, Ø 28 cm) is held with both hands in front of the chest and kicked from there. The medicine ball kick is invalid if the buttocks leave the bench, the back leaves the wall (check whether the foam/soft tennis ball moves/falls down) or the ball is not kicked with both hands.
Tip: the participants should press themselves against the wall with the strength of their legs to keep their back against the wall when kicking the ball. The ball must be held firmly and kicked at an angle of approximately 45 degrees. Before the ball kick, the participant should build up tension in the upper body, with the final kick being performed as explosively as possible.
Attempts:
Three, the best attempt is scored, but at least one valid attempt must be achieved.
All three attempts are either performed immediately one after the other without interruption or all participants complete the first, then the second and finally the third attempt one after the other (pauses between the kicks can influence the results, but different scoring is not used as the difference is negligible).
Measurement:
The distance is measured to the nearest centimetre (round results mathematically), from the wall to the landing point of the ball (centre of the ball).
Control:
The test leader is located next to the expected landing area of the ball. He/she checks the correct execution of the ball kick, paying particular attention to ensuring that the buttocks do not leave the long bench, the back does not leave the wall (displacement of the foam/soft tennis ball) and that the ball is kicked with both arms simultaneously. The landing point of the ball (centre of the ball) is immediately marked with an indicator stick to record the distance of the shot. The result is recorded directly electronically or transferred to an evaluation form and later analysed electronically.
Station 2: Standing long jump
Facility:
A jump line is marked on the hall floor and a 3.5 m long measuring tape is attached to the floor perpendicular to it with adhesive tape. The zero point of the measuring tape is at the front edge of the jump line (edge facing the jumper). Next to the measuring tape, the landing area is laid out with three mats on one side (from 0.5 m due to the risk of tripping during the jump). So that there is no gap between the mats in the anticipated landing area, the first mat is placed with the width of the mat facing the measuring tape, and the other two mats are placed lengthways. The rearmost mat is placed flush with a wall to prevent the mats attached to each other from slipping away.
Execution:
The participant must jump from a standing position with both legs at the same time. Rocking is allowed, jumping forward is not. Both feet are in front of the jump line and must touch the ground until the jump. Over-jumping attempts are invalid. The participant must jump onto the mat track (scoring table corresponds to this variant). Jumping next to the mat track is also prohibited due to injury-related aspects. The landing position does not have to be maintained, but the participant must step forwards after the jump.
Tip: Before the jump, participants should bend their knees slightly, achieve a good pre-tension, take a slight forward lean and then jump off powerfully. Leading the arms forwards (swinging movement) supports the jump. The legs are pulled in during the jump and placed as far forward as possible on landing without the participant losing their balance and falling backwards.
Attempts:
Three, the best attempt is scored, but at least one valid attempt must be achieved.
All three attempts are either made immediately one after the other without interruption or all participants complete the first, then the second and finally the third attempt one after the other (pauses between the jumps can influence the results, but different scoring is not used as the difference is negligible).
Measurement:
The distance is measured to the nearest centimetre (round results mathematically), from the front edge of the take-off line to the rearmost point of contact of the body on the mat (usually the heel).
Control:
The test leader is located next to the expected landing area. He checks the correct execution of the jump, paying particular attention to ensuring that there is no bouncing or stepping over the jump line. After landing, the landing point is immediately marked with an indicator stick to record the jump distance. The result is recorded directly electronically or transferred to an evaluation form and later evaluated electronically.
Station 3: One-legged stand
Facility:
A (gymnastics) tyre with a diameter of 70 cm is placed on flat ground.
Variant: A music system including a CD on which a count can be heard is also required.
Execution:
The participant places the left foot in the centre of the tyre. The right foot is held against the back of the knee of the supporting leg (left leg). The upper body is upright, the supporting leg is extended. The hands are held together behind the back. The competitor assumes this position at the start signal "Ready, start", whereupon the timing begins. After 10 seconds the command "Close your eyes" is given, after a further 10 seconds the next command "Head back with eyes closed" is given. In response to the test leader's commands, the participants carry out the corresponding commands. After 60 seconds, the measurement is cancelled and the maximum time is scored. The right leg is then tested.
The time is stopped as soon as the standing foot leaves the ground (only slight shifts with constant contact with the ground are permitted, jumping is not permitted); the standing foot touches the tyre; the bent foot no longer touches the back of the knee; the hands are no longer held together; the commands are no longer followed (the eyes are opened or the head leaves the neck).
Attempts:
One attempt per side (leg).
The two attempts are performed immediately one after the other without interruption.
Measurement:
The final result is the sum of the results of the left and right standing leg.
The time is measured to the nearest 0.1 seconds (round results mathematically).
Variant: The time is measured to the nearest second (results according to the count on the CD).
Control:
The test leader explicitly points out all cancellation criteria in advance. At this station, special care must be taken to ensure that the participants do not practise. During the test, the test leader ensures calm and concentration and gives the appropriate commands ("close eyes" after 10 seconds, "head with eyes closed in the neck" after 20 seconds). The test leader is constantly on the move to monitor the criteria. For example, the extension of the standing leg can be checked at some distance from the participant. However, to check whether the eyes are closed, the distance between the test leader and participant needs to be reduced from time to time and a new angle of vision is required. As soon as a participant no longer fulfils the execution requirements, the test leader records the time. The result is recorded directly electronically or transferred to an evaluation form and later analysed electronically.
Ideally, a test administrator stops the time of a participant. If there is not enough time, one test leader can time two participants at the same time (2 stopwatches).
Variant: In exceptional cases, the test can be carried out in small groups if there are large numbers of participants. In this case, a CD is used for timing, on which a count can be heard every second. The participants start the one-leg stand at the same time. As soon as a participant no longer fulfils the execution requirements, the test leader records the time. In this variant, it is more difficult for the test leader to check the execution rules (use a helper).
Station 4a: Global trunk strength test
Facility:
A fitness mat can optionally be placed on a flat floor for the participants. A trunk strength tester (RKT) is attached to the centre of a vaulting box to check the position in the forearm support. A music system including a CD with a count is required for the test procedure.
Execution:
Position in the forearm support: The outstretched legs and upper body form a line. The legs are supported on the tips of the toes and the upper body on the forearms. The forearms lie flat on the floor parallel to each other. The hands must not touch/be closed. The upper arms are vertical (90 degree angle at the elbow joint).
The feet are lifted alternately 2 to 5 cm off the floor in a one-second rhythm. If the rhythm cannot be maintained due to a lack of sense of rhythm, the test leader corrects the participant. As the rhythm only has a minor influence on the performance, the test can also be assessed if the leg movement is arrhythmic.
The time is stopped as soon as the position in the forearm support can no longer be maintained and the participant returns to the prone position; the knees are put down; the head is supported on the arms. The participant is admonished, but the time is not stopped as soon as the hands touch/close.
The participant is in the prone position (on the fitness mat) between the centre section of the vaulting box and assumes the position in the forearm support under the instruction of the test leader. The test leader checks the position of the RKT so that it is positioned on the small of the back (directly above the buttocks). If the switch on the RKT is pressed upwards, the diode lights up. If necessary, a small soft mat can be used for smaller participants so that they can also assume the correct position. As soon as the participant has positioned themselves correctly in relation to the RKT, they return to the prone position. At the start signal, the competitor assumes the forearm support position again, whereupon the timing starts. In the event of an abort, the competitor does not have to remain lying between the centre section of the vault box, but can return to the waiting area. If no cancellation criterion occurs, the participants can cancel the measurement after 300 seconds, as the maximum time is counted from this point onwards (CD runs up to a maximum of 400 seconds).
Attempts:
One. It is not permitted to continue the test after a cancellation criterion (a pause) has been reached.
Measurement:
The time is measured to the nearest second (result according to the count on the CD).
Control:
The test leader explicitly points out the cancellation criteria in advance. During the test, the test leader checks the execution regulations, paying particular attention to the fact that the hands do not touch, the head is not supported, the feet are lifted alternately and contact with the measuring device is maintained. If the participant is unable to maintain the rhythm when lifting their legs every second, the test leader will point this out to them. However, this is not a criterion for cancelling the test. The participant's contact with the measuring device can be checked using the light on the timer. If contact is lost, the test leader is responsible for ensuring that contact is re-established immediately. This applies until one of the cancellation criteria is met. The result is recorded directly electronically or transferred to an evaluation form and later analysed electronically.
A CD is used for the time measurement, on which a count can be heard every second. The test is carried out in small groups. The test leader checks the positions of the participants beforehand to ensure that they are correctly positioned under the RKT. Once all the settings have been made, the participants start the global trunk strength test at the same time. As soon as a participant no longer fulfils the execution requirements, the test leader records the time.
Station 4b: Anthropometric parameters
Facilities:
Height: A stadiometer is provided to measure height or a measuring tape is attached to a wall with adhesive tape.
Weight: A calibrated scale is required to determine weight (including spare batteries). It is important to ensure that the scales are placed on a firm surface (the hall floor can distort the result). Once the scale has been calibrated, it will not be moved again.
Waist circumference: The waist circumference is recorded with a measuring tape.
Design:
All measurements are taken without shoes and only in a T-shirt and gym shorts.
Size: The participant stands upright under the stadiometer/on the wall in front of the measuring tape. Feet touching, looking straight ahead (head upright).
Weight: The participant stands on the scales and remains still until the scales display shows a stable number.
Waist circumference: The participant stands upright and relaxed in front of the test leader, feet positioned hip-width apart, arms hanging loosely beside the body. The measurement is taken while exhaling (no abdominal contraction).
Measurement:
Height: The height is measured to the nearest centimetre (mathematically rounding the result), from the floor to the top of the head.
Weight: The weight is measured to the nearest 0.1 kg (mathematically rounding the result).
Waist circumference: The circumference is measured to the nearest centimetre (mathematically rounding the result). The waist circumference is measured in the centre between the lower edge of the ribs and the iliac crest (usually the thinnest part of the upper body, approx. 1-2 cm above the navel).
Calculations: WHtR (waist to height index) = waist circumference [cm] / height [cm] BMI (body mass index) = body weight [kg] / height2 [m2].
Control:
Height: The test leader ensures that the participant is in the correct position and positions the height slider of the stadiometer or places a flat surface on the participant's head at right angles to the wall in order to read the height on the measuring tape.
Weight: The test leader ensures that the participant stands on the scales until they have finally defined the weight.
Waist circumference: The waist circumference is measured with a measuring tape that is placed horizontally (parallel to the floor) on the participant's body without cutting into it. The test leader takes the measurement while the participant exhales.
The anthropometric parameters are recorded directly electronically or transferred to an evaluation form and later analysed electronically.
Station 5a: Progressive endurance run (circuit)
Facility:
If conditions permit, the progressive endurance run is carried out on an outdoor facility (see section 1.2.3 Endurance test). A flat and clear circular track with a length of at least 200 metres is required for the run. The ground must be firm (a finned track is not suitable as the additional load caused by the soft ground distorts the evaluation). A marker (pig cone/cap) is placed on the inside of the track every 10 metres. If signalling lamps are available, these are placed on the markings (pig cones). If no optical signalling system is available, the progressive endurance run is conducted with an acoustic signal. This requires a music system including a CD on which a signal tone can be heard. The music system must be set up so that the signal tone can be heard clearly along the entire circuit.
Execution:
Each participant starts at a marker. In exceptional cases (lack of time), two competitors may line up at each marker. At the start signal, the participant starts running anti-clockwise. During the progressive endurance run, the competitors must reach the next marker at each visual/audible signal. If the participant is travelling too fast, they must wait at the next marker until the signal. The test ends as soon as the participant can no longer keep up with the set pace and passes the next marker too late without being able to catch up. If the participant drops out, he/she goes to the outside lane and ensures that his/her running time has been recorded (report to the test leader responsible for the respective sector).
Attempts:
One.
Measurement:
The running time is measured to the nearest second (round the result mathematically).
The progressive endurance run starts at 8.5 km/h. The running speed increases every 200 metres. The running speed increases by 0.5 km/h every 200 m.
Control:
If the participants are lined up in the order of the start numbers, the control is simplified, as a mistake in the form of running ahead/overtaking or falling behind the participants is better recognised if the participants do not adhere to the execution regulations. Before the test, the visual or acoustic signal is shown or played to the participants. At the start signal, all test leaders start their stopwatch. During the progressive endurance run, the test leaders check that the participants keep to the pace and always pass a marker at the signal. Participants running ahead/overtaking are instructed to reduce their running speed until the running rhythm matches the signal tone again or to wait briefly at the marker until the signal appears or sounds. The test leaders look towards the direction in which the participants are running and note the running time of the participants who stop the test between themselves and the previous test leader (sector allocation). If a participant does not stop the test independently, even though he/she is obviously no longer able to keep up the pace, the test leader takes him/her out of the run and records the time. The result is recorded directly electronically or transferred to an evaluation form and later analysed electronically.
Recommendation for sector allocation: the 4 test leaders are allocated to the "corners" of the circuit (start/end of the bends).
Station 5b: Progressive endurance run (20-metre penile run)
Facility:
If the conditions do not allow the progressive endurance run to take place on an outdoor facility, the progressive endurance run is moved indoors (see section 1.2.3 Endurance test). In the hall, 22 m in length (20 m from baseline to baseline plus one metre each for turning) and 1 m in width per participant must be available for the run. The two baselines and the centre line must be clearly marked (cones). The shuttle run is carried out with an acoustic signal. This requires a music system including a CD on which a signal tone can be heard. The music system is set up so that the signal tone can be heard clearly by all participants.
Performance:
The participants line up next to each other at a distance of one metre between two markers (cones). At the start signal, the participant runs to the opposite baseline. During the progressive endurance run, the participants must reach the next line (baseline or centre line) at each acoustic signal. At the baselines, the participant turns, crossing the line with at least one part of the foot. The participants therefore shuttle back and forth between the baselines. If the participant is travelling too fast, they must wait at the next line until the signal tone. The test ends as soon as the participant can no longer keep up with the set pace and passes the next line too late without being able to catch up. If the participant drops out, they leave the running area and make sure that their running time has been recorded (report to the test leader responsible for the respective sector).
Tries:
One.
Measurement:
The running time is measured to the nearest second (round the result mathematically).
The progressive endurance run starts at 8.5 km/h. The running speed increases every 200 metres. The running speed increases by 0.5 km/h every 200 metres.
Control:
Before the test, the acoustic signal is played to the participants. At the start signal, all test leaders start their stopwatch. During the progressive endurance run, the test leaders check that the participants keep to the pace and always pass the line (baseline or centre line) at the acoustic signal. Participants running ahead are instructed to reduce their running speed until the running rhythm matches the signal tone again or to wait briefly at the line until the signal sounds. The test leaders note the running time of the participants who stop the test between themselves and the next test leader (sector allocation). If a participant does not stop the test independently, even though he/she is obviously no longer able to keep up the pace, the test leader takes him/her out of the run and records the time. The result is recorded directly electronically or transferred to an evaluation form and later analysed electronically.
Recommendation for sector allocation: The test leaders distribute themselves evenly over the available area (for 30 participants, for example, 2 sectors of 8 and 7 participants respectively).
All items:
Evaluation form including writing materials or device for electronic data collection.
Medicine ball kick:
Long bench, measuring tape, adhesive tape, 2-3 medicine balls (2 kg, Ø 28 cm), foam/soft tennis ball, scoreboard.
Long jump:
Measuring tape, adhesive tape, 3 small soft mats (7 cm), scoreboard.
One-legged stand:
1 gymnastics tyre (Ø 70cm) per participant, 1-2 stopwatches.
Variant: music system including CD with acoustic signal tone.
Global core strength test:
1 fitness mat per participant (optional), 1 vaulting box centre section incl. RKT per participant, small soft mat for smaller participants, music system including CD with acoustic signal tone.
Anthropometric parameters:
Stadiometer or measuring tape including adhesive tape and flat base, scales including spare batteries, (tailor's) measuring tape.
Circuit run:
1 marker (pig cone for optical signalling system, cone for acoustic signal) per 10 m running distance, distance measuring wheel (if no distance markers are available), optical signalling system or music system including CD with acoustic signal, 1 stopwatch per measuring leader.
20 m shuttle run:
3 markers (cones) per participant, measuring tape, music system including CD with acoustic signal, 1 stopwatch per measuring leader.
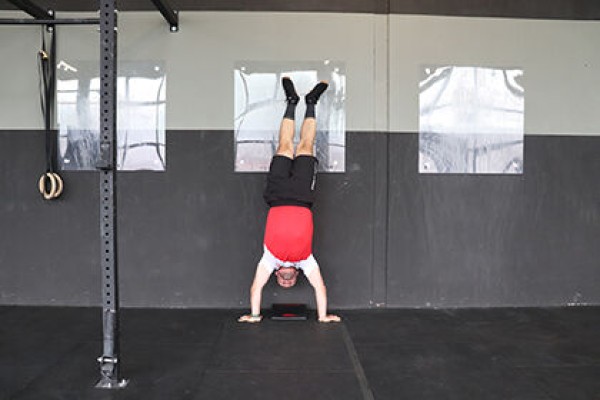
Flexion of the arms in handstand ► negative handstand push up
Power
Individual work


Stand upright in front of a wall (facing the wall), bring your arms to the floor close to the wall and move one leg at a time from a stepping position to the wall with momentum, place your heels against the wall to be able to hold yourself in the handstand (full body stretch, arms overhead in a high position). From this position, bend your arms very slowly and bring your head/body towards the floor. Once in the headstand position, bring the legs back to the standing position.
Attention:
Lower the upper body in a controlled manner.
Lighten:
Bend the arms slightly and bring the legs back to the standing position before the final position in the headstand.
Harden:
Additional weight (on the feet).
1 wall
2 weight cuffs/1 weight waistcoat ► Make the exercise more difficult (additional weight)
Flexion of the arms in the hang ► chin over bar hold
Power
Individual work

When hanging on the horizontal bar (upper grip, back of hands pointing backwards), arms bent so that the chin is at or above the horizontal bar (arms at least at shoulder height), hold the position (elbows close to the body, legs stretched).
Attention:
Keep the whole body as stable as possible (body tension, no swinging/swaying).
Lighten:
Attach an elasticated band to the bar to place one or both feet in its loop.
Harden:
Additional weight.
Variation:
Grab the bar with an underhand grip (palm facing your face).
1 horizontal bar
1 elasticated rubber band ► Make the exercise easier (support)
2 weight cuffs/1 weight waistcoat ► Make the exercise more difficult (additional weight)
Flexion of the arms on the slope ► negative pull up
Power
Individual work


When hanging from the horizontal bar (upper grip, back of hands pointing backwards), bend your arms so that your chin is level with the horizontal bar (arms almost at shoulder height) and slowly stretch your arms to lower your body towards the floor in a controlled manner until your arms are finally fully extended overhead (passive hang, full body stretch).
Attention:
Keep the whole body as stable as possible (body tension, no swinging/swaying).
Lighten:
Attach an elasticated band to the horizontal bar to place one or both feet in its loop.
Harden:
Additional weight.
Variant:
Grab the bar with an underhand grip (palm facing your face).
1 horizontal bar
1 elasticated rubber band ► Make the exercise easier (support)
2 weight cuffs/1 weight waistcoat ► Make the exercise more difficult (additional weight)
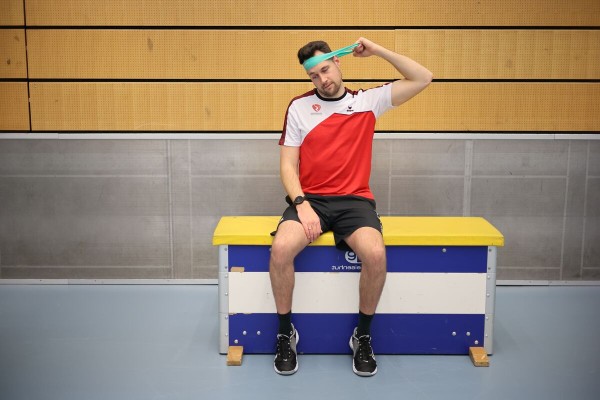
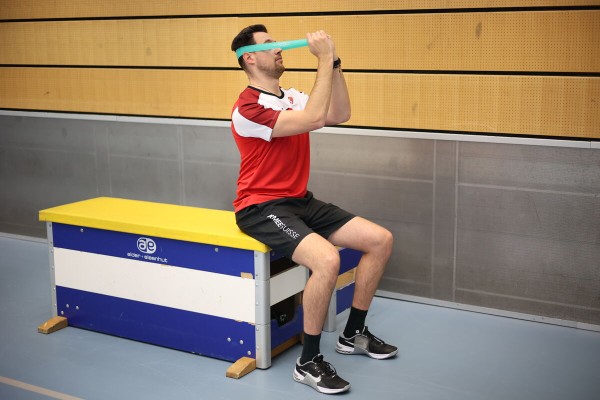
Lateral flexion of the neck in standing, sitting or supine position (left)
Power
Individual work
When standing upright, sitting or lying on your back, place an elasticated band around your forehead and hold/fix it with the (right) hand of your bent arm (elbow pointing to the side) to the side of your head at ear level. Tilt the head to the (left) side to stretch/tension the band and return to the neutral starting position (lateral neck flexion).
Attetnion:
Movement takes place exclusively in the neck (upper body and arm remain stable).
Lighten:
Choose a rubber band with less resistance.
Harden:
Choose a rubber band with greater resistance.
1 mini band
1 seating option (e.g. chair, plyo box or vaulting box) ► depending on the starting position
Lateral flexion of the neck in standing, sitting or supine position (right)
Power
Individual work
When standing upright, sitting or lying on your back, place an elasticated band around your forehead and hold/fix it with the (left) hand of your bent arm (elbow pointing to the side) to the side of your head at ear level. Tilt the head to the (right) side to stretch/tension the band and return to the neutral starting position (lateral neck flexion).
Attention:
Movement takes place exclusively in the neck (upper body and arm remain stable).
Lighten:
Choose a rubber band with less resistance.
Harden:
Choose a rubber band with greater resistance.
1 mini band
1 seating option (e.g. chair, plyo box or vaulting box) ► depending on the starting position
Flexion and extension of the arms in handstand ► handstand push up
Power
Individual work


Handstand against a wall, facing away from the wall and holding the position by placing your heels against the wall. Bend your arms until your head practically touches the floor (lower your body) and stretch back to the handstand (full body stretch, arms stretched and held high).
Attention:
Lower and raise your upper body in a controlled manner.
Lighten:
barely bend your arms; support the lifting of the upper body with your legs by bending them and pushing them upwards.
Harden:
additional weight (on your feet).
1 wall
2 weight cuffs/1 weight waistcoat ► Make the exercise more difficult (additional weight)
Flexion/retraction of the neck in standing, sitting or supine position
Power
Individual work
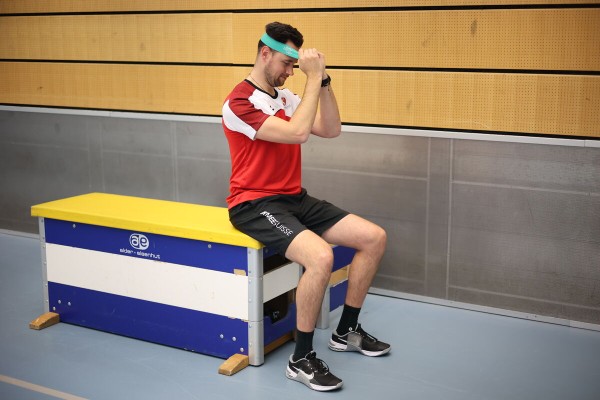
When standing upright, sitting or lying on your back, place an elasticated band around your forehead and hold/fix it with the hands of your bent arms in front of your head (elbows at chest height, hands placed in front of your forehead). Tilt your head slightly forwards and backwards to stretch/tension the band and return to the starting position (neck flexion/retraction).
Attention:
Movement only takes place in the neck (upper body and arms remain stable).
Lighten:
Choose a rubber band with less resistance.
Harden:
Choose a rubber band with greater resistance.
1 mini band
1 seating option (e.g. chair, plyo box or vaulting box) ► depending on the starting position
Flying elbows while standing ► fly
Power
Partner work
1 trainee & 1 helper ► Note change of position
(= double the time required; for lesson planner see Organisation Kraft: Info button Execution)


Trainee: Standing, support the upper body on the vaulting box, clasp your hands behind your head (elbows pointing to the side), bring your elbows together in front of your head (in the direction of your gaze) and back to the starting position.
Partner: Stands on the opposite side of the vaulting box, holds the elbows against the movement of the active participant (pulls upwards/outwards).
Attention:
Always listen to/respond to the partner (adjust pressure/resistance). Elbows are at shoulder height or slightly below.
Lighten:
Less pressure/resistance from your partner.
Harden:
More pressure/resistance from your partner.
1 swing box (3-4 elements incl. top section)
FooBaSKILL
Games / Tournament
Game idea:
Two teams play against each other. On one side of the pitch there are two Swedish boxes, each with a Molankegel or the FooBaSKILL goal on top, which serve as football goals. Football is played on this half. There is a basketball hoop on the other half, where normal basketball is played. In the centre of the hall, the players switch from one sport to the other. In the second half, the roles are swapped. The aim is to score the most points.
Scoring:
Football:
- 1 point: The ball touches the bottom of the Swedish box (wooden structure). The players can aim at 360° of the box.
- 2 pts: The ball touches the bottom of the Swedish box and is stopped (intercepted) by the player of the same team or the kicker himself with the sole of his shoe before it crosses the centre line (second offensive intention in football). Only one point is awarded if a defender intercepts the ball.
- 3 points: The ball brings down the juggernaut or goes through the FooBaSKILL goal.
- 0 points: No point is awarded if the ball touches the top of the box. The game continues without interruption.
Basketball:
- 1 point: The ball bounces off the basketball board without touching the ring and falls to the ground.
- 2 points: The ball bounces off the basketball board without touching the ring and is caught by another team member with both hands before falling to the floor (offensive rebound in basketball).
- 3 points: The ball is kicked into the basket.
- 0 points: No point is awarded if the ball touches the hoop (play continues without interruption) or if the ball touches the back of the basketball board, the edge of the board or the supporting structure (counts as a fault) or if the ball bounces against the basketball board without touching the hoop and is caught by the opposing team with two hands before it touches the floor (play continues without interruption).
Pitch:
22 x 42 metres (with indoor walls)
Number of participants:
4:4 (or 5:5)
Rules of the game:
The kick-off at the start of the game and at the start of the second half takes place in the middle of the pitch with a bounce ball, as in basketball. The ball must be tapped by one of the two players in the centre circle to a teammate. The other players spread out freely across the entire pitch, but outside the circle.
After a point has been scored in football or basketball, the ball is played as quickly as possible. This happens at the point where the ball is seized by the defender. The kick-off takes place immediately with a pass.
The basic rules of classic indoor football and basketball apply.
In the event of an infringement of the rules, play continues with a throw-in at the place where the mistake was made. In the event of a shot at the football goal with the intention of overturning the goal cone or hitting the FooBaSKILL goal, the ball must not exceed the height of these elements. If this happens anyway, it is a fault and the ball goes to the defending team.
Tackling in the FooBaSKILL is prohibited.
It is a fault if:
- The ball touches the hall ceiling or other suspended equipment.
- The ball touches the edge of the basketball board.
- The ball touches the back of the basketball board or the supporting structure.
The walls of the sports hall are part of the playing court. It is permitted to play with the walls in both football and basketball. It is allowed to give yourself a pass against the wall; to give your partner a pass against the wall; to score a goal using the walls.
The duration of the match is twice five minutes. During the first half, one team attacks in football and defends in basketball. In the second half, the roles are reversed.
FooBaSKILL: Dribbling, passing with a basket shot as a finish
Forms of play / exercises
Group work
The participants spread out in the corners of the pitch at the start of the exercise. The sequence of the exercise is as follows:
Two players (A1+B1 or A2+B2) perform the exercise together on one side along the entire length of the hall.
Player A1:
- Dribbling around the marker sticks (incl. change of hands)
- Pass to player B1
- Running around the marker change of hands)
- Pass to player B1
- Run around the marker, demand and receive the pass
- Finish with a lay-up
- Settle into the line of players opposite the starting point (new player B1)
Player B1:
- Sprint to the mark (note timing to player A1)
- Claim and receive the ball
- Pass into the run of player A1
- Chase after player A1 to secure the ball after he has finished (rebound)
- Join the column on the opposite side (new player A2)
Player A2: Analogue to player A1, but becomes player B2 after the exercise
Player B2: Analogue to player B1, but becomes player A1 after the exercise
The players therefore rotate in an anti-clockwise direction.
Pitch:
12 colouring sticks
2 marking cones
x basketballs
FooBaSKILL: Foosball
Forms of play / exercises
2 teams of 4-7 players each
2 teams (4-7 players each) play against each other at their own target. The target is a hoop that is held horizontally in front of the vaulting box by a player standing on the vaulting box. The player may move the hoop towards the ball.
Goal: good teamwork.
Variant:
Target throws to the hoop may not be defended.
Per 2 teams:
1 basketball
2 hoops
x game wristbands / overcoats ►team identification
FooBaSKILL: Passing relay with a basket shot as a finish
Forms of play / exercises
Group work
The participants pass the ball to each other in the specified form before the last player in the line puts the ball in the basket with a lay-up.
Passing sequence:
1. A-B Overhead pass
2. B-C Chest pass
3. C-D Floor pass
4. D-E Lateral curve pass (i.e. pass next to the body; with one or both hands)
5.i.e. pass next to the body; one- or two-handed)
5. E Finish with a lay-up
6. F Secure the ball, then line up with the ball in the column
7. A-F Move to the next position in order immediately after the action
Per group:
5 colouring sticks
x basketballs
FooBaSKILL: Rebound
Forms of play / exercises
2 Teams with 3-4 Spieler
Basketball game with 2 teams (3-4 players each) on one half of the court. Aim for the basket and two additional hoops. An oversized ball, e.g. a gym ball, is placed on the basketball hoop. 2 points can be scored if the basketball bouncing off the gym ball is caught as a rebound. 1 point is scored if the ball is placed in a hoop. This can be prevented by a defender putting his foot in the hoop. The attacker is the referee.
Objectives: Use of the rebound, opening up the game through additional scoring opportunities.
Variant I:
Change of possession after a point or when the ball is lost.
Variant II:
One team tries to score as many points as possible during 1-3 minutes and counts the points.
Per half of the court:
1 basketball
1 basketball hoop
1 gym ball
2 hoops
x game wristbands / covers ► Team labelling
Frisbee Ultimate
Games / Tournament
Game idea:
The team in possession of the frisbee tries to move it towards the targeted end zone. The opposing team tries to prevent this movement and force possession of the frisbee by means of a "turnover" (see rules of the game). The frisbee may only be moved by throwing it from one player to the other.
Scoring:
The aim is to catch the frisbee in the opposite end zone following a pass from a teammate and thus score a point.
Playing field:
Rectangular field with an end zone at each end. 64mx37m with 18m outdoor end zone, 40mx25m with 15m indoor end zone.
The pitch is bounded by cones. The connections between them form the side or out lines.
Number of ends:
7 against 7 outdoor, 5 against 5 indoor
Game rules:
At the start of the game and after each point, the teams line up on their end zone line. The team that starts or has just scored throws a high, long pass towards the opponent's end zone (throw-off). As soon as the disc is released, all participants may move freely on the field. The other team may pick up the disc and start the game.
The disc may be thrown in any direction. The player with the disc in his hands may neither walk nor run, only star steps are allowed. However, if the disc is caught during the race, the movement may be slowed down by the required number of steps. The disc may not be passed, but must move from A to B through the air. If the attackers are unable to catch the disc (disc touches the ground, flies out of bounds or the opponent intercepts it or knocks it to the ground), the defending team gains possession of the disc and attacks. This is referred to as a "turnover". There is no stoppage of play.
The defender covering the thrower must keep at least an arm's length away. Only one player may cover the thrower at a time; the next defender must be at least three metres away. The attacker must play the frisbee after a maximum of 10 seconds. To signal this, the defender counts the seconds out loud.
Body contact or tackling is not permitted. Each player is responsible for signalling an infringement of the rules. There is no referee. Fair play is therefore very important. If an attacker and a defender catch the disc at the same time, it belongs to the attacker.
After a successful point is scored, the teams switch sides. The team that scored the point then starts again with a throw-off towards the opposing team.
Frisbee Ultimate: Burning disc
Forms of play / exercises
2 Teams
In a marked playing field, several markings are made along the outer lines. Two teams play against each other. One team (runner) has the task of completing a predetermined route from mark to mark as quickly as possible. To do this, one participant throws the disc from the drop point (e.g. tyre) and starts running. It is allowed to run until the field team (catcher) returns the disc to the dropping point and burns it there. If the runners are not at the firing point at the same time, they burn and have to return to the start without scoring any points (possibly incorporate additional exercises to shorten the waiting time). Each completed lap scores one point for the runners. If a runner rounds the course without stopping, the run counts double. The field team may not run with the disc, it may only be passed. The winner is the team that scores the most points in a given time (e.g. 2 x 6 minutes).
Variant I:
Only one runner is allowed at each mark. If there are two participants, one burns.
Variant II:
Play with two or more discs.
Pitch:
1 frisbee
x colouring sticks
1 tyre
Frisbee Ultimate: Frisbee handball
Forms of play / exercises
2 Teams
Two teams play against each other on a pitch with a frisbee on two goals. As in handball, the goal circles may not be entered. Unlike handball, however, no physical contact is allowed in this form of the game (one arm's length away from the thrower) and there is no goalkeeper. If the disc falls to the ground, the team that last touched the frisbee loses possession.
Pitch:
1 frisbee
2 goals (handball/uni hockey goals or mats)
x cones (goal circles)