Exercises (2330)
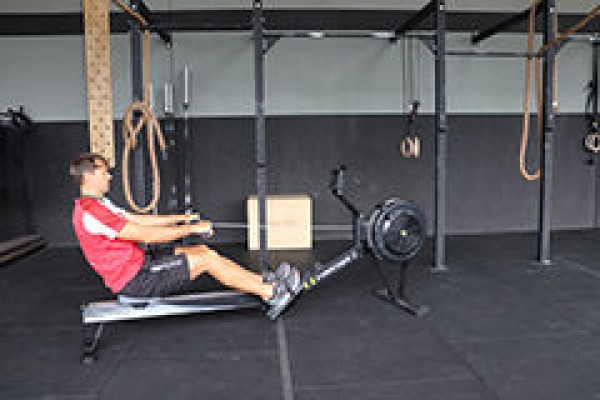
Rowing (m: 250m - 20cal; w: 200m - 15cal) ► row
Power
Individual work


Sitting with your legs bent and arms stretched forwards, first push off and stretch your legs, then pull your arms towards your head with your upper body leaning slightly backwards. Return to the starting position in exactly the opposite way: first stretch your arms, then move your upper body forwards and finally pull your legs forwards. In theory, the rowing movement sequence sounds complicated, but many of the individual movement sequences are already performed correctly unconsciously:
Starting position:
Upper body bent forwards towards the thighs.
Back muscles relaxed.
Lower back straight, upper back (trapezius muscle) may make a slight hump.
Arms stretched (triceps remain relaxed).
Tummy muscles slightly tensed.
Starting the pull-through:
Legs lead the movement by stretching them.
At the same time as stretching your legs, slightly tense your lower back and bring it into a straight position.
The phase ends when your legs are almost fully extended.
Middle phase of the pull-through:
From this phase, the upper body also comes into play.
The arms and back now dictate the movement, with both parts of the body being pulled backwards almost simultaneously (between the chest and belly button). The strength comes from the back and not the arms.
The abdominal muscles and thigh muscles remain tensed the whole time.
The phase ends with the upper body leaning slightly backwards and the arms slightly raised. The back shoulder is already working slightly.
Final move:
Pull your arms completely towards your body.
The upper body leans back a little further in the same move. The back shoulder is now even more involved.
Tighten all the muscles involved (buttocks, thighs, abdomen, arms and shoulders).
Rolling:
Arms lead the way.
Stretch your arms forwards again. The upper body and legs follow the arms.
The buttocks pull the seat forwards.
The phase ends in the starting position.
1 rowing machine
Rowing (m: 375m - 30cal; w: 300m - 22cal) ► row
Power
Individual work


Sitting with your legs bent and arms stretched forwards, first push off and stretch your legs, then pull your arms towards your head with your upper body leaning slightly backwards. Return to the starting position in exactly the opposite way: first stretch your arms, then move your upper body forwards and finally pull your legs forwards. In theory, the rowing movement sequence sounds complicated, but many of the individual movement sequences are already performed correctly unconsciously:
Starting position:
Upper body bent forwards towards the thighs.
Back muscles relaxed.
Lower back straight, upper back (trapezius muscle) may make a slight hump.
Arms stretched (triceps remain relaxed).
Tummy muscles slightly tensed.
Starting the pull-through:
Legs lead the movement by stretching them.
At the same time as stretching your legs, slightly tense your lower back and bring it into a straight position.
The phase ends when your legs are almost fully extended.
Middle phase of the pull-through:
From this phase, the upper body also comes into play.
The arms and back now dictate the movement, with both parts of the body being pulled backwards almost simultaneously (between the chest and belly button). The strength comes from the back and not the arms.
The abdominal muscles and thigh muscles remain tensed the whole time.
The phase ends with the upper body leaning slightly backwards and the arms slightly raised. The back shoulder is already working slightly.
Final move:
Pull your arms completely towards your body.
The upper body leans back a little further in the same move. The back shoulder is now even more involved.
Tighten all the muscles involved (buttocks, thighs, abdomen, arms and shoulders).
Rolling:
Arms lead the way.
Stretch your arms forwards again. The upper body and legs follow the arms.
The buttocks pull the seat forwards.
The phase ends in the starting position.
1 rowing machine
Rudern (m: 5000m/5km - 400kal; w: 4000m/4km - 300kal) ► row
Power
Individual work


Sitting with your legs bent and arms stretched forwards, first push off and stretch your legs, then pull your arms towards your head with your upper body leaning slightly backwards. Return to the starting position in exactly the opposite way: first stretch your arms, then move your upper body forwards and finally pull your legs forwards. In theory, the rowing movement sequence sounds complicated, but many of the individual movement sequences are already performed correctly unconsciously:
Starting position:
Upper body bent forwards towards the thighs.
Back muscles relaxed.
Lower back straight, upper back (trapezius muscle) may make a slight hump.
Arms stretched (triceps remain relaxed).
Tummy muscles slightly tensed.
Starting the pull-through:
Legs lead the movement by stretching them.
At the same time as stretching your legs, slightly tense your lower back and bring it into a straight position.
The phase ends when your legs are almost fully extended.
Middle phase of the pull-through:
From this phase, the upper body also comes into play.
The arms and back now dictate the movement, with both parts of the body being pulled backwards almost simultaneously (between the chest and belly button). The strength comes from the back and not the arms.
The abdominal muscles and thigh muscles remain tensed the whole time.
The phase ends with the upper body leaning slightly backwards and the arms slightly raised. The back shoulder is already working slightly.
Final move:
Pull your arms completely towards your body.
The upper body leans back a little further in the same move. The back shoulder is now even more involved.
Tighten all the muscles involved (buttocks, thighs, abdomen, arms and shoulders).
Rolling:
Arms lead the way.
Stretch your arms forwards again. The upper body and legs follow the arms.
The buttocks pull the seat forwards.
The phase ends in the starting position.
1 rowing machine
Rowing (m: 500m - 40cal; w: 400m - 30cal) ► row
Power
Individual work


Sitting with your legs bent and arms stretched forwards, first push off and stretch your legs, then pull your arms towards your head with your upper body leaning slightly backwards. Return to the starting position in exactly the opposite way: first stretch your arms, then move your upper body forwards and finally pull your legs forwards. In theory, the rowing movement sequence sounds complicated, but many of the individual movement sequences are already performed correctly unconsciously:
Starting position:
Upper body bent forwards towards the thighs.
Back muscles relaxed.
Lower back straight, upper back (trapezius muscle) may make a slight hump.
Arms stretched (triceps remain relaxed).
Tummy muscles slightly tensed.
Starting the pull-through:
Legs lead the movement by stretching them.
At the same time as stretching your legs, slightly tense your lower back and bring it into a straight position.
The phase ends when your legs are almost fully extended.
Middle phase of the pull-through:
From this phase, the upper body also comes into play.
The arms and back now dictate the movement, with both parts of the body being pulled backwards almost simultaneously (between the chest and belly button). The strength comes from the back and not the arms.
The abdominal muscles and thigh muscles remain tensed the whole time.
The phase ends with the upper body leaning slightly backwards and the arms slightly raised. The back shoulder is already working slightly.
Final move:
Pull your arms completely towards your body.
The upper body leans back a little further in the same move. The back shoulder is now even more involved.
Tighten all the muscles involved (buttocks, thighs, abdomen, arms and shoulders).
Rolling:
Arms lead the way.
Stretch your arms forwards again. The upper body and legs follow the arms.
The buttocks pull the seat forwards.
The phase ends in the starting position.
1 rowing machine
Rudern (m: 750m - 60kal; w: 600m - 45kal) ► row
Power
Individual work


Sitting with your legs bent and arms stretched forwards, first push off and stretch your legs, then pull your arms towards your head with your upper body leaning slightly backwards. Return to the starting position in exactly the opposite way: first stretch your arms, then move your upper body forwards and finally pull your legs forwards. In theory, the rowing movement sequence sounds complicated, but many of the individual movement sequences are already performed correctly unconsciously:
Starting position:
Upper body bent forwards towards the thighs.
Back muscles relaxed.
Lower back straight, upper back (trapezius muscle) may make a slight hump.
Arms stretched (triceps remain relaxed).
Tummy muscles slightly tensed.
Starting the pull-through:
Legs lead the movement by stretching them.
At the same time as stretching your legs, slightly tense your lower back and bring it into a straight position.
The phase ends when your legs are almost fully extended.
Middle phase of the pull-through:
From this phase, the upper body also comes into play.
The arms and back now dictate the movement, with both parts of the body being pulled backwards almost simultaneously (between the chest and belly button). The strength comes from the back and not the arms.
The abdominal muscles and thigh muscles remain tensed the whole time.
The phase ends with the upper body leaning slightly backwards and the arms slightly raised. The back shoulder is already working slightly.
Final move:
Pull your arms completely towards your body.
The upper body leans back a little further in the same move. The back shoulder is now even more involved.
Tighten all the muscles involved (buttocks, thighs, abdomen, arms and shoulders).
Rolling:
Arms lead the way.
Stretch your arms forwards again. The upper body and legs follow the arms.
The buttocks pull the seat forwards.
The phase ends in the starting position.
1 rowing machine
Rowing ► row
Power
Individual work


Sitting with your legs bent and arms stretched forwards, first push off and stretch your legs, then pull your arms towards your head with your upper body leaning slightly backwards. Return to the starting position in exactly the opposite way: first stretch your arms, then move your upper body forwards and finally pull your legs forwards. In theory, the rowing movement sequence sounds complicated, but many of the individual movement sequences are already performed correctly unconsciously:
Starting position:
Upper body bent forwards towards the thighs.
Back muscles relaxed.
Lower back straight, upper back (trapezius muscle) may make a slight hump.
Arms stretched (triceps remain relaxed).
Tummy muscles slightly tensed.
Starting the pull-through:
Legs lead the movement by stretching them.
At the same time as stretching your legs, slightly tense your lower back and bring it into a straight position.
The phase ends when your legs are almost fully extended.
Middle phase of the pull-through:
From this phase, the upper body also comes into play.
The arms and back now dictate the movement, with both parts of the body being pulled backwards almost simultaneously (between the chest and belly button). The strength comes from the back and not the arms.
The abdominal muscles and thigh muscles remain tensed the whole time.
The phase ends with the upper body leaning slightly backwards and the arms slightly raised. The back shoulder is already working slightly.
Final move:
Pull your arms completely towards your body.
The upper body leans back a little further in the same move. The back shoulder is now even more involved.
Tighten all the muscles involved (buttocks, thighs, abdomen, arms and shoulders).
Rolling:
Arms lead the way.
Stretch your arms forwards again. The upper body and legs follow the arms.
The buttocks pull the seat forwards.
The phase ends in the starting position.
1 rowing machine
Rowing ► row (300m)
Power
Individual work
Sitting with your legs bent and arms stretched forwards, first push off and stretch your legs, then pull your arms towards your head with your upper body leaning slightly backwards. Return to the starting position in exactly the opposite way: first stretch your arms, then move your upper body forwards and finally pull your legs forwards. In theory, the rowing movement sequence sounds complicated, but many of the individual movement sequences are already performed correctly unconsciously:
Starting position:
Upper body bent forwards towards the thighs.
Back muscles relaxed.
Lower back straight, upper back (trapezius muscle) may make a slight hump.
Arms stretched (triceps remain relaxed).
Tummy muscles slightly tensed.
Starting the pull-through:
Legs lead the movement by stretching them.
At the same time as stretching your legs, slightly tense your lower back and bring it into a straight position.
The phase ends when your legs are almost fully extended.
Middle phase of the pull-through:
From this phase, the upper body also comes into play.
The arms and back now dictate the movement, with both parts of the body being pulled backwards almost simultaneously (between the chest and belly button). The strength comes from the back and not the arms.
The abdominal muscles and thigh muscles remain tensed the whole time.
The phase ends with the upper body leaning slightly backwards and the arms slightly raised. The back shoulder is already working slightly.
Final move:
Pull your arms completely towards your body.
The upper body leans back a little further in the same move. The back shoulder is now even more involved.
Tighten all the muscles involved (buttocks, thighs, abdomen, arms and shoulders).
Rolling:
Arms lead the way.
Stretch your arms forwards again. The upper body and legs follow the arms.
The buttocks pull the seat forwards.
The phase ends in the starting position.
1 rowing machine
Concentricity
Coordination exercises
Individual work

The participants complete the following obstacles in a circuit:
Balancing over a long bench (forwards, backwards, crawling);
Roll forwards over a small mat;
Roll backwards over a small mat;
Slalom around stakes;
Balancing over a rope;
Hanging from one side to the other on the climbing pole without touching the ground;
Balancing over a tilt (long bench on two vaulting box elements).
► Balance ability, rhythmisation ability, orientation ability
1 climbing pole
2-7 soft mats (small)
2 long benches
1 vaulting box
7 stakes
1 rope
Post set-up:
Set up the following posts in a circuit: Upside-down long bench; small soft mat on the floor; position 7 stakes in a slalom; small soft mat on the floor; rope laid out on the floor; climbing pole pulled out to the maximum (soft mats placed underneath if necessary); tipping point consisting of a long bench and two elements of a vaulting box.
Concentricity
Coordination exercises
Individual work

The participant climbs over the wall bars without touching the forbidden zone (marked with ropes). The participants then jump over the tyres distributed on the floor. If two tyres are at the same height, both legs are stalled. Individual hoops are passed with the leg corresponding to the respective side. The hoops can be jumped through forwards or backwards. To make hoop jumping more difficult, the respective arm on the same or even opposite side can be raised or stretched to the side at the same time as standing. Jumping over the hurdles, the participant returns to the wall bars.
► Rhythmisation ability, orientation ability, balance ability
1 wall bars
3-5 ropes
4-5 hurdles
20-30 tyres
Post set-up:
Arrange the following posts to form a circuit: Use ropes to mark a forbidden zone on the wall bars; lay out tyres to form a jumping course; place hurdles one behind the other
Shadow boxing
Light-Contact
Individual work


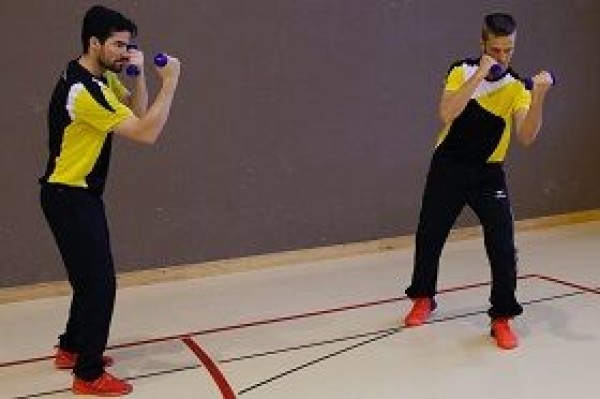
Stand dynamically on the balls of the feet. The participants hold weights (approx. 1 kg) in both hands, move freely around the room (look at all four walls/corners once) and perform the learnt punches (straight, sideways, uppercuts) against imaginary opponents. The fists are in the starting position in front of the face. The arms are never fully extended (maintain tension in the muscles and keep the elbow joint slightly bent). The fists are pulled back horizontally. Throughout the entire exercise unit, quality is more important than quantity (technically clean punches)!
Variant:
Only punch straight lines/sideways hooks/upward hooks.
Per participant:
2 dumbbells/filled pet bottles
Shadow run
Light-Contact
Partner work
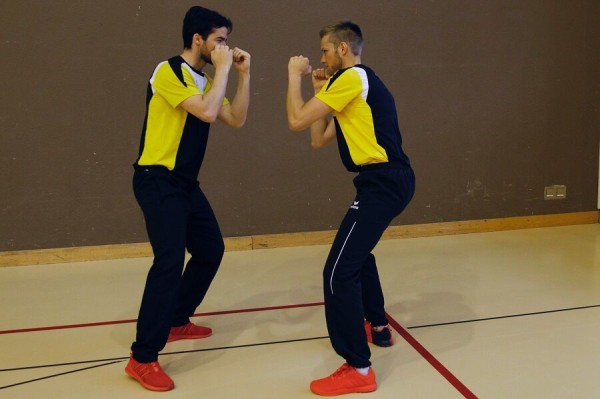
One participant moves into a boxing stance with a follow-through step. The feet remain shoulder-width apart, the foot that is closer to the direction of movement initiates the movement. The weight is on the balls of the feet, the steps are springy and gliding. The partner opposite always tries to keep the same distance and performs the same movements in mirror image (shadow walk).
Variant:
Touch the knuckle of your partner's little finger at eye level with every step.
No material required
Shadow run with touch
Light-Contact
Partner work
Regular change of roles and partners
.
One participant moves into a boxing stance with a follow-through step and sets the pace and direction. The feet remain shoulder-width apart, with the foot closest to the direction of movement initiating the movement. The weight is on the balls of the feet, the steps are springy and gliding. The partner opposite always tries to keep the same distance and performs the same movements in mirror image (shadow walk). As soon as the leading participant stands still, the other participant tries to touch the partner's shoulders twice crosswise with the respective palm (leading hand/punching hand).
Key points: move slowly to acquire the technique, maintain the same distance, keep your guard up, punch from the hip (metaphor: putting out a cigarette with your foot), reduce the distance when attacking (into the opponent) and then immediately move back again (detach yourself from the opponent).
Variant:
Acquisition of punch combinations by the instructor demonstrating different sequences:
1. lead hand
2. lead hand + punching hand
3. lead hand + punching hand + sideways hook (left)
4. lead hand + punching hand + sideways hook (left) + uppercut (right)
No material required
Shooting position - crouching
Power
Individual work

From the patrol position to the crouch position in accordance with regulation 53.096:
1. position the hips at an angle of 35° to the direction of fire, the weak shoulder to the front;
2. bend both knees simultaneously and move into the crouch position;
3. the feet remain flat on the ground;
4. place the weapon against the shoulder;
5. the strong hand grasps the pistol grip without tensing, the strong arm pulls the stock into the shoulder cavity;
6. both elbows rest in front of the knees;
7. the weak hand grasps the hand guard and presses the weapon against the shoulder;
8. The body is slightly bent forwards.
Lighten:
Without a combat backpack
Harden:
Combat backpack loaded with an additional 3kg (water bottles)
Material per participant: Tenue CNK 420
Additional material: 1 F-disc with peg, 2 PET bottles (1.5l)
Shooting position - kneeling
Power
Individual work

From the patrol position to the kneeling shooting position according to regulation 53.096:
1. Take a step forward with the weak foot, crossing the imaginary line between the tip of the strong foot and the target;
2. Bend both knees simultaneously;
3. If possible, sit on the strong heel;
4. Align the strong knee at a 45° angle to the direction of the shot;
5. Support the weak elbow slightly in front of or behind the weak knee. Avoid resting the elbow exactly on it, as the elbow and knee joints are round and this affects stability. Support the weapon at the shoulder;
6. The strong arm pulls the stock into the shoulder cavity, the strong hand grips the pistol grip without cramping;
7. The weak hand grips the hand guard and presses the weapon against the shoulder.
Lighten:
Without a combat backpack
Harden:
Combat backpack loaded with an additional 3kg (water bottles)
Material per participant: Tenue CNK 420
Additional material: 1 F-disc with peg, 2 PET bottles (1.5l)
Shooting position - prone
Power
Individual work

From the patrol position to the kneeling shooting position in accordance with regulation 53.096:
1. Bend both knees simultaneously;
2. Kneel in line with the hips;
3. Bend the upper body forwards and support it with the weak hand;
4. Lie down so that the weapon and the body form a line (avoid contact between the weapon and the ground);
5. the strong hand grips the pistol grip without tensing, the strong arm pulls the stock into the shoulder cavity;
6. the weak forearm is as vertical as possible, the weak hand clasps the hand guard and presses the weapon against the shoulder;
7. Place your feet on the ground if possible.
Lighten:
Start from point 2 (see above)
Harden:
With a protective waistcoat;
With the weapon shouldered.
Material per participant: Tenue CNK 420
Additional material: 1 F-disc with peg; 1 protective vest
Shooting position - sitting
Power
Individual work

Lying on your back, assume the seated shooting position with legs apart according to regulation 53.096:
1. The strong hand grasps the pistol grip without tensing, the strong arm pulls the stock into the shoulder cavity;
2. Both elbows rest on the inside of the knees;
3. the weak hand grasps the hand guard and presses the weapon against the shoulder;
4. the body is slightly bent forwards.
Repeat the exercise without resting the shoulders on the ground.
Lighten:
Without material
Harden:
With combat backpack
Material per participant: Tenue CNK 420
Additional material: 1 F-disc with peg
Type of stroke: Uppercut
Light-Contact
Individual work

Stance offset frontally to the soft mat placed on a bar. With both arms, alternate strikes from bottom to top (uppercuts) to the mat (underside of the opponent's chin). The elbows remain in front of the body and the opposite hand on the face for protection/defence. The legs and upper body are straightened simultaneously for the punch (use the power from the legs).
Uppercut:
The uppercut is the most difficult punch in terms of structure. It is triggered by hip rotation. In preparation, the fist and upper body are dropped slightly. The forearm is then brought up vertically in front of the body and the legs, hips and torso are stretched at the same time. The fist should hit the chin from below.
1 pair of boxing gloves
1 soft mat
1 parallel bars
Type of stroke: Uppercut
Light-Contact
Partner work
Uppercut:
The uppercut is the most difficult punch in terms of structure. It is triggered by hip rotation. In preparation, the fist and upper body are dropped slightly. The forearm is then brought up vertically in front of the body and the legs, hips and torso are stretched at the same time. The fist should hit the chin from below.
Exercise:
From the starting position, the partner stretches one hand slightly towards the other participant and raises the elbow so that the palm is pointing down towards the floor (open fist). The upper and lower arm are approximately at right angles. The attacker strikes an uppercut crosswise into the palm of the partner's hand. After a few punches, the roles are reversed. Caution: the attacker makes sure that the palm of the hand is facing their own body during the uppercut and that the upper body is dropped slightly before the punch.
Participant:
1 pair of boxing gloves
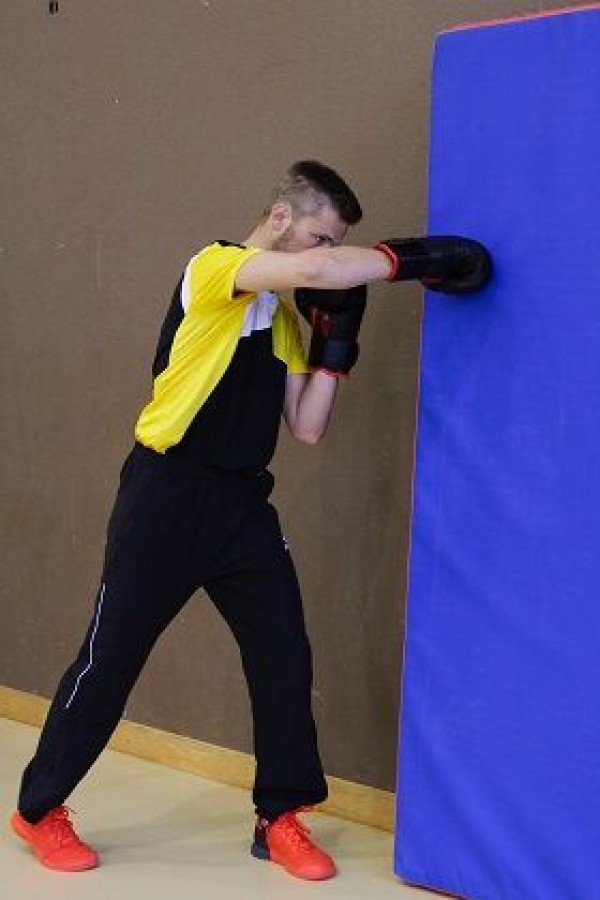
Type of stroke: Straight
Light-Contact
Individual work


Staggered stance frontally to the raised (large) soft mat. Alternate straight punches with both arms on the soft mat (against the opponent's chin, nose or forehead). The strike is straight and horizontal, the opposite hand remains on the face for protection/defence.
Straight punch:
The straight punch is delivered from the starting position in the most direct way to the target. This is done with an extension of the arm, at the same time as the hip rotates and the ball of the foot presses down on the same side. The elbow points towards the floor for as long as possible. As the punching fist is brought forward, the second fist goes back to the cheek (cover). The upper body and knees bend at the same time as the punch. The fist is at head height of the punching boxer. The head is thus protected by the shoulder. The boxing stance should then be resumed in a flash.
1 pair of boxing gloves
1 soft mat (large)
Type of stroke: Straight
Light-Contact
Partner work
Straight:
The straights are brought from the starting position to the target in the most direct way. This is done by stretching the arm while rotating the hips and pushing off the balls of the feet on the same side. The elbow points towards the floor for as long as possible. As the punching fist is brought forward, the second fist goes back to the cheek (cover). The upper body and knees bend at the same time as the punch. The fist is at head height of the punching boxer. The head is thus protected by the shoulder. Afterwards, the boxing stance should be assumed again in a flash.
Exercise:
The partner stretches one arm slightly towards the other participant from the starting position and turns the arm so that the palm is facing the other person (open fist). The attacker strikes a straight cross into the palm of the partner's hand, whereby the lead hand is referred to as a "jab". After a few punches, the roles are swapped. Watch out for possible mistakes: Head turned away, rear leg lifted off the ground or back position during the punching movement.
Participant:
1 pair of boxing gloves
Type of stroke: Straight (hard strokes)
Light-Contact
Partner work
Stance offset frontally to the punching bag. Strike the punching bag as hard as possible (1st pass: lead hand, 2nd pass: punching hand). The punch is straight and horizontal, the opposite hand remains on the face for protection/defence.
Straight line:
The straight lines are delivered from the starting position in the most direct way to the target. This is done by stretching the arm while rotating the hips and pushing off the ball of the foot on the same side. The elbow points towards the ground for as long as possible. When the punching fist is brought forward, the second fist goes back to the cheek (cover). The upper body and knees bend at the same time as the punch. The fist is at head height of the punching boxer. The head is thus protected by the shoulder. The boxing stance should then be resumed in a flash.
2 punching bags (one punching bag per participant)
Participant:
1 pair of boxing gloves
Type of stroke: Straight (fast strokes)
Light-Contact
Partner work
Both participants stand facing the raised (large) soft mat. Strike the soft mat with the highest possible cadence (1st pass: lead hand, 2nd pass: punching hand). The punch is straight and horizontal, the opposite hand remains on the face for protection/defence.
1 soft mat (large)
Participant:
1 pair of boxing gloves
Type of stroke: Sideways hook
Light-Contact
Individual work

Stance offset frontally to the raised (large) soft mat (position of the boxer at the end of the soft mat). Strike the edge of the soft mat with the arm facing away from the mat (against the opponent's head). During the punch (semi-circular movement), the elbow remains at shoulder height and the back of the hand points upwards, with the opposite hand remaining on the face for protection/defence.
Sideways hook:
The sideways hook is triggered by pressing down on the ball of the foot and simultaneously pushing the hips forwards. The body rotates around the longitudinal axis. The arm is not stretched, but tilted 90 degrees during the rotation so that the fist, elbow and shoulder are at the same height. The fist should hit the side of the opponent's head. The chin is covered by the shoulder. The elbow and shoulder joints are at a 90 degree angle. The second hand lies at the side of the cheekbone, the forearm vertically in front of the torso.
1 pair of boxing gloves
1 soft mat (large)
Type of stroke: Sideways hook
Light-Contact
Partner work
Sideways hook:
The sideways hook is triggered by pressing down on the ball of the foot and pushing the hips forwards at the same time. The body rotates around the longitudinal axis. The arm is not stretched, but tilted 90 degrees during the rotation so that the fist, elbow and shoulder are at the same height. The fist should hit the side of the opponent's head. The chin is covered by the shoulder. The elbow and shoulder joints are at a 90 degree angle. The second hand lies at the side of the cheekbone, the forearm vertically in front of the torso.
Exercise:
The partner stretches one arm slightly towards the other participant from the starting position and opens the fist so that the back of the hand points to the respective side (e.g.: left hand is moved forwards, so the palm points to the right side). The attacker strikes a sideways cross into the palm of the partner's hand. After a few punches, the roles are reversed. Caution: the distance to the opponent is slightly closer with the sideways hook than with the straight punch. Also make sure that the elbow is held high at shoulder height (forearm and upper arm at a 90 degree angle).
Participant:
1 pair of boxing gloves
Impact types
Light-Contact
Individual work
Present - imitate
The participants practise independently, the instructor corrects
Introduction:
All punches are executed in such a way that the permitted target area is hit with the knuckle area. The punching boxer should remain as well covered as possible and at the same time have an efficient transfer of power. To do this, the weight is shifted to the second leg and the torso, hips and heel are rotated outwards until the shoulder protects the chin. The impact is made on the ball of the foot, with most of the power coming from the core muscles. As soon as the fist approaches the target, it is closed and the wrist is firmly tensed. Straight punches are struck from a long distance, hooks in close combat, i.e. when the opponents are body to body. Any punch can be thrown to the head or body.
The instructor demonstrates the different types of punch and the participants then practise them independently (shadow boxing). The instructor checks and corrects the exercises.
Strikes:
Target = nose, chin or forehead of the opponent.
The strikes are delivered from the starting position in the most direct way to the target (movement as straight as possible). This is done by stretching the arm, simultaneously rotating the hips and pressing down on the ball of the foot on the same side. The elbow points towards the floor for as long as possible. As the punching fist is brought forward, the second fist goes back to the cheek (cover). The upper body and knees bend at the same time as the punch. The fist is at head height of the punching boxer. The head is thus protected by the shoulder. Afterwards, the boxing stance should be assumed again in a flash.
Sideways punch:
Target = cheek.
Pre-exercise: Upper arms in a line, right angle in the elbow and only rotation from the torso.
The sideways punch is triggered by pressing down on the ball of the foot and simultaneously pushing the hips forwards. The body rotates around the longitudinal axis (circular movement). The arm is not stretched, but tilted 90 degrees during the rotation so that the fist, elbow and shoulder are at the same height. The fist should hit the side of the opponent's head. The chin is covered by the shoulder. The elbow and shoulder joints are at a 90 degree angle. The second hand is positioned at the side of the cheekbone, the forearm vertically in front of the torso.
Upward punch:
Target = underside of the chin.
The upward punch is the most difficult punch in terms of structure. It is triggered by hip rotation. In preparation, the fist and upper body are dropped slightly. The forearm is then brought up vertically in front of the body (elbows remain in front of the body) and at the same time the legs, hips and torso are stretched. The fist should hit the chin from below.
No material required