
Exercises (3274)
Flexion and extension of the arms in handstand ► handstand push up
Power
Individual work


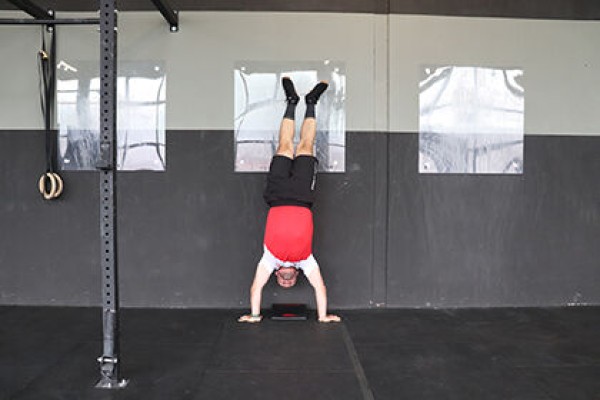
Handstand against a wall, facing away from the wall and holding the position by placing your heels against the wall. Bend your arms until your head practically touches the floor (lower your body) and stretch back to the handstand (full body stretch, arms stretched and held high).
Attention:
Lower and raise your upper body in a controlled manner.
Lighten:
barely bend your arms; support the lifting of the upper body with your legs by bending them and pushing them upwards.
Harden:
additional weight (on your feet).
1 wall
2 weight cuffs/1 weight waistcoat ► Make the exercise more difficult (additional weight)
Flexion/retraction of the neck in standing, sitting or supine position
Power
Individual work
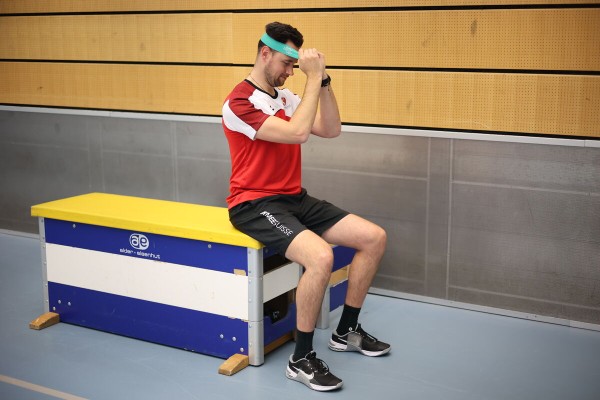
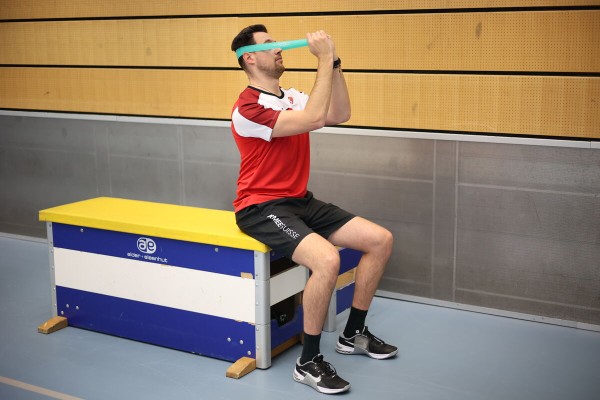
When standing upright, sitting or lying on your back, place an elasticated band around your forehead and hold/fix it with the hands of your bent arms in front of your head (elbows at chest height, hands placed in front of your forehead). Tilt your head slightly forwards and backwards to stretch/tension the band and return to the starting position (neck flexion/retraction).
Attention:
Movement only takes place in the neck (upper body and arms remain stable).
Lighten:
Choose a rubber band with less resistance.
Harden:
Choose a rubber band with greater resistance.
1 mini band
1 seating option (e.g. chair, plyo box or vaulting box) ► depending on the starting position
Flying elbows while standing ► fly
Power
Partner work
1 trainee & 1 helper ► Note change of position
(= double the time required; for lesson planner see Organisation Kraft: Info button Execution)


Trainee: Standing, support the upper body on the vaulting box, clasp your hands behind your head (elbows pointing to the side), bring your elbows together in front of your head (in the direction of your gaze) and back to the starting position.
Partner: Stands on the opposite side of the vaulting box, holds the elbows against the movement of the active participant (pulls upwards/outwards).
Attention:
Always listen to/respond to the partner (adjust pressure/resistance). Elbows are at shoulder height or slightly below.
Lighten:
Less pressure/resistance from your partner.
Harden:
More pressure/resistance from your partner.
1 swing box (3-4 elements incl. top section)
FlowFit (Part 0)
Mobilisation of the joints / dynamic stretching
Individual work
FlowFit - complete exercise sequence (film)
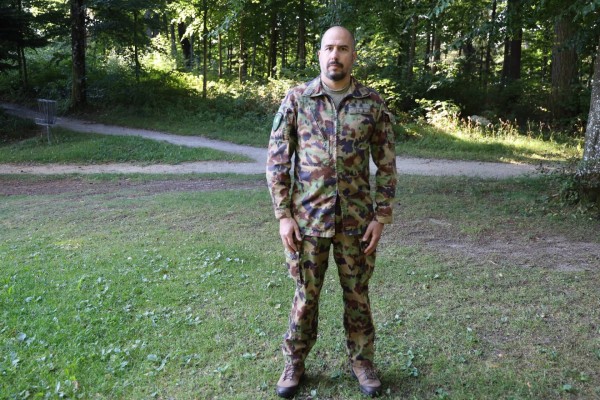
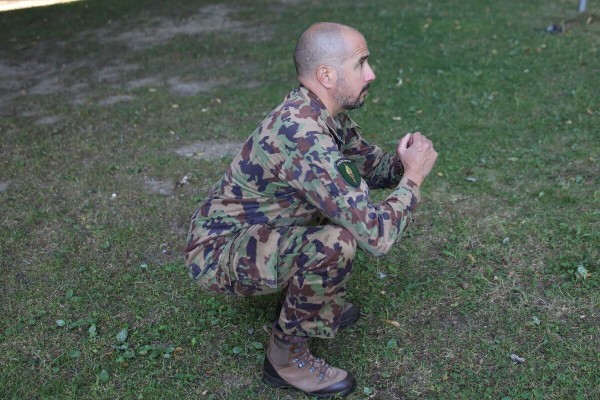
Stand shoulder-width apart, arms hanging at the sides of the body, bend the knees until the buttocks are lower than knee height and at the same time bring the hands together in front of the body at chest height (arms bent with the elbows at the knees). Maintain a deep squat position.
Caution:
Lower your buttocks backwards, not your knees forwards. Keep your knees behind your toes. Keep your back straight at all times (tense your core), distribute your weight over your entire foot, push your knees outwards (do not tilt inwards).
Lighten up:
Do not lower your buttocks too low (greater angle in the knees - buttocks at or above knee height).
No material required
FlowFit (Part 1)
Mobilisation of the joints / dynamic stretching
Individual work
FlowFit - complete exercise sequence (film)
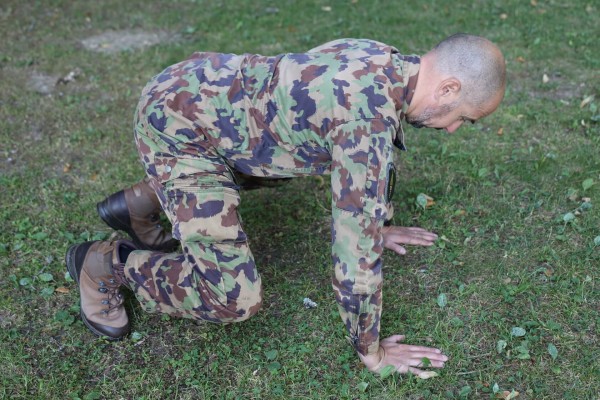
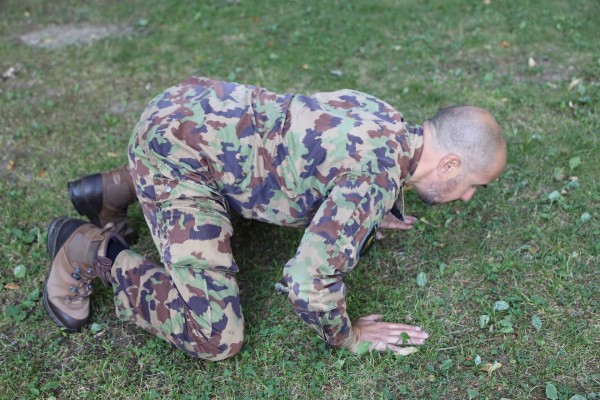
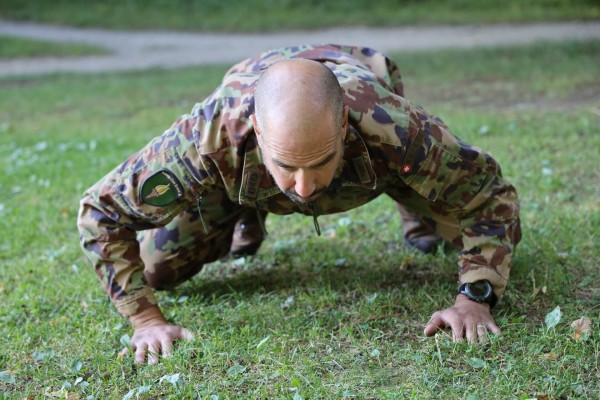
From the deep squat position, the weight of the upper body is shifted forwards so that you can finally support yourself on the floor with outstretched arms (knees do not touch the floor). In this quadruped position, the heels are lifted off the floor (tiptoe position) and the legs are bent, pushing the knees outwards. Perform a push-up from this "frog position". After the push-up, return to the deep squat position by pushing off the floor with your arms to shift your weight onto your feet. Straighten your legs to stand upright.
Caution:
When performing the push-ups, make sure that you not only bend and straighten your arms, but also work with your legs (actively push your knees outwards).
Lighten the load:
Support your arms on a raised surface (e.g. bench or large stone).
No material required
FlowFit (Part 2)
Mobilisation of the joints / dynamic stretching
Individual work
FlowFit - complete exercise sequence (film)
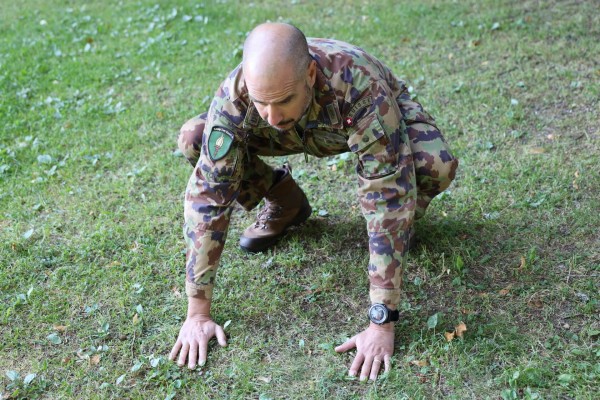
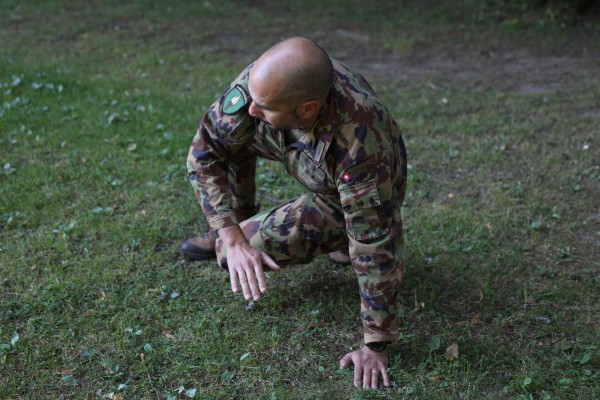
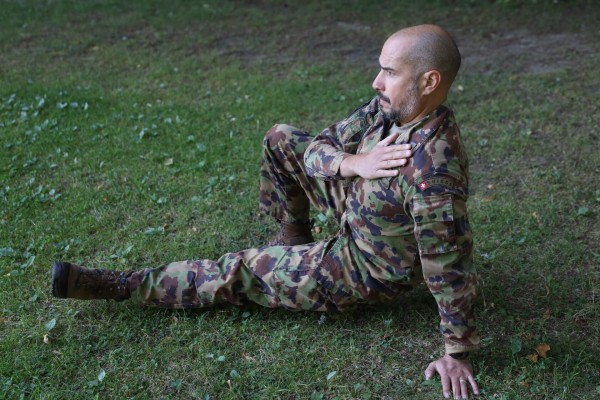
From the deep squat position, shift the weight of your upper body forwards so that you can bring your outstretched arms to the floor. From this position, lift one foot and one arm crosswise off the floor. Bring the foot under the body to the other side and stretch the leg out to the side (including rotation of the upper body - chest and leg point in the same direction). At the same time, wrap your arm and place your hand on your chest. The weight is then distributed on one foot and on the arm supported on the floor. Reverse the sequence of movements to return to the starting position and perform the exercise on the other side. Return to the deep squat position and finally straighten your legs to stand upright.
Caution:
Do not lower your buttocks or the leg stretched out to the side to the floor, but still keep them as low as possible. Actively push the shoulder of the supporting arm backwards and hold it in place so that the shoulder joint is protected/relieved.
Lighten the load:
Support your arms on a raised surface (e.g. bench or large stone).
No material required
FlowFit (Part 3)
Mobilisation of the joints / dynamic stretching
Individual work
FlowFit - complete exercise sequence (film)
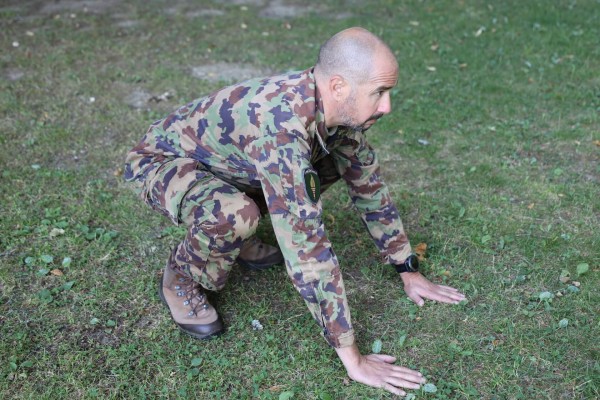
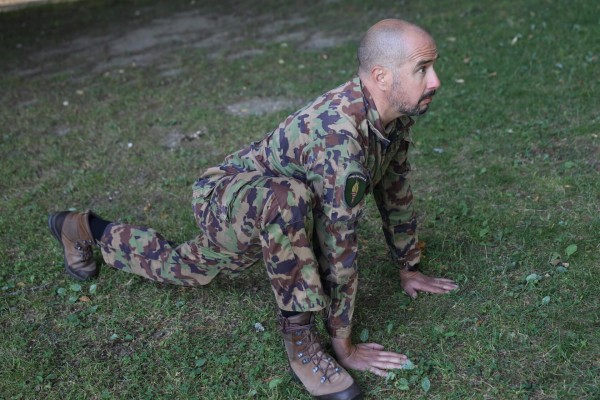
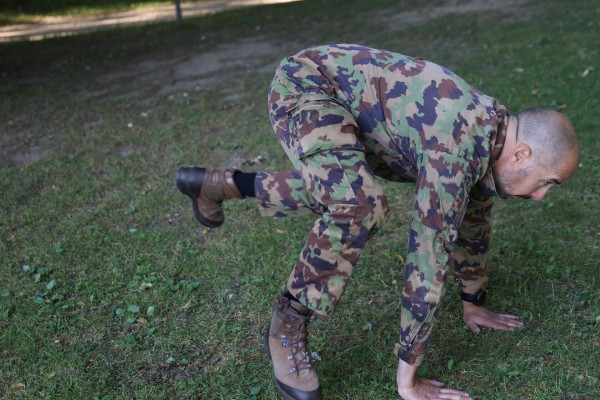
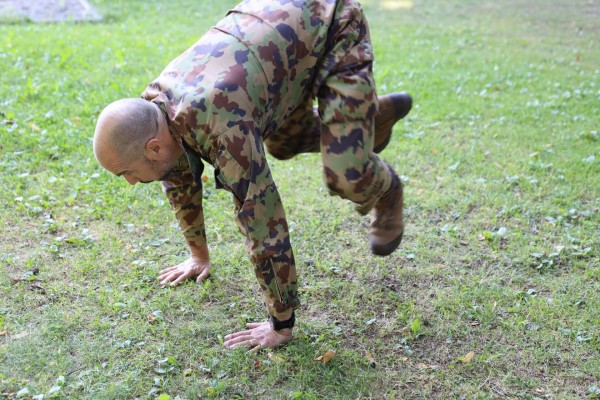
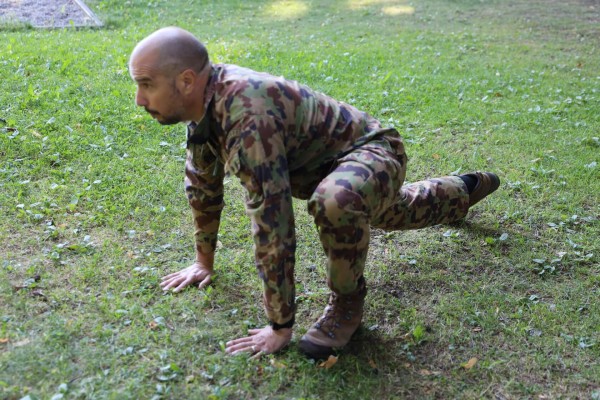
From the deep squat position, shift the weight of your upper body forwards so that you can bring your outstretched arms to the floor. From this position, move one foot further forwards to place it next to the supporting hand (place the foot on the same side of the body as close as possible to the edge of the hand). The other leg is moved backwards and supported on the tip of the toe. At the same time as the leg position is shifted, the upper body/weight is shifted so that the arms are perpendicular to the floor. Now swap the leg position by jumping off with both legs. Then bring the back leg back next to the other leg, straighten the upper body and release the hands from the floor to return to the deep squat position. Finally, straighten your legs to stand upright.
Lighten up:
Support your arms on a raised surface (e.g. bench or large stone).
No material required
FlowFit (Part 4)
Mobilisation of the joints / dynamic stretching
Individual work
FlowFit - complete exercise sequence (film)
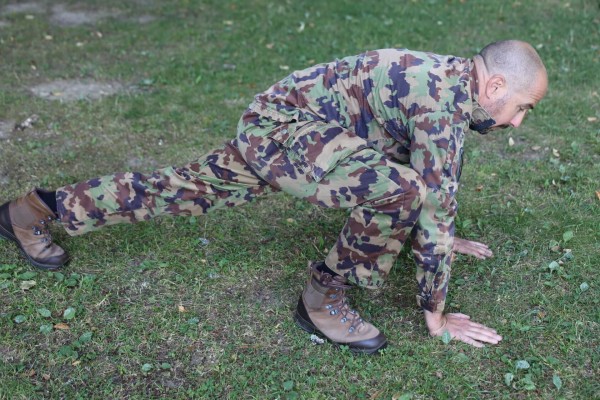
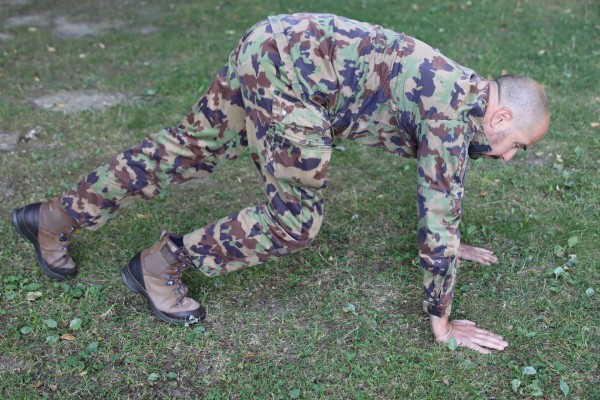
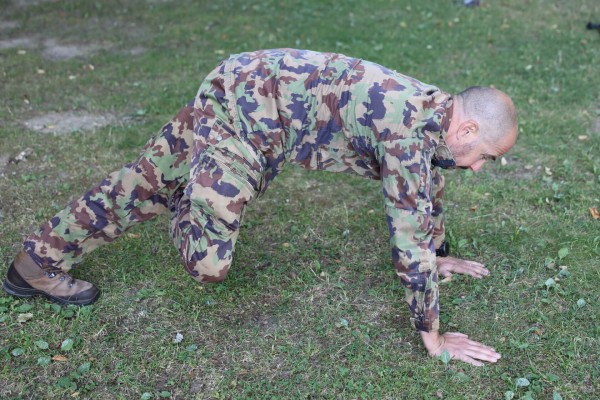
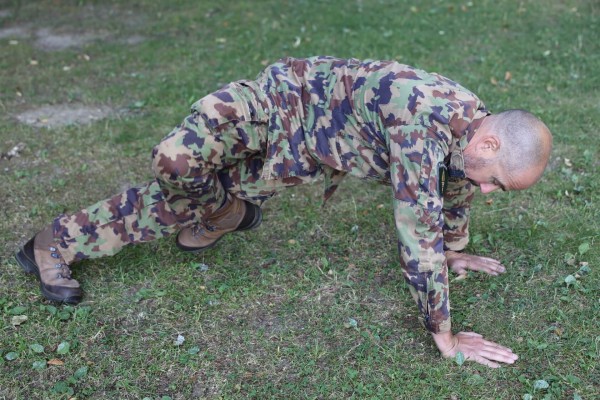
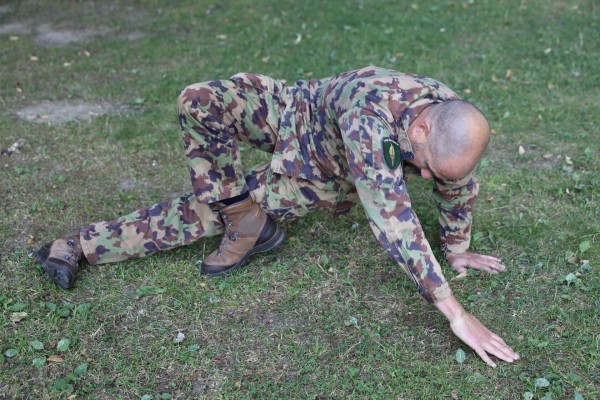
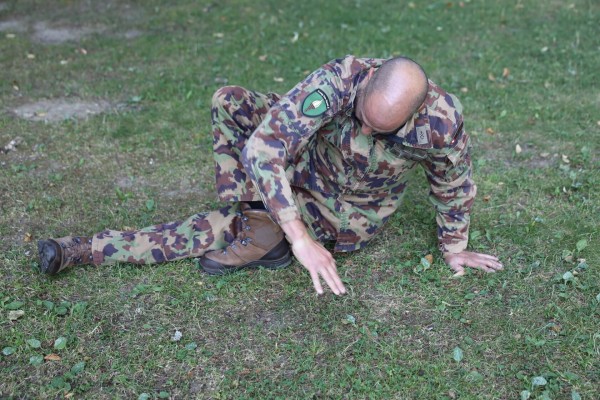
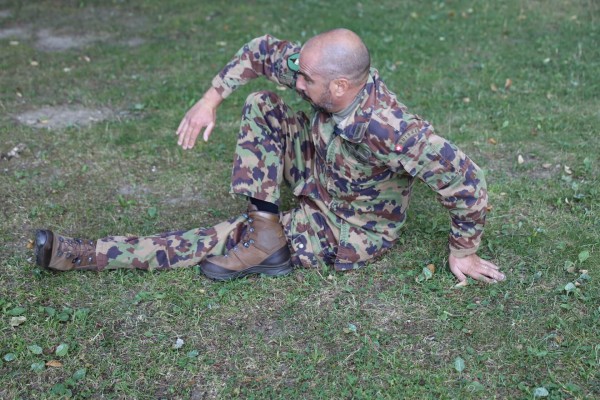
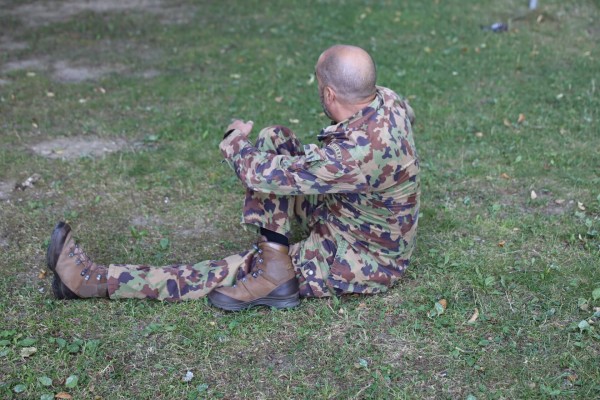
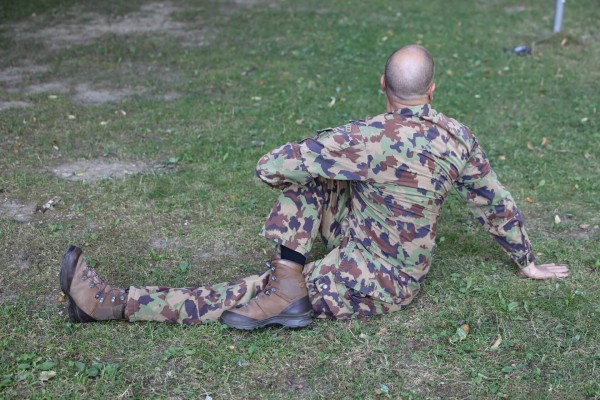
From the deep squat position, shift the weight of your upper body forwards so that you can bring your outstretched arms to the floor. From this position, move one foot further forwards to place it behind the supporting hand (same side of the body - knee at the elbow). The other leg is extended backwards and supported on the tip of the toes. At the same time as shifting the leg position, the upper body/weight is shifted so that the arms are perpendicular to the floor. From this position, release the front foot from the floor and move the outer instep of the foot towards the knee of the other leg extended backwards. At the same time, turn the upper body out so that you reach the seat, placing the foot of the bent leg flat on the floor and the outstretched leg also flat on the floor (the instep of the bent leg is finally on the outside of the knee of the outstretched leg - the legs are crossed). During this movement, the hand on the body side of the bent leg is also lifted off the floor and the elbow is brought to the bent knee. In a seated position, with one leg pointing forwards and the other knee pointing vertically upwards, turn the upper body further out to look backwards. The hand grasps the bent knee and pulls it back to the side of the foot placed on the floor. Reverse the sequence of movements to return to the squat position. Now perform the exercise on the other side. Return to the deep squat position and finally straighten your legs to stand upright.
No material required
FlowFit (Part 5)
Mobilisation of the joints / dynamic stretching
Individual work
FlowFit - complete exercise sequence (film)
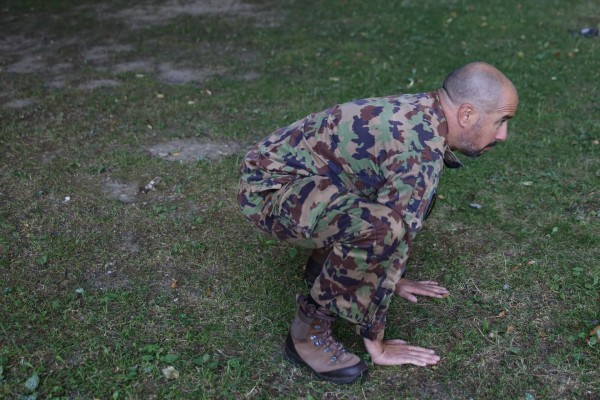
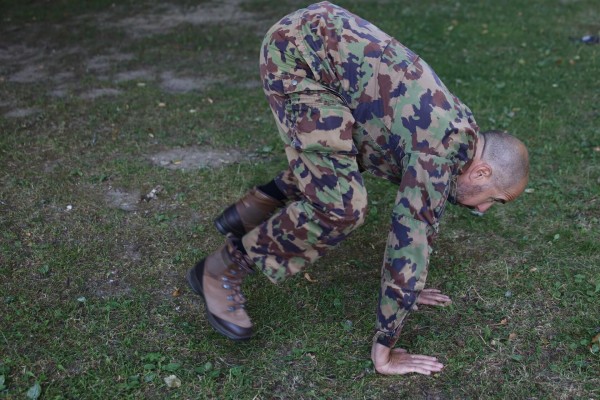
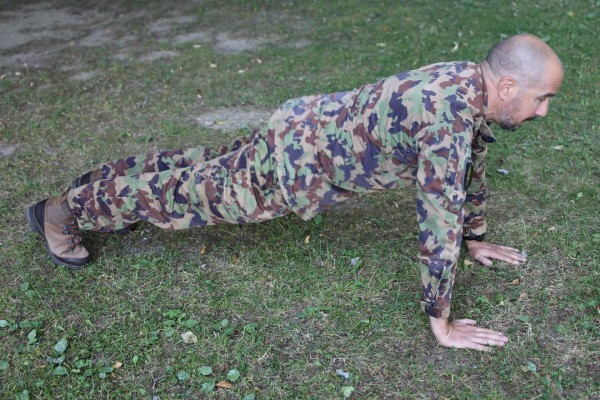
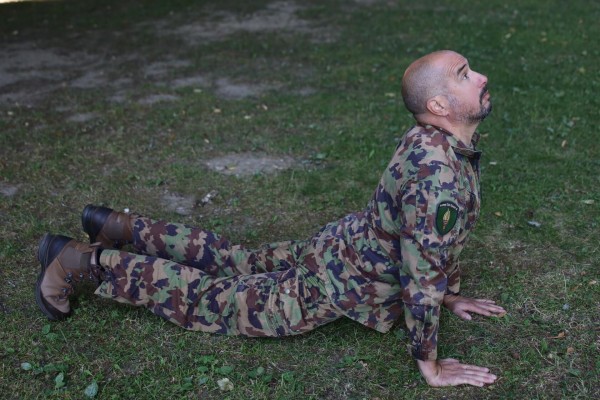
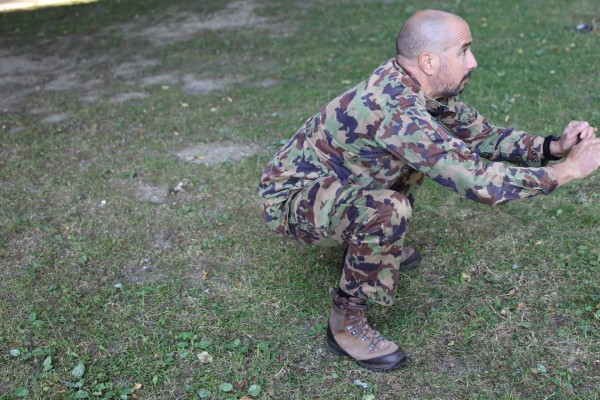
From the deep squat position, the weight of the upper body is shifted forwards so that the outstretched arms can be brought to the floor. Place your arms as close to your feet as possible. Jump off with both legs and stretch your legs backwards to get into the push-up position. Now press your thighs to the floor and at the same time look forwards at an angle (hollow back position). Again in a jump, bring your legs back to your arms to return to the deep squat position. Finally, straighten your legs back to the standing position.
Caution:
Do not allow your pelvis to sag in the push-up position (actively tense your torso) so that your legs and upper body practically form a line.
Lighten up:
Do not move your legs while jumping, but rather move one leg after the other backwards or forwards. Support your arms on a raised surface (e.g. bench or large stone).
No material required
FlowFit (Part 6)
Mobilisation of the joints / dynamic stretching
Individual work
FlowFit - complete exercise sequence (film)
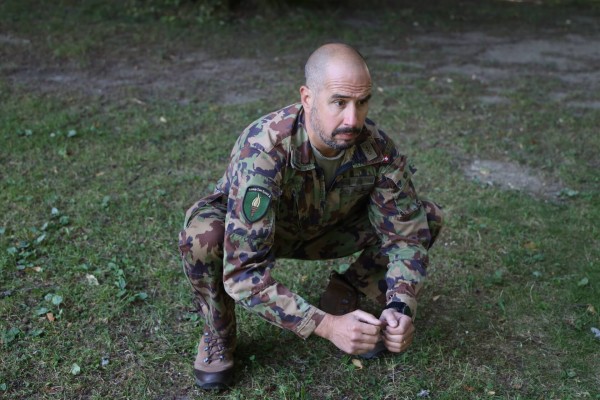
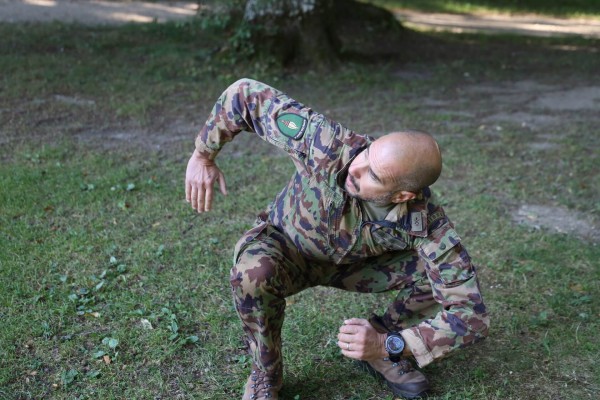
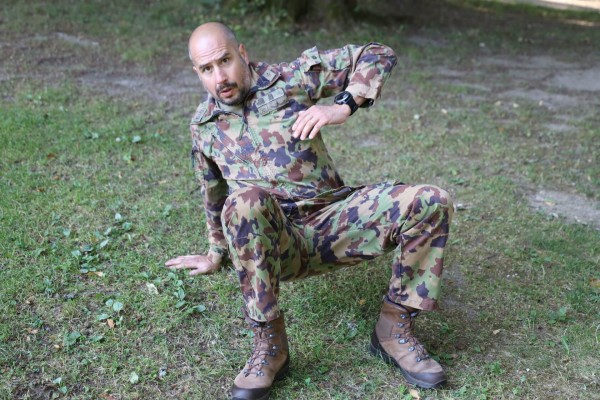
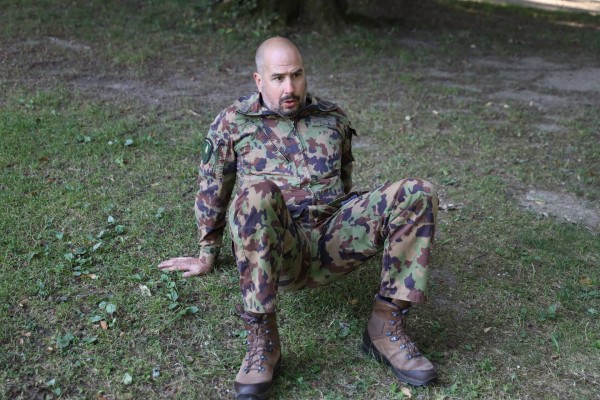
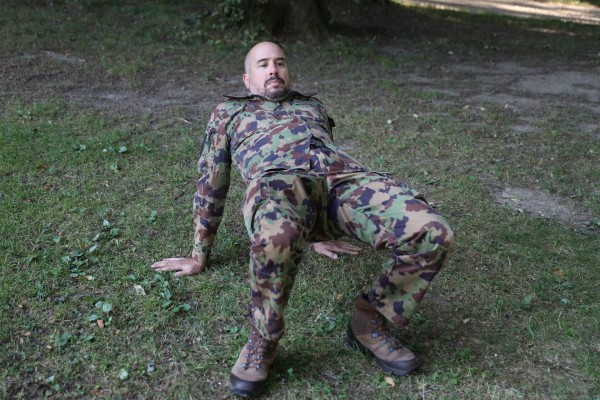
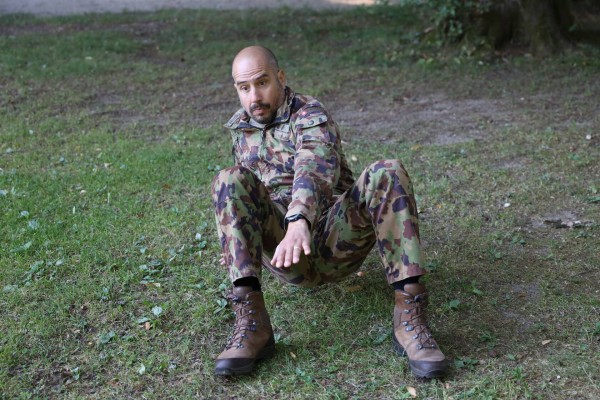
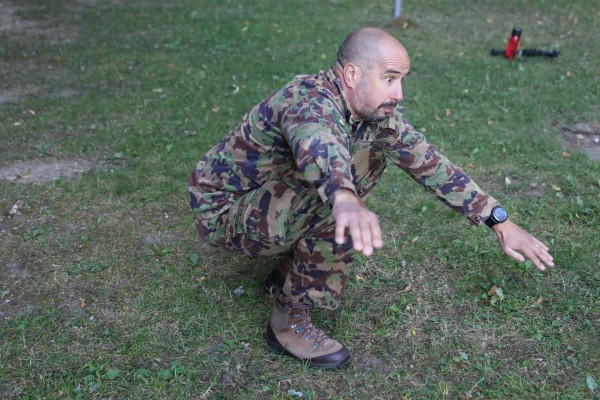
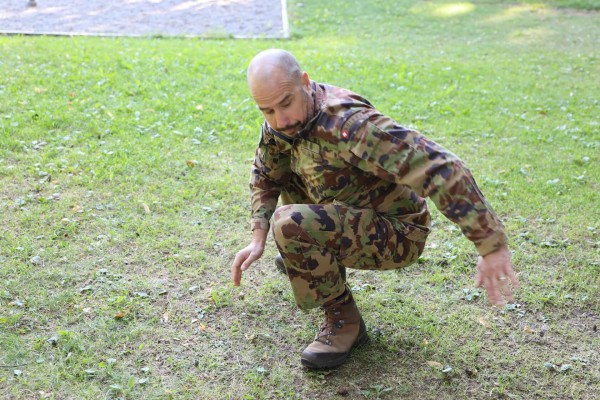
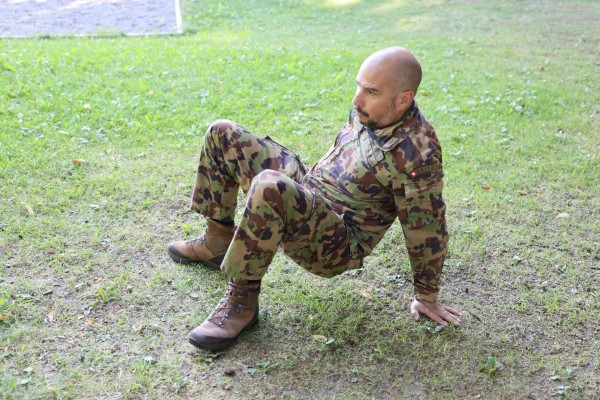
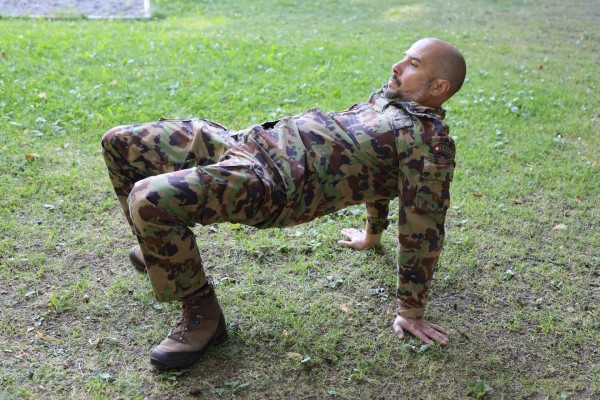
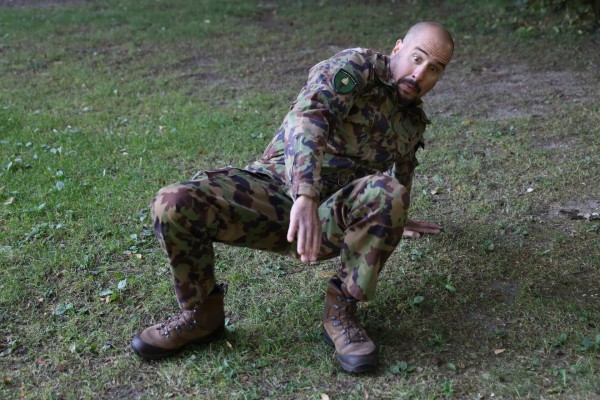
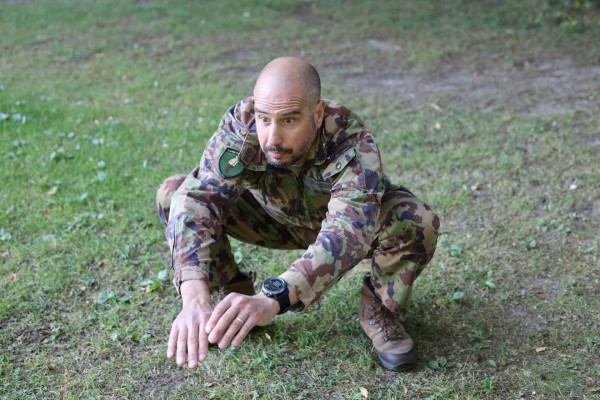
From the deep squat position, alternate between moving one arm backwards to get into the inverted quadruped position (chest pointing upwards). Actively push your pelvis upwards so that your upper body and thighs practically form a line. Lower the pelvis again and bring one arm after the other back between the knees back into the squatting position. Perform the exercise again, but this time change the starting side (arm that is first moved backwards or forwards). Return to the deep squat position, then straighten your legs back to standing.
Caution:
Centre one arm between your knees and move the other to the side in a semi-circle to support the rotation/twist of the upper body (momentum) to return to the squat position.
Lighten the load:
Support your arms on a raised surface (e.g. bench or large stone).
No material required
FlowFit (Part 7)
Mobilisation of the joints / dynamic stretching
Individual work
FlowFit - complete exercise sequence (film)
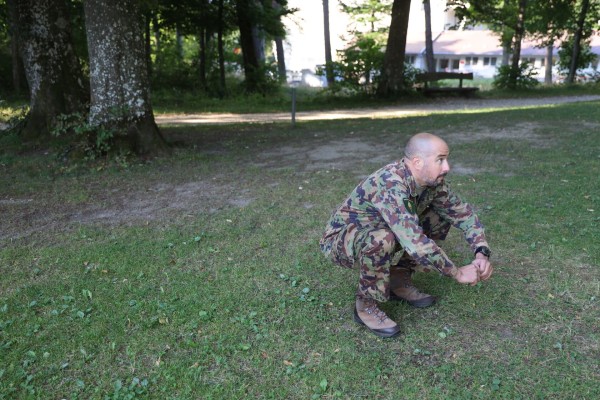
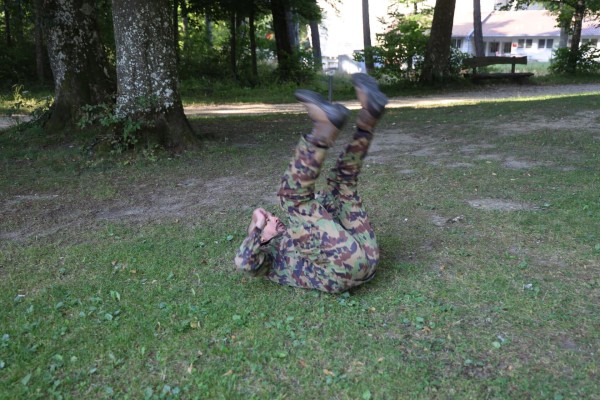
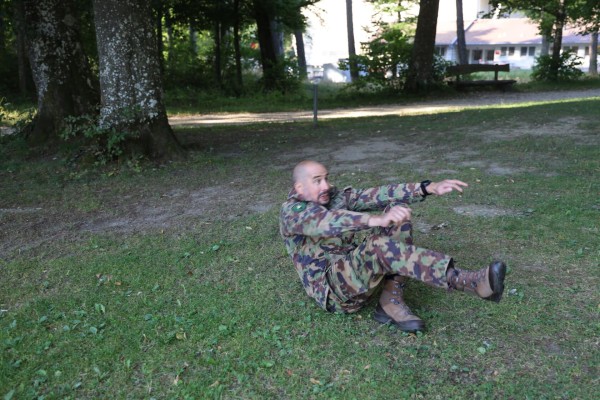
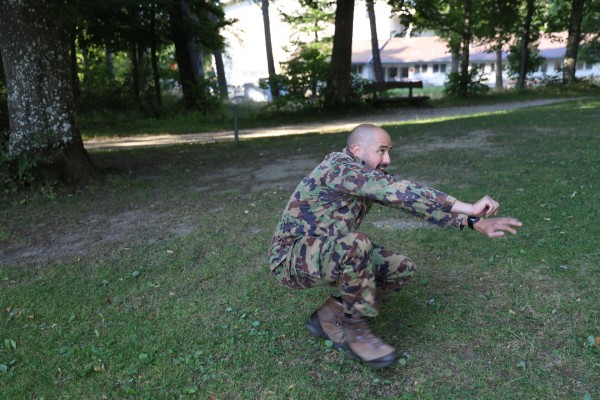
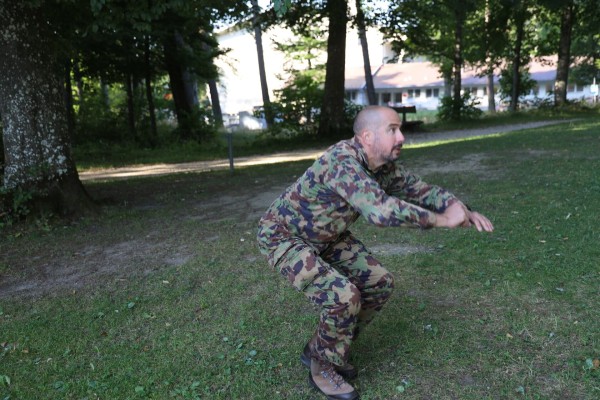
From the deep squat position, drop back onto your back. The arms are bent and the hands are brought to the floor next to the head, the legs are also bent and pointing diagonally forwards. In a flowing sequence of movements, push yourself off the floor with your hands and bring your legs forwards to the floor again (lift your upper body off the floor and straighten up). When standing up, however, only one leg is placed on the floor at first, with the other leg still pointing forwards. Only when you assume the deep squat position is the leg that was initially raised off the floor also lowered. Now perform the exercise on the other side (place the other leg on the floor first when standing up). Return to the deep squat position and finally straighten your legs to a standing position.
Caution:
Knee of the training leg should remain as centred as possible over the foot when standing up.
Easier:
Arms support the movement more clearly (more momentum); the almost extended free leg is brought to the ground with the heel to support the standing up movement.
Harder:
Use less momentum (hardly any support from the arms).
No material required
FlowFit: Explanation of the exercises
Introduction/Info
FlowFit - complete exercise sequence (film)
The instructor explains the 7 exercises to the participants, which comprise a complete exercise sequence (flow). The correct execution and possible misalignments/error patterns are pointed out.
The individual exercises are demonstrated by the sports instructor, after which the participants can try out the exercises themselves (possibly working with the add-on method: Exercise 0, exercise 1, exercise 0+1, exercise 2, exercise 0+1+2 etc.)
1 flipchart with a sketch of the exercise
Escape catch
Stimulate circulation
Group work
Groups of 2-3
Groups of 3 are formed (number the participants per group). As soon as the sports leader calls out one of the numbers 1-3, the group member concerned becomes the catcher and tries to catch the other two participants. Whoever is caught within a certain time performs an additional task (e.g. push-ups, stretch jumps, etc.). The groups can be reshuffled from time to time.
Variant:
Perform the same game as a partner exercise.
No material required
FooBaSKILL
Games / Tournament
Game idea:
Two teams play against each other. On one side of the pitch there are two Swedish boxes, each with a Molankegel or the FooBaSKILL goal on top, which serve as football goals. Football is played on this half. There is a basketball hoop on the other half, where normal basketball is played. In the centre of the hall, the players switch from one sport to the other. In the second half, the roles are swapped. The aim is to score the most points.
Scoring:
Football:
- 1 point: The ball touches the bottom of the Swedish box (wooden structure). The players can aim at 360° of the box.
- 2 pts: The ball touches the bottom of the Swedish box and is stopped (intercepted) by the player of the same team or the kicker himself with the sole of his shoe before it crosses the centre line (second offensive intention in football). Only one point is awarded if a defender intercepts the ball.
- 3 points: The ball brings down the juggernaut or goes through the FooBaSKILL goal.
- 0 points: No point is awarded if the ball touches the top of the box. The game continues without interruption.
Basketball:
- 1 point: The ball bounces off the basketball board without touching the ring and falls to the ground.
- 2 points: The ball bounces off the basketball board without touching the ring and is caught by another team member with both hands before falling to the floor (offensive rebound in basketball).
- 3 points: The ball is kicked into the basket.
- 0 points: No point is awarded if the ball touches the hoop (play continues without interruption) or if the ball touches the back of the basketball board, the edge of the board or the supporting structure (counts as a fault) or if the ball bounces against the basketball board without touching the hoop and is caught by the opposing team with two hands before it touches the floor (play continues without interruption).
Pitch:
22 x 42 metres (with indoor walls)
Number of participants:
4:4 (or 5:5)
Rules of the game:
The kick-off at the start of the game and at the start of the second half takes place in the middle of the pitch with a bounce ball, as in basketball. The ball must be tapped by one of the two players in the centre circle to a teammate. The other players spread out freely across the entire pitch, but outside the circle.
After a point has been scored in football or basketball, the ball is played as quickly as possible. This happens at the point where the ball is seized by the defender. The kick-off takes place immediately with a pass.
The basic rules of classic indoor football and basketball apply.
In the event of an infringement of the rules, play continues with a throw-in at the place where the mistake was made. In the event of a shot at the football goal with the intention of overturning the goal cone or hitting the FooBaSKILL goal, the ball must not exceed the height of these elements. If this happens anyway, it is a fault and the ball goes to the defending team.
Tackling in the FooBaSKILL is prohibited.
It is a fault if:
- The ball touches the hall ceiling or other suspended equipment.
- The ball touches the edge of the basketball board.
- The ball touches the back of the basketball board or the supporting structure.
The walls of the sports hall are part of the playing court. It is permitted to play with the walls in both football and basketball. It is allowed to give yourself a pass against the wall; to give your partner a pass against the wall; to score a goal using the walls.
The duration of the match is twice five minutes. During the first half, one team attacks in football and defends in basketball. In the second half, the roles are reversed.
FooBaSKILL: Dribbling, passing with a basket shot as a finish
Forms of play / exercises
Group work
The participants spread out in the corners of the pitch at the start of the exercise. The sequence of the exercise is as follows:
Two players (A1+B1 or A2+B2) perform the exercise together on one side along the entire length of the hall.
Player A1:
- Dribbling around the marker sticks (incl. change of hands)
- Pass to player B1
- Running around the marker change of hands)
- Pass to player B1
- Run around the marker, demand and receive the pass
- Finish with a lay-up
- Settle into the line of players opposite the starting point (new player B1)
Player B1:
- Sprint to the mark (note timing to player A1)
- Claim and receive the ball
- Pass into the run of player A1
- Chase after player A1 to secure the ball after he has finished (rebound)
- Join the column on the opposite side (new player A2)
Player A2: Analogue to player A1, but becomes player B2 after the exercise
Player B2: Analogue to player B1, but becomes player A1 after the exercise
The players therefore rotate in an anti-clockwise direction.
Pitch:
12 colouring sticks
2 marking cones
x basketballs
FooBaSKILL: Foosball
Forms of play / exercises
2 teams of 4-7 players each
2 teams (4-7 players each) play against each other at their own target. The target is a hoop that is held horizontally in front of the vaulting box by a player standing on the vaulting box. The player may move the hoop towards the ball.
Goal: good teamwork.
Variant:
Target throws to the hoop may not be defended.
Per 2 teams:
1 basketball
2 hoops
x game wristbands / overcoats ►team identification
FooBaSKILL: Passing relay with a basket shot as a finish
Forms of play / exercises
Group work
The participants pass the ball to each other in the specified form before the last player in the line puts the ball in the basket with a lay-up.
Passing sequence:
1. A-B Overhead pass
2. B-C Chest pass
3. C-D Floor pass
4. D-E Lateral curve pass (i.e. pass next to the body; with one or both hands)
5.i.e. pass next to the body; one- or two-handed)
5. E Finish with a lay-up
6. F Secure the ball, then line up with the ball in the column
7. A-F Move to the next position in order immediately after the action
Per group:
5 colouring sticks
x basketballs
FooBaSKILL: Rebound
Forms of play / exercises
2 Teams with 3-4 Spieler
Basketball game with 2 teams (3-4 players each) on one half of the court. Aim for the basket and two additional hoops. An oversized ball, e.g. a gym ball, is placed on the basketball hoop. 2 points can be scored if the basketball bouncing off the gym ball is caught as a rebound. 1 point is scored if the ball is placed in a hoop. This can be prevented by a defender putting his foot in the hoop. The attacker is the referee.
Objectives: Use of the rebound, opening up the game through additional scoring opportunities.
Variant I:
Change of possession after a point or when the ball is lost.
Variant II:
One team tries to score as many points as possible during 1-3 minutes and counts the points.
Per half of the court:
1 basketball
1 basketball hoop
1 gym ball
2 hoops
x game wristbands / covers ► Team labelling
Football-Drill
Stimulate circulation
Group work
The participants line up in several rows; front to the sports leader (distance between the participants to the front/back and to the side 2-3 metres).
The participants line up in several rows at a sufficient distance from each other, facing the exercise leader. The participants trot loosely in place. If the sports leader stretches an arm out to the side, the participants move sideways in the respective direction. If the sports leader stretches his arms forwards or places them on his chest, this causes the participants to move backwards or forwards. Various exercises (stretch jump, prone position, rapid skipping in place for a few seconds, sit down/stand up or others) are integrated by signals from the sports leader (e.g. 1-4 whistles). After an exercise, the participants trot in place again until the next arm signal from the instructor.
Variant I:
The participants perform the movements in the opposite direction to that indicated by the instructor. The sports leader can make the drill even more difficult by making incorrect movements (including exercises).
Variant II:
The participants line up in a circle around the sports leader and move in a circle around him (note: not suitable for more than 20 participants).
Sports director:
1 signal/hand whistle
Frisbee Ultimate
Games / Tournament
Game idea:
The team in possession of the frisbee tries to move it towards the targeted end zone. The opposing team tries to prevent this movement and force possession of the frisbee by means of a "turnover" (see rules of the game). The frisbee may only be moved by throwing it from one player to the other.
Scoring:
The aim is to catch the frisbee in the opposite end zone following a pass from a teammate and thus score a point.
Playing field:
Rectangular field with an end zone at each end. 64mx37m with 18m outdoor end zone, 40mx25m with 15m indoor end zone.
The pitch is bounded by cones. The connections between them form the side or out lines.
Number of ends:
7 against 7 outdoor, 5 against 5 indoor
Game rules:
At the start of the game and after each point, the teams line up on their end zone line. The team that starts or has just scored throws a high, long pass towards the opponent's end zone (throw-off). As soon as the disc is released, all participants may move freely on the field. The other team may pick up the disc and start the game.
The disc may be thrown in any direction. The player with the disc in his hands may neither walk nor run, only star steps are allowed. However, if the disc is caught during the race, the movement may be slowed down by the required number of steps. The disc may not be passed, but must move from A to B through the air. If the attackers are unable to catch the disc (disc touches the ground, flies out of bounds or the opponent intercepts it or knocks it to the ground), the defending team gains possession of the disc and attacks. This is referred to as a "turnover". There is no stoppage of play.
The defender covering the thrower must keep at least an arm's length away. Only one player may cover the thrower at a time; the next defender must be at least three metres away. The attacker must play the frisbee after a maximum of 10 seconds. To signal this, the defender counts the seconds out loud.
Body contact or tackling is not permitted. Each player is responsible for signalling an infringement of the rules. There is no referee. Fair play is therefore very important. If an attacker and a defender catch the disc at the same time, it belongs to the attacker.
After a successful point is scored, the teams switch sides. The team that scored the point then starts again with a throw-off towards the opposing team.
Frisbee Ultimate: Burning disc
Forms of play / exercises
2 Teams
In a marked playing field, several markings are made along the outer lines. Two teams play against each other. One team (runner) has the task of completing a predetermined route from mark to mark as quickly as possible. To do this, one participant throws the disc from the drop point (e.g. tyre) and starts running. It is allowed to run until the field team (catcher) returns the disc to the dropping point and burns it there. If the runners are not at the firing point at the same time, they burn and have to return to the start without scoring any points (possibly incorporate additional exercises to shorten the waiting time). Each completed lap scores one point for the runners. If a runner rounds the course without stopping, the run counts double. The field team may not run with the disc, it may only be passed. The winner is the team that scores the most points in a given time (e.g. 2 x 6 minutes).
Variant I:
Only one runner is allowed at each mark. If there are two participants, one burns.
Variant II:
Play with two or more discs.
Pitch:
1 frisbee
x colouring sticks
1 tyre
Frisbee Ultimate: Frisbee handball
Forms of play / exercises
2 Teams
Two teams play against each other on a pitch with a frisbee on two goals. As in handball, the goal circles may not be entered. Unlike handball, however, no physical contact is allowed in this form of the game (one arm's length away from the thrower) and there is no goalkeeper. If the disc falls to the ground, the team that last touched the frisbee loses possession.
Pitch:
1 frisbee
2 goals (handball/uni hockey goals or mats)
x cones (goal circles)
Frisbee baseball (Brennball)
Forms of play / exercises
Group work
2 teams
Two teams play against each other, with one group representing the throwing team and the other the catching team. The roles are swapped halfway through the game (define the number of throws or set a time). Two marker cones mark the throwing zone, behind which all players of team A line up. Four further marker cones (placed in a rectangle) symbolise the running track. Team B lines up along the entire running track within the playing field.
Two runners from team A get ready to throw. One player holds the rugby ball, the other the throwing disc. At the same time, they throw the ball into the pitch. After each throw, both participants run to the first marker cone on the running track. The players of team B try to get the throwing disc to the "burning point" (hoop) as quickly as possible. The second task of the field team is to line up in a column and pass the ball between their legs to the last player. The last player in the line is usually the player who placed the disc in the hoop. So if the disc is in the hoop, all field players have touched the ball and passed it between their legs to a team-mate, the entire team B shouts "Stop" as soon as the last player in the one-man column has received the ball. If the runners are not at a marker but on the track when the "stop" signal is given, they must return to the previous marker (any number of runners may be at the markers). The runners therefore decide for themselves at each marker whether they want to continue their run or wait (until the next throw of the other players to continue the run). The team receives one point for each completed run. The points are entered on the score sheet by the respective participant after the run (put a line behind the team name). If the ball or throwing disc is caught directly by the field team, the field team receives one point, which is noted on the score sheet by the sports director. Whichever team scores more points with the number of defined throws or within the specified time wins the game. The number of throws is the slightly fairer option to prevent the field team from suddenly starting to run out of time when the equipment is returned.
Variant:
If a runner is not at a marker when the "stop signal" is given, they must return to the start and line up with the throwers (or drop out completely and perform additional tasks at the edge of the field).
6 marking cones
1 rugby ball
1 throwing disc (frisbee)
1 tyre
1 flipchart (evaluation)
Frisbee Olympics
Orienteering
Single run
Frisbee-OL is a fun form of endurance training, as running is combined with Frisbee target throws and running to various posts.
The Frisbee is thrown at numbered tyres (Velopneus). If the tyre (Velopneu) is hit (contact is sufficient), the corresponding control can be approached and stamped on the run card. So that not all participants start with the same target or run to the same control, the first target can be marked on the run card, which must be hit first. After that, the targets can be chosen freely. One throw is available for the shorter distances up to the centre line, and two throws from the centre line onwards. If the attempts are unsuccessful, a penalty lap must be run around the marked field before the targets can be thrown at again. The Frisbee must be returned to the baseline before the control or the penalty lap is tackled. Each participant who moves within the marked field must ensure that they are not hit by a frisbee. Who will be the first to reach all the posts or the most posts in a certain time?
There are various ways to distribute the posts:
- The posts are distributed within sight of the throwing field so that the participants can easily reach them (e.g. place numbered F-discs with a clamp on a grass field).
- If the controls are out of sight of the throwing field, the participants are given a map/sketch of the controls (can be integrated on the map) in addition to a running map, which they can use to run to the controls.
- A poster with the controls marked on it is attached to the throwing field. The participants memorise the route to the respective post (memory run).
14-20 tyres/cycling tyres
14-20 orienteering posts (fixed, but controlled or for unplugging)/F-discs incl. Mini pole with pliers
6 fanjons/marking cones/caps/painting sticks
1 route tape
x throwing discs (frisbees)
1 stopwatch
1 poster with control overview (memory run)
Participant:
1 running map form 30.063
1 orienteering map; if control not in sight (prepared in advance by sports director)
Frontal and lateral raising and lowering of the arms while standing ► front raise/lateral raise (side raise)
Power
Individual work

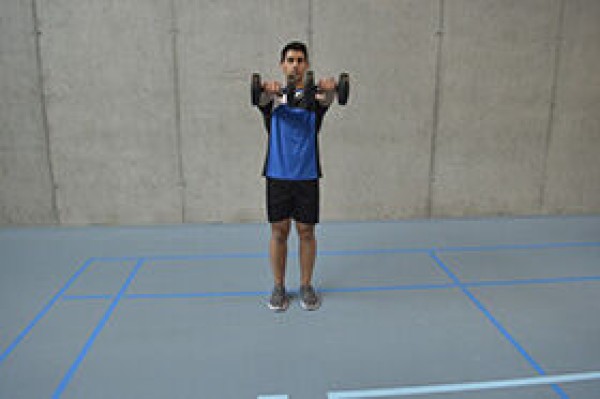

Stand upright, arms extended downwards in front of your body with the dumbbells in your hands (hanging), the backs of your hands pointing forwards (overhand grip), raise your arms in the direction you are facing until they are horizontal (shoulder height, backs of hands pointing upwards), spread your arms out to the side from the holding position ("T" position), bring your arms back together in front of your head and lower them back to the starting position.
Attention:
Keep your back straight (possibly back against a wall), actively tense your core.
Lighten:
Less weight.
Harden:
More weight.
2 dumbbells