Exercises (2330)
Interval training (medium): Skipping rope
Interval training
Together in the group, in small groups or each participant independently
Exercise duration: 60-90 seconds of jumping rope
Pause: 30-60 seconds resting in place or walking around at a leisurely pace
Repeats: 4-8 times
Intensity level: 3-4 (medium-hard)
Hmax: 80-95%
Rule of speech: speak in full sentences - short exchanges
The participants jump rope during the specified time without interruption if possible (technique free). The intensity of the jumping is adjusted according to the target. The skipping takes place in a group, with the sports instructor responsible for ensuring that the load and break times are adhered to (small groups with a group leader are also possible), or each participant carries out the interval units independently.
Variant:
Integrate variations of rope jumping (specified by the sports instructor, e.g. a special technique every 10 jumps): running in place, running in place with knee lifts, two-footed jumps, double rope turns, crossed arms, backwards rope jumping, etc.
Per participant:
1 skipping rope
1 heart rate monitor
For sports leaders or per participant/group:
1 stopwatch
Interval training (medium): Stair run
Interval training
Individual run
(possibly also run in strength groups depending on the size of the stairs, with the pace maker controlling the time)
Stair running is a gentle, effective and therefore ideal strength and endurance workout for runners, which also improves coordination, concentration and running technique. Above all, training on the stairs can improve the short forefoot strike, which is particularly beneficial for so-called heel runners. Training on the stairs can be very varied and playful, but can also be used for interval training with short and intensive sessions. Stairs that are as long (and wide) as possible simplify the type of exercise.
Exercise duration: 45-60 seconds running up a flight of stairs
Break: 1-3 minutes
Repeats: 4-8 times
Intensity level: 3 (medium) / 4 (hard)
Hmax: 80-90% (extensive interval method) / 90-95% (intensive interval method)
Rule of speech: speak in full sentences / short exchanges of words
For the workload, the participants/groups run up the stairs (possibly staggered start from place level). staggered start for reasons of space), during the break they have time to return to the starting position (agree on running directions so that the participants do not get in each other's way). After the first interval, the participants/groups memorise how far they have climbed the stairs in the specified time, as they will try to cover the same distance in each subsequent session (it is always important to cover the same distance per running session during interval training). For this type of exercise, however, the length of the staircase is usually not sufficient to fully utilise the time, so you can turn around at the end of the staircase and return to the start to tackle the staircase again. This means that you memorise the number of runs plus the distance covered until the end of the interval. Depending on the training goal, the sports instructor adjusts the intensity of the exercise and the recovery phase.
There are the following options for climbing the stairs:
- in a sprint - free technique (any number of steps per stride); Climb the stairs as quickly as possible while still concentrating on the steps (short ground contact time, not touching down with the entire foot)
- two-step run
- put one leg alternately on each step
- step on each step with both legs
- one-leg jumps (determine/vary the number of steps)
- double jumps (determine/vary number of steps)
- squat jumps
- side jumps
To stop the time, you have the following options:
- each participant receives a stopwatch/pulse clock and completes their training sessions independently;
- the sports director starts and stops the time for the participants/groups (staggering makes sense, keep an overview with the break times);
- it is started in strength groups, with the pace maker checking the time using the stopwatch/pulse clock.
1 signalling instrument (e.g. whistle)
Evaluation FTA (group formation)
Per participant:
1 heart rate monitor
For sports leader or per participant/group:
1 stopwatch
Juggler
Coordination exercises
Individual work
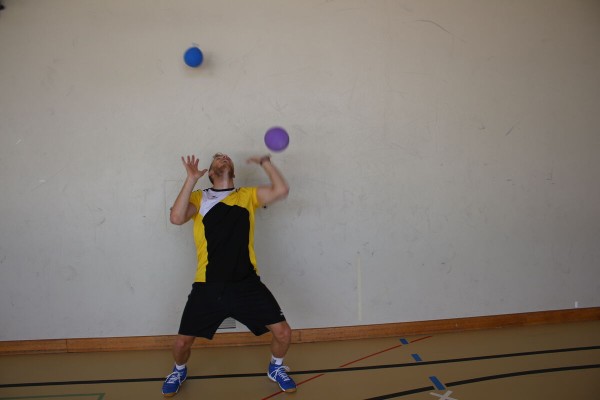
Hold two, three or more balloons in the air at the same time by flapping them with your hands without one balloon falling to the ground.
Variant I:
Hold balloons or balls/shuttles in the air with a tennis or badminton racket.
Variant II:
Hold juggling scarves in the air by plucking them.
8 balloons
2 badminton/tennis rackets
4 badminton shuttles/balls
6 juggling cloths
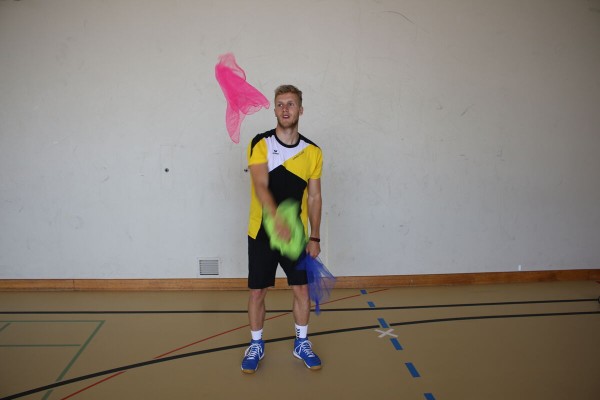
Juggler
Light-Contact
Partner work
The participant tries to keep 3 juggling scarves in the air for as long as possible. The participant is in double cover and pulls the scarves upwards by crossing their arms over the scarves.
6 juggling cloths (3 per participant)
Juggler
Coordination exercises
Individual work
The participants try to juggle with different utensils:
- Juggling one-handed with 2 balls or two-handed with 3 balls (tennis balls, foam balls, floorball balls, possibly even frisbees). Also possible standing on a balancing board.
- Holding juggling scarves in the air.
- Holding a badminton shuttle with the racket in the air while sitting down and standing up. Perform half and full body rotations while juggling. The same exercise can be performed with the Indiaca.
- Throw the foam ball into the air or against a wall and catch it with the frisbee. Throw the foam ball to each other in pairs and catch it with the frisbee.
Make it easier:
Juggling can be practised on an inclined surface (e.g. door of the equipment room/garage door; small mats set up at an angle). The balls are not thrown straight up into the air, but onto the sloping surface. This gives the participant more time to learn the basic movement.
► Differentiation ability, rhythmisation ability, reaction ability
3 tennis/unihockey/smolball balls, throwing discs, juggling cloths
1 Indiaca
1 badminton racket incl. badminton shuttle
1 balance board
Door of the equipment room/garage door ►Facilitate the exercise
Beetle turning
Fighting and roughhousing games
Partner work
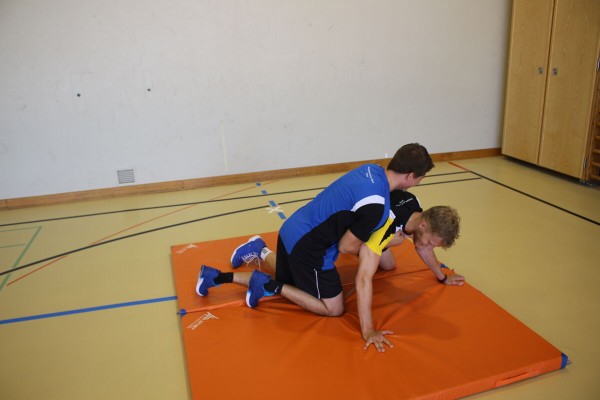
One participant is in a four-foot stance in the centre of a mat/turf area. His opponent tries to turn him onto his back. Switch roles after each (successful) attempt.
Variant:
Time the participant until the attempt is successful or the opponent has a specific time limit for their attempt.
2-4 soft mats (small) ►Indoor version
2 tent sheets ►Outdoor version
1 stopwatch ►Variation of the exercise
Indoor post set-up:
Using soft mats to form a rectangular field of mats.
Kastensurfer
Coordination exercises
Individual work
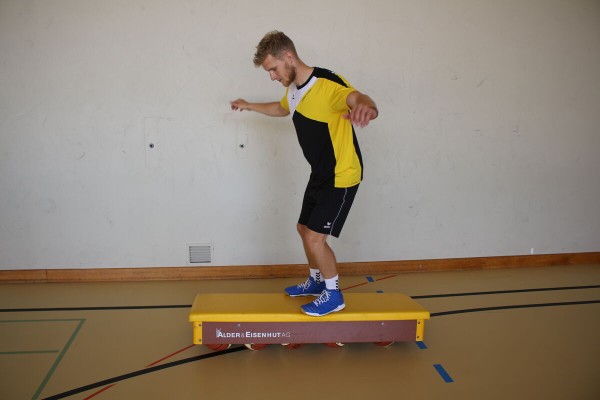
The participant tries to keep their balance while standing on the unstable box lid.
► Balance ability
1 vaulting box top
3-4 basket/medicine balls
Post structure:
One vaulting box top is placed on three to four medicine or basketballs
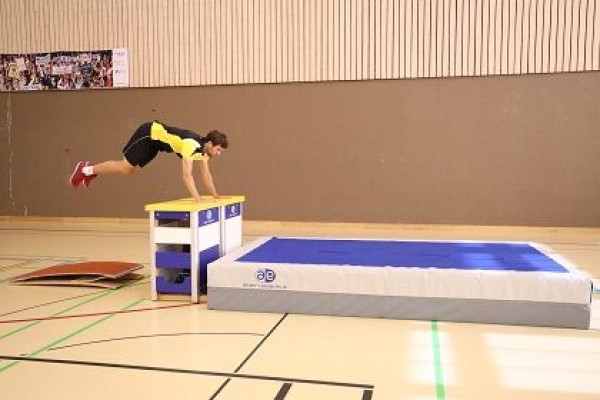
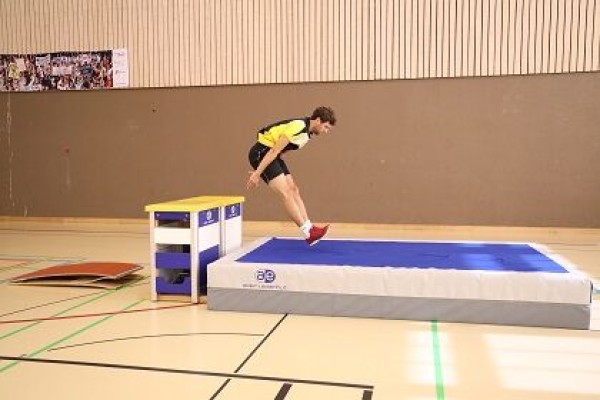
Cat's jump I
Parkour
Individual work

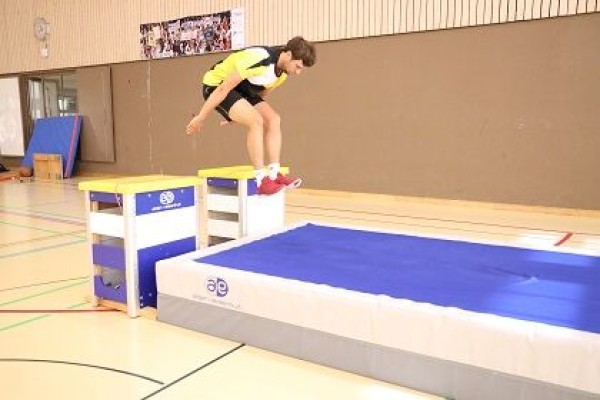
Start with a straight run-up, frontal jump, support yourself with your hands on one of the two vaulting boxes, bring your legs between your arms to stand on the large soft mat.
outdoor:
Straight run-up, frontal jump followed by a squat jump and short support phase with both hands over the obstacle.
Variations:
One-legged or two-legged jump;
Shorter or longer obstacle.
2 vaulting boxes ►indoor version
1 soft mat (large) ►indoor version
1 elasticated rubber band ►indoor version
Indoor post set-up:
Place two vaulting boxes next to each other at a distance of approx. 50 cm. 50cm apart, place a large soft mat behind them and stretch an elastic rubber band between the vaulting boxes if necessary.
outdoor:
A table (approx. size of a table tennis table).
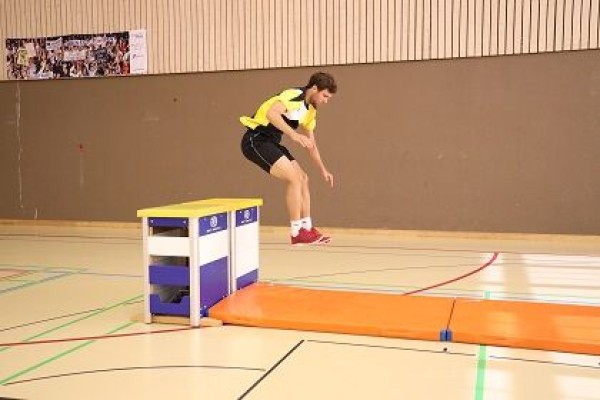
Cat's jump II
Parkour
Individual work
Strong run-up, two-legged take-off from the Reuter board, support yourself with both hands on the vaulting box, pass your legs between your arms to land on the soft mat.
Variant:
Landing with both feet between your hands on the vaulting box, direct take-off to stand on the soft mat.
1 vibratory box
1 soft mat (large)
1 Reuter board
Post setup:
Place the vibratory box between a Reuter board and a large soft mat.
Cat's jump III
Parkour
Individual work
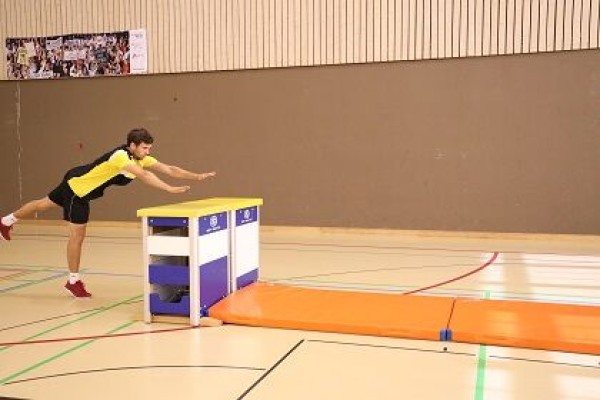

Strong run-up, frontal take-off, moving the centre of gravity forwards, support yourself with both hands on the vaulting box, bring your legs between your arms to land on the small soft mat.
1 vaulting box
1 soft mat (small)
Post setup:
Place a small soft mat behind a vaulting box.
Squat jump in push-up position ► plank jump
Power
Individual work


Push-up position (high support, face/look down), bend your legs during the jump (bring your knees between your arms) and stretch back out to the starting position for the next jump.
Attention:
Keep your upper body stable in the starting position (tense your stomach).
Lighten:
Just hold the basic position (push-up position); smaller jumps (bring your knees less forwards).
Harden:
Additional weight (on the legs); unstable base (for the arms).
2 weight cuffs ► to make the exercise more difficult (additional weight)
1 balance cushion/balance board ► to make the exercise more difficult (unstable surface)
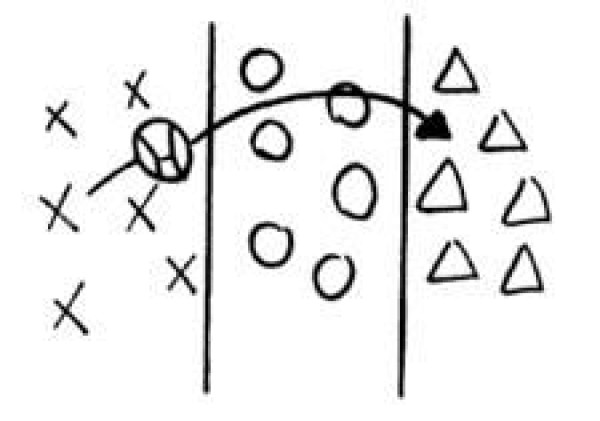
Kickball - Brennball
Games / Tournament
Game idea:
The game idea is similar to that of baseball. Two teams, a kicker and a catcher, try to score as many points as possible during a certain period of time.
Scoring points:
A point is scored when a run is successfully completed. If necessary, points are also awarded for successfully caught balls.
Playing field:
Can be adapted to the available possibilities.
Number of participants:
10 against 10
Game rules:
One player of the kick team plays the ball from the kick zone into the catch zone (throwing or kicking). He then runs around the pitch back into the kicking zone. Meanwhile, the catcher tries to catch the ball and bring it to their "nest" as quickly as possible. The ball must be passed from catcher to catcher, as it is not allowed to run with the ball. As soon as the ball is placed in the "nest", a loud whistle sounds from the game leader. A run is successful if the runner is back in the kick zone before the whistle sounds (the ball is in the "nest"). The run markers are neutral points where the runner can interrupt his run and wait for the next kick. If a runner is not at a run mark when the referee blows his whistle, he must return to the kick zone without having scored a point for his team.
If the ball is caught directly out of the air by the catching team, they are awarded a point and the runner must return to the kick zone.
Variant:
If a runner is found between the running marks when the referee whistles, he is completely eliminated from the game so that the kicking team becomes smaller (provide additional tasks).
Kickball/burnball: 7 against 4
Forms of play / exercises
7 attackers 4 defenders

On 2 or more pitches, 7 attackers play against 4 defenders. The attackers try to play 20 passes, for example. The defenders simultaneously aim to touch an attacker who is in possession of the ball. If they succeed, the game starts again. After 5 attempts, switch functions.
Objective: free running, accurate passing, cover work, anticipation.
Pitch:
4 armbands / covers
1 rugby ball
Kickball/fireball: Snap ball
Forms of play / exercises
2 teams of 3-4 players each
Two teams are formed (3-4 players). One team rolls a ball to itself as often as possible. The opposing team tries to capture the ball and make lots of passes. Whoever has the ball is not allowed to move. Who will be the first to make ten passes in a row?
Objective: free running, precise passing, cover work, anticipation.
Pitch:
4 armbands / covers
1 rugby ball
Kin-Ball
Games / Tournament
Game idea:
One team throws the ball and calls out the colour of one of the other teams. The other team must catch the ball before it hits the ground. The aim of the game is, of course, to throw the ball to the other team so that they cannot catch it before it hits the ground.
Scoring:
- If the receiving team drops the ball, the other 2 teams each get a point.
- If the serving team (or the serving team itself) makes a mistake, the other two teams each score one point.
Court:
The entire hall (maximum 21m x 21m). The walls, ceiling and objects in the sports hall (basketball hoop, etc.) are not part of the playing field and must be considered off.
Number of participants:
4:4:4
Playing rules:
The serving team determines the team that must receive the ball. Before the serve is executed, the serving player must call out the word "Omnikin" followed by the colour of the opposing team of their choice. Only then may he hit the ball upwards or horizontally with one or both arms. The ball must fly at least 1.8 metres. The team whose colour was called out loud becomes the receiving team and must control the ball before it touches the ground. You can control the ball with any part of your body without catching or holding it. If the ball is only touched by one or two players when it is received, they may move onto the pitch by holding the ball in their hands or by passing the ball to each other. In this way, they can thwart the opponents' defence on the next serve. As soon as three players of the team have touched the ball, the ball must be stopped. At this point, the ball must be served again.
If a mistake is made, the referee whistles and stops the game. The referee places the ball where the mistake was made and gives it to the team that made the mistake. The other two teams are awarded one point each.
Faults are awarded if
- the bouncing player hits the ball directly out of bounds (the ball touches a wall, the ceiling or any other object in the sports hall (basketball hoop, light, bench).
- the ball is hit with a downward trajectory.
- the ball does not fly at least 1.8 metres.
- the same player serves the ball twice in succession.
- the ball is not touched by 3 players during the serve.
The game lasts until one team has won 3 periods (maximum 7 periods in total). One period lasts 7 minutes.
Kin-Ball: Off to the centre
Forms of play / exercises
Divide the group into three teams: one team in the centre, the other two to the right and left. The teams at the far end pass the ball to each other, the team in the centre must try to intercept it. The team whose pass is blocked must go to the centre. Who is least in the middle?
Variations:
- Before passing the ball over the centre, pass the ball three times within the team.
- Increase the intensity with a second ball.
Pitch:
1 Kin-Ball
Kin-Ball: Brennball
Forms of play / exercises
2 Teams

Divide the group into two teams, one attacking, the other defending. One after the other, the players on the attacking team throw the ball into the defence zone. After the throw-in, they run from one base to the next and can stop to avoid being "burnt".
If a player is not on a base, he is "burnt" if the defence team catches the ball and puts it in the hoop. Each completed turn scores a point for the attackers.
Variations:
- Defence team: make three passes before putting the ball in the hoop.
- Burn the bases (baseball).
- Run multiple players.
- Slap the ball instead of throwing it in (cell formed by two players).
Pitch:
1 Kin-Ball
Kin-Ball: Queen-Ball
Forms of play / exercises
4 Teams with 3-4 Spieler

Four teams of three to four players are formed. Two teams are on the court, the other two on the bench, ready to return to the game.
The game lasts until the ball touches the ground in the opponent's half, or until the offensive team makes a mistake (ball goes out of bounds, descending serve).
The team that makes the mistake is replaced by one of the two on the bench. The team that stays wins a point. The team that scores the most points wins the crown.
Variations:
- With two balls, divide the court lengthwise. The game is played 3:3 using the same system.
- A joker always supports the team in possession of the ball
Pitch:
3-4 game ribbons / overcoats
1 Kin ball
Kin-Ball: Four corners
Forms of play / exercises
4 Teams with 3-4 Spieler

Form four teams of four players or more and divide the hall into four areas. The ball is hit clockwise from one team to the other.
At the time of the hit, three players touch the ball and a fourth hits it. A team scores a point when the ball touches the ground in the opponent's zone.
Variations:
- Play with two balls.
- The team in possession of the ball decides where to hit the ball.
- Announce the colour of the team that receives the ball (see Haids
Pitch:
3-4 playing ribbons / covers
1 Kin ball
King of the line
Coordination exercises
Individual work
Two participants stand on the same slackline. The one who manages to stay up longer receives a point. Who has 5 wins first?
Easier:
Another participant sits in the centre of the slackline.
Easier:
The participants position themselves closer together in the centre of the slackline.
1 Slackline
Climbing - 4.5 on rope
Examinations
Time ratios (20 min.) correspond to a group size of approx. 30 participants.
Of course, each participant is tested individually.
Climbing on the rope is used to test fitness and coordination skills. The aim is to test agility and technique on the climbing pole by measuring time.
Execution rules
Facility:
A rope with a mark 4.5 m above the ground. A small (or large) soft mat is placed on both sides of the rope.
Execution:
Contestants are free to climb with or without shoes. The participant may not touch the rope before the start. From the start command of the test leader, the participant climbs up the rope (climbing on two ropes is prohibited) to the 4.5 m mark. Touching the marker is sufficient for the time to be stopped.
Tip: It is recommended to jump off as high as possible with both legs at the start. The most common variants for climbing on the rope are the S-wrap and the J-hook technique. In the S-wrap technique, you grab the rope with your hands (close together) as high up as possible, keeping the rope between your thighs. Now wrap the rope around the weak leg. The rope practically runs once around the calf and finally over the foot further down (S-shape). With the other (strong) foot, step on the rope that has been placed on the weak foot and lock it. Support yourself with the tips of your toes to grab the rope again with your hands (one after the other), preferably at the highest point. Now let go of the rope with the foot clamp grip and pull your legs upwards so that your knees and elbows are almost at the same height. The rope can then be locked again with the feet as described above. With the J-hook technique, you stand next to the rope at the start. Here too, you then grab the rope as high as possible. The hands are close together, which stabilises the entire body. Now pull your leg up to your chest, with the rope running to the left of your body. With the right
foot, grab the rope under the left foot and place it on the left foot to secure it. This creates an angle of over 90 degrees in the rope (J-shape). Once the rope is fixed to the foot, you grab it again with your hands one at a time and the process starts all over again (you can switch sides).
Attempts:
Three, the best attempt is scored.
Measurement:
The time from the start command until the participant touches the 4.
Control:
The test leader ensures that the competitor does not touch the rope before the start command. From the start command, the test leader lets the time run until the participant touches the 4.5 m mark.
The result is recorded directly electronically or transferred later from an evaluation sheet to an electronic device.
Evaluation:
Evaluation sheets and electronic evaluation programmes are available for all sports tests:
www.armee.ch/sportausbildung
-> downloads -> sports tests -> evaluation -> climbing
A rope attached to the ceiling (4.5 m), 2 soft mats small/large, 1 stopwatch, climbing control sheet including writing materials, possibly a device for electronic data collection.
Climbing - 5 m on the vertical pole
Examinations
Time ratios (20 min.) correspond to a group size of approx. 30 participants.
Of course, each participant is tested individually.
Climbing on the vertical pole is used to test physical condition and coordination skills. The aim is to test dexterity and technique on the climbing pole by measuring time.
Execution rules
Facility:
Vertical climbing pole with a mark 5 metres above the ground. A small soft mat is placed on both sides of the pole.
Execution:
The participants are free to climb with or without shoes. The participant may not touch the pole before the start. From the start command of the test leader, the participant climbs up the vertical pole (climbing on two poles is prohibited) to the 5 m mark. Touching the marker is sufficient for the time to be stopped.
Tip: It is recommended to jump off as high as possible with both legs at the start. The most common techniques for climbing the pole are either to press the instep of the back leg and the sole of the front leg or both soles of the feet against the pole.
Attempts:
Three, the best attempt is scored.
Measurement:
The time from the start command until the participant touches the 5 m mark is measured to the nearest 1/10 of a second (round the result mathematically).
Control:
The test leader ensures that the participant does not touch the climbing pole before the start command. From the start command, the test leader lets the time run until the participant touches the 5 m mark.
The result is recorded directly electronically or transferred later from an evaluation sheet to an electronic device.
Evaluation:
Evaluation sheets and electronic evaluation programmes are available for all sports tests:
www.armee.ch/sportausbildung
-> downloads -> sports tests -> evaluation -> climbing
Vertical climbing pole (5 m), 2 small soft mats, 1 stopwatch, climbing control sheet including writing materials, possibly a device for electronic data recording
.Climbing on horseback
Parkour
Individual work
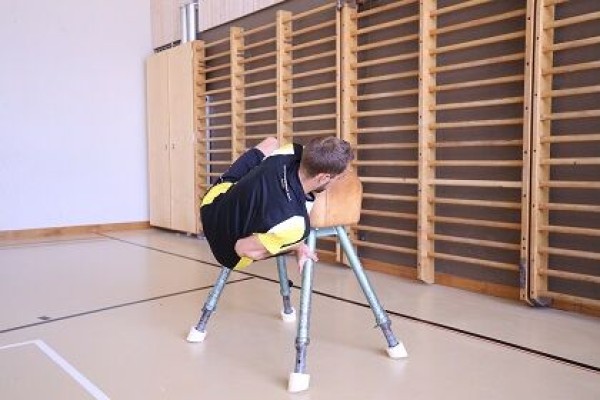
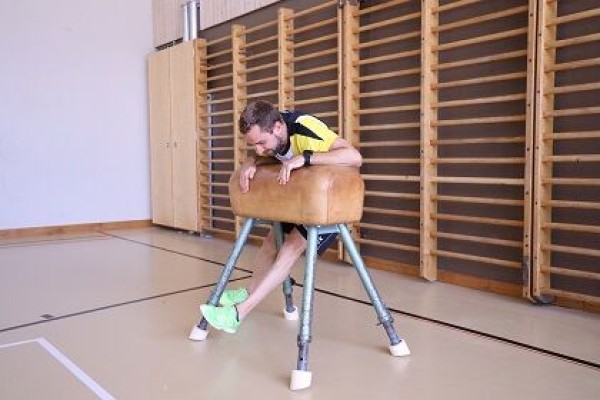
Hold on to the horse with your arms and legs and climb around it without touching the ground.
1 pommel horse
Climbing on the rope
Power
Individual work


The rope is climbed up to the mark, with the S-wrap and J-hook techniques being the most common climbing methods. In the S-wrap technique, you grab the rope with your hands (close together) as high up as possible, keeping the rope between your thighs. The rope is then wrapped around the weak leg. The rope practically runs once around the calf and finally over the foot further down (S-shape). With the other (strong) foot, step on the rope that has been placed on the weak foot and lock it. Support yourself with the tips of your toes to grab the rope again with your hands (one after the other), preferably at the highest point. Now let go of the rope with the foot clamp grip and pull your legs upwards so that your knees and elbows are almost at the same height. The rope can then be locked again with the feet as described above. With the J-hook technique, you stand next to the rope at the start. Here too, you then grab the rope as high as possible. The hands are close together, which stabilises the entire body. Now pull your leg up to your chest, with the rope running to the left of your body. With the right
foot, grab the rope under the left foot and place it on the left foot to secure it. This creates an angle of over 90 degrees in the rope (J-shape). Once the rope is fixed to the foot, reach up again with your hands one at a time and the process starts all over again (you can switch sides).
Harden:
Additional weight (on the legs and/or arms).
1 climbing rope
2-4 weight cuffs/1 weight waistcoat ► Make the exercise more difficult (additional weight)
Climbing on rope for a limited time
Climbing
The participants climb up the rope to the marker. A team mate stops the time. Each participant completes at least two attempts.
1 climbing rope
1-2 soft mats (large)
1-4 stopwatches