Exercises (2330)
Raising and lowering the pelvis in lateral forearm support (right) ► lateral pillar bridge / side bridge
Power
Individual work
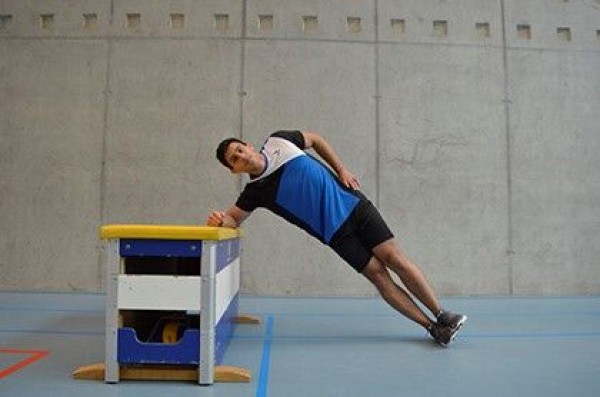
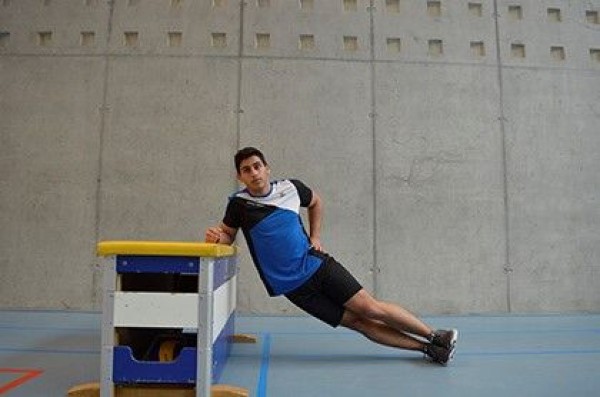
Lateral support with the (right) forearm resting on the top of the Swedish box, legs straight, raise and lower the pelvis.
Attention:
Head, torso, hips and knees practically form a line (pelvis does not tilt backwards or forwards), keep the shoulder above the elbow.
Lighten:
Support in place (without raising and lowering the pelvis), more box elements (more upright position).
Harden:
Less box elements (more lying position); additional weight (on the hips).
2-3 vaulting box elements (incl. upper part)
1 weight vest/weight disc/sandbag ► Make the exercise more difficult (additional weight)
Raising and lowering the pelvis in lateral forearm support (right) ► lateral pillar bridge / side bridge
Power
Individual work
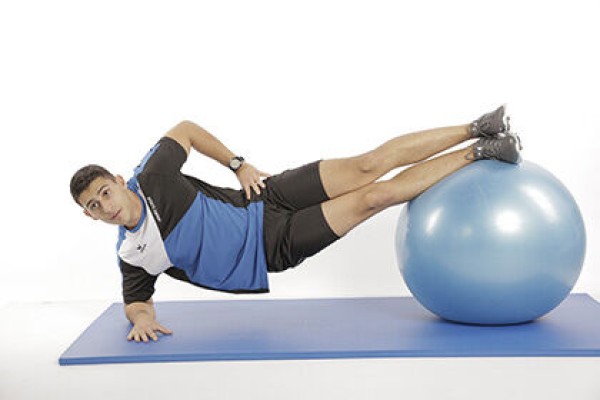

Side support on the right forearm, feet crossed and placed on the exercise ball. In this position, raise and lower the pelvis.
Attention:
Head, torso and hips practically form a line (pelvis does not tilt backwards or forwards), keep the shoulder above the elbow. To keep the ball in place, you can lean it against a wall.
Lighten:
The upper arm also stabilises the hips (hand on the floor); support in place (without raising and lowering the pelvis).
Harden:
Additional weight (on the hips); unstable base for the supporting forearm.
1 exercise ball
1 weight vest/weight disc/sandbag ► to make the exercise more difficult (additional weight)
1 balance cushion/balance board ► to make the exercise more difficult (unstable base)
Raising and lowering the pelvis in lateral forearm support (right) ► lateral pillar bridge / side bridge / forearm side plank hip dips
Power
Individual work


Side plank on the (left) forearm, with the elbow directly beneath the shoulder, the forearm on the floor, and the legs stretched out, either one on top of the other or staggered for greater stability; the body forms a straight line from head to toe, with the oblique abdominal muscles, glutes and legs actively engaged. From this position, lower the pelvis towards the floor in a controlled manner. Then lift the pelvis back to the starting position. The movement is slow and controlled, originating from the core; the upper body remains stable.
Attention:
Do not rotate your hips forwards or backwards; do not let your pelvis drop completely; do not let your shoulders collapse when in the forearm plank position; use momentum rather than control when lifting/lowering; do not let your head tilt downwards or to the side (to avoid straining your neck).
Lighten:
Knees on the floor (knee-side-plank); smaller range of motion (only a slight lowering); static side plank hold without movement; feet staggered rather than stacked.
Harden:
Feet close together (maximum stability); upper leg raised; additional load on the hips (e.g. weight on the pelvis); free upper hand held above the head or holding a weight; unstable surface.
1 soft mat (small)
1 weighted vest/weight plate/dumbbell/sandbag ► Make the exercise more challenging (additional weight)
1 ball/1–2 balance cushions/1 balance board ► Make the exercise more challenging (unstable surface)
Raising and lowering the pelvis in lateral forearm support (right) ► lateral pillar bridge adductors / side bridge
Power
Individual work


Lateral support on the (right) forearm, upper (left) leg placed on the exercise ball, the lower (right) leg bent and lifted off the floor, raise and lower the pelvis.
Attention:
Head, torso and hips practically form a line (pelvis does not tilt backwards or forwards), keep the shoulder above the elbow. To keep the ball in place, you can lean it against a wall.
Lighten:
The upper arm also stabilises the hips (hand on the floor); support in place (without raising and lowering the pelvis).
Harden:
Additional weight (on the hips); unstable base for the supporting forearm.
1 exercise ball
1 weight vest/weight disc/sandbag ► to make the exercise more difficult (additional weight)
1 balance cushion/balance board ► to make the exercise more difficult (unstable base)
Raising and lowering the pelvis in side support (left)
Power
Individual work

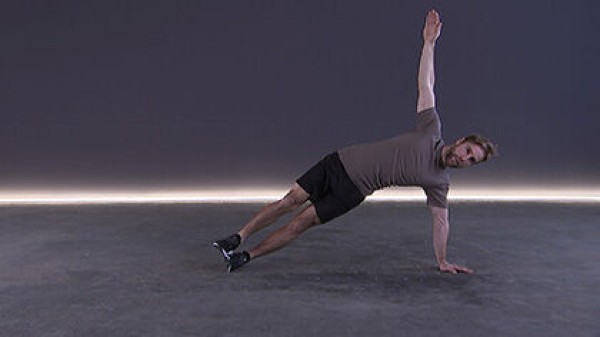
Side support with the (left) arm stretched out (possibly against a wall for the correct straight position), free (right) arm supported on the hip or held high, raise and lower the pelvis.
Attention:
Head, torso, hips and knees practically form a line (pelvis does not tilt backwards or forwards), keep the shoulder above the elbow.
Lighten:
Knees on the floor; just hold the position.
Harden:
Additional weight (on the hips); unstable support (possible for both the arm and the legs); raise and lower the upper leg as soon as the torso is raised for additional abductor training.
1 weight vest/weight disc/sandbag ► make the exercise more difficult (additional weight)
1 ball/1-2 balance cushions/1 balance board ► make the exercise more difficult (unstable surface)
Raising and lowering the pelvis in side support (left)
Power
Individual work
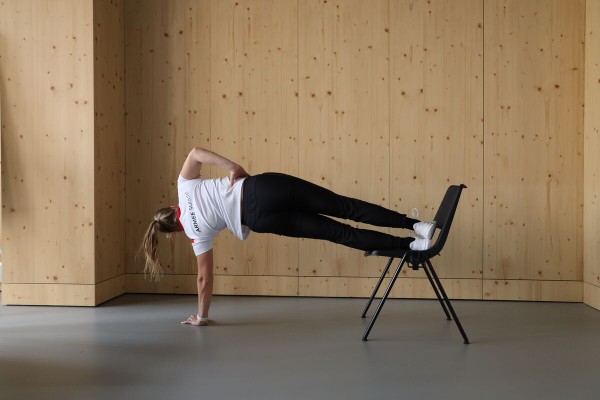
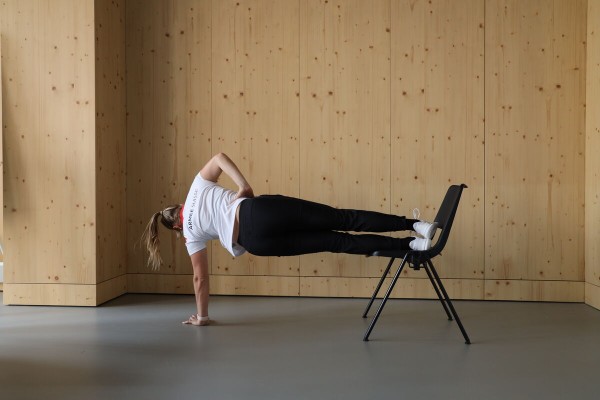
Side support, outstretched (left) arm placed on the floor, free (right) arm supported on the hip or held high, feet placed on the seat of the chair. From this position, raise and lower the pelvis.
Attention:
Head, torso, hips and knees practically form a line (pelvis does not tilt backwards or forwards), keep the shoulder above the elbow.
1 (office) chair
Raising and lowering the pelvis in side support (right)
Power
Individual work


Side support with your (right) arm stretched out (possibly against a wall for the correct straight position), free (left) arm supported on your hip or held high, raise and lower your pelvis.
Attention:
Head, torso, hips and knees practically form a line (pelvis does not tilt backwards or forwards), keep your shoulder above your elbow.
Lighten:
Knees on the floor; just hold the position.
Harden:
Additional weight (on the hips); unstable support (possible for both the arm and the legs); raise and lower the upper leg as soon as the torso is raised for additional abductor training.
1 weight vest/weight disc/sandbag ► make the exercise more difficult (additional weight)
1 ball/1-2 balance cushions/1 balance board ► make the exercise more difficult (unstable surface)
Raising and lowering the pelvis in side support (right)
Power
Individual work
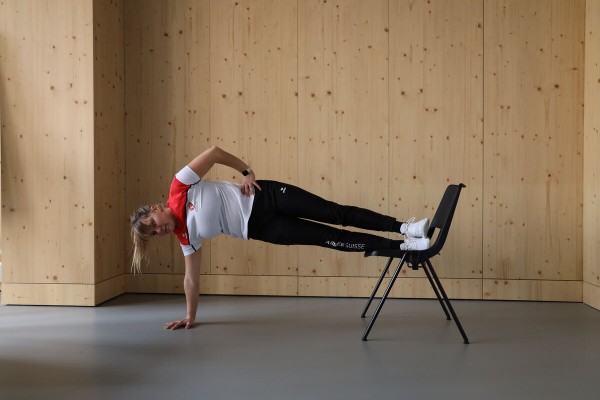

Side support, straight (right) arm placed on the floor, free (left) arm supported on the hip or held high, feet placed on the seat of the chair. From this position, raise and lower the pelvis.
Attention:
Head, torso, hips and knees practically form a line (pelvis does not tilt backwards or forwards), keep the shoulder above the elbow.
1 (office) chair
Raising and lowering the pelvis backwards in forearm support ► reverse pillar bridge
Power
Individual work


Inverted forearm support (the stretched legs and upper body practically form a line, the legs are supported on the heels and the upper body on the forearms, the face/gaze points upwards, the forearms lie flat on the floor parallel to each other, the upper arms are vertical), raise and lower the pelvis.
Attention:
Head, torso, hips and knees form a line in the starting position (do not let your buttocks sag, tense your stomach), do not hyperextend your knee joints.
Lighten:
Bend your legs slightly.
Harden:
Additional weight (on the hips); unstable support for the legs (arms probably too difficult).
1 weight vest/weight disc/sandbag ► to make the exercise more difficult (additional weight)
1 ball/balance cushion/balance board ► to make the exercise more difficult (unstable surface)
Raising and lowering the pelvis in supine position
Power
Individual work


Lying on your back, arms at your sides on the floor, hands on the soft mat (stability), legs slightly bent in a high position (feet pointing diagonally upwards), raise and lower your pelvis (including legs).
Attention:
Push your feet up as vertically as possible, trying to work without momentum.
Lighten:
Lower the pelvis.
Harden:
Additional weight for the legs.
1 soft mat (small)
2 weight cuffs/1 ball (e.g. football, volleyball/basketball) ► Make the exercise more difficult (additional weight)
Raising and lowering the pelvis in supine position
Power
Individual work


Supine position, hands clasping a rung of the wall bars at head height, legs slightly bent in a high position (feet pointing diagonally upwards), raise and lower the pelvis (including legs).
Attention:
Push your feet up as vertically as possible, trying to work without momentum.
Lighten:
Lift the pelvis less.
Harden:
Additional weight for the legs.
1 wall bars
1 soft mat (small)
2 weight cuffs/1 ball (e.g. football, volleyball, basketball) Make the exercise more difficult (additional weight)
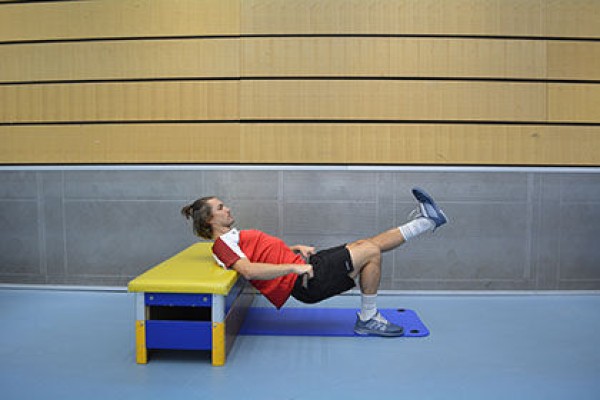
Raising and lowering the pelvis in supine position
Power
Individual work


Back position, shoulders and heels each placed on a long bench, raise and lower pelvis.
Attention:
Shoulders can be padded with a soft pad.
Lighten:
Just hold position; support execution with arms.
Harden:
Additional weight (on hips).
2 long benches
1 soft surface (e.g. fitness mat)
1 weight vest/weight disc/dumbbell/sandbag ► Make the exercise more difficult (additional weight)
Raising and lowering the pelvis in supine position
Power
Individual work


Lay on your back, place the pole against your buttocks and fix it there with your hands, your feet are in the loops, stretch both legs vertically upwards, alternately lift the right or left half of your buttocks and lower them back to the starting position.
Attention:
Push your feet upwards as vertically as possible, trying to work without momentum.
Lighten:
Choose less strong elastic bands; roll up the elastic bands less.
Harden:
Choose stronger elastic bands; roll up the elastic bands more.
Variation:
Lift both halves of the buttocks at the same time (lift the soles of the feet vertically upwards).
1 gymnastic bar with elasticated straps
Raising and lowering the pelvis in supine position ► candle / puise up
Power
Individual work


Lie on your back, arms at your sides on the floor, legs slightly bent in a high position (feet pointing diagonally upwards), raise and lower your pelvis (including legs).
Attention:
Push your feet up as vertically as possible, trying to work without momentum.
Lighten:
Lift the pelvis less.
Harden:
Additional weight for the legs.
2 weight cuffs/1 ball (e.g. football/volleyball/basketball) ► Make the exercise more difficult (additional weight)
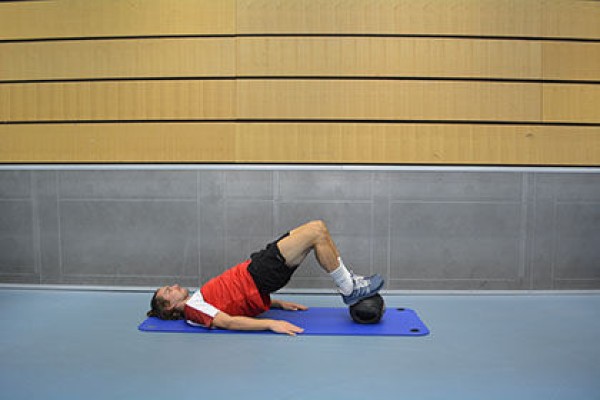
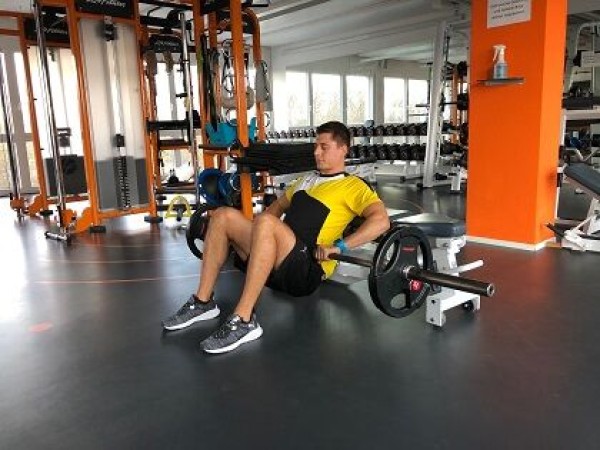
Raising and lowering the pelvis in the shoulder position (hip bridge/pelvic lift) ► glute bridge
Power
Individual work


Lie on your back, bend your knees, place your feet hip-width apart (heels close to your buttocks), and let your arms rest relaxed by your sides. Press your heels into the floor, lift your pelvis upwards until your upper body and thighs form a straight line, and consciously tighten your buttocks. Hold the final position briefly, then lower the pelvis in a controlled manner (do not lower it completely if you wish to maintain tension).
Attention:
Do not overextend the lower back (the movement should come from the back rather than the glutes), insufficient glute engagement (the hips are simply ‘thrown up’), feet too far forward or back (which adversely affects muscle activation), knees do not cave inwards, do not lower yourself without control.
Lighten:
Smaller range of motion; hold the top position for a shorter time; perform without pauses; increase support by placing your hands on the floor.
Harden:
Single-leg variation (single-leg glute bridge); weight on the hips (e.g. dumbbell or weight plate); hold the top position for longer (isometric); resistance band around the knees (additional outward tension); unstable surface; feet raised (e.g. on a bench).
Variation:
Cross one leg over the other or extend one leg in line with the upper body (Setup = 2 exercises/work both sides).
1 weight vest/weight plate/dumbbell/sandbag► Increase the difficulty of the exercise (additional weight)
1 ball/balance cushion/balance board ► Increase the difficulty of the exercise (unstable surface)
1 raised surface (e.g. box) ► Increase the difficulty of the exercise (position)
Raising and lowering the pelvis in the shoulder position (hip bridge/pelvic lift) ► glute bridge
Power
Partner work
1 trainee & 1 helper ► Note change of position
(= double the time required; for lesson planner see Organisation Kraft: Info button Execution)


Trainee: Lie on back with legs bent, arms at sides of body, raise and lower pelvis (do not lower buttocks).
Partner: Support yourself on the hips of the active participant.
Attention:
Always listen to/respond to your partner (adjust pressure/resistance). No hollow back, push knees apart.
Lighten:
Just hold the position (without lifting and lowering the pelvis), more upright position of the partner (less pressure/resistance).
Harden:
Position the partner in a more forward position (additional pressure/resistance); unstable base.
1 ball/balance board/balance cushion ► Make the exercise more difficult (unstable surface)
Raising and lowering the pelvis in the shoulder position (hip bridge/pelvic lift) ► glute bridge
Power
Individual work


Shoulder position (supine position on the shoulder blades), legs bent on the balance board (board lies in the longitudinal axis of the body), arms outstretched and held high (or supported flat on the floor at the side), raise and lower the pelvis.
Attention:
Upper body only rests on the shoulders/do not lower the upper body completely, straight back (one line from knee to shoulder), push knees outwards.
Lighten:
Just hold the position with the pelvis raised (without raising and lowering). Place one side of the balance board on the floor or perform the exercise without the balance board.
Harden:
Lateral instability of the balance board (board across the longitudinal axis of the body, instability sideways); additional weight (on the hips).
1 balance board incl. roller
1 weight vest/weight disc/dumbbell/sandbag ► to make the exercise more difficult (additional weight)
Raising and lowering the pelvis in the shoulder position (hip bridge/pelvic lift) ► glute bridge
Power
Individual work


Shoulder position with legs bent and feet up. The arms hold the weight on the hips. Raise and lower the pelvis in this position.
Attention:
Upper body only rests on the shoulders, do not lower the upper body/pelvis completely.
Lighten:
Lift the pelvis less; only hold the position.
Harden:
Stable support for the legs.
Variation:
Place one leg over the other or stretch one leg out in extension of the upper body (organisation = 2 exercises/train both sides).
1 dumbbell/kettlebell/weight disc/sandbag
1 ball/balance cushion/balance board ► Make the exercise more difficult (unstable surface)
Raising and lowering the pelvis in the shoulder position (hip bridge/pelvic lift) ► glute bridge
Power
Individual work

Shoulder position, arms flat on the floor and stretched out away from the body, gaze upwards, heels on the medicine ball/helmet and pelvis lifted off the floor until legs and torso form a straight line. In this position, only the back of the shoulders, head and arms touch the floor. The pelvis is lowered and lifted back to the starting position, whereby the body remains extremely tense throughout the movement. Hold the starting position briefly before starting the next repetition.
Attention:
Do not lower your body completely.
Lighten:
Lower your upper body completely after each repetition (supine position).
Harden:
Add weight (on the hips).
Variant:
Perform the exercise on one leg, intensifying the exercise considerably. The leg can either be bent and placed on the supporting leg or held in an outstretched position (organisation = 2 exercises; train both sides)
1 medicine ball/helmet
1 weight disc/sandbag ► Make the exercise more difficult (additional weight)
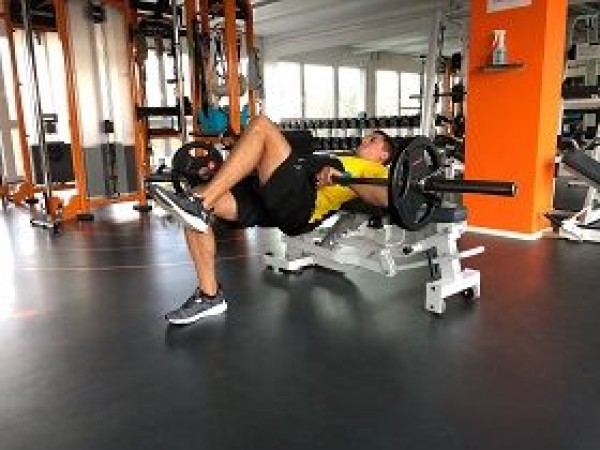
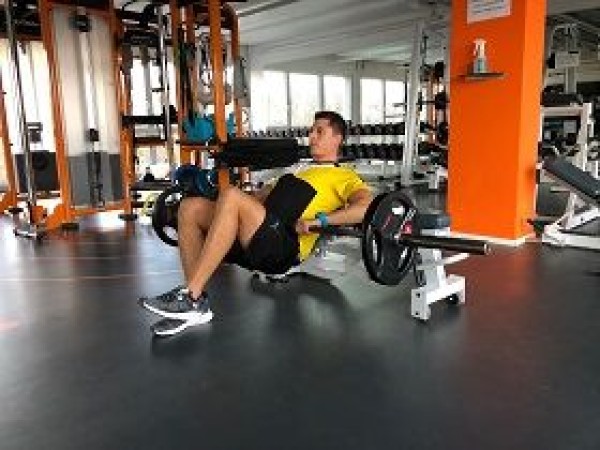
Raising and lowering the pelvis in the shoulder position (hip extension) ► hip thrust
Power
Individual work
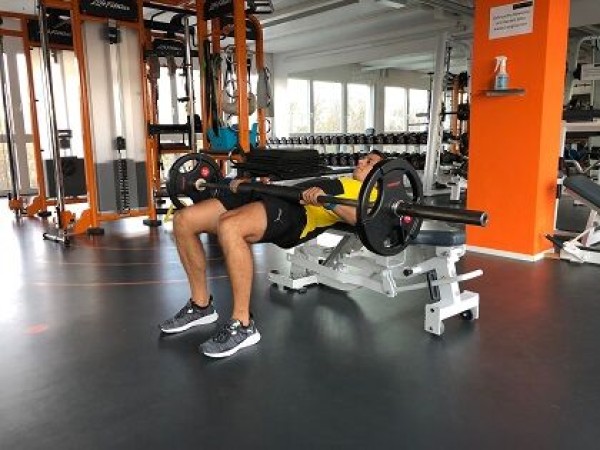
Lying on your back, rest your shoulders on the (flat) bench, keep your hips in the air with your legs bent, place the barbell on your hips and hold it with your hands in an overhand grip, lower your buttocks in this position and press back down firmly to the starting position.
Starting position:
- Lie on your back on the flat bench (only place your shoulders on the bench)
- Legs bent, feet on the floor
- Hips in the air (buttocks pressed upwards - a line from head to knee), barbell on the hips
- Head in line with the back (slight double chin)
Finishing position:
- Buttocks lowered
Attention:
Always keep your head in line with your back (slight double chin) and your core muscles under tension.
1 flat bench/swinging box
1 barbell
Raising and lowering the pelvis in shoulder position (hip extension) one-legged (left) ► hip thrust 1-leg
Power
Individual work
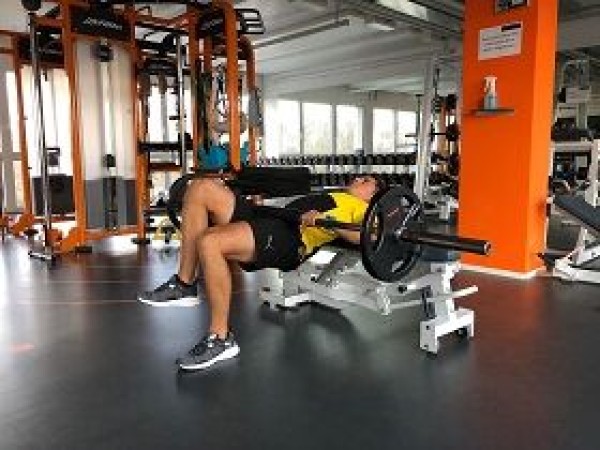
Lying on your back, rest your shoulders on the (flat) bench, keep your hips in the air with one leg bent on the floor (left) and one leg raised (right), place the barbell on your hips and hold it with your hands in an overhand grip, lower your buttocks in this position and press firmly back to the starting position.
Starting position:
- Lying on your back on the flat bench (only place your shoulders on the bench)
- One leg bent on the floor, one leg held high
- Hips in the air (buttocks pressed upwards - a line from head to knee), barbell on the hips
- Head in line with the back (slight double chin)
Finishing position:
- Buttocks lowered
Attention:
Always keep your head in line with your back (slight double chin) and your core muscles under tension.
1 flat bench/swinging box
1 barbell
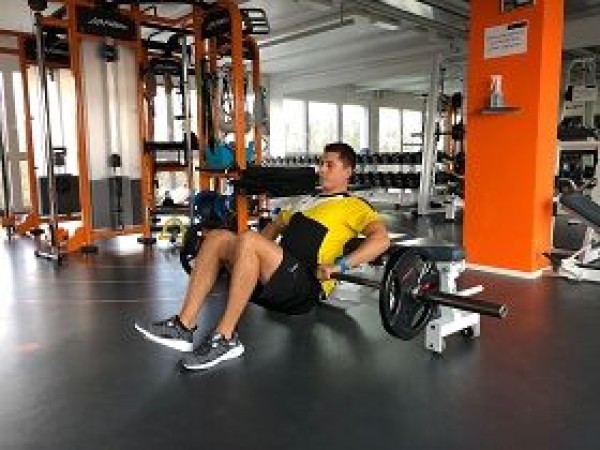
Raising and lowering the pelvis in shoulder position (hip extension) one-legged (right) ► hip thrust 1-leg
Power
Individual work

Lying on your back, rest your shoulders on the (flat) bench, keep your hips in the air with one leg bent on the floor (right) and one leg raised (left), place the barbell on your hips and hold it with your hands in an overhand grip, lower your buttocks in this position and press firmly back to the starting position.
Starting position:
- Lying on your back on the flat bench (only place your shoulders on the bench)
- One leg bent on the floor, one leg held high
- Hips in the air (buttocks pressed upwards - a line from head to knee), barbell on the hips
- Head in line with the back (slight double chin)
Finishing position:
- Buttocks lowered
Attention:
Always keep your head in line with your back (slight double chin) and your core muscles under tension.
1 flat bench/swinging box
1 barbell
Raising and lowering the pelvis in the shoulder position ► hip thrust
Power
Individual work


Shoulders and head rest on the exercise ball, legs bent, feet flat on the floor, arms stretched out and held high, buttocks raised and lowered.
Lighten:
Arms crossed on the chest or supported on the hips, just hold the position with the pelvis raised (without raising and lowering the buttocks).
Harden:
Additional weight (on the hips); unstable support for the legs.
1 exercise ball
1 weight disc/dumbbell/sandbag ► to make the exercise more difficult (additional weight)
1 ball/balance board/balance cushion ► to make the exercise more difficult (unstable surface)
Alternating raising and lowering of the pelvis in the shoulder position (hip bridge/pelvic lift) ► glute bridge
Power
Individual work
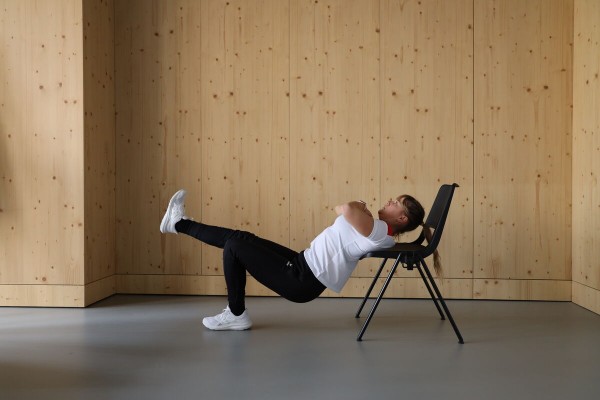

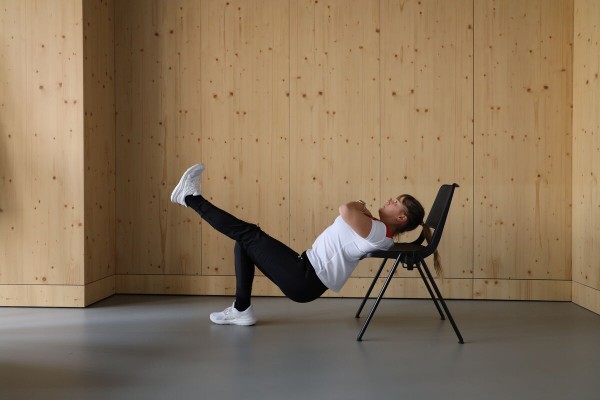
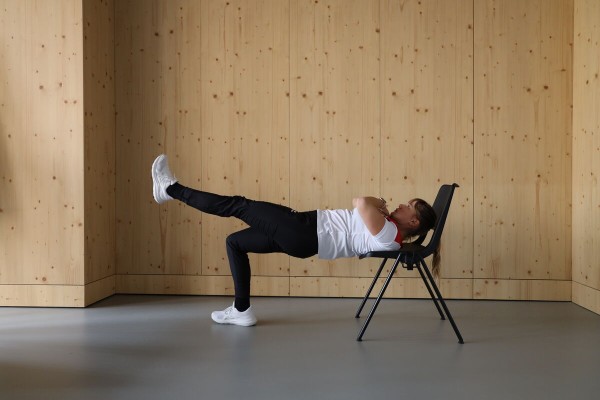
Position your shoulders with your upper back on the edge of the seat of the chair, your legs bent with your feet on the floor (heel below the knee) and your arms crossed over your chest. From this position, lift one leg and stretch it out approximately horizontally to the floor (the thighs of the legs are parallel to each other), now lower the pelvis and raise it again. Finally, return the free leg to the starting position (put your foot down). Switch sides after each exercise.
Attention:
The upper body and thighs practically form a line in the starting position, keep the pelvis parallel to the floor (do not let it hang sideways).
1 (office) chair (without castors)
Raising and lowering the pelvis in the shoulder position on one leg (left) (hip bridge/pelvic lift) ► glute bridge
Power
Partner work

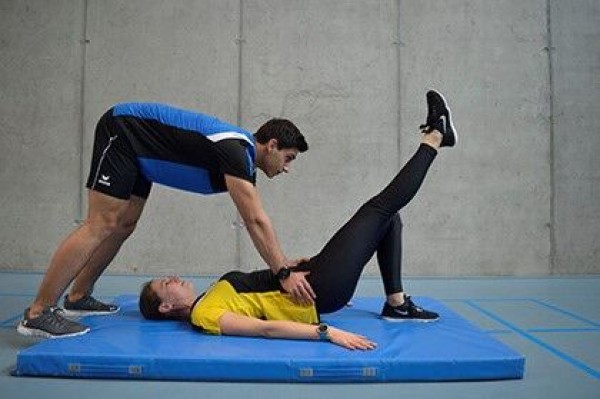
Trainee: Supine position, one leg bent and raised on the floor, the other (right) leg stretched out and raised, arms at the side of the body, raise and lower the pelvis (do not lower the buttocks).
Partner: Support yourself on the hips of the active participant.
Attention:
Always listen to/respond to your partner (adjust pressure/resistance). No hollow back, push knees apart.
Lighten:
Just hold the position (without raising and lowering the pelvis), more upright stance of the partner (less pressure/resistance).
Harden:
Position the partner more forward (additional pressure/resistance); unstable base for the supporting leg.
1 ball/balance cushion/balance board ► Make the exercise more difficult (unstable surface)