Exercises (2330)
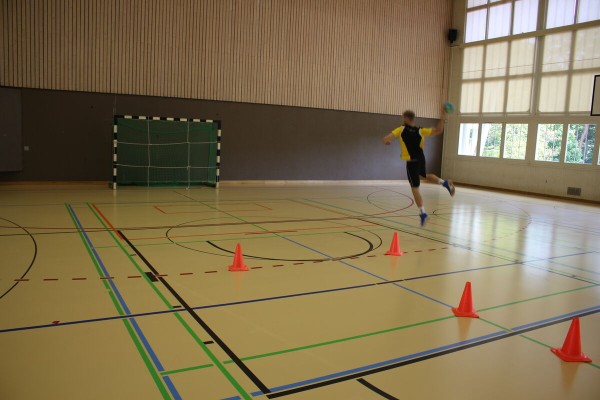
Slalom
Coordination exercises
Individual work

The participants run a slalom between marker cones/caps while bouncing two different balls simultaneously.
Variant:
Bounce both balls simultaneously or alternately (change rhythm).
► Rhythmisation ability, differentiation ability
8-10 marker cones/caps
2 various balls (e.g. basketball, football, volleyball, tennis ball, handball, foam ball)
Post set-up:
Set up a slalom with marker cones (cones/caps offset sideways).
Slalom with finish
Coordination exercises
Individual work

The participant guides a futsal/football in a slalom around the marking cones, sometimes starting on the right, sometimes on the left. At the height of the last cone, the participants shoot at the goal and try to hit the various zones in the goal, which are divided by ropes. Make sure to dribble and shoot with both the stronger and weaker foot.
► Differentiation skills, orientation skills
1 (handball) goal
6 ropes
4-8 marking cones/caps/painting sticks
1 futsal/football
Post set-up:
Set up a slalom towards the (handball) goal using marking cones. The last marker is approx. 7 metres in front of the goal. Divide the goal into several zones with ropes.
Slalom with finish
Coordination exercises
Individual work
The participant bounces a handball in a slalom around the marking cones, sometimes starting on the right, sometimes on the left. At the height of the last cone, the participant throws at the goal and tries to hit the various zones in the goal, which are divided by ropes. Make sure to dribble and throw with both the stronger and weaker hand.
► Differentiation ability, rhythmisation ability, orientation ability
1 handball goal
6 ropes
4-8 marking cones/caps/painting sticks
1 handball
Post set-up:
Set up a slalom towards the (handball) goal using marking cones. The last marker is approx. 7 metres in front of the goal. Divide the goal into several zones with ropes.
Slalom with finish
Coordination exercises
Individual work
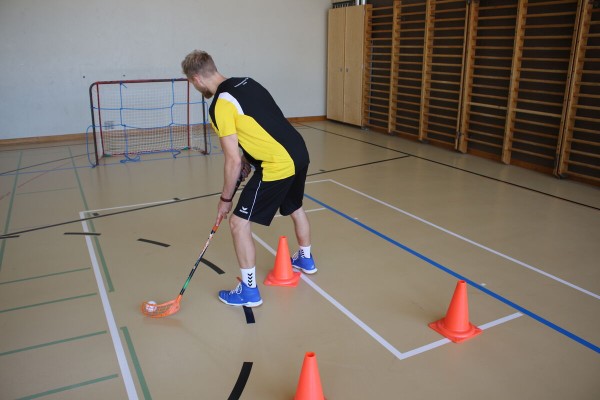
The participant dribbles a floorball with a stick in a slalom around the marking cones, sometimes starting on the right, sometimes on the left. At the height of the last cone, the participant shoots at the goal and tries to hit the various zones in the goal, which are divided by ropes.
► Differentiation ability, orientation ability
1 floorball goal
6 ropes
4-8 marking cones/caps/painting sticks
1 floorball stick
1 floorball ball
Post set-up:
Set up a slalom towards the floorball goal using marking cones. The last marker is approx. 7 metres in front of the goal. Divide the goal into several zones with ropes.
Slalom with basketball
Coordination exercises
Individual work
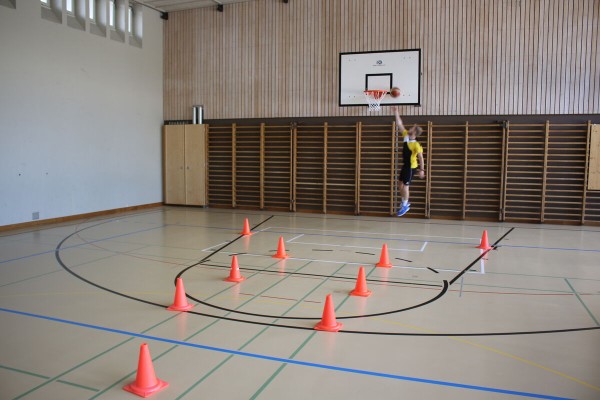
Bounce a basketball in a slalom around the marking cones, starting on the right and then on the left - on the right side you bounce with your right hand, on the left side with your left hand. When you reach the last cone, you finish with a basket shot (be careful: correct "jam-ta-tam" rhythm). Coming from the right side, you throw with your right hand - coming from the left side, you throw with your left hand.
►Differentiation ability, rhythmisation ability
1 basketball hoop
4-8 marker cones
2 basketballs
Post set-up:
Set up a slalom with the marker cones (cones offset sideways). The last cone is between the basket and the free-throw line
.
Smolball
Games / Tournament
Game idea:
Two teams with several outfield players and a goalkeeper play the softball into the opponent's goal by attacking skilfully. Good defensive behaviour should prevent the opponent from scoring goals.
Scoring:
A goal is scored when the ball completely crosses the goal line.
Playing field:
Smolball field (22mx36m). Two goals with a goal area (2mx5m).
The entire hall is used as a playing field (hall walls are part of the playing field). In the field, side and base lines delimit the playing field.
Number of participants:
4 against 4 (3 field players plus goalkeeper)
Game rules:
The game begins with a bouncing ball in the centre of the field. One player from each team touches the centre with the tip of their stick. By throwing up the cue ball, the referee releases the game.
The following 4-man rules apply to smolball:
- The ball, which is balanced on the racket, may be carried a maximum of 4 steps and must then be passed immediately.
- The ball may be touched a maximum of 4 times before it is passed on.
- The ball may be touched a maximum of 4 times before it is played on (picking up the ball from the ground does not count as touching the ball).
- The ball at rest on the racket, without the player moving, may be held for a maximum of 4 seconds.
- The ball may not be covered with the racket or the body, but must be played on immediately. If the ball is on the ground, it may only be picked up from the ground with the racket without touching any part of the body and played on. It is not permitted to actively play the ball with the foot, lower leg, hand, arm or head.
Stick shots, body shots, attacks from behind, active body contact and playing the ball against the ceiling result in a free hit for the opposing team. The free hit is taken indirectly at the place of the offence, whereby the opponent must keep a distance of 4m. Exceptions to this rule are offences committed behind the goal and in the goal area. In these cases, the free shot is taken from the front corner of the goal area. If a goal-scoring opportunity is prevented by a violation of the rules, the fouled player is awarded a penalty (direct shot from a distance of 4m; the goalkeeper stands with both feet on the goal line; the field players stand 4m behind the penalty taker).
If Smolball is played on an outdoor pitch, the boundary of the pitch plays an additional role. If the ball leaves the field of play, it is brought back into play by a free hit by the opposing team at the place of the incident.
Smolball: Carousel
Forms of play / exercises
Group work
Simple standard pass and shot exercise: The players stand in both corners next to the goal. The foremost player runs in a high arc into the centre in front of the goal (around the marker stick). There he receives the ball from the other side and shoots (at the height of the two cones). The passer runs up next and shoots at the goal.
Variations:
- Shooting at the empty goal or whoever has shot then stands in the goal themselves.
- The sports leader can demand different types of shots (direct shots are also possible).
Per group:
1 floorball goal
x Smolballs
4 cones
1 colouring stick
Per participant:
1 Smolball stick
Smolball: slalom and goal kick
Forms of play / exercises
Group work
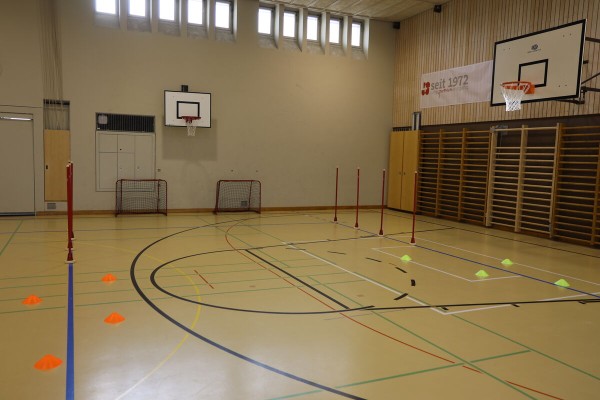
The participants run through a slalom course consisting of stakes juggling with the ball on the stick, before placing the ball on the ground and dribbling it with the stick through a slalom course marked with marker cones. Once the ball reaches a defined line, a shot on goal is taken from there.
Additional strengthening task:
If you don't hit the goal, complete a strength exercise: 10x trunk bend (sit up)
2 (small/medium) goals
2-4 smolball bats (depending on the number of participants)
2-4 smolball balls (depending on the number of participants)
8 stakes
8 marker cones
Smolball: Czech square
Forms of play / exercises
Group work

3 to 4 players form a triangle or a square in a confined space (markings). An additional player goes into the centre. The outside players now pass to the centre player one after the other. The centre player passes the ball directly to the next player. The centre player decides which player to pass to.
Variations:
- The outfield players immediately take the position of the player in the middle after passing the ball.
- An additional ball is brought into play.
- Outfield players can also pass to outfield players.
- Outfield players only pass to outfield players. The player in the centre must try to touch the ball. The outfield player who last touched the ball must swap positions in the centre.
Per participant:
1 smolball bat
Per group:
1 smolball ball
Smolball: Wimbledon
Forms of play / exercises
Player against player

The players face each other like in a tennis match. A line, a net or a long bench (wide side down) serves as a boundary in the centre of the court. The playing area is defined by markings or by mutual agreement (e.g. badminton markings). The game is played according to the rules of tennis, starting from the bottom behind the baseline. A game lasts 5 to 10 minutes, after which the players switch clockwise.
This game organisation enables movement-intensive lessons with a focus on promoting playing skills in heterogeneous classes.
Variants:
- The rules are determined by mutual agreement between the opponents. Each pairing can set different rules for their game.
- Different "nets" are set up (Swedish box, long bench, badminton net, rope, etc.).
- Doubles are played.
- Different balls are used (smolball, tennis ball, table tennis ball).
- After the pass, turn around your own body axis and reorient yourself.
- The game form can also be used as a form of practice for passing (forehand / backhand; long / short passes; receiving the ball, etc.)
Per team:
1 smolball racket
Pitch:
1 long bench / vaulting box / mini tennis net
1 smolball ball
Sparring
Light-Contact
Group work
Groups of 3


Sparring in a three-man team: two boxers and a referee. After a while, the roles are switched.
Participant:
1 pair of boxing gloves
Sparring
Light-Contact
Partner work


Sparring between two participants, with one always taking the role of the attacker and the other the defender. In the next round, the roles are swapped. The attacker makes sure to constantly cut the defender's path (shorten the path) so that he can immediately move on to the next attack. The defender, for his part, tries to evade the attacker by moving in the shape of a banana.
Participant:
1 pair of boxing gloves
Sparring with restrictions
Light-Contact
Partner work

Sparring with restrictions, e.g. both boxers only use the lead hand.
Participant:
1 pair of boxing gloves
Speedminton
Games / Tournament
Game idea:
Two parties try to score a direct point by skilfully hitting the speeder or to force a mistake by the opposing party.
Scoring:
A point is scored if the speeder lands in the opposing field or the opposing party cannot return the speeder in accordance with the rules.
Playing field:
In singles (1 vs. 1), the playing field consists of two square courts (5.5m x 5.5m) that are set up 12.80m apart (corresponds to a tennis court divided lengthwise).
For doubles (2 against 2), the court widths are doubled (11m x 5.5m), which corresponds to the size of a tennis court.
There is no net
Number of participants:
1 against 1 (singles), 2 against 2 (doubles)
Rules of the game:
A match is played over three winning sets. A set ends with 16 winning points. At 15:15, the set goes into extra time until one of the players has a 2-point lead. After each set, the side is changed to ensure equal opportunities (wind and light conditions). If it comes to a fifth set (deciding set), the sides are switched as soon as one player has reached 8 points.
The right to serve and the choice of side is decided by drawing lots. Each player has 3 serves in a row. Each party can score regardless of the right to serve. If the score is tied at 15:15, the right to serve changes after each point. The service is executed either from the centre of the court or from behind the baseline. When serving, the speeder is dropped from hip height in front of the body and then hit. Overhead serves from a standing or jumping position are only permitted from the back baseline. The first serve of the following set goes to the loser of the previous set.
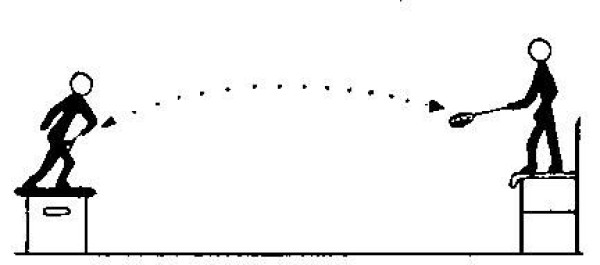
Speedminton: Conscious stroke execution
Forms of play / exercises
Groups of 2

Passing game in teams of two; during the passes, the partner is asked for the type of shot, but before the speeder has crossed the centre zone (e.g. forehand, backhand, overhead, hand change or rotation on its own axis).
Per participant:
1 speedminton racket
Per group:
1 speeder
Speedminton: Accuracy
Forms of play / exercises
Groups of 2
Passing game in teams of two; both players stand so that they have little freedom of movement (e.g. on a long bench, a vaulting box or in a hoop).
Variant:
Only one player has limited freedom of movement.
Per participant:
1 speedminton racket
Per team:
1 speeder
2 length benches / vaulting box
Speedminton: Skill
Forms of play / exercises
Groups of 2
Passing game in teams of two; every third or fifth touch of the ball, the speeder should be caught and stopped by the player
.Per participant:
1 speedminton racket
Per group:
1 speeder
Speedminton: controlled hitting and stopping
Forms of play / exercises
Groups of 2

Passing game in teams of two; before hitting back, however, the speeder is played vertically upwards and only then hit back again.
Per participant:
1 speedminton racket
Per group:
1 speeder
Speedminton: Circle game
Forms of play / exercises
Group work
6-8 participants form a circle. The game is played with a speeder, which should stay in the air as long as possible.
Variant:
Multiple speeder.
Per participant:
1 speedminton racket
Per group:
1 speeder
Speedminton: Marathonspiel
Forms of play / exercises
Groups of 2
Two players pass the speeder to each other as often as possible in a given time and count the passes. All pairs have the same distance to each other. The pair with the highest number of passes wins the game.
Per participant:
1 speedminton racket
Per team:
1 speeder
Speedminton: Round robin
Forms of play / exercises
Group work
Several speedminton courts are laid out. 4-10 players play on each court, evenly distributed over both halves of the court. The foremost players on both sides are in the court and play the speeder to each other. The remaining players wait in single file behind the playing field until it is their turn. After each shot, the respective player runs to the opposite side, lines up at the back and waits for their next shot. The player at the front of the column becomes the new batter. If a player makes a mistake (hit into the outfield or speeder falls to the ground in their own court), they are eliminated from the game. The last 2 players play a final game to 3 points.
Variant:
Ejected players have the chance to return to the game by the player who threw them out (i.e. last speeder touch before the error) being eliminated in turn.
Per team:
1 speedminton racket
Pitch:
1 speeder
Speedminton: Change hands
Forms of play / exercises
Groups of 2
Passing game in teams of two; change of hands after each shot. Who makes fewer mistakes?
Per participant:
1 speedminton racket
Per group:
1 speeder
Speedminton: Game
Forms of play / exercises
Group work
Single game for a certain number of points (e.g. 10). If the group size is uneven (e.g. 3 participants), one player enjoys a break, whereby the duration of the game is reduced (e.g. 7 points) so that waiting times are shortened.
Additional task Strengthening:
After each game, the loser completes a strength exercise: 5x push-ups
2 speedminton rackets
1 speedminton shuttle
8 marker cones
Speedminton: Staffellauf
Forms of play / exercises
Teamwork
Pendulum relay with several teams (participants of the teams are evenly distributed on markers approx. 20 metres apart). Each team has a bat and a speeder. The first runner from each team must balance the speeder with the bat to the other side and hand the bat and speeder to the next runner. If the speeder falls down, it must be picked up and placed back on the bat. Each player completes two runs (i.e. the players are in the same position at the end as at the beginning).
Variant:
The players must hit the speeder into the air at least 10 times during the race.
Per participant:
1 speedminton racket
Per team:
1 speeder
Speedminton: Exercises for beginners
Forms of play / exercises
Individual work

Juggle speeder in various positions (smooth transitions):
- standing
- walking
- sitting
- on your stomach
- on your back
- running
- walking backwards, etc.
Per participant:
1 speedminton racket
1 speeder