
Exercises (660)
Info: forms of endurance
Introduction/Info
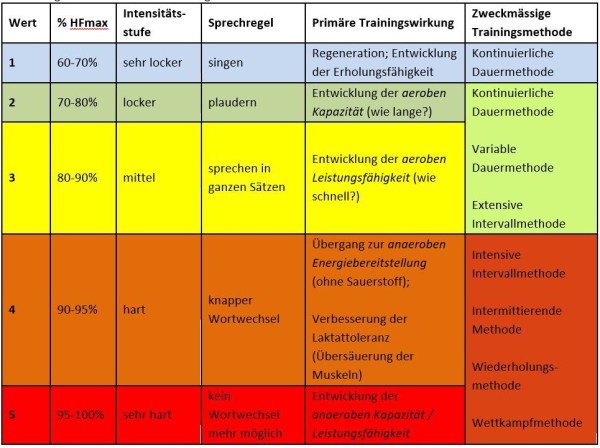
Introduction to running with the help of the table on the forms of endurance:
(see appendix/graphic)
Depending on the desired training effect, different intensity levels can be used in endurance training. Various training methods are used for this purpose.
1 poster with the endurance forms
Info: Principles of running training
Introduction/Info
Breathing:
Regular natural breathing in rhythm with the running movement improves cardiovascular activity (endurance). Please note:
- The body regulates its oxygen requirements automatically. Breathing adapts automatically to the walking rhythm. During exertion, the body gets the air it needs by breathing faster. A "forced" breathing rhythm should therefore be avoided.
- Breathe in through the nose and out through the mouth.
- Pay particular attention to deep, complete exhalation. This ensures improved exhalation of carbon dioxide (abdominal breathing).
Overexertion:
Overexertion should be avoided at all costs. It is important to interpret the body's signals correctly and deal with them. Never run faster than an increase in performance of at least 10% is possible at any time. A good training effect is achieved if you train regularly (e.g. 3-4 x 30 minutes per week). Only one, longer training session per week is less recommended, as it could lead to overexertion and have a counterproductive effect.
Pulse control:
The following rule of thumb applies to the normal amateur athlete:
Training pulse = 220 minus age, 70-85% of which (= pulse target zone)
So, for example, a runner with a pulse of 20 years must train with a pulse of at least 220.For example, a runner aged 20 who wants to improve their fitness level must train between 140 and 170 heart rate beats.
To check endurance capacity, the difference between the training heart rate and the recovery heart rate (immediately two minutes after the end of training) should be measured. Differences of 60 or more beats indicate a very good level of endurance. Note: "The higher the performance heart rate, the greater the difference in heart rate should be".
Side stitch:
Side stitch is not a disease. Occasionally, you feel a stitch-like discomfort on the left or right side of the abdominal area just a few minutes after starting to run. The actual causes of this common phenomenon are still not exactly known. Some studies suggest that this may be a purely mechanical cause. The connective tissue that supports the abdominal organs is under much greater strain after a meal. Physical activity at this time can cause small tissue tears and bleeding. Other explanations include insufficient oxygen supply to the diaphragm or pain caused by blood redistribution in the spleen or liver.
Possible measures to prevent side stitches may include:
- Training the abdominal muscles; weak abdominal muscles increase the risk of side stitches.
- No solid food intake (1-2 hours) before training or competition. Liquid food (non-carbonated) or very easily digestible food is recommended.
Possible measures for side stitches:
- Interrupt training and press inhaled air into the lungs for 5-10 seconds in a crouching position (repeat the process several times).
- Continue running at a reduced pace and change your breathing rhythm until the pain has disappeared.
1 flipchart with the principles of running training (optional)
Info: Running style analysis
Introduction/Info
Running style analysis:
With sport, you don't necessarily live longer, but you do feel young and fit for longer. Sport should ultimately help to improve quality of life and successfully counteract the millennial problem of "lack of exercise".
Running is one of the most popular sports in Switzerland. More than 500 fun runs are organised every year and the number of participants is constantly increasing.
Although a small child masters its first attempts at walking at around one year of age, running must be learned. Every person walks as individually as they look. The muscles, tendons and ligaments have become accustomed to the individual running load over the years. A change in running style takes a lot of time, as ligaments and tendons adapt to a new load situation much more slowly than the muscles. Biomechanists therefore do not recommend one-sided running that only focusses on one running style. It is important to vary the running style and adapt it to the running pace and terrain. Varying your running style can prevent annoying overloads.
Firstly, a running style analysis differentiates between the area of the foot that first makes contact with the ground. A basic distinction can be made between heel, midfoot and forefoot running. From a biomechanical perspective, all three running style techniques have both advantages and disadvantages.
The rearfoot runner:
Rearfoot running (heel running) is the most common form of running style for longer endurance activities. In this running style, the runner touches down on the outer edge of the heel. The orthopaedic load is higher than with forefoot running (bunion running) due to the force transmission of the joints. The spring effect is lower. Running shoes compensate for this by increasing the cushioning behaviour in the heel area. This results in a rolling behaviour over the midfoot and an impact from the ball of the foot. The rolling behaviour usually involves a slight inward rotation (pronation) of the foot. This running style is an energy-saving running style.
The metatarsal runner:
This running style involves an overstrike over the entire outer edge of the foot. It is a kind of compromise between the forefoot runner and the heel runner. The rolling behaviour is lower compared to the heel runner. The footprint is made by the ball of the foot. The risk of overpronation is particularly high, but the strain on the joints is less than with rearfoot runners. This style is becoming increasingly popular. Its advantage lies in the fact that the impact load on the midfoot is the lowest. This reduces the susceptibility of the Achilles tendon, ankle, knee and hip joints to injury.
The forefoot runner:
The forefoot runner usually strikes with the toes and balls of the foot when running. The impact hardness is higher than the normal rolling behaviour of the foot. However, the spring effect is increased. Running on the forefoot enables high running speeds and is therefore used by sprinters and mountain runners. The strain on the calf muscles and Achilles tendon is particularly high. As the entire foot is not rolled over, the risk of overpronation is very low. This running style alone is not suitable for continuous strain.
-> running style techniques demonstrated by the sports director
-> optional: imitation by participants; complete a short distance (adjust time required)
Another way of analysing running style is to look at the foot after it leaves the ground (footprint phase). A distinction is made between normal pronators, overpronators or supinators (underpronators):
Normal pronation:
Pronation (outward rotation) corresponds to the healthy anatomy of the foot when jogging. The foot touches down on the outer edge of the heel or midfoot. The foot strikes over the inside of the ball of the foot. In pronation, the outer edge of the foot lifts up.
Overpronation:
In overpronation, the inner edge of the foot bends too much towards the inside. Overpronation can have several causes. (Foot misalignment, weak ligaments, beginner runners). Overpronation can be recognised by increased wear on the inside of the shoe. Rearfoot runners in particular tend to overpronate. The consequences of overpronation are increased strain on the joint apparatus in the ankle. Overpronation can be corrected with orthopaedic insoles or reinforced shoes.
Supination:
Supination is the opposite movement of pronation and can be recognised by increased wear on the outside of the shoe in the front area. When leaving the ground, the foot is positioned towards the inside. The lack of cushioning often results in damage to the ligaments and bones in the ankle joint. Sufficiently cushioned or reinforced shoes should be used as well as orthopaedic insoles.
-> Footprint phases shown by the sports director
-> Shoe check of the participants; are the inner or outer sides more stressed?
-> Note: free running style analyses in most sports shops and assistance in choosing the right shoes (reinforced shoes)
The running style is often neglected during training. An individually customised and correct running style helps to prevent injuries and overloading and also helps to make the running style more economical. The nodal points of the running movement can be individually analysed by means of observation or videos. Deficits and errors can be communicated and corrected with suitable exercises. This allows you to organise your running style economically, efficiently and, above all, injury-free in the long term. Typical running technique errors include:
Overcrossing
Overcrossing is when the foot crosses over the centre line of the body during the running movement. This is often associated with tilting of the pelvis.
- Causes: Functional leg length discrepancy, muscular imbalance.
- Problems: Overpronation, forefoot supination.
- Measures: Stretch adductors, strengthen abductors, coordination and stability exercises, conscious running style corrections.
Circumduction
In a circumduction, the foot is guided forwards from the outside ("duck walk") after the kick. This results in a gyrating movement.
- Cause: insufficient knee lift, low hip extension in the push-off, insufficient lifting of the lower leg in the swing phase.
- Problems: unphysiological knee movement with rotation, inefficient and uneconomical running movement.
- Measures: Strengthening the hip flexor and posterior thigh muscles, coordination training, running ABC.
Diminished hip extension
Diminished hip extension is observed in many runners. The extension is often achieved by tilting the pelvis forwards (hollow back). Insufficient hip extension usually also leads to poor knee joint extension.
- Cause: Muscular imbalances, poor running technique.
- Problems: Back problem (lumbar spine), patella overload with insufficient knee extension.
- Measures: Stretching the anterior thigh muscle and hip flexor, strengthening the buttocks, posterior thigh muscles and abdominal muscles, running ABC.
Insufficient knee extension
Insufficient knee extension in the push-off phase is often associated with excessive sinking in the hip and knee joint in the support phase.
- Cause: Shortening of the thigh and hip muscles causes insufficient hip extension. Insufficient strength of the hip extensors and posterior thigh muscles.
- Problems: Jumper's knee, long-term patella arthrosis, poor efficiency due to shortened stride length.
- Measures: Targeted stretching, training running style, running ABC.
-> error patterns demonstrated by the sports director
-> in future, the sports director should observe the participants during running exercises and point out error patterns
-> participants should also be sensitised to mutual corrections/tips among themselves in order to achieve progress
1 flipchart with the most important keywords for the running style analysis and possibly pictures (optional)
Info: running training
Introduction/Info
Your natural running style depends on your individual physique and statics. If you train regularly, you will certainly want to optimise your personal running style at some point. This not only allows you to run faster and longer with less effort, but also reduces the risk of overuse injuries.
If you've ever observed other runners, you've probably noticed that there are more beautiful (aesthetic) and less beautiful running styles. Running errors, unsuitable running shoes, cramped arms that swing back and forth in front of the body, hollow crosses, strides that are too long - all of these can have a negative impact on your running style and use up too much energy that you would actually like to use for running.
You can influence around 90% of your performance with endurance training and 10% with technique training.
Strong muscles are a good preventative measure against poor posture, slipped discs and back pain. Weak pelvic and core muscles also have a negative effect on running posture and running style. You can pay attention to the following points during running training:
Look about 10 metres ahead at the ground to relieve the strain on your neck muscles and run more relaxed.
The "control" of your body starts in your head! Keep your head upright but make sure your cervical spine is in a relaxed position.
The arms swing loosely back and forth in the direction you are running.
The hands are relaxed and hardly move at all. The thumb rests loosely on the index finger, the back of the hand points outwards.
The forearm and upper arm form almost a right angle.
The thigh swings forwards in the front swing phase until the ankle is approximately vertically below the kneecap.
The foot touches down slightly in front of the body axis. The footprint is active and directed backwards. The knees and hips are fully extended during the push-off.
The heel swings to the height of the knee or above (depending on the running speed) during the back swing phase.
The upper body is erect, almost stretched, so that the spine is relieved and can swing in a relaxed manner above the body's centre of gravity. This allows you to lengthen your stride by up to 2 cm!
With a fluid running style, the centre of gravity moves up and down only slightly. This saves a lot of energy!
Beginners often sit with their pelvis tilted backwards. The pelvis should be tilted slightly forwards. This automatically straightens the upper body.
Sometimes a mental image helps to make the movement more fluid: imagine that you are being moved like a marionette. Invisible strings are attached to the head and torso, which carry out the movements and keep the body upright.
-> complete medium distance: Demonstration / imitation / mutual observation / correction
-> if available, shift to a slightly sloping/rising terrain (hill/wall)
Running technique when running downhill / uphill
If you have to run downhill, this is where the greatest strain occurs. Reduce your speed when running downhill (even if it could be quite fast right now!). The upper body should be slightly tilted back.
When running uphill, lean your upper body forwards a little more than if you were running straight ahead. Make sure you take short steps with a more intense impact and let your arms swing vigorously.
That's a bit of a lot of points to remember, you might be thinking?
The best thing to do is to set yourself a small goal for each run. For example: "I'll make sure that my foot touches down just before the centre of my body."
Note (possible repetition according to the motto: constant dripping wears away the stone):
It would be even better to have a running style analysis carried out by a specialist. Practically all sports equipment shops now do this and help you choose the right shoes. However, progress can also be made here with the help of fellow runners (observations and tips).
You can also improve your running style with a regular strength training and stretching programme. Balancing exercises, optimal leg stretching and a regular running ABC programme are also very good.
1 flipchart with instructions for running training (optional)
Info: Light contact
Introduction/Info
The technical elements are demonstrated practically by the instructor.
Ideally, the participants follow the movements immediately (demonstration - imitation).
- Light contact boxing is a variant of boxing in which no strong punches are allowed and the opponent may only be touched.
- Basic rules:
- Handshake: before and after duels, apology after a blow that is too hard, expression of respect towards the opponent.
- Commands: "Box" (release the ring); "Stop/Break" (interruption of the fight).
- Boxing position:
- Position of the legs: Feet shoulder-width apart; body weight distributed on both balls of the feet; foot slightly set back on the side of the stronger hand; heel of front foot = toe of back foot.
- Position of the upper body: punching hand at the side of the cheek; leading hand at eye level approx. 10-20cm in front of the head; back of the hand pointing outwards; shoulder girdle slightly raised and brought forwards ("tighten rucksack").
- Continued movement:
- Sliding in stride: Push off with the foot standing behind in the direction of movement; offset front foot 10-15cm; movement dynamically gliding over the ground; flat jumps possible.
- Diagonal gait: Simultaneous strike and step leads to twisting of the hips (e.g. Step with left leg forwards & punch with right fist; step with right leg backwards & punch with right fist)
- Passing gait: no twisting with simultaneous step and punch (e.g. step with left leg forwards & punch with left fist; step with left leg backwards & punch with right fist)
- Punches:
- Straight: Straight punch on the most direct path to the target; push-off of the balls of the feet on the same side - hip rotation - extension of the arm; target: chin, nose, forehead; bring the opposite hand back to the cheek (cover)
- Sideways punch: push-off of the balls of the feet on the same side - hip rotation - rotation around the longitudinal axis of the body - punch in a circle from the outside to the inside; forearm in a horizontal position; 90° angle in the elbow and shoulder joint; opposite hand is at the side of the cheek.
- Upward punch: Slightly lower the upper body and fist (preparation); stretch the legs, hips and torso and bring the forearm up vertically in front of the body; fist hits the chin from below.
- Defence:
- Head cover (inside hand block): Turn the palm of the punching hand towards the opponent; bring the fist slightly forwards and catch the opponent's straight; arm spring-loaded.
- Elbow block: Turn the body out around the longitudinal axis; bring the elbow towards the body (arm covers the body); body remains upright; fists remain at head height.
- Lateral avoidance: Bend body forwards at an angle; shift body weight to the respective side; head remains behind the fists; duck to the outside of the opponent's arm.
- Rolling avoidance: Avoidance movement for sideways chopping; lower the upper body sideways, pass under the opponent's punching arm and raise it again on the other side; the nose draws a circle in the air.
1 poster with key points on the subject of light contact
Info: mobility flow
Introduction/Info
This session is designed to promote active recovery. For example, after a walk or a physically demanding week, the body is often not only tired but also experiences increased muscle tension. We therefore promote the active recovery of our circulatory system and then mobilise the whole body. Slow movements, calm breathing and a comfortable level of intensity are key.
The teacher asks the participants to briefly reflect on how they are feeling:
Where does your body feel particularly tired or tense?
Are there any tender spots, pain or restricted movement?
How high is your overall level of tension on a scale of 1 to 10?
This short self-assessment can be repeated again at the end of the lesson.
Info: Nordic Walking
Introduction/Info
Nordic walking: moderate exercise for the body
The use of poles turns walking into a workout that also works the muscles of the upper body. Nordic walking is just as suitable for ambitious athletes as it is for untrained people. However, contrary to claims to the contrary, the joints are put under more strain than with normal walking. According to a study, the oxygen consumption (and therefore the endurance load) is approx. 5 per cent higher when Nordic walking is performed correctly than when conventional walking is performed without additional upper body movement.
Walking is a sport with a cyclical movement sequence. The right pole always touches the ground when the left heel touches down, the left pole when the right heel touches down. The poles are held close to the body. The respective pole is used diagonally backwards, the pole should always be used below the body's centre of gravity, i.e. in the stride position on the vertical body axis. Double pole technique)
Note: A pole that is too short is a hindrance to functional movement. The following rule of thumb can be recommended for the length of the poles Body height (in cm) x 0.66 = pole length. If in doubt, it is advisable to select a slightly shorter pole length than calculated to prevent evasive movements in the shoulder joints.
1 flipchart with memo points (optional)
Info: Organisation/settings of the equipment in the fitness room
Introduction/Info
Explain to participants how to organise the fitness room:
- Where to put what; always put equipment away after use
- Hygiene; use a sweat towel and clean equipment after use
Explain to participants how to use and correctly adjust the equipment:
- Spinning bike
- Correct adjustment of saddle and handlebar height
- . and handlebar height
- How the display works
- Change pedalling resistance
- Use the pulse belt
- Rowing machine
- How the display works
- Correct movement execution
- Change traction resistance
- Power tower
- Correct adjustment of the equipment (seat height, levers etc.) / correct posture
- Exercise executions
- Cable pull
- Incline bench
- Leg press
- Forearm supports
- Bench press
- Shoulder thrusts
- Leg bends
- Butterfly
- Free weights
- Exercise executions / correct posture
-> stable/straight upper body (keyword: Spine)
- Exercise executions / correct posture
For demonstrating the settings on the equipment:
1 spinning bike
1 rowing machine
1 strength tower (8-10 stations)
2 free weights
Info: Regeneration
Introduction/Info
Recovery – what happens after a workout?
1. What does ‘regeneration’ mean?
Recovery refers to the body’s processes of recuperation and adaptation following physical exertion. In doing so, the body attempts to counteract the fatigue caused by training and to prepare itself for future exertion.
Exercise provides a stimulus. In the short term, this stimulus places a strain on the body:
Energy stores are depleted.
The muscles become fatigued.
The nervous system is put under strain.
Metabolic by-products are produced.
Fluids and electrolytes may be lost.
Concentration and performance levels temporarily decline.
During recovery, the body tries to reverse these changes and adapt to the strain.
Key point: Training provides the stimulus – recovery enables adaptation.
Without sufficient recovery, the body cannot process the training stimuli effectively.
2. What does the body need to recover?
Sleep
the most important factor for physical and mental recovery
supports repair and adaptation processes
affects performance, concentration and mood
Nutrition
Replenishing energy stores
Protein provides building blocks for the muscles
Carbohydrates help to replenish glycogen stores
Fluids and electrolytes aid rehydration
Exercise
Gentle exercise can improve blood circulation
Helps you return to a relaxed state of movement after physical exertion
Can reduce the subjective feeling of muscle stiffness
Mental recovery
Stress also puts a strain on the body
Relaxation and mental rest are therefore also part of the recovery process
Time
The body needs sufficient time to process the effects of training
The recovery time required may vary depending on the intensity and type of training
3. Active vs. passive recovery
Passive recovery: The body is allowed to rest and is not subjected to any additional physical strain.
Examples: sleeping, lying down, sitting, relaxation, a day of rest.
Active recovery: The body is moved at a very low intensity.
Examples: a gentle jog, a walk, a gentle cycle, light swimming, mobility exercises, light physical exercises
The key point is the intensity. Active recovery is meant to support the body – not to put it through another workout. If a gentle jog suddenly turns into a tempo run, it is no longer a recovery session.
4. Why can exercise be beneficial for recovery?
Light exercise keeps the muscles moving and ensures they continue to receive a good blood supply. This makes it easier for the body to return to its normal state after intense exercise.
It’s not about burning as many calories as possible or achieving a particularly high level of performance.
Rather, it is about:
gentle movement
blood circulation
mobilisation
body awareness
relaxation
Reduction in the feeling of stiffness
An important principle is therefore that, during active recovery, how your body feels takes precedence over performance.
5. How can I tell if a recovery session is effective?
During active recovery, you should generally feel light and relaxed.
Difficulty: RPE 1–3 out of 10
1 = very easy
3 = easy
5 = moderate
7 = hard
10 = maximum exertion
When jogging at a relaxed pace, for example, you should be able to hold a normal conversation without any difficulty. Other signs include:
no severe shortness of breath
no burning sensation in the muscles
no increasing fatigue
no expectation of performance
ideally, after the session you should feel better or at least no more exhausted than before
Question for the group:
"How would you tell when active recovery has suddenly turned into a training session?"
6. Recovery is individual
Not everyone recovers at the same rate. Factors that influence this include, for example:
Training volume and intensity
Training condition
Age
Sleep quality
Diet and fluid intake
mental stress
work-related stress
previous recovery
type of previous exertion
That is why there is no standard recovery time.
After a light training session, a short rest may be enough. After an intense competition or a very strenuous training session, the body needs considerably more time to recover.
7. Introduction to the practical lesson
After the theoretical part, the group can focus directly on their own perceptions.
A short session before active recovery, such as a light jog:
“Take 30 seconds to assess how you’re feeling right now.”
The participants consider:
How tired do I feel right now? 1–10
How relaxed do my muscles feel? 1–10
What is my current energy level? 1–10
These observations are not necessarily recorded, but at the end of the lesson (after the footing, mobilisation and massage), the observations are revisited:
"Has anything changed?"
This means that the lesson becomes not just a sequence of different regeneration methods, but a practical experience of regeneration.
A good key message for the lesson
1. Training puts the body under strain.
→ The body needs time and the right conditions to adapt.
2. Recovery is part of training.
→ Progress isn’t just made during exercise.
3. ‘Active’ does not mean ‘intense’.
→ With active recovery, the focus is on recovery, not performance.
1 flipchart with key points (optional)
Info: Training design in the area of strength
Introduction/Info
Basically, strength training starts with strength endurance and progresses to increasing the muscle cross-section (hypertrophy training) through to maximum strength training. Of course, it is important to focus on the objective. For example, someone can train exclusively in the area of strength endurance. However, if someone wants to achieve an increase in strength, the above-mentioned sequence must be observed, whereby the next stage can be progressed to after an appropriate training period. The right choice of load is crucial for strength training. Low loads are used to work on strength endurance. As the load increases, a stronger stimulus is applied so that further progress can be made in the strength area. However, it should be mentioned that the load can also be too high, which is counterproductive for training (even in the form of a decrease in performance) and harmful to health.
Three training variants/programmes are used by the majority of athletes:
Basic training I - losing weight / building up
The goals of basic training I:
- Reduce body fat
- Get used to physical exertion
- Increase quality of movement
Basic training I is the ideal introduction to strength training. If it has been some time since your last sporting activity, it is also advantageous to start with basic training I.
Basic training I is a basic training programme that creates the prerequisites for making everyday life and work easier on the one hand and for more intensive training in the next step on the other. Basic training involves working on strength endurance. This improves the body's resistance to physical fatigue. The intensity of basic training is low and the training is suitable for reducing the body fat percentage.
8 to 12 exercises should be selected for a training session. The exercises should involve the whole body. Ideally, you should choose two exercises for the legs, two exercises to train the core muscles (abdomen and back) and two exercises for the upper body (chest and shoulder muscles). This gives you six basic exercises. Additional exercises can be selected for the areas listed or you can choose supplementary exercises (e.g. arms, shoulders).
The exercises chosen are primarily those that are performed with strength machines, as the movements here are guided to get you started. Simple exercises based on your own body weight are also possible. The focus is on strengthening the supporting muscles of the core and back.
In the beginning, little to no additional weight is used so that the exercises can be performed in a controlled and technically correct manner. The principle is quality over quantity. It is also important to avoid imbalances. If an exercise can be performed individually rather than as a complete movement for one side (left or right), this variant is more likely to be chosen in order to avoid muscular imbalances. With an overall movement, there is a risk that you will automatically put more strain on the better side and thus neglect the weaker side even more.
If you want to make progress, you should do this type of training twice a week. If you train once a week, your physical performance will be maintained, but no progress can be expected.
Load factors for basic training I:
- 8 to 12 exercises
- 20 to 25 repetitions per exercise
- Finish the set when 2 to 3 repetitions are still possible
- 1 to 2 sets
- Train 1 to 2 times a week
By trying out the exercises and determining the optimum weight, the first training sessions will take a little longer. However, it is worth taking a little more time for the first few training sessions so that you can define an efficient training programme. It is important to stick to the load factors. If you are constantly doing 30 or more repetitions of an exercise, you need to increase the weight. If, on the other hand, you can only just manage the last repetition of an exercise, the weight is too high. This is because the intensity of basic training I is ideal if 2-3 repetitions are still possible after the last repetition. If a second set is added, a break of one to two minutes should be taken between sets, which, in addition to recovery, serves to keep the movements concentrated and correct. A set, also known as a series, describes the one-off execution of an exercise with different numbers of repetitions. If we talk about three sets, for example, the respective exercise is performed three times, including the corresponding breaks.
The exercises can be changed after every six to eight weeks, thus avoiding monotony for body and mind. If you are satisfied with the results, you can choose exercises of the same intensity. However, you can also increase the intensity and move on to basic training II.
Basic Training II - Maintaining / Strengthening
The goals of Basic Training II:
- Maintain or improve strength
- Prepare for muscle-building training
Furthermore, it is important to create a stable foundation by choosing low weights that can be lifted frequently. The training intensity increases compared to basic training I, as the weight is increased so that only 15-20 repetitions per set are possible. Basic training I mainly involves working with strength machines. Basic training II can also be done with strength machines, but the level can now be increased using cable pulleys. In exercises with cable pulleys, the movement is no longer fully guided, which requires additional stabilisation work by the trainee. In addition, training should be carried out at least twice a week to achieve an appropriate training result. Three training sessions per week are better, with one or two rest days in between for regeneration. If you are satisfied with your physical fitness or have little time for strength training, you should still plan one training session per week to maintain your athletic level.
Stress factors for basic training II:
- 8 to 12 exercises
- 15 to 20 repetitions per exercise
- Finish the set when 2 to 3 repetitions are still possible
- 1 to 3 sets
- Train at least 1 to 3 times a week
If you are satisfied with your training results and feel comfortable doing them, you should stick with this training programme. As with basic training I, the exercises can be changed every six to eight weeks.
Build-up training - increase volume
Aims of build-up training:
- Increase the muscle cross-section
- Increase strength performance
Build-up training is intended to further increase strength performance. The aim is to increase the muscle cross-section and the associated visual change. The training is intensive and should only be practised by athletes who have a solid (strength) foundation. During build-up training, the weights are lifted 8-12 times. In contrast to basic training, the last repetition of an exercise can hardly be performed and additional repetition is no longer possible. The training can be done on the strength machines as well as on the cable pulleys. The level is increased by increasing the weight. Other ways to make the training more difficult include working with free weights (no guidance of the movement by a machine) or exercises can be made more complex through variation (e.g. unstable base). To achieve a respectable result, you should train at least twice a week, but three training sessions would be more beneficial.
Stress factors for advanced training:
- 8 to 12 exercises
- 8 to 12 repetitions per exercise
- End the set with the last possible repetition
- 2 to 3 sets
- Train at least 2-3 times a week
Furthermore, it is important to avoid monotony for both the body and the mind. As with basic training, the exercises in this type of training should also be changed after a few weeks. However, exercises for the core and back must always be included in the programme, as they form the foundation of strength training and should not be neglected, even by very experienced athletes.
1 flipchart with the training variants/programmes and their objectives and forms of exercise (optional)
Info: Training principles in the area of strength
Introduction/Info
Multi-set training:
Multi-set training means that the specified number of sets per exercise are performed one after the other.
The idea behind multi-set training is that repeating an exercise several times causes progressive fatigue of the muscle, resulting in an increased training effect. This form of organisation is the most common variant in strength training. As several sets per exercise (3-8) are often performed at an appropriate performance level, the time required for an advanced training session increases significantly with this form.
Conscious breathing:
Breathing should be aligned with the effort. Exhale during the effort and inhale during the return movement.
Avoid compressed breathing:
When breathing under pressure, avoid exhaling. Pressed breathing should be avoided as it can have a negative effect on the heart and circulation, especially in older people.
Torso stability:
The statics in the torso must not be lost. Swinging, twisting or writhing of the body should be avoided.
Slow movements:
The speed should be deliberately slow. Two seconds is ideal for a movement sequence, which also applies to the return movement. If necessary, you can overcome the load more quickly (more explosively), but the weight should still be returned slowly.
1 flipchart with the training principles (optional)
Island ball
Stimulate circulation
Group work
4-5 participants per group
4 to 5 players together have an island (two mats lined up next to each other). There are 2 to 3 balls in the game. The aim of the game is to "banish" all players to their island. Someone is "banished" if they are hit by a ball from an opposing player (either by throwing the foam/softball or hitting it with a bat, depending on the type of game). Players may continue to play from the island, but may not leave the island. It is not allowed to run with the ball.
Variations:
- A player who has been hit may leave the island again if the player who "burnt" him has been hit.
- If a player on the island can throw/shoot an opponent, he/she may leave the island.
- Smolball: A participant may move with the ball while observing the rules of the game (e.g. 4-man rule regarding steps and time in possession of the ball).
Participants:
1 bat ►smolball
1 ribbon/sticker ►team identification
Pro group:
2 soft mats (small) ►playing field (island)
2-3 (foam/soft) balls ►smolball
Island ball
Stimulate circulation
Group work
4-5 participants per group
4 to 5 players together have an island (two mats lined up next to each other). There are 2 to 3 balls in the game. The aim of the game is to "banish" all players to their island. Someone is "banished" if they are hit by a ball from an opposing player (only leg hits are allowed!). The players may continue to play from the island, but may not leave the island.
Variants:
- A player who has been hit may leave the island again if the player who "burnt" them has been hit.
- If a player on the island can hit an opponent, they may leave the island.
Participants:
1 stick ►Futsal/Football, Floorball
1 wristband/disc ►Team identification
Per group:
2 soft mats (small) ►Playing field (island)
2-3 balls ►Futsal/Football, Floorball
Hunter's ball
Stimulate circulation
Group work
2 groups
One group is located in a marked square field (side length approx. 4-5 metres). The second group (hunters) spreads out outside this field and has to hit as many players as possible within the field with two softballs within a certain time. Each contact with the ball (even from the ground) scores a point, so the inner group may not play the ball out even if it remains in the field (the ball must be retrieved by the hunters). Those who are hit remain in the field, those who leave the field score a point.
Variant:
The hunters try to hit the other group with a gym ball (via the ground or directly). Whoever is hit performs an additional task outside the playing field (e.g. 50x rope skipping). After completing the additional task, you return to the playing field (optional: after a hit, you are eliminated and perform an additional task until the end of the round, such as the forearm support or wall sitting). If a group manages to ensure that only a certain number of opponents are left on the field (or no one is left), the game is over.
2 foam/soft balls
1 exercise ball ►Variant
Sports leader:
1 stopwatch
Jass card race
Increase pulse
Group work
4-5 participants per group
Each group has a set of Jass cards (cards face down) at the turnaround point. The runner may only take certain cards there that have been defined by the game master (e.g. red or black cards). Otherwise, the card is placed face down again and the runner returns to the group without a card to send the next runner onto the course with a handshake. Which group is the first to have collected all the cards provided (18 cards) or the most cards after a certain time?
Variant I:
The criteria are made stricter by only collecting a certain colour (e.g. all heart cards, only pictures of a certain colour).
Variant II:
The runners collect a card of their choice in each round, which is used to build card houses at the starting point. Which group is the first to have built 5 card houses or the most card houses after a certain time (1 house consists of a total of 7 cards)?
Variant III:
Four groups are formed and each team is assigned a colour (diamonds, hearts, spades, clubs). Only 1 set of cards is used. The respective runners of the groups run to this set and turn over a card. They may only take the revealed card with them if it matches the colour of their group. Otherwise, they run back to the group without a card to send the next runner onto the course with a handshake. Which team is the first to collect all the cards of their colour?
1 stopwatch
Per group:
1 set of jacket cards
Juggler
Stimulate circulation
Individual work
The participant tries to balance a stick/stick on one part of the body (e.g. foot, head, elbow, palm).
Variant:
Balancing two sticks/sticks simultaneously.
Per participant:
1-2 sticks/sticks ►Smolball, floorball, intercross/lacrosse, badminton/speedminton, Nordic walking
Box clearance
Stimulate circulation
Group work
2-3 (or more) participants try to throw/shoot/hit all the balls from one or more box elements (by hand, foot or with the game device, depending on the type of game). The remaining participants collect the balls and bring them back. Does the throwing team manage to empty all the box elements or is the transport team too fast?
Variant:
The sports leader specifies different ways of transporting the balls back (e.g. bouncing the ball, rolling it, guiding/juggling it with the feet/playing equipment or pinching it between the knees).
Per participant:
1 racket/stick ►smolball, floorball, intercrosse/lacrosse
1-2 Swedish box
x balls ►basketball, blitzball/rugby/football, FooBaSKILL, futsal/football, handball, intercrosse/lacrosse, smolball, floorball, volleyball
Stimulate circulation
Group work
Basic version:
All participants stand in a circle. One person has the ball. They throw the ball to anyone they like. The person who catches the ball says their own name out loud. The next person chooses someone else, throws the ball to them and does not say their name yet, as they do not know it. The person who catches the ball says their own name again.
Example:
Person A throws the ball to someone → “I’m Marc.”
Marc throws the ball on → “I’m Sarah.”
Sarah throws it on → “I’m Thomas.”
Variations: When catching the ball, the person says their name whilst performing a simple movement (e.g. a squat, lifting a knee, turning round). The group repeats the name and movement.
When the ball is touched, everyone says their name and a piece of additional information about themselves (e.g. a hobby – ‘I’m Marc and I like playing football’ or, more briefly, ‘Marc, hobby: football’). The group tries to remember the names and details.
Once everyone’s names have been called out once, the person with the ball tries to say the name of the person who is going to catch it (before throwing the ball).
Sarah! → Pass to Sarah.
If the name is correct, Sarah catches the ball and carries on (or a correction is made and the correct name is given first).
Once the children have learnt the names, a second ball can be introduced to the game to boost concentration and communication.
Variation: The person who receives the ball must immediately call out the name of the next player and pass the ball on. If anyone hesitates or calls out the wrong name, they must carry out an extra task (e.g. 3 squats, 3 jumping jacks, run once round the group). The sports director can integrate other additional tasks (e.g. clap your hands once on whistle). The sports director is the referee for all variants and interrupts the game if necessary.
Variation:
After a few rounds, you can adapt the exercise by setting a passing order: everyone gets the ball once. The group tries to memorise the order. The ball is then passed around in the same order again – without anyone saying the names. You could then time the exercise and try to complete the round faster and faster.
1–2 balls
1 stopwatch
Kettenball
Stimulate circulation
Group work
6-8 participants per group
The group lines up in a column (straddle position). Each participant faces the person in front, with a distance of around one to two metres between them. The participant at the back rolls a ball through the legs of the person in front. The last participant in the chain catches the ball and transports it back to the other end of the line. The ball is then rolled through the tunnel again.
Possible competition form: The winner is the group in which all participants have rolled the ball through the tunnel once (or several times) and the whole group is seated.
Variant:
The ball can also be passed from participant to participant between their legs or over their heads instead of being rolled (shortening the distance). These shapes can be combined again immediately and the ball must be passed once between the legs and then over the head.
Per group:
1 ball (e.g. basketball, softball, football, volleyball, medicine ball)
Knee lift (skipping) / jump in place incl. knee to chest jump ► high knees / high knee jump (knee to chest tuck jump)
Increase pulse
Individual work
Running very quickly on the spot, with the knees raised to at least the level of the navel (skipping). At a signal from the instructor, the participants perform a few jumps on the spot. The knees are also brought to the chest during the jumps. After the jumps (3-5x), continue with fast skipping.
Variant:
Replace the jumps with other short, intensive exercises (e.g. quick jumping jacks or a push-up and a stretch jump on the signal).
No material required
Tricky turns
Stimulate circulation
Individual work
Each participant practises various movement tasks with the frisbee:
- Fingerspin: The aim is to make the disc spin vertically or horizontally around the index finger (middle finger). In the starting position, the disc is held vertically with the index finger at the edge. Now the disc is spun from the wrist (spin). The index finger always remains stretched on the edge of the disc.
Variations:
Switch fingers while spinning, spin a disc with both hands simultaneously or throw the disc up from the spin, catch it with one finger and continue spinning.
- Thumb flip: This trick involves spinning the disc once around its longitudinal axis around the thumb. Starting position: hold the disc in your hand with the underside facing up. The thumb is on top, the remaining four fingers are under the disc. The disc is rotated around the resting thumb to the left and stopped again. The rotation of the disc is triggered by a slight twist of the wrist. At this moment, the fingers are released from the underside of the disc. Once the disc has rotated once around the hand, it is stopped again with the thumb at the top and four fingers at the bottom.
Variant:
Turn the disc to the right, turn it once to the left and then to the right or perform two double thumb flips without stopping.
- Chest roll: Hold your arms horizontally outwards. Hold the disc in one hand with the underside facing upwards. With a light kick from the wrist, the disc is rolled over the arm, chest and other arm to the opposite hand.
- Blind catch: Throw the disc up with a spin and catch it behind the back with one or both hands.
Per participant:
1 throwing disc (frisbee)
1 additional throwing disc (frisbee) per participant ►Variant
Royal tournament
Stimulate circulation
Group work
The playing field is divided into 3-4 zones. First, all participants dribble (bounce the ball, guide it with their foot/toy, juggle it on the stick) with their ball in the lowest/first zone. Whoever captures (plays away) an opponent's ball moves up, whoever loses the ball with or without the opponent's influence (the ball leaves the playing field) moves down (if possible).
Per participant:
1 ball ►basketball, FooBaSKILL, futsal/football, handball, smolball, floorball
1 stick ►floor hockey
8-10 marking cones/caps ►field markings (3-4 zones)
Basket collector
Stimulate circulation
Group work
All participants move clockwise or anti-clockwise. The direction can be changed at a signal from the sports director.
The participants dribble from basketball hoop to basketball hoop. The participants have one final attempt at each basket. The winner is the player who has scored the most baskets after a certain time.
Court:
4-6 basketball hoops
Participant:
1 ball (basketball)
Sport leader:
1 signalling instrument (e.g. hand whistle, tambourine)
Running ABC
Stimulate circulation
Group work
6-10 participants per group (3-5 participants per side)
The participants line up in groups facing each other at a distance of approx. 15-20 metres from each other. After the exercise, the participants line up again behind the opposite group.
Depending on the size of the group: start from both sides simultaneously or alternately.
The running ABC is a special form of coordination exercises and helps to improve running style. The easy-to-perform exercises promote mobility and muscular balance.
The running ABC should be familiarised with using various running exercises in smaller groups. It is advisable to keep the upper body, and especially the head, upright during all exercises. The running ABC should be carried out with concentration and in a rested state. You should start with slow and technically clean movements. After a few repetitions, the speed of the steps can be increased.
- Loose trotting forwards / backwards (perform a half turn in the centre, changing the direction of rotation with each run)
- Floose trotting forwards / backwards (perform a half turn in the middle, changing the direction of rotation with each run)
- Floose running
- Knee lift
- Hop run
- Side straddle run (move sideways with leg dragging)
- Crossover run (move sideways with legs crossed)
- Forwards/backward running with incline run
- Running curves
Complete all exercises 2-4x.
Per group:
4 marker cones/caps ►Define walking routes (optional)
Run Bingo
Increase pulse
Group work
4-5 participants per group
Each group has a bingo card at the starting point. At the turning point there are corresponding number cards (numbers face down). The runners each pick up a number card (it is not possible to swap) and bring it to the group. The number card is placed on the corresponding field of the bingo card at the starting point. Which group is the first to have a complete row (horizontally, vertically or diagonally)?
Per group:
1 bingo card (5x5)
25 number cards